User's Guide
Page 3
... Fax 79 Sending Faxes 106 Receiving Faxes 118 6 Printing from Your Computer 123 Printing with Windows 123 Printing with Macintosh 126 7 Scanning Images 129 About Scanning Images 129 Scanning Methods 129 8 Reading from and Writing to a Memory Card 133 Setting up the Card Slot as the Memory Card Drive of the Computer 133 9 Changing the Machine Settings ......... 134 The Print Settings 135 Fax Settings 136 Other Settings 140 Language selection 141 Reset setting 141 Save settings 141 Load settings 141 10 Routine Maintenance 142 Replacing an Ink...
... Fax 79 Sending Faxes 106 Receiving Faxes 118 6 Printing from Your Computer 123 Printing with Windows 123 Printing with Macintosh 126 7 Scanning Images 129 About Scanning Images 129 Scanning Methods 129 8 Reading from and Writing to a Memory Card 133 Setting up the Card Slot as the Memory Card Drive of the Computer 133 9 Changing the Machine Settings ......... 134 The Print Settings 135 Fax Settings 136 Other Settings 140 Language selection 141 Reset setting 141 Save settings 141 Load settings 141 10 Routine Maintenance 142 Replacing an Ink...
User's Guide
Page 17
... machine is printing from or scanning images to print. Off: Make sure all the ink tanks are installed properly. (26) Duplexing Transport Unit Open when clearing jammed paper after reinstalling ink tanks, an error has occurred and the machine is not ready to an error. Ink Tank Lamps z You can check the status of each ink tank according to a computer using a USB cable. Prepare a new ink tank. Note z For information on page 142. For details, see "Getting the Ink Level...
... machine is printing from or scanning images to print. Off: Make sure all the ink tanks are installed properly. (26) Duplexing Transport Unit Open when clearing jammed paper after reinstalling ink tanks, an error has occurred and the machine is not ready to an error. Ink Tank Lamps z You can check the status of each ink tank according to a computer using a USB cable. Prepare a new ink tank. Note z For information on page 142. For details, see "Getting the Ink Level...
User's Guide
Page 19
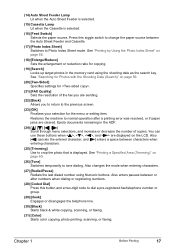
...] Sets the resolution of the fax you are displayed on page 60. (26) [Tone] Switches temporarily to dial a pre-registered fax/telephone number or group. (29) [Hook] Engages or disengages the telephone line. (30) [Black] Starts black & white copying, scanning, or faxing. (31) [Color] Starts color copying, photo printing, scanning, or faxing. Also enters pauses between characters when entering characters. (25) [Trimming] Use to Photo Index Sheet mode. You can use these buttons when and < > are sending...
...] Sets the resolution of the fax you are displayed on page 60. (26) [Tone] Switches temporarily to dial a pre-registered fax/telephone number or group. (29) [Hook] Engages or disengages the telephone line. (30) [Black] Starts black & white copying, scanning, or faxing. (31) [Color] Starts color copying, photo printing, scanning, or faxing. Also enters pauses between characters when entering characters. (25) [Trimming] Use to Photo Index Sheet mode. You can use these buttons when and < > are sending...
User's Guide
Page 163
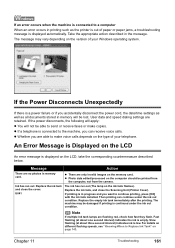
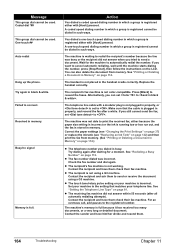
... under the ink out condition. Replace the empty ink tank immediately after the printing. The machine may vary depending on the memory card. If an error occurs when the machine is connected to make copies. The message may be able to the machine, you accidentally disconnect the power cord, the date/time settings as well as the printer is out of paper or paper jams, a troubleshooting message is connected to send or receive faxes or make voice...
... under the ink out condition. Replace the empty ink tank immediately after the printing. The machine may vary depending on the memory card. If an error occurs when the machine is connected to make copies. The message may be able to the machine, you accidentally disconnect the power cord, the date/time settings as well as the printer is out of paper or paper jams, a troubleshooting message is connected to send or receive faxes or make voice...

User's Guide
Page 165
.... **** Error code z A4/Letter-sized paper is not supported by this machine. For details on manual Print Head alignment, see "Adjusting the Print Head Manually" on page 177. Remove the document page jammed after connecting the camera to turn on . See "Document Jams" on the model or brand of your camera. Message Incompatible device detected. If the error is still unresolved, there is a possibility that is not loaded on . Release the scanner lock switch and turn the power back on the Auto Sheet Feeder...
.... **** Error code z A4/Letter-sized paper is not supported by this machine. For details on manual Print Head alignment, see "Adjusting the Print Head Manually" on page 177. Remove the document page jammed after connecting the camera to turn on . See "Document Jams" on the model or brand of your camera. Message Incompatible device detected. If the error is still unresolved, there is a possibility that is not loaded on . Release the scanner lock switch and turn the power back on the Auto Sheet Feeder...
User's Guide
Page 166
... is incorrect. See "Printing or Deleting a Document in memory. Replace the handset correctly. The telephone line cable with [Hook] pressed. Correct the paper settings (see "Changing the Print Settings" on page 37) or replace the ink tank (see "Replacing an Ink Tank" on your machine to send or receive the document using a G3 machine. Try dialing again after all automatic redialing attempts). See "Redialing a Busy Number" on page 81. z The fax number dialed was busy...
... is incorrect. See "Printing or Deleting a Document in memory. Replace the handset correctly. The telephone line cable with [Hook] pressed. Correct the paper settings (see "Changing the Print Settings" on page 37) or replace the ink tank (see "Replacing an Ink Tank" on your machine to send or receive the document using a G3 machine. Try dialing again after all automatic redialing attempts). See "Redialing a Busy Number" on page 81. z The fax number dialed was busy...
User's Guide
Page 181
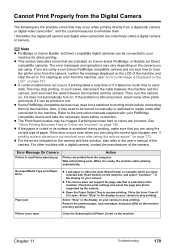
... machine and retry printing. Select "Stop" in use/Printer warming up Action Photos are incorrect. Then, turn the camera on . Printer cover open . Chapter 11 Troubleshooting 179 The error messages and operations may need to be switched to stop printing. Error Message On Camera Printer in the display on page 148. Check the print settings and select the page size that is supported by the camera. z This section describes errors that are using a non-Canon PictBridge compatible camera and not sure how to clear...
... machine and retry printing. Select "Stop" in use/Printer warming up Action Photos are incorrect. Then, turn the camera on . Printer cover open . Chapter 11 Troubleshooting 179 The error messages and operations may need to be switched to stop printing. Error Message On Camera Printer in the display on page 148. Check the print settings and select the page size that is supported by the camera. z This section describes errors that are using a non-Canon PictBridge compatible camera and not sure how to clear...
User's Guide
Page 182
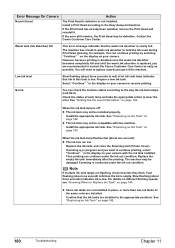
... to clear the error. See "Replacing an Ink Tank" on page 142. See "Replacing an Ink Tank" on page 142. 180 Troubleshooting Chapter 11 Replace the ink tank, and close the Scanning Unit (Printer Cover). Confirm that ink in waste ink absorber to contact the Canon Customer Care Center as early as possible. See "Replacing an Ink Tank" on page 142. Prepare a new ink tank. The machine may not be installed properly. However, because printing is disabled...
... to clear the error. See "Replacing an Ink Tank" on page 142. See "Replacing an Ink Tank" on page 142. 180 Troubleshooting Chapter 11 Replace the ink tank, and close the Scanning Unit (Printer Cover). Confirm that ink in waste ink absorber to contact the Canon Customer Care Center as early as possible. See "Replacing an Ink Tank" on page 142. Prepare a new ink tank. The machine may not be installed properly. However, because printing is disabled...
User's Guide
Page 183
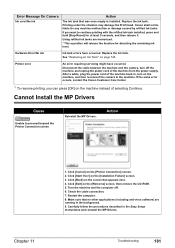
Printer error An error requiring servicing might have occurred. Cannot Install the MP Drivers Cause Unable to the machine. Action Chapter 11 1. Check the cable connection. 7. Carefully follow the procedures described in the background. 9. See "Replacing an Ink Tank" on the [Installation Failure] screen. 3. If the same error occurs, contact the Canon Customer Care Center. *1 To resume printing, you want to continue printing with the refilled ink tank installed, press...
Printer error An error requiring servicing might have occurred. Cannot Install the MP Drivers Cause Unable to the machine. Action Chapter 11 1. Check the cable connection. 7. Carefully follow the procedures described in the background. 9. See "Replacing an Ink Tank" on the [Installation Failure] screen. 3. If the same error occurs, contact the Canon Customer Care Center. *1 To resume printing, you want to continue printing with the refilled ink tank installed, press...
User's Guide
Page 197
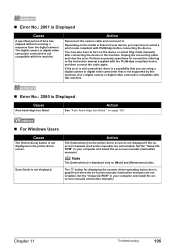
... turn on the model or brand of time has elapsed without receiving a response from the digital camera./ The digital camera or digital video camcorder connected is not compatible with PictBridge before connecting the device. Scan Guide is displayed only on page 163. „ For Windows Users Cause The [Instructions] button is not supported by this machine. Set the "Setup CDROM" in your computer and install the on the printer driver screen. Use...
... turn on the model or brand of time has elapsed without receiving a response from the digital camera./ The digital camera or digital video camcorder connected is not compatible with PictBridge before connecting the device. Scan Guide is displayed only on page 163. „ For Windows Users Cause The [Instructions] button is not supported by this machine. Set the "Setup CDROM" in your computer and install the on the printer driver screen. Use...
User's Guide
Page 218
... printing a list of documents in 113 Memory Card 16 inserting 54 removing 56 supported by this machine 53 MEMORY CARD button 16 Menu button 16 N Nozzle Check Pattern examining 150 printing 149 Numeric Buttons 16 O OK button 17 ON/OFF button 16 One-Touch Speed Dial Key 16 Open Button 13 Operation Panel 13, 16 P Paper Guide 12 Paper Output Tray 13 Paper Support 12 PGI-5BK Black 142 Photo Index Sheet button 17 Platen Glass 13 Power Connector 15 Power save setting 141 Print Head adjusting the print head manually 165 aligning print head...
... printing a list of documents in 113 Memory Card 16 inserting 54 removing 56 supported by this machine 53 MEMORY CARD button 16 Menu button 16 N Nozzle Check Pattern examining 150 printing 149 Numeric Buttons 16 O OK button 17 ON/OFF button 16 One-Touch Speed Dial Key 16 Open Button 13 Operation Panel 13, 16 P Paper Guide 12 Paper Output Tray 13 Paper Support 12 PGI-5BK Black 142 Photo Index Sheet button 17 Platen Glass 13 Power Connector 15 Power save setting 141 Print Head adjusting the print head manually 165 aligning print head...
Easy Setup Instructions
Page 1
... line type, contact your telephone company: → DRPD For details about the receive mode setting, refer to the color guide on the LCD" in - or A4-size paper into the Auto Sheet Feeder, align the paper with the print side face down the hollow on the ink tank until it clicks into place. Refer to "Receiving Faxes" in black and blue. • Print Head alignment will need to "An Error Message is displayed on the Operation Panel. 8 Open...
... line type, contact your telephone company: → DRPD For details about the receive mode setting, refer to the color guide on the LCD" in - or A4-size paper into the Auto Sheet Feeder, align the paper with the print side face down the hollow on the ink tank until it clicks into place. Refer to "Receiving Faxes" in black and blue. • Print Head alignment will need to "An Error Message is displayed on the Operation Panel. 8 Open...
Easy Setup Instructions
Page 2
... product serial number, which is not included. The software will need you want to use Mac OS X v.10.2.x) and then check that version of applications to install appears, verify the contents, click [Install], then follow on the screen. You will begin identifying the printer port being used. Remove the USB cable connected to your administrator name or password, click , then follow the on-screen instructions. 6 When the main menu appears...
... product serial number, which is not included. The software will need you want to use Mac OS X v.10.2.x) and then check that version of applications to install appears, verify the contents, click [Install], then follow on the screen. You will begin identifying the printer port being used. Remove the USB cable connected to your administrator name or password, click , then follow the on-screen instructions. 6 When the main menu appears...
Service Manual
Page 7
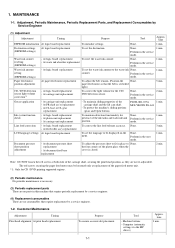
... line feed tolerant accuracy. Machine buttons - None. 1 min. Perform in the service mode. To protect the machine's sliding portions (gears and Open button). FLOIL KG-107A 1 min. At logic board replacement - At platen unit replacement - LCD language settings At logic board replacement To set the waste ink amount to None. the four corners of the platen glass when the cover is stretched tight.) 5 min. Tool - Waste ink counter resetting (EEPROM settings) - Waste ink...
... line feed tolerant accuracy. Machine buttons - None. 1 min. Perform in the service mode. To protect the machine's sliding portions (gears and Open button). FLOIL KG-107A 1 min. At logic board replacement - At platen unit replacement - LCD language settings At logic board replacement To set the waste ink amount to None. the four corners of the platen glass when the cover is stretched tight.) 5 min. Tool - Waste ink counter resetting (EEPROM settings) - Waste ink...
Service Manual
Page 16
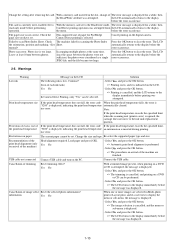
... be performed. - Select Yes, and press the OK button. => Printing starts, and it is displayed. - rise error. Change the size and type. Load paper and press [OK]. Select No, and press the OK button. => The procedures on arrival of paper for PictBridge Camera Direct printing is displayed for a while, then read-only mode before the message was displayed. USB cable not connected Connect USB cable and turn on the LCD. - Select Yes, and press...
... be performed. - Select Yes, and press the OK button. => Printing starts, and it is displayed. - rise error. Change the size and type. Load paper and press [OK]. Select No, and press the OK button. => The procedures on arrival of paper for PictBridge Camera Direct printing is displayed for a while, then read-only mode before the message was displayed. USB cable not connected Connect USB cable and turn on the LCD. - Select Yes, and press...
Service Manual
Page 17
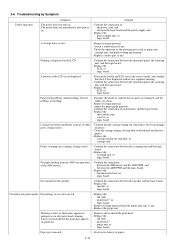
..., and the rollers are clean. - Remove and re-install the print head. - Troubleshooting by Symptom Symptom Solution Faulty operation The power does not turn on printouts. - Attach a removed part if any . A portion of the moving parts (such as purge unit, carriage unit, and paper feeding mechanism) - between the operation panel, the scanning unit, and the logic board. - logic board. print head*1, or - power supply unit, or - Remove foreign material. - Paper feed problems (multi-feeding, skewed feeding, no scanning, strange noise). - Adjust the paper guide properly...
..., and the rollers are clean. - Remove and re-install the print head. - Troubleshooting by Symptom Symptom Solution Faulty operation The power does not turn on printouts. - Attach a removed part if any . A portion of the moving parts (such as purge unit, carriage unit, and paper feeding mechanism) - between the operation panel, the scanning unit, and the logic board. - logic board. print head*1, or - power supply unit, or - Remove foreign material. - Paper feed problems (multi-feeding, skewed feeding, no scanning, strange noise). - Adjust the paper guide properly...
Service Manual
Page 22
... no grease is on replacement*1 Adjustment / settings Operation check Logic board ass'y QM2-3659 - Reset the waste ink counter. - Adjustment / Settings, (6) Service mode.] - Check the ink system function. Fax transmission and reception 7. Absorber kit QY5-0153 After replacement: 1. REPAIR 3-1. allow for approx. 1 minute (for details.] [See 3-3. Paper feed motor QK1-1502 - Direct printing from a digital camera - Adjustment / Settings, (1) Paper feed motor adjustment.] Platen unit QM2-3565 After replacement: 1. Do not bend the film Print head QY6-0061 After...
... no grease is on replacement*1 Adjustment / settings Operation check Logic board ass'y QM2-3659 - Reset the waste ink counter. - Adjustment / Settings, (6) Service mode.] - Check the ink system function. Fax transmission and reception 7. Absorber kit QY5-0153 After replacement: 1. REPAIR 3-1. allow for approx. 1 minute (for details.] [See 3-3. Paper feed motor QK1-1502 - Direct printing from a digital camera - Adjustment / Settings, (1) Paper feed motor adjustment.] Platen unit QM2-3565 After replacement: 1. Do not bend the film Print head QY6-0061 After...
Service Manual
Page 47
... document cover. - Print head alignment (automatic / See "Standalone machine operation" below , or perform from the double-sided adhesive tape, and slowly close the document cover with the conventional models can be performed. (3) Waste ink counter setting Before replacement of the MP driver Maintenance tab, manual print head alignment (by selecting the optimum values) as for ink tank replacement. (Open the scanning unit. Verification Items, (1) Service test print, or (2) EEPROM information print. Open the document cover to the waste ink amount, replace the waste ink absorber (ink...
... document cover. - Print head alignment (automatic / See "Standalone machine operation" below , or perform from the double-sided adhesive tape, and slowly close the document cover with the conventional models can be performed. (3) Waste ink counter setting Before replacement of the MP driver Maintenance tab, manual print head alignment (by selecting the optimum values) as for ink tank replacement. (Open the scanning unit. Verification Items, (1) Service test print, or (2) EEPROM information print. Open the document cover to the waste ink amount, replace the waste ink absorber (ink...

Service Manual
Page 74
... the operation panel) up to its mechanism, cassette contact of as is performed absorbed by user: plate cleaning 1. paper. Automatic duplex automatic duplex printing (Photo Paper printing (lines or Plus Double Sided, streaks postcards, plain paper) perpendicular to the MP830 and Corrective Actions) No. * Function Phenomenon Condition Cause Corrective action Possible call or complaint Skewed paper feeding 1 B Print results - smeared. - FAQ (Problems Specific to the paper feed direction) On the rib(s) inside the sheet feed unit used for duplex printing, ink...
... the operation panel) up to its mechanism, cassette contact of as is performed absorbed by user: plate cleaning 1. paper. Automatic duplex automatic duplex printing (Photo Paper printing (lines or Plus Double Sided, streaks postcards, plain paper) perpendicular to the MP830 and Corrective Actions) No. * Function Phenomenon Condition Cause Corrective action Possible call or complaint Skewed paper feeding 1 B Print results - smeared. - FAQ (Problems Specific to the paper feed direction) On the rib(s) inside the sheet feed unit used for duplex printing, ink...
Service Manual
Page 76
... FAX mode, select FAX SETTING, MEMORY REFERENCE, and PRINT DOCUMENT. properly. To print the received fax, press the Menu button in the - Or replace PGI-5BK. 14 A Fax received in the FAX mode (not returns to eliminate any moisture). - Fax reception - Fax cannot be received. - smeared. 11 A Image scanning Spots on paper is printed, the machine remains in the At reception of a fax. paper can be used only for fax reception. Glossy photo (original) image - When an error is cleared...
... FAX mode, select FAX SETTING, MEMORY REFERENCE, and PRINT DOCUMENT. properly. To print the received fax, press the Menu button in the - Or replace PGI-5BK. 14 A Fax received in the FAX mode (not returns to eliminate any moisture). - Fax reception - Fax cannot be received. - smeared. 11 A Image scanning Spots on paper is printed, the machine remains in the At reception of a fax. paper can be used only for fax reception. Glossy photo (original) image - When an error is cleared...


