User's Guide
Page 3
... Compliant Device 70 Connecting to a PictBridge Compliant Device 70 Printing Photographs Directly from a PictBridge Compliant Device 73 Printing Photographs Directly from a Canon Bubble Jet Direct Compatible Digital Camera 76 5 Faxing 79 Preparing Your Machine for Fax 79 Sending Faxes 106 Receiving Faxes 118 6 Printing ... Becomes Faint or Colors are Incorrect 148 Cleaning Your Machine 154 11 Troubleshooting 159 If the Power Disconnects Unexpectedly ..... 161 An Error Message is Displayed on the LCD 161 Cannot See the Display Properly on the LCD/Cannot See the Display on the LCD .....
... Compliant Device 70 Connecting to a PictBridge Compliant Device 70 Printing Photographs Directly from a PictBridge Compliant Device 73 Printing Photographs Directly from a Canon Bubble Jet Direct Compatible Digital Camera 76 5 Faxing 79 Preparing Your Machine for Fax 79 Sending Faxes 106 Receiving Faxes 118 6 Printing ... Becomes Faint or Colors are Incorrect 148 Cleaning Your Machine 154 11 Troubleshooting 159 If the Power Disconnects Unexpectedly ..... 161 An Error Message is Displayed on the LCD 161 Cannot See the Display Properly on the LCD/Cannot See the Display on the LCD .....
User's Guide
Page 20
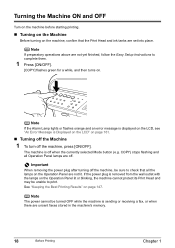
..., or when there are not yet finished, follow the Easy Setup Instructions to print. Note If the Alarm Lamp lights or flashes orange and an error message is displayed on the LCD, see "An Error Message is removed from the wall outlet with the lamps on page 147.
..., or when there are not yet finished, follow the Easy Setup Instructions to print. Note If the Alarm Lamp lights or flashes orange and an error message is displayed on the LCD, see "An Error Message is removed from the wall outlet with the lamps on page 147.
User's Guide
Page 79
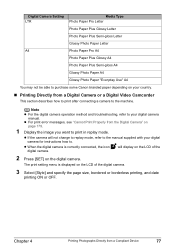
Note z For the digital camera operation method and troubleshooting, refer to the machine. z For print error messages, see "Cannot Print Properly from the Digital Camera" on your country. „ Printing Directly from a Compliant Device 77 z If the camera will display on the ... A4 Photo Paper Plus Semi-gloss A4 Glossy Photo Paper A4 Glossy Photo Paper "Everyday Use" A4 You may not be able to purchase some Canon branded paper depending on page 179. 1 Display the image you want to print in replay mode. The print setting menu is correctly connected, the icon...
Note z For the digital camera operation method and troubleshooting, refer to the machine. z For print error messages, see "Cannot Print Properly from the Digital Camera" on your country. „ Printing Directly from a Compliant Device 77 z If the camera will display on the ... A4 Photo Paper Plus Semi-gloss A4 Glossy Photo Paper A4 Glossy Photo Paper "Everyday Use" A4 You may not be able to purchase some Canon branded paper depending on page 179. 1 Display the image you want to print in replay mode. The print setting menu is correctly connected, the icon...
User's Guide
Page 134
Note z The operation to be performed after the button is pressed, check the error message displayed on the computer and take the corresponding countermeasure. z A computer error may have selected in the application software. z When you have occurred if scanning does not start after...Guide. 132 Scanning Images Chapter 7 For details on the scan operation setting you press [Stop/Reset] while scanning, the computer displays an error message. For detailed operations, refer to the Scan Guide. or WIA- (Windows XP only) compliant application software and handle the scanned image ...
Note z The operation to be performed after the button is pressed, check the error message displayed on the computer and take the corresponding countermeasure. z A computer error may have selected in the application software. z When you have occurred if scanning does not start after...Guide. 132 Scanning Images Chapter 7 For details on the scan operation setting you press [Stop/Reset] while scanning, the computer displays an error message. For detailed operations, refer to the Scan Guide. or WIA- (Windows XP only) compliant application software and handle the scanned image ...
User's Guide
Page 144
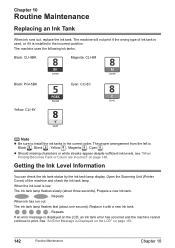
... Open the Scanning Unit (Printer Cover) of ink tank is used, or if it with a new ink tank. ...Repeats If an error message is displayed on the LCD, an ink tank error has occurred and the machine cannot continue to install the ink tanks in the incorrect position. Prepare a new ink tank. ...Repeats... the ink tank lamp display. The machine will not print if the wrong type of the machine and check the ink tank lamp. See "An Error Message is Black , Black , Yellow , Magenta , Cyan .
... Open the Scanning Unit (Printer Cover) of ink tank is used, or if it with a new ink tank. ...Repeats If an error message is displayed on the LCD, an ink tank error has occurred and the machine cannot continue to install the ink tanks in the incorrect position. Prepare a new ink tank. ...Repeats... the ink tank lamp display. The machine will not print if the wrong type of the machine and check the ink tank lamp. See "An Error Message is Black , Black , Yellow , Magenta , Cyan .
User's Guide
Page 156
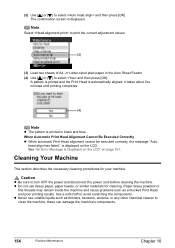
... Head Alignment Cannot Be Executed Correctly z When automatic Print Head alignment cannot be executed correctly, the message "Auto head align has failed." is automatically aligned. Caution z Be sure to avoid scratching the components. See "An Error Message is displayed. The confirmation screen is Displayed on the LCD" on the LCD. It takes about...
... Head Alignment Cannot Be Executed Correctly z When automatic Print Head alignment cannot be executed correctly, the message "Auto head align has failed." is automatically aligned. Caution z Be sure to avoid scratching the components. See "An Error Message is displayed. The confirmation screen is Displayed on the LCD" on the LCD. It takes about...
User's Guide
Page 161
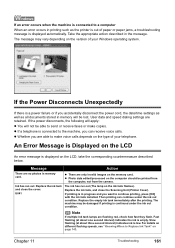
z "If the Power Disconnects Unexpectedly" on page 161 z "An Error Message is Displayed on the LCD" on page 161 z "Cannot See... LCD or troubleshooting tips for your problem, refer to a Computer Running Windows XP, the Screen Shows the Warning Message "This device can perform faster" or "High-SPEED USB Device Plugged into nonHigh-SPEED USB Hub"" on page... z "Telephone Disconnects During a Call" on page 187 z "Problems Scanning" on -screen manuals. Note This section describes about error messages that are Misaligned/Cannot Print to End of Job" on page 166 z "When Copying" on page 169 z "Back of ...
z "If the Power Disconnects Unexpectedly" on page 161 z "An Error Message is Displayed on the LCD" on page 161 z "Cannot See... LCD or troubleshooting tips for your problem, refer to a Computer Running Windows XP, the Screen Shows the Warning Message "This device can perform faster" or "High-SPEED USB Device Plugged into nonHigh-SPEED USB Hub"" on page... z "Telephone Disconnects During a Call" on page 187 z "Problems Scanning" on -screen manuals. Note This section describes about error messages that are Misaligned/Cannot Print to End of Job" on page 166 z "When Copying" on page 169 z "Back of ...

User's Guide
Page 162
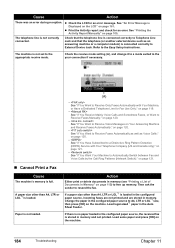
... set properly" on page 191 z "An Error Message Appears on the Screen" on page 192 z "Service Error 5100 is Displayed" on page 192 z "Writing Error/Output Error/Communication Error" on page 192 z "When an Error is Displayed Regarding Automatic Duplex Printing" on page 193 z "Error No.: 300 is Displayed" on page 193 z "Error No.: 1700 is Displayed" on page...
... set properly" on page 191 z "An Error Message Appears on the Screen" on page 192 z "Service Error 5100 is Displayed" on page 192 z "Writing Error/Output Error/Communication Error" on page 192 z "When an Error is Displayed Regarding Automatic Duplex Printing" on page 193 z "Error No.: 300 is Displayed" on page 193 z "Error No.: 1700 is Displayed" on page...
User's Guide
Page 163
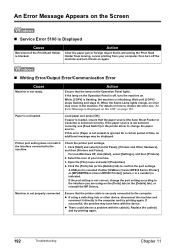
... the LCD, take the corresponding countermeasure described below. Take the appropriate action described in progress and you can continue under the ink out condition. An Error Message is Displayed on the LCD An error message is displayed on page 143. Slow flashing (at about three second interval) indicates ink is low...
... the LCD, take the corresponding countermeasure described below. Take the appropriate action described in progress and you can continue under the ink out condition. An Error Message is Displayed on the LCD An error message is displayed on page 143. Slow flashing (at about three second interval) indicates ink is low...
User's Guide
Page 181
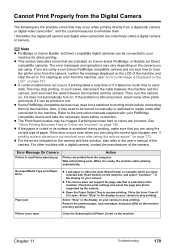
...automatically turn on Canon-brand PictBridge- z Open the Paper Output Tray to send data. Select "Stop" in the display on the LCD of the machine and clear the error. Remove the jammed paper, load new paper, and press [OK] on the camera you are using . The error messages and operations ... not support the page size that is still unresolved, select some other troubles with a digital camera, contact the manufacturer of paper, see "An Error Message is open Close the Scanning Unit (Printer Cover) on page 148. Close the Inner Cover if it takes too much time to resume printing. ...
...automatically turn on Canon-brand PictBridge- z Open the Paper Output Tray to send data. Select "Stop" in the display on the LCD of the machine and clear the error. Remove the jammed paper, load new paper, and press [OK] on the camera you are using . The error messages and operations ... not support the page size that is still unresolved, select some other troubles with a digital camera, contact the manufacturer of paper, see "An Error Message is open Close the Scanning Unit (Printer Cover) on page 148. Close the Inner Cover if it takes too much time to resume printing. ...
User's Guide
Page 182
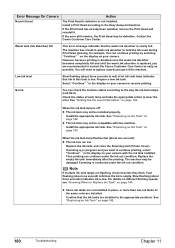
..."Replacing an Ink Tank" on page 142. Install a Print Head according to the way the ink tank lamps (red) flash. Contact the Canon Customer Care Center. No Ink You can check the machine status according to the Easy Setup Instructions. Install the appropriate ink tank. See "Replacing...Then printing can continue printing by selecting "Continue"*1 on the display on page 142. Replace the empty ink tank immediately after the printing. Error Message On Camera No print head Action The Print Head is low. Low ink level Slow flashing (about one second) indicates the ink is ...
..."Replacing an Ink Tank" on page 142. Install a Print Head according to the way the ink tank lamps (red) flash. Contact the Canon Customer Care Center. No Ink You can check the machine status according to the Easy Setup Instructions. Install the appropriate ink tank. See "Replacing...Then printing can continue printing by selecting "Continue"*1 on the display on page 142. Replace the empty ink tank immediately after the printing. Error Message On Camera No print head Action The Print Head is low. Low ink level Slow flashing (about one second) indicates the ink is ...
User's Guide
Page 183
... servicing might have occurred. Click [Back] on the screen that was once empty is installed. Check the cable connection. 7. Error Message On Camera Ink error/No ink Action The ink tank that appears next. 4. Replace the ink tank. Click [Cancel] on page 142. Restart the computer. ...continue printing with the refilled ink tank installed, press and hold [Stop/Reset] for any machine malfunction or damage caused by refilled ink tanks. Canon shall not be liable for at least 5 seconds, and then release it. After a while, plug the power cord of selecting Continue. Click...
... servicing might have occurred. Click [Back] on the screen that was once empty is installed. Check the cable connection. 7. Error Message On Camera Ink error/No ink Action The ink tank that appears next. 4. Replace the ink tank. Click [Cancel] on page 142. Restart the computer. ...continue printing with the refilled ink tank installed, press and hold [Stop/Reset] for any machine malfunction or damage caused by refilled ink tanks. Canon shall not be liable for at least 5 seconds, and then release it. After a while, plug the power cord of selecting Continue. Click...
User's Guide
Page 186
...Memory" on the machine. Load some paper and press [OK] on page 120. - z Check the LCD for an error. Check the receive mode setting (A), and change it to a mode suited to resend the fax. Action Either print or delete...Receive Faxes Automatically:" on the machine. 184 Troubleshooting Chapter 11 z Print the Activity report and check for an error message. The machine is loaded. See "If You Want to the appropriate receive mode. Load legal-sized*1 paper ... Instructions. Paper is Displayed on the LCD" on page 119. - See "An Error Message is not loaded.
...Memory" on the machine. Load some paper and press [OK] on page 120. - z Check the LCD for an error. Check the receive mode setting (A), and change it to a mode suited to resend the fax. Action Either print or delete...Receive Faxes Automatically:" on the machine. 184 Troubleshooting Chapter 11 z Print the Activity report and check for an error message. The machine is loaded. See "If You Want to the appropriate receive mode. Load legal-sized*1 paper ... Instructions. Paper is Displayed on the LCD" on page 119. - See "An Error Message is not loaded.

User's Guide
Page 188
...Jack. Resend the fax after a while. See "Registering One-Touch Speed Dialing" on page 105. z Print the Activity report and check for an error message. See "Printing the Activity Report Manually" on page 86. If so, then there is being sent from memory. The document is poor. If you..." on the Another document is a problem with the telephone line. In this case, be able to turn the power on. See "An Error Message is being sent from memory. Remove the document then reload it as necessary. Cannot hear the dial tone. Action Reduce the reception start speed....
...Jack. Resend the fax after a while. See "Registering One-Touch Speed Dialing" on page 105. z Print the Activity report and check for an error message. See "Printing the Activity Report Manually" on page 86. If so, then there is being sent from memory. The document is poor. If you..." on the Another document is a problem with the telephone line. In this case, be able to turn the power on. See "An Error Message is being sent from memory. Remove the document then reload it as necessary. Cannot hear the dial tone. Action Reduce the reception start speed....
User's Guide
Page 190
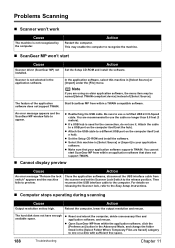
... the release position. Attach the cable to preview. z Make sure that does not support TWAIN. „ Cannot display preview Cause Action An error message "Release the lock switch" appears and the machine fails to a USB port on a disk with sufficient free space. 188 Troubleshooting Chapter 11... Action Reboot the computer, lower the output resolution and rescan. An error message appears and the ScanGear MP window fails to use a certified USB 2.0 Hi-Speed cable. z Set the Setup CD-ROM and install the ...
... the release position. Attach the cable to preview. z Make sure that does not support TWAIN. „ Cannot display preview Cause Action An error message "Release the lock switch" appears and the machine fails to a USB port on a disk with sufficient free space. 188 Troubleshooting Chapter 11... Action Reboot the computer, lower the output resolution and rescan. An error message appears and the ScanGear MP window fails to use a certified USB 2.0 Hi-Speed cable. z Set the Setup CD-ROM and install the ...
User's Guide
Page 194
...is flashing, the machine is not loaded. Select the icon of your computer, then turn off , turn it directly to resolve the error, see "An Error Message is preventing the Print Head Holder from moving, cancel printing from your machine. 3. Click the [Ports] tab (or the [Details]...For non-Windows XP, click [Start], select [Settings], and then [Printers]. 2. A USB port is selected if either [USBnnn (Canon MP830 Series Printer)] or [MPUSBPRNnn (Canon MP830 Printer)] (where n is a number) is securely connected to the computer. Ensure that the lamp on . z There could also be displayed...
...is flashing, the machine is not loaded. Select the icon of your computer, then turn off , turn it directly to resolve the error, see "An Error Message is preventing the Print Head Holder from moving, cancel printing from your machine. 3. Click the [Ports] tab (or the [Details]...For non-Windows XP, click [Start], select [Settings], and then [Printers]. 2. A USB port is selected if either [USBnnn (Canon MP830 Series Printer)] or [MPUSBPRNnn (Canon MP830 Printer)] (where n is a number) is securely connected to the computer. Ensure that the lamp on . z There could also be displayed...
User's Guide
Page 195
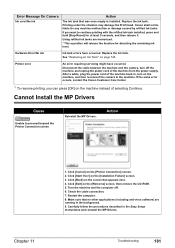
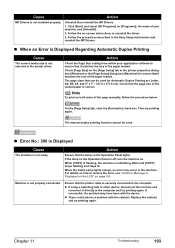
...MP Drivers. „ When an Error is Displayed Regarding Automatic Duplex Printing Cause The correct media size is not ready. Action Ensure that the page size of your application software to ensure that it directly to resolve the error, see "An Error Message is correct. When the Alarm Lamp... lights orange, an error may have been with the cable(s). If successful, the problem may occur in the machine. Click [...
...MP Drivers. „ When an Error is Displayed Regarding Automatic Duplex Printing Cause The correct media size is not ready. Action Ensure that the page size of your application software to ensure that it directly to resolve the error, see "An Error Message is correct. When the Alarm Lamp... lights orange, an error may have been with the cable(s). If successful, the problem may occur in the machine. Click [...
Easy Setup Instructions
Page 1
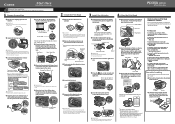
... Machine Telephone or answering machine Built-in - Press [ON/OFF]. 7 Open the Scanning Unit (Printer Cover) until it . Click Cover Guide 3 Ensure that the message requesting head alignment is left . Click The pattern is Displayed on your products. Paper Guide AB Inner Cover Serial Number Location IMPORTANT If the Scanning.... 5 Use [ ] or [ ] on the Operation Panel to complete. Scanning Unit (Printer Cover) IMPORTANT Be careful not to the right. Be careful not to "An Error Message is printed. Refer to get ink on the Operation Panel. 8 Open the Inner Cover.
... Machine Telephone or answering machine Built-in - Press [ON/OFF]. 7 Open the Scanning Unit (Printer Cover) until it . Click Cover Guide 3 Ensure that the message requesting head alignment is left . Click The pattern is Displayed on your products. Paper Guide AB Inner Cover Serial Number Location IMPORTANT If the Scanning.... 5 Use [ ] or [ ] on the Operation Panel to complete. Scanning Unit (Printer Cover) IMPORTANT Be careful not to the right. Be careful not to "An Error Message is printed. Refer to get ink on the Operation Panel. 8 Open the Inner Cover.
Service Manual
Page 4
...2-6. REPAIR 3-1. Adjustment, Periodic Maintenance, Periodic Replacement Parts, and Replacement Consumables by Symptom 3. Special Tools 1-5. Fax Errors 2-4. Other Error Messages 2-5. Notes on Repair Servicing (1) Power supply unit removal / reassembly (2) Cassette, front door (paper output tray... unit wiring (25) Logic board ass'y removal (26) Printer unit removal Service Call Errors 2-3. Troubleshooting by Service Engineer 1-2. Operator Call Errors 2-2. Special Notes on Service Part Replacement (and Disassembling / Reassembling) 3-2. II. MAINTENANCE 1-1. Product Life 1-4. ...
...2-6. REPAIR 3-1. Adjustment, Periodic Maintenance, Periodic Replacement Parts, and Replacement Consumables by Symptom 3. Special Tools 1-5. Fax Errors 2-4. Other Error Messages 2-5. Notes on Repair Servicing (1) Power supply unit removal / reassembly (2) Cassette, front door (paper output tray... unit wiring (25) Logic board ass'y removal (26) Printer unit removal Service Call Errors 2-3. Troubleshooting by Service Engineer 1-2. Operator Call Errors 2-2. Special Notes on Service Part Replacement (and Disassembling / Reassembling) 3-2. II. MAINTENANCE 1-1. Product Life 1-4. ...
Service Manual
Page 15
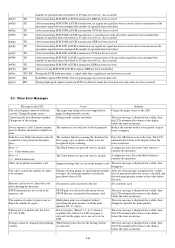
... the procedure signal has been attempted the number of specified times but failed, or T5 time-over (60 sec.) has occurred. The error message is available only for a while, then disappears. With Sticker print selected, the Settings button was selected in the menu, but no ...significant signal has been received, and re-transmission of the procedure signal has been attempted the number of specified times but failed. The error message is full. Cannot specify the followings together. Settings cannot be printed, or print from a computer. The machine failed in the memory ...
... the procedure signal has been attempted the number of specified times but failed, or T5 time-over (60 sec.) has occurred. The error message is available only for a while, then disappears. With Sticker print selected, the Settings button was selected in the menu, but no ...significant signal has been received, and re-transmission of the procedure signal has been attempted the number of specified times but failed. The error message is full. Cannot specify the followings together. Settings cannot be printed, or print from a computer. The machine failed in the memory ...


