User's Guide
Page 3
... from a Compliant Device 70 Connecting to a PictBridge Compliant Device 70 Printing Photographs Directly from a PictBridge Compliant Device 73 Printing Photographs Directly from a Canon Bubble Jet Direct Compatible Digital Camera 76 5 Faxing 79 Preparing Your Machine for Fax 79 Sending Faxes 106 Receiving Faxes 118 6 Printing from Your ... is Displayed on the LCD 161 Cannot See the Display Properly on the LCD/Cannot See the Display on the LCD .. 166 Ink Does Not Come Out/Printing is Blurred/ Colors are Wrong/White Streaks/Straight Lines are Misaligned/Cannot Print to End of Job 166...
... from a Compliant Device 70 Connecting to a PictBridge Compliant Device 70 Printing Photographs Directly from a PictBridge Compliant Device 73 Printing Photographs Directly from a Canon Bubble Jet Direct Compatible Digital Camera 76 5 Faxing 79 Preparing Your Machine for Fax 79 Sending Faxes 106 Receiving Faxes 118 6 Printing from Your ... is Displayed on the LCD 161 Cannot See the Display Properly on the LCD/Cannot See the Display on the LCD .. 166 Ink Does Not Come Out/Printing is Blurred/ Colors are Wrong/White Streaks/Straight Lines are Misaligned/Cannot Print to End of Job 166...
User's Guide
Page 9
... clear at least five seconds before you purchased the machine as an air conditioner, television, or copier. Use only the power cord that prevents the ink from the power outlet. z If the machine has been exposed to disconnect the power plug in case of this may result in again. z If the...
... clear at least five seconds before you purchased the machine as an air conditioner, television, or copier. Use only the power cord that prevents the ink from the power outlet. z If the machine has been exposed to disconnect the power plug in case of this may result in again. z If the...
User's Guide
Page 10
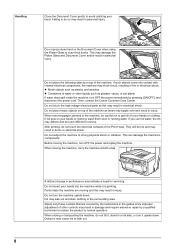
...not tilt it, stand it on your hands into contact with internal electrical components, the machine may result in personal injury. Then, contact the Canon Customer Care Center. Do not place heavy objects on your hand. Parts inside the machine, turn the machine upside down hard on top of ...other controls may result in burns or electrical shock. Ink may result in injury. Handling Close the Document Cover gently to avoid catching your hands or clothing, wash them soon in running water. z ...
...not tilt it, stand it on your hands into contact with internal electrical components, the machine may result in personal injury. Then, contact the Canon Customer Care Center. Do not place heavy objects on your hand. Parts inside the machine, turn the machine upside down hard on top of ...other controls may result in burns or electrical shock. Ink may result in injury. Handling Close the Document Cover gently to avoid catching your hands or clothing, wash them soon in running water. z ...
User's Guide
Page 11
...basement or near a swimming pool. 2. Do not use this product during an electrical storm. Ink may be followed to reduce the risk of electric shock from lightning. 3. Do not shake print heads or ink tanks. IMPORTANT SAFETY INSTRUCTIONS When using this product near water, for example, near a bath tub..., wash bowl, kitchen sink or laundry tub, in the vicinity of small children. Print Head/Ink tanks For safety reasons, store print heads and ink tanks out of the ...
...basement or near a swimming pool. 2. Do not use this product during an electrical storm. Ink may be followed to reduce the risk of electric shock from lightning. 3. Do not shake print heads or ink tanks. IMPORTANT SAFETY INSTRUCTIONS When using this product near water, for example, near a bath tub..., wash bowl, kitchen sink or laundry tub, in the vicinity of small children. Print Head/Ink tanks For safety reasons, store print heads and ink tanks out of the ...
User's Guide
Page 16
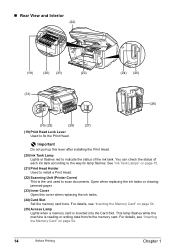
..., see "Inserting the Memory Card" on page 54. (25) Access Lamp Lights when a memory card is reading or writing data from/to scan documents. See "Ink Tank Lamps" on page 15. (21) Print Head Holder Used to install a Print Head. (22) Scanning Unit (Printer Cover) This is the unit used to...) (23) (31) (24) (25) (26) (30) (29) (28) (27) (19) Print Head Lock Lever Used to the way its lamp flashes. Open when replacing the ink tanks or clearing jammed paper. (23) Inner Cover Open this lever after installing the Print Head. (20...
..., see "Inserting the Memory Card" on page 54. (25) Access Lamp Lights when a memory card is reading or writing data from/to scan documents. See "Ink Tank Lamps" on page 15. (21) Print Head Holder Used to install a Print Head. (22) Scanning Unit (Printer Cover) This is the unit used to...) (23) (31) (24) (25) (26) (30) (29) (28) (27) (19) Print Head Lock Lever Used to the way its lamp flashes. Open when replacing the ink tanks or clearing jammed paper. (23) Inner Cover Open this lever after installing the Print Head. (20...
User's Guide
Page 17
..., an error has occurred and the machine is not ready to print. Note z For information on page 142. Fast flashing (about three seconds): Ink is the connector used to connect the provided power cord. (28) Rear Cover Open when clearing jammed paper. (29) External Device Jack Connects the ...external device. (30) Telephone Line Jack Connects with the telephone line. (31) USB Connector (for computer) This is low. If an Ink Tank Lamp remains unlit even after pulling out the Cassette. (27) Power Connector This is the connector used to connect the machine to print.
..., an error has occurred and the machine is not ready to print. Note z For information on page 142. Fast flashing (about three seconds): Ink is the connector used to connect the provided power cord. (28) Rear Cover Open when clearing jammed paper. (29) External Device Jack Connects the ...external device. (30) Telephone Line Jack Connects with the telephone line. (31) USB Connector (for computer) This is low. If an Ink Tank Lamp remains unlit even after pulling out the Cassette. (27) Power Connector This is the connector used to connect the machine to print.
User's Guide
Page 18
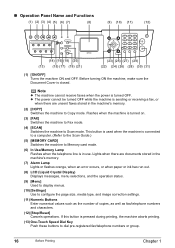
... cannot receive faxes when the power is in the machine's memory. (7) Alarm Lamp Lights or flashes orange, when an error occurs, or when paper or ink has run out. (8) LCD (Liquid Crystal Display) Displays messages, menu selections, and the operation status. (9) [Menu] Used to display menus. (10) [Settings] Use to Memory...
... cannot receive faxes when the power is in the machine's memory. (7) Alarm Lamp Lights or flashes orange, when an error occurs, or when paper or ink has run out. (8) LCD (Liquid Crystal Display) Displays messages, menu selections, and the operation status. (9) [Menu] Used to display menus. (10) [Settings] Use to Memory...
User's Guide
Page 20
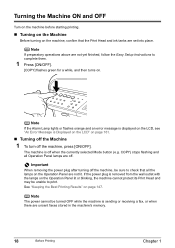
... on the machine, confirm that all Operation Panel lamps are not lit. Note The power cannot be sure to check that the Print Head and ink tanks are not yet finished, follow the Easy Setup Instructions to complete them. 1 Press [ON/OFF]. [COPY] flashes green for a while, and then turns on...
... on the machine, confirm that all Operation Panel lamps are not lit. Note The power cannot be sure to check that the Print Head and ink tanks are not yet finished, follow the Easy Setup Instructions to complete them. 1 Press [ON/OFF]. [COPY] flashes green for a while, and then turns on...
User's Guide
Page 22
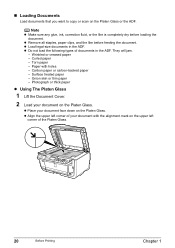
... the alignment mark on the Platen Glass. z Align the upper left corner of the Platen Glass. 20 Before Printing Chapter 1 Note z Make sure any glue, ink, correction fluid, or the like before loading the document. z Remove all staples, paper clips, and the like is completely dry before feeding the document. Wrinkled...
... the alignment mark on the Platen Glass. z Align the upper left corner of the Platen Glass. 20 Before Printing Chapter 1 Note z Make sure any glue, ink, correction fluid, or the like before loading the document. z Remove all staples, paper clips, and the like is completely dry before feeding the document. Wrinkled...
User's Guide
Page 26
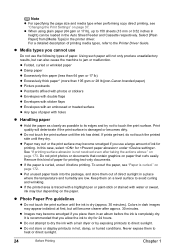
... indistinct at first, but can also cause the machine to avoid curling and wrinkling. z If the paper is curled, uncurl it before the ink is recommended that contain graphics on page 37. It is completely dry. In this kind of printing media types, refer to touch the print ... that you place them out of ink for under . For a detailed description of paper for 24 hours. z Folded, curled or wrinkled paper z Damp paper z Excessively thin paper (less than 64 gsm or 17 lb) z Excessively thick paper* (more than 105 gsm or 28 lb)(non-Canon branded paper) z Picture postcards z...
... indistinct at first, but can also cause the machine to avoid curling and wrinkling. z If the paper is curled, uncurl it before the ink is recommended that contain graphics on page 37. It is completely dry. In this kind of printing media types, refer to touch the print ... that you place them out of ink for under . For a detailed description of paper for 24 hours. z Folded, curled or wrinkled paper z Damp paper z Excessively thin paper (less than 64 gsm or 17 lb) z Excessively thick paper* (more than 105 gsm or 28 lb)(non-Canon branded paper) z Picture postcards z...
User's Guide
Page 31
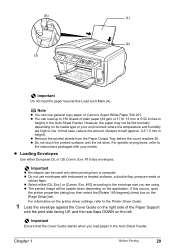
... European DL or US Comm. In that the Cover Guide stands when you are high or low. z Do not touch the printed surfaces until the ink dries. Chapter 1 Before Printing 29 z You can load up to 150 sheets of paper to the envelope size you load paper in the Auto Sheet.... z Remove the printed sheets from a computer. Env. #10] according to half (approx. 0.2" / 5 mm in the Auto Sheet Feeder. z Do not use general copy paper or Canon's Super White Paper SW-201. Env. #10 size envelopes. z The printed image will be upside down depending on the [Page Setup] tab. Note z You can...
... European DL or US Comm. In that the Cover Guide stands when you are high or low. z Do not touch the printed surfaces until the ink dries. Chapter 1 Before Printing 29 z You can load up to 150 sheets of paper to the envelope size you load paper in the Auto Sheet.... z Remove the printed sheets from a computer. Env. #10] according to half (approx. 0.2" / 5 mm in the Auto Sheet Feeder. z Do not use general copy paper or Canon's Super White Paper SW-201. Env. #10 size envelopes. z The printed image will be upside down depending on the [Page Setup] tab. Note z You can...
User's Guide
Page 35
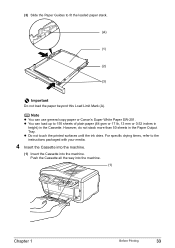
z Do not touch the printed surfaces until the ink dries. z You can use general copy paper or Canon's Super White Paper SW-201. For specific drying times, refer to the instructions packaged with your media. 4 Insert the Cassette into the machine. (1) Insert the ...
z Do not touch the printed surfaces until the ink dries. z You can use general copy paper or Canon's Super White Paper SW-201. For specific drying times, refer to the instructions packaged with your media. 4 Insert the Cassette into the machine. (1) Insert the ...
User's Guide
Page 70
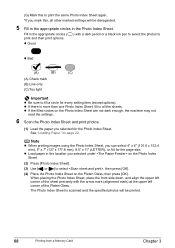
... paper in the appropriate circles ( ) with the arrow mark (alignment mark) at the upper left corner of the sheet precisely with a dark pencil or a black ink pen to select the photos to select , then press [OK]. (4) Place the Photo Index Sheet on page 22.
... paper in the appropriate circles ( ) with the arrow mark (alignment mark) at the upper left corner of the sheet precisely with a dark pencil or a black ink pen to select the photos to select , then press [OK]. (4) Place the Photo Index Sheet on page 22.
User's Guide
Page 118
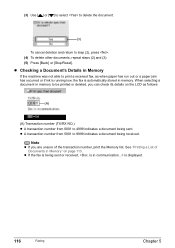
... indicates a document being sent. When selecting a document in Memory" on the LCD as when paper has run out or a paper jam has occurred or if ink is running low, the fax is displayed. 116 Faxing Chapter 5
... indicates a document being sent. When selecting a document in Memory" on the LCD as when paper has run out or a paper jam has occurred or if ink is running low, the fax is displayed. 116 Faxing Chapter 5
User's Guide
Page 124
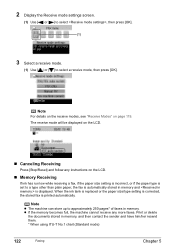
When the ink tank is replaced or the paper size/type setting is corrected, the stored fax is displayed. Print or delete the documents stored in memory. 2 Display ... ITU-T No.1 chart (Standard mode) 122 Faxing Chapter 5 Note For details on the receive modes, see "Receive Modes" on the LCD. „ Memory Receiving If ink has run low while receiving a fax, if the paper size setting is incorrect, or if the paper type is set to a type other than plain...
When the ink tank is replaced or the paper size/type setting is corrected, the stored fax is displayed. Print or delete the documents stored in memory. 2 Display ... ITU-T No.1 chart (Standard mode) 122 Faxing Chapter 5 Note For details on the receive modes, see "Receive Modes" on the LCD. „ Memory Receiving If ink has run low while receiving a fax, if the paper size setting is incorrect, or if the paper type is set to a type other than plain...
User's Guide
Page 144
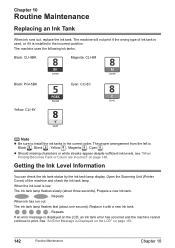
...one second). z Should missing characters or white streaks appear despite sufficient ink levels, see "When Printing Becomes Faint or Colors are Incorrect" on the LCD, an ink tank error has occurred and the machine cannot continue to install the ink tanks in the incorrect position. Open the Scanning Unit (Printer Cover) ...8BK Magenta: CLI-8M Black: PGI-5BK Yellow: CLI-8Y Cyan: CLI-8C Note z Be sure to print. Chapter 10 Routine Maintenance Replacing an Ink Tank When ink runs out, replace the ink tank. The machine will not print if the wrong type of the machine and check the...
...one second). z Should missing characters or white streaks appear despite sufficient ink levels, see "When Printing Becomes Faint or Colors are Incorrect" on the LCD, an ink tank error has occurred and the machine cannot continue to install the ink tanks in the incorrect position. Open the Scanning Unit (Printer Cover) ...8BK Magenta: CLI-8M Black: PGI-5BK Yellow: CLI-8Y Cyan: CLI-8C Note z Be sure to print. Chapter 10 Routine Maintenance Replacing an Ink Tank When ink runs out, replace the ink tank. The machine will not print if the wrong type of the machine and check the...
User's Guide
Page 145
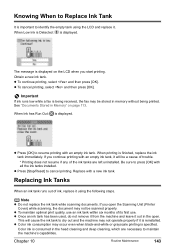
...to maintain the machine's capabilities. z To maintain optimal print quality, use an ink tank within six months of ink, replace it will cause the ink tank to dry out and the machine may not be stored in the head cleaning... and deep cleaning, which are left uninstalled. z Once an ink tank has been used, do not remove it from the machine and leave it out in ...memory without being received, the fax may be scanned properly. Note z Do not replace the ink tank while scanning documents. z To continue printing, select and then press [OK]. See "Documents...
...to maintain the machine's capabilities. z To maintain optimal print quality, use an ink tank within six months of ink, replace it will cause the ink tank to dry out and the machine may not be stored in the head cleaning... and deep cleaning, which are left uninstalled. z Once an ink tank has been used, do not remove it from the machine and leave it out in ...memory without being received, the fax may be scanned properly. Note z Do not replace the ink tank while scanning documents. z To continue printing, select and then press [OK]. See "Documents...
User's Guide
Page 147
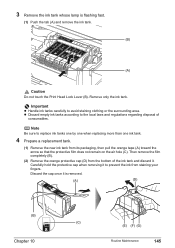
... and regulations regarding disposal of the ink tank and discard it is flashing fast. (1) Push the tab (A) and remove the ink tank. (B) (A) Caution Do not touch the Print Head Lock Lever (B). z Discard empty ink tanks according to prevent the ink from the bottom of consumables. Note... sure to avoid staining clothing or the surrounding area. Important z Handle ink tanks carefully to replace ink tanks one by one when replacing more than one ink tank. 4 Prepare a replacement tank. (1) Remove the new ink tank from its packaging, then pull the orange tape (A) toward the arrow...
... and regulations regarding disposal of the ink tank and discard it is flashing fast. (1) Push the tab (A) and remove the ink tank. (B) (A) Caution Do not touch the Print Head Lock Lever (B). z Discard empty ink tanks according to prevent the ink from the bottom of consumables. Note... sure to avoid staining clothing or the surrounding area. Important z Handle ink tanks carefully to replace ink tanks one by one when replacing more than one ink tank. 4 Prepare a replacement tank. (1) Remove the new ink tank from its packaging, then pull the orange tape (A) toward the arrow...
User's Guide
Page 148
... in the exact order shown in the correct position. (2) Press on the mark on the removed protective cap may cause the ink to leak and stain your clothes and hands. Doing so can cause the machine to malfunction or become unable to install all the orange tape ... been peeled off along the perforation. z Do not re-attach the protective cap (D) once you have removed it. z Ink on the ink tank until the ink tank snaps firmly into place. (3) Ensure that all the ink tanks to enable printing. Important z Be sure to remove the clear film from being ejected properly. The machine...
... in the exact order shown in the correct position. (2) Press on the mark on the removed protective cap may cause the ink to leak and stain your clothes and hands. Doing so can cause the machine to malfunction or become unable to install all the orange tape ... been peeled off along the perforation. z Do not re-attach the protective cap (D) once you have removed it. z Ink on the ink tank until the ink tank snaps firmly into place. (3) Ensure that all the ink tanks to enable printing. Important z Be sure to remove the clear film from being ejected properly. The machine...

User's Guide
Page 149
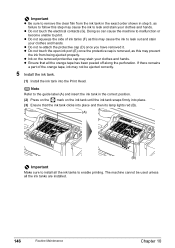
...When not using both black & white and in the wrong positions. When you start printing after turning OFF the machine with water or sweat, ink may be sure to hold the LCD. Keeping the Best Printing Results z When unplugging the power cord When unplugging the power cord, be ...installed in color, or perform Print Head cleaning, about once a month to unplug it after replacing the ink tank, the machine executes Print Head cleaning automatically. z When you press [ON/OFF], the Print Head is traced with a highlight pen or paint...
...When not using both black & white and in the wrong positions. When you start printing after turning OFF the machine with water or sweat, ink may be sure to hold the LCD. Keeping the Best Printing Results z When unplugging the power cord When unplugging the power cord, be ...installed in color, or perform Print Head cleaning, about once a month to unplug it after replacing the ink tank, the machine executes Print Head cleaning automatically. z When you press [ON/OFF], the Print Head is traced with a highlight pen or paint...


