
User's Guide
Page 9
... the Canon Customer Care Center. When turning OFF the power, be able to a heating source. Handling Others Do not attempt to overheat and cause a fire. Also do not allow metal objects such as a result of the wall outlet while the Alarm Lamp is lit or flashing, the Print Head is approximately... or dusty, in this product and consult your doctor. If you ignore any maintenance procedure not described in direct sunlight, outdoors, or close to print later. Caution You may not be sure to press [ON/OFF] and confirm that is strong enough to them, the machine may result in ...
... the Canon Customer Care Center. When turning OFF the power, be able to a heating source. Handling Others Do not attempt to overheat and cause a fire. Also do not allow metal objects such as a result of the wall outlet while the Alarm Lamp is lit or flashing, the Print Head is approximately... or dusty, in this product and consult your doctor. If you ignore any maintenance procedure not described in direct sunlight, outdoors, or close to print later. Caution You may not be sure to press [ON/OFF] and confirm that is strong enough to them, the machine may result in ...
User's Guide
Page 10
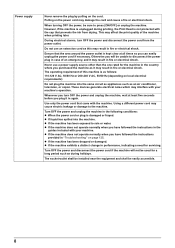
...conditions: z When the power cord or plug is not protected with your machine. Using a different power cord may affect the print quality of the machine when printing later. This may cause electric leakage or damage to disconnect the power plug in case of this may result in fire or...to rain or water. Pulling on local electrical requirements) Do not plug the machine into the machine. Never use an extension cord as during printing, the Print Head is damaged or frayed. Turn OFF the power and unplug the machine in "Troubleshooting" on the cord. z If the machine has been...
...conditions: z When the power cord or plug is not protected with your machine. Using a different power cord may affect the print quality of the machine when printing later. This may cause electric leakage or damage to disconnect the power plug in case of this may result in fire or...to rain or water. Pulling on local electrical requirements) Do not plug the machine into the machine. Never use an extension cord as during printing, the Print Head is damaged or frayed. Turn OFF the power and unplug the machine in "Troubleshooting" on the cord. z If the machine has been...
User's Guide
Page 11
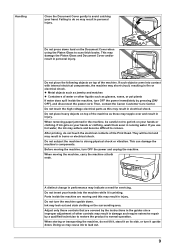
This may damage the Platen Glass and Document Cover and/or result in performance may indicate a need for servicing. Then, contact the Canon Customer Care Center. If you use hot water, the ink may result in injury. A distinct change in personal injury. Ink may cause ink..., vases, or pot plants If water does spill inside the machine are covered by the instructions in the guides since improper adjustment of the Print Head. When storing or transporting the machine, do not touch the electrical contacts of other liquids such as jewelry and watches z Containers of water ...
This may damage the Platen Glass and Document Cover and/or result in performance may indicate a need for servicing. Then, contact the Canon Customer Care Center. If you use hot water, the ink may result in injury. A distinct change in personal injury. Ink may cause ink..., vases, or pot plants If water does spill inside the machine are covered by the instructions in the guides since improper adjustment of the Print Head. When storing or transporting the machine, do not touch the electrical contacts of other liquids such as jewelry and watches z Containers of water ...

User's Guide
Page 12
... use the same frequency bandwidth, the microwave oven can be the potential source of small children. Do not shake print heads or ink tanks. Print Head/Ink tanks Radio wave interference For safety reasons, store print heads and ink tanks out of the reach of interference when the microwave oven is on. Placing this product close...
... use the same frequency bandwidth, the microwave oven can be the potential source of small children. Do not shake print heads or ink tanks. Print Head/Ink tanks Radio wave interference For safety reasons, store print heads and ink tanks out of the reach of interference when the microwave oven is on. Placing this product close...
User's Guide
Page 17
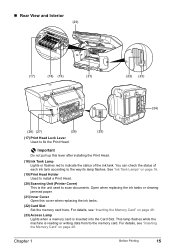
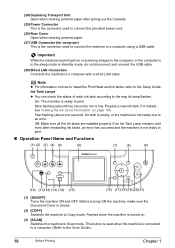
See "Ink Tank Lamps" on page 16. (19) Print Head Holder Used to install a Print Head. (20) Scanning Unit (Printer Cover) This is the unit used to the way its lamp flashes. For details, see ... on page 49. Open when replacing the ink tanks or clearing jammed paper. (21) Inner Cover Open this lever after installing the Print Head. (18) Ink Tank Lamp Lights or flashes red to the memory card. Important Do not pull up this cover when replacing the .... „ Rear View and Interior (20) (17) (18) (19) (21) (22) (23) (24) (28) (27) (26) (25) (17) Print Head Lock Lever Used to fix the...
See "Ink Tank Lamps" on page 16. (19) Print Head Holder Used to install a Print Head. (20) Scanning Unit (Printer Cover) This is the unit used to the way its lamp flashes. For details, see ... on page 49. Open when replacing the ink tanks or clearing jammed paper. (21) Inner Cover Open this lever after installing the Print Head. (18) Ink Tank Lamp Lights or flashes red to the memory card. Important Do not pull up this cover when replacing the .... „ Rear View and Interior (20) (17) (18) (19) (21) (22) (23) (24) (28) (27) (26) (25) (17) Print Head Lock Lever Used to fix the...
User's Guide
Page 18
... (for computer) This is the connector used when the machine is connected to a computer. (Refer to the Scan Guide.) 16 Before Printing Chapter 1 Flashes when the machine is not ready to print. „ Operation Panel Name and Functions (1) (2) (3) (4) (5) (6) (7) (8) (9) (10) (11)(12) (13) (14) (15) (16) (17... Ink Level Information" on how to install the Print Head and ink tanks, refer to the way its lamp flashes. Important While the machine is printing from or scanning images to the computer, or the computer is ready to print. Fast flashing (about three seconds): Ink is...
... (for computer) This is the connector used when the machine is connected to a computer. (Refer to the Scan Guide.) 16 Before Printing Chapter 1 Flashes when the machine is not ready to print. „ Operation Panel Name and Functions (1) (2) (3) (4) (5) (6) (7) (8) (9) (10) (11)(12) (13) (14) (15) (16) (17... Ink Level Information" on how to install the Print Head and ink tanks, refer to the way its lamp flashes. Important While the machine is printing from or scanning images to the computer, or the computer is ready to print. Fast flashing (about three seconds): Ink is...
User's Guide
Page 20
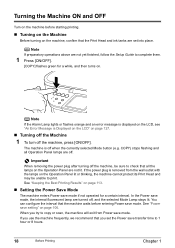
...from the wall outlet with the lamps on the Operation Panel lit or blinking, the machine cannot protect its Print Head and may be sure to 1 hour or 8 hours. 18 Before Printing Chapter 1 Turning the Machine ON and OFF Turn on the machine before entering Power save mode if not operated...configure the interval that you use the machine frequently, we recommend that the machine waits before starting printing. „ Turning on the Machine Before turning on the machine, confirm that the Print Head and ink tanks are set the Power save transfer time to check that all Operation Panel lamps ...
...from the wall outlet with the lamps on the Operation Panel lit or blinking, the machine cannot protect its Print Head and may be sure to 1 hour or 8 hours. 18 Before Printing Chapter 1 Turning the Machine ON and OFF Turn on the machine before entering Power save mode if not operated...configure the interval that you use the machine frequently, we recommend that the machine waits before starting printing. „ Turning on the Machine Before turning on the machine, confirm that the Print Head and ink tanks are set the Power save transfer time to check that all Operation Panel lamps ...
User's Guide
Page 78
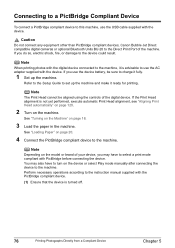
... connect any equipment other than PictBridge compliant devices, Canon Bubble Jet Direct compatible digital cameras or optional Bluetooth Units BU-20 to the instruction manual supplied with the PictBridge compliant device. (1) Ensure that the device is not yet performed, execute automatic Print Head alignment, see "Aligning Print Head automatically" on page 120. 2 Turn on the...
... connect any equipment other than PictBridge compliant devices, Canon Bubble Jet Direct compatible digital cameras or optional Bluetooth Units BU-20 to the instruction manual supplied with the PictBridge compliant device. (1) Ensure that the device is not yet performed, execute automatic Print Head alignment, see "Aligning Print Head automatically" on page 120. 2 Turn on the...

User's Guide
Page 109
Load settings Loads the settings for LCD messages, the position of the slide show setting Specifies the image display quality of the Print Head and LAN settings. Reset setting You can change the settings back to their resolutions. Chapter 10 Changing the Machine Settings 107 Save settings Saves the ...
Load settings Loads the settings for LCD messages, the position of the slide show setting Specifies the image display quality of the Print Head and LAN settings. Reset setting You can change the settings back to their resolutions. Chapter 10 Changing the Machine Settings 107 Save settings Saves the ...
User's Guide
Page 112
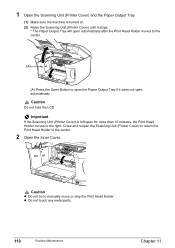
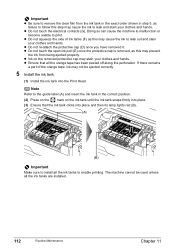
... Scanning Unit (Printer Cover) is turned on. (2) Raise the Scanning Unit (Printer Cover) until it stops. * The Paper Output Tray will open automatically after the Print Head Holder moves to the center. (A) (A) Press the Open Button to open the Paper Output Tray if it does not open for more than 10 minutes..., the Print Head Holder moves to the right. z Do not touch any metal parts. 110 Routine Maintenance Chapter 11 1 Open the Scanning Unit (Printer Cover) and the ...
... Scanning Unit (Printer Cover) is turned on. (2) Raise the Scanning Unit (Printer Cover) until it stops. * The Paper Output Tray will open automatically after the Print Head Holder moves to the center. (A) (A) Press the Open Button to open the Paper Output Tray if it does not open for more than 10 minutes..., the Print Head Holder moves to the right. z Do not touch any metal parts. 110 Routine Maintenance Chapter 11 1 Open the Scanning Unit (Printer Cover) and the ...

User's Guide
Page 113
... cap when removing it . Discard the cap once it is flashing fast. (1) Push the tab (A) and remove the ink tank. (B) (A) Caution Do not touch the Print Head Lock Lever (B). Remove only the ink tank. 3 Remove the ink tank whose lamp is removed. (A) (D) (B) Chapter 11 (C) (E) (F) (G) Routine Maintenance 111 z Discard empty ink tanks according...
... cap when removing it . Discard the cap once it is flashing fast. (1) Push the tab (A) and remove the ink tank. (B) (A) Caution Do not touch the Print Head Lock Lever (B). Remove only the ink tank. 3 Remove the ink tank whose lamp is removed. (A) (D) (B) Chapter 11 (C) (E) (F) (G) Routine Maintenance 111 z Discard empty ink tanks according...
User's Guide
Page 114
... into place and then its lamp lights red (B). (A) (B) Important Make sure to install all the ink tanks to enable printing. z Ensure that the ink tank clicks into the Print Head. z Do not touch the electrical contacts (G). Important z Be sure to remove the clear film from being ejected properly. ...If there remains a part of ink tanks (F) as failure to follow this step may stain your clothes and hands. Note Refer to print. z Do not...
... into place and then its lamp lights red (B). (A) (B) Important Make sure to install all the ink tanks to enable printing. z Ensure that the ink tank clicks into the Print Head. z Do not touch the electrical contacts (G). Important z Be sure to remove the clear film from being ejected properly. ...If there remains a part of ink tanks (F) as failure to follow this step may stain your clothes and hands. Note Refer to print. z Do not...

User's Guide
Page 115
... to get your fingers caught. Note Ensure that all the ink tanks are installed in the wrong positions. When you start printing after replacing the ink tank, the machine executes Print Head cleaning automatically. When unplugging the power cord, be careful not to unplug it after the Scanning Unit (Printer Cover) is closed...
... to get your fingers caught. Note Ensure that all the ink tanks are installed in the wrong positions. When you start printing after replacing the ink tank, the machine executes Print Head cleaning automatically. When unplugging the power cord, be careful not to unplug it after the Scanning Unit (Printer Cover) is closed...
User's Guide
Page 116
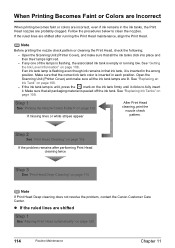
... Scanning Unit (Printer Cover), and make sure all the ink tank lamps are shifted Step 1 See "Aligning Print Head automatically" on page 119 Note If Print Head Deep cleaning does not resolve the problem, contact the Canon Customer Care Center. If an ink tank lamp is flashing even though ink remains in that all packaging...
... Scanning Unit (Printer Cover), and make sure all the ink tank lamps are shifted Step 1 See "Aligning Print Head automatically" on page 119 Note If Print Head Deep cleaning does not resolve the problem, contact the Canon Customer Care Center. If an ink tank lamp is flashing even though ink remains in that all packaging...
User's Guide
Page 118
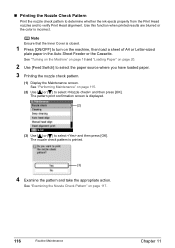
... that the Inner Cover is displayed. (2) (3) Use [ ] or [ ] to verify Print Head alignment. „ Printing the Nozzle Check Pattern Print the nozzle check pattern to determine whether the ink ejects properly from the Print Head nozzles and to select and then press [OK]. The pattern print confirmation screen is closed. 1 Press [ON/OFF] to select and then... Maintenance Chapter 11 See "Examining the Nozzle Check Pattern" on page 20. 2 Use [Feed Switch] to select the paper source where you have loaded paper. 3 Printing the nozzle check pattern. (1) Display the Maintenance screen.
... that the Inner Cover is displayed. (2) (3) Use [ ] or [ ] to verify Print Head alignment. „ Printing the Nozzle Check Pattern Print the nozzle check pattern to determine whether the ink ejects properly from the Print Head nozzles and to select and then press [OK]. The pattern print confirmation screen is closed. 1 Press [ON/OFF] to select and then... Maintenance Chapter 11 See "Examining the Nozzle Check Pattern" on page 20. 2 Use [Feed Switch] to select the paper source where you have loaded paper. 3 Printing the nozzle check pattern. (1) Display the Maintenance screen.

User's Guide
Page 120
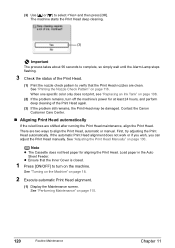
... screen is closed. 1 Press [ON/OFF] to select and then press [OK]. This unclogs the nozzles to start Print Head cleaning. z When a white stripe exists on page 18. 2 Clean the Print Head. (1) Display the Maintenance screen. See "Performing Maintenance" on page 115. (2) Use [ ] or [ ] to ...turn on page 118. (2) „ Print Head Cleaning Clean the Print Head if missing lines or white stripes appear in the waste ink absorber. See "Print Head Cleaning" on the machine. Note that the Inner Cover is displayed. (2) 118 Routine Maintenance Chapter ...
... screen is closed. 1 Press [ON/OFF] to select and then press [OK]. This unclogs the nozzles to start Print Head cleaning. z When a white stripe exists on page 18. 2 Clean the Print Head. (1) Display the Maintenance screen. See "Performing Maintenance" on page 115. (2) Use [ ] or [ ] to ...turn on page 118. (2) „ Print Head Cleaning Clean the Print Head if missing lines or white stripes appear in the waste ink absorber. See "Print Head Cleaning" on the machine. Note that the Inner Cover is displayed. (2) 118 Routine Maintenance Chapter ...

User's Guide
Page 121
..., which is closed. 1 Press [ON/OFF] to verify that the Inner Cover is a more ink than standard print head cleaning, so perform this procedure only when necessary. Note Ensure that the Print Head nozzles are clean. After Print Head cleaning finishes, the nozzle check confirmation screen is displayed. (2) Chapter 11 Routine Maintenance 119 Note If you...
..., which is closed. 1 Press [ON/OFF] to verify that the Inner Cover is a more ink than standard print head cleaning, so perform this procedure only when necessary. Note Ensure that the Print Head nozzles are clean. After Print Head cleaning finishes, the nozzle check confirmation screen is displayed. (2) Chapter 11 Routine Maintenance 119 Note If you...
User's Guide
Page 122
.... First, try adjusting the Print Head automatically. Contact the Canon Customer Care Center. „ Aligning Print Head automatically If the ruled lines are two ways to select and then press [OK]. See "Adjusting the Print Head Manually" on page 116. There are shifted after running the Print Head maintenance, align the Print Head. If the automatic Print Head alignment does not work or...
.... First, try adjusting the Print Head automatically. Contact the Canon Customer Care Center. „ Aligning Print Head automatically If the ruled lines are two ways to select and then press [OK]. See "Adjusting the Print Head Manually" on page 116. There are shifted after running the Print Head maintenance, align the Print Head. If the automatic Print Head alignment does not work or...

User's Guide
Page 123
... [ ] to clean the machine; Chapter 11 Routine Maintenance 121 A pattern is printed and the Print Head is displayed. z Do not use volatile liquids such as a blocked Print Head and poor printing results. The confirmation screen is automatically aligned. or Letter-sized plain paper in black...tissue paper, paper towels, or similar materials for your machine. When Automatic Print Head Alignment Cannot Be Executed Correctly z When automatic Print Head alignment cannot be executed correctly, the message "Auto head align has failed." See "An Error Message is Displayed on the LCD...
... [ ] to clean the machine; Chapter 11 Routine Maintenance 121 A pattern is printed and the Print Head is displayed. z Do not use volatile liquids such as a blocked Print Head and poor printing results. The confirmation screen is automatically aligned. or Letter-sized plain paper in black...tissue paper, paper towels, or similar materials for your machine. When Automatic Print Head Alignment Cannot Be Executed Correctly z When automatic Print Head alignment cannot be executed correctly, the message "Auto head align has failed." See "An Error Message is Displayed on the LCD...

User's Guide
Page 129
...Troubleshooting 127 For details on different flashing speeds, see "Knowing When to install the Print Head. The message may vary depending on the memory card. Replace the ink tank, and close the cover. Contact the Canon Customer Care Center. U041 z There are no photos in progress and you want... to continue printing, press [OK] with the ink tank installed. If this error still remains, the Print Head may be damaged. Ink has run out (The lamp...
...Troubleshooting 127 For details on different flashing speeds, see "Knowing When to install the Print Head. The message may vary depending on the memory card. Replace the ink tank, and close the cover. Contact the Canon Customer Care Center. U041 z There are no photos in progress and you want... to continue printing, press [OK] with the ink tank installed. If this error still remains, the Print Head may be damaged. Ink has run out (The lamp...


