
Quick Start Guide
Page 4
... not intended to be an easy-to your Canon PIXMA MP510 Photo All-in part, without notice. z "MEMORY STICK", "Memory Stick PRO", "MEMORY STICK Duo" and "Memory Stick Pro Duo" are office equipment such as computers, monitors, printers, faxes and copiers. and are available for efficiency. One Canon Plaza Lake Success, NY 11042 Bluetooth ID...
... not intended to be an easy-to your Canon PIXMA MP510 Photo All-in part, without notice. z "MEMORY STICK", "Memory Stick PRO", "MEMORY STICK Duo" and "Memory Stick Pro Duo" are office equipment such as computers, monitors, printers, faxes and copiers. and are available for efficiency. One Canon Plaza Lake Success, NY 11042 Bluetooth ID...
Quick Start Guide
Page 10
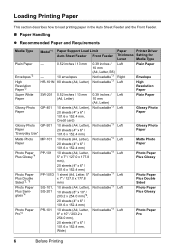
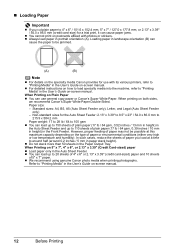
... paper in the Auto Sheet Feeder and the Front Feeder. „ Paper Handling z Recommended Paper and Requirements Media Type Model*1 Paper Support Load Limit Paper Printer Driver Auto Sheet Feeder Front Feeder Thickness Setting for Lever Media Type Plain Paper Envelopes*2 High Resolution Paper*2 - 0.52 inches / 13 mm - 10 envelopes HR...
... paper in the Auto Sheet Feeder and the Front Feeder. „ Paper Handling z Recommended Paper and Requirements Media Type Model*1 Paper Support Load Limit Paper Printer Driver Auto Sheet Feeder Front Feeder Thickness Setting for Lever Media Type Plain Paper Envelopes*2 High Resolution Paper*2 - 0.52 inches / 13 mm - 10 envelopes HR...
Quick Start Guide
Page 11
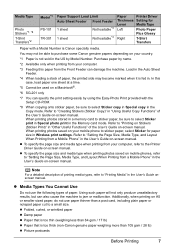
...Transfers*2 Model*1 PS-101 TR-301 Paper Support Load Limit Auto Sheet Feeder Front Feeder 1 sheet Not loadable*3 1 sheet Not loadable*3 Paper Printer Driver Thickness Setting for paper size in the User's Guide on-screen manual. Purchase paper by name. *2 Available only when printing from a ...Picture postcards Before Printing 7 You may become marked when it is too thick (non-Canon genuine paper weighing more than a post card, including plain paper or notepad paper cut to the Printer Driver Guide on mobile phones, refer to sticker paper, select Sticker for Lever Media Type...
...Transfers*2 Model*1 PS-101 TR-301 Paper Support Load Limit Auto Sheet Feeder Front Feeder 1 sheet Not loadable*3 1 sheet Not loadable*3 Paper Printer Driver Thickness Setting for paper size in the User's Guide on-screen manual. Purchase paper by name. *2 Available only when printing from a ...Picture postcards Before Printing 7 You may become marked when it is too thick (non-Canon genuine paper weighing more than a post card, including plain paper or notepad paper cut to the Printer Driver Guide on mobile phones, refer to sticker paper, select Sticker for Lever Media Type...

Quick Start Guide
Page 14
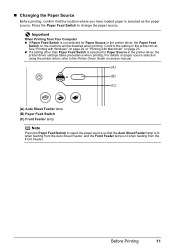
... When using any other than A4, Letter, or B5-sized plain paper in the Auto Sheet Feeder. For details on paper source selection using the printer driver. Before you print, make sure that the paper source selection matches the paper source where you can also select the paper source using the... printer driver, refer to the Printer Driver Guide on-screen manual. (A) (A) Press to the type of paper, load it in the Front Feeder. Note You cannot load paper ...
... When using any other than A4, Letter, or B5-sized plain paper in the Auto Sheet Feeder. For details on paper source selection using the printer driver. Before you print, make sure that the paper source selection matches the paper source where you can also select the paper source using the... printer driver, refer to the Printer Driver Guide on-screen manual. (A) (A) Press to the type of paper, load it in the Front Feeder. Note You cannot load paper ...
Quick Start Guide
Page 15
... on page 22 or "Printing with Macintosh" on the machine will be disabled when printing. For details on paper source selection using the printer driver, refer to the Printer Driver Guide on-screen manual. (A) (B) (C) (A) Auto Sheet Feeder lamp (B) Paper Feed Switch (C) Front Feeder lamp Note Press the Paper... Feed Switch to change the paper source. Confirm the setting in the printer driver, the printer driver settings takes precedence when printing. z If a setting other than Paper Feed Switch is selected for Paper Source in the...
... on page 22 or "Printing with Macintosh" on the machine will be disabled when printing. For details on paper source selection using the printer driver, refer to the Printer Driver Guide on-screen manual. (A) (B) (C) (A) Auto Sheet Feeder lamp (B) Paper Feed Switch (C) Front Feeder lamp Note Press the Paper... Feed Switch to change the paper source. Confirm the setting in the printer driver, the printer driver settings takes precedence when printing. z If a setting other than Paper Feed Switch is selected for Paper Source in the...
Quick Start Guide
Page 16
..." / 54.0 x 86.0 mm (credit card-size) for a trial print, it can cause paper jams. z You cannot print on postcards affixed with its various printers, refer to around half (around 0.2 inches / 5 mm in the User's Guide on Plain Paper z You can load up to "Printing Media" in the Front ... capacity depending on the type of paper or environmental conditions (either very high or low temperature and humidity). z We recommend using genuine Canon photo media when printing photographs. z For detailed instructions on how to load specialty media into the machine, refer to 150 sheets of plain...
..." / 54.0 x 86.0 mm (credit card-size) for a trial print, it can cause paper jams. z You cannot print on postcards affixed with its various printers, refer to around half (around 0.2 inches / 5 mm in the User's Guide on Plain Paper z You can load up to "Printing Media" in the Front ... capacity depending on the type of paper or environmental conditions (either very high or low temperature and humidity). z We recommend using genuine Canon photo media when printing photographs. z For detailed instructions on how to load specialty media into the machine, refer to 150 sheets of plain...
Quick Start Guide
Page 17
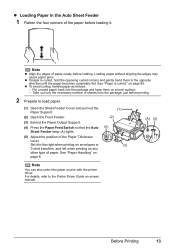
... paper becomes completely flat. Note z Align the edges of the Paper Thickness Lever. on page 6. (1) (2) (5) (3) (A) (4) Note You can also select the paper source with the printer driver. Set it . Before Printing 13 Take out only the necessary number of paper. See "Paper Handling" on page 65. Loading paper without aligning the... Support. (4) Press the Paper Feed Switch so that the Auto Sheet Feeder lamp (A) lights. (5) Adjust the position of paper neatly before printing. 2 Prepare to the Printer Driver Guide on a level surface. -
... paper becomes completely flat. Note z Align the edges of the Paper Thickness Lever. on page 6. (1) (2) (5) (3) (A) (4) Note You can also select the paper source with the printer driver. Set it . Before Printing 13 Take out only the necessary number of paper. See "Paper Handling" on page 65. Loading paper without aligning the... Support. (4) Press the Paper Feed Switch so that the Auto Sheet Feeder lamp (A) lights. (5) Adjust the position of paper neatly before printing. 2 Prepare to the Printer Driver Guide on a level surface. -
Quick Start Guide
Page 18
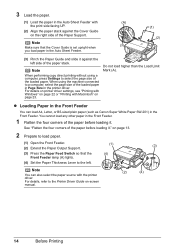
... Sheet Feeder. (1) (2) (3) Pinch the Paper Guide and slide it against the Cover Guide on page 22 or "Printing with the printer driver. Note You can load A4, Letter, or B5-sized plain paper (such as Canon Super White Paper SW-201) in the Front Feeder. When using a computer, press Settings to the... Printer Driver Guide on page 23. You cannot load any other paper in the printer driver. For details, refer to select the page size of the...
... Sheet Feeder. (1) (2) (3) Pinch the Paper Guide and slide it against the Cover Guide on page 22 or "Printing with the printer driver. Note You can load A4, Letter, or B5-sized plain paper (such as Canon Super White Paper SW-201) in the Front Feeder. When using a computer, press Settings to the... Printer Driver Guide on page 23. You cannot load any other paper in the printer driver. For details, refer to select the page size of the...

Quick Start Guide
Page 19
Before Printing 15 For details on printer driver settings, see "Printing with Windows" on page 23. When using a computer, press Settings to load paper with Macintosh" on page 22 or "Printing with ... Size in the Front Feeder, refer to the illustration below and make sure not to select the page size. Note z When loading paper in the printer driver.
Before Printing 15 For details on printer driver settings, see "Printing with Windows" on page 23. When using a computer, press Settings to load paper with Macintosh" on page 22 or "Printing with ... Size in the Front Feeder, refer to the illustration below and make sure not to select the page size. Note z When loading paper in the printer driver.
Quick Start Guide
Page 20
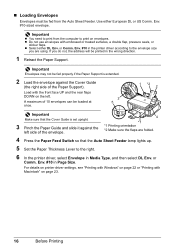
.... 3 5 1 *2 2 Important Make sure that the Auto Sheet Feeder lamp lights up. 5 Set the Paper Thickness Lever to the right. 6 In the printer driver, select Envelope in Media Type, and then select DL Env. Important z You need to print on page 23. 16 Before Printing z Do not use...). „ Loading Envelopes Envelopes must be printed in the wrong direction. 1 Retract the Paper Support. Env. #10 in Page Size. For details on printer driver settings, see "Printing with Windows" on page 22 or "Printing with Macintosh" on envelopes. Use either DL Env. If you are folded. 4 ...
.... 3 5 1 *2 2 Important Make sure that the Auto Sheet Feeder lamp lights up. 5 Set the Paper Thickness Lever to the right. 6 In the printer driver, select Envelope in Media Type, and then select DL Env. Important z You need to print on page 23. 16 Before Printing z Do not use...). „ Loading Envelopes Envelopes must be printed in the wrong direction. 1 Retract the Paper Support. Env. #10 in Page Size. For details on printer driver settings, see "Printing with Windows" on page 22 or "Printing with Macintosh" on envelopes. Use either DL Env. If you are folded. 4 ...
Quick Start Guide
Page 26
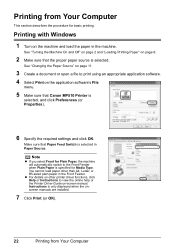
...printing. See "Changing the Paper Source" on page 11. 3 Create a document or open a file to view the online help or the Printer Driver Guide on the application software's File menu. 5 Make sure that the proper paper source is selected. Instructions is selected, and click Preferences ... other than A4, Letter, or B5-sized plain paper in Paper Source. Printing with Windows 1 Turn on page 6. 2 Make sure that Canon MP510 Printer is only displayed when the onscreen manuals are installed. 7 Click Print (or OK). 22 Printing from Your Computer This section describes the procedure for...
...printing. See "Changing the Paper Source" on page 11. 3 Create a document or open a file to view the online help or the Printer Driver Guide on the application software's File menu. 5 Make sure that the proper paper source is selected. Instructions is selected, and click Preferences ... other than A4, Letter, or B5-sized plain paper in Paper Source. Printing with Windows 1 Turn on page 6. 2 Make sure that Canon MP510 Printer is only displayed when the onscreen manuals are installed. 7 Click Print (or OK). 22 Printing from Your Computer This section describes the procedure for...
Quick Start Guide
Page 27
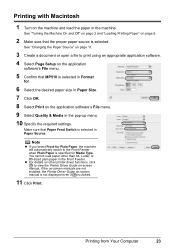
... and load the paper in Paper Source. See "Turning the Machine On and Off" on page 2 and "Loading Printing Paper" on page 6. 2 Make sure that MP510 is selected in the machine. Make sure that Paper Feed Switch is selected in Format for. 6 Select the desired paper size in Paper Size. 7 Click... or open a file to print using an appropriate application software. 4 Select Page Setup on -screen manual. If the on-screen manuals are not installed, the Printer Driver Guide on other than A4, Letter, or B5-sized plain paper in the pop-up menu. 10 Specify the required settings. Note z If you...
... and load the paper in Paper Source. See "Turning the Machine On and Off" on page 2 and "Loading Printing Paper" on page 6. 2 Make sure that MP510 is selected in the machine. Make sure that Paper Feed Switch is selected in Format for. 6 Select the desired paper size in Paper Size. 7 Click... or open a file to print using an appropriate application software. 4 Select Page Setup on -screen manual. If the on-screen manuals are not installed, the Printer Driver Guide on other than A4, Letter, or B5-sized plain paper in the pop-up menu. 10 Specify the required settings. Note z If you...
Quick Start Guide
Page 38
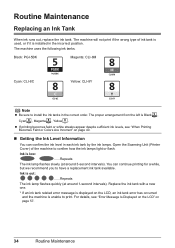
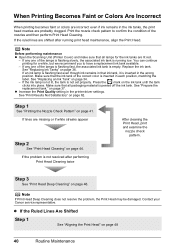
... in the correct order. For details, see "When Printing Becomes Faint or Colors Are Incorrect" on page 57. 34 Routine Maintenance Open the Scanning Unit (Printer Cover) of ink tank is used, or if it is Black , Cyan , Magenta , Yellow . The machine will not print if the wrong type of the...
... in the correct order. For details, see "When Printing Becomes Faint or Colors Are Incorrect" on page 57. 34 Routine Maintenance Open the Scanning Unit (Printer Cover) of ink tank is used, or if it is Black , Cyan , Magenta , Yellow . The machine will not print if the wrong type of the...
Quick Start Guide
Page 40
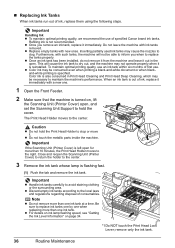
Important Handling Ink z To maintain optimal printing quality, we recommend the use of first use an ink tank within six months of specified Canon brand ink tanks. z Once an ink tank has been installed, do not remove it from the machine and leave it out in Print Head Cleaning ... ink tanks according to the right. Do not leave the machine with new ones. To maintain optimal printing quality, use . Important If the Scanning Unit (Printer Cover) is flashing fast. (1) Push the tab and remove the ink tank. Note z Do not remove more than 10 minutes, the Print Head Holder moves...
Important Handling Ink z To maintain optimal printing quality, we recommend the use of first use an ink tank within six months of specified Canon brand ink tanks. z Once an ink tank has been installed, do not remove it from the machine and leave it out in Print Head Cleaning ... ink tanks according to the right. Do not leave the machine with new ones. To maintain optimal printing quality, use . Important If the Scanning Unit (Printer Cover) is flashing fast. (1) Push the tab and remove the ink tank. Note z Do not remove more than 10 minutes, the Print Head Holder moves...
Quick Start Guide
Page 42
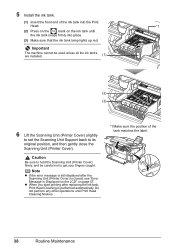
Important The machine cannot be careful not to its original position, and then gently close the Scanning Unit (Printer Cover). z When you start printing after the Scanning Unit (Printer Cover) is performed automatically. Note z If the error message is still displayed after replacing the ink tank, Print Head... ink tank lamp lights up red. Caution Be sure to hold the Scanning Unit (Printer Cover) firmly, and be used unless all the ink tanks are installed. (1) (2) (3) 6 Lift the Scanning Unit (Printer Cover) slightly to set the Scanning Unit Support back to get your fingers caught....
Important The machine cannot be careful not to its original position, and then gently close the Scanning Unit (Printer Cover). z When you start printing after the Scanning Unit (Printer Cover) is performed automatically. Note z If the error message is still displayed after replacing the ink tank, Print Head... ink tank lamp lights up red. Caution Be sure to hold the Scanning Unit (Printer Cover) firmly, and be used unless all the ink tanks are installed. (1) (2) (3) 6 Lift the Scanning Unit (Printer Cover) slightly to set the Scanning Unit Support back to get your fingers caught....
Quick Start Guide
Page 44
Note Before performing maintenance z Open the Scanning Unit (Printer Cover) and make sure that the ink tank of the lamps is flashing fast, the associated ink tank is empty. See "Replacing Ink Tanks" on ... position, matching the label. Make sure that ink tank, it is inserted in the wrong position. Contact your Canon service representative. If an ink lamp is flashing fast even though ink remains in the printer driver settings. See "Replacing an Ink Tank" on page 46. Step 3 See "Print Head Deep Cleaning" on...
Note Before performing maintenance z Open the Scanning Unit (Printer Cover) and make sure that the ink tank of the lamps is flashing fast, the associated ink tank is empty. See "Replacing Ink Tanks" on ... position, matching the label. Make sure that ink tank, it is inserted in the wrong position. Contact your Canon service representative. If an ink lamp is flashing fast even though ink remains in the printer driver settings. See "Replacing an Ink Tank" on page 46. Step 3 See "Print Head Deep Cleaning" on...
Quick Start Guide
Page 61
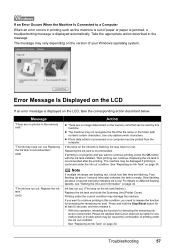
...on different flashing speeds, see "Getting the Ink Level Information" on the ink tank flashes.) Replace the ink tank and close the Scanning Unit (Printer Cover). Error Message Is Displayed on the LCD, take the corresponding action described below. Message "There are no photos in the memory card." Use... detecting the remaining ink level. Troubleshooting 57 "The ink may damage the machine. See "Replacing an Ink Tank" on the memory card that Canon shall not be liable for detecting the remaining ink level is empty. If an Error Occurs When the Machine Is Connected to a Computer When ...
...on different flashing speeds, see "Getting the Ink Level Information" on the ink tank flashes.) Replace the ink tank and close the Scanning Unit (Printer Cover). Error Message Is Displayed on the LCD, take the corresponding action described below. Message "There are no photos in the memory card." Use... detecting the remaining ink level. Troubleshooting 57 "The ink may damage the machine. See "Replacing an Ink Tank" on the memory card that Canon shall not be liable for detecting the remaining ink level is empty. If an Error Occurs When the Machine Is Connected to a Computer When ...
Quick Start Guide
Page 62
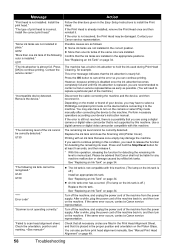
.... If the error is still not resolved, there is not compatible with this machine. Replace the ink tank and close the Scanning Unit (Printer Cover). z The ink tank is a possibility that you need to the machine. See "Replacing an Ink Tank" on the camera or ...U071 "The ink absorber is nearly full. "Incompatible device detected. U140 U150 "**** Error code" "Scanner is incorrect. Perform necessary operations according your Canon service representative. Printing with this condition, you are installed in , and then turn on the ink tank is off the machine, and unplug the...
.... If the error is still not resolved, there is not compatible with this machine. Replace the ink tank and close the Scanning Unit (Printer Cover). z The ink tank is a possibility that you need to the machine. See "Replacing an Ink Tank" on the camera or ...U071 "The ink absorber is nearly full. "Incompatible device detected. U140 U150 "**** Error code" "Scanner is incorrect. Perform necessary operations according your Canon service representative. Printing with this condition, you are installed in , and then turn on the ink tank is off the machine, and unplug the...
Quick Start Guide
Page 64
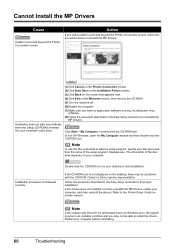
...then the name of the disc drive depends on the desktop, there may not be a problem with the CD-ROM. Contact a Canon service representative. Restart your computer, and then reinstall the drivers. Installation does not start installation. Action If you were unable to proceed beyond..., uninstall the MP Drivers, restart your computer before reinstalling. 60 Troubleshooting Cannot Install the MP Drivers Cause Unable to proceed beyond the Printer Connection screen, follow the procedure below to reinstall the MP Drivers. Note To use the Run command to start the setup program, ...
...then the name of the disc drive depends on the desktop, there may not be a problem with the CD-ROM. Contact a Canon service representative. Restart your computer, and then reinstall the drivers. Installation does not start installation. Action If you were unable to proceed beyond..., uninstall the MP Drivers, restart your computer before reinstalling. 60 Troubleshooting Cannot Install the MP Drivers Cause Unable to proceed beyond the Printer Connection screen, follow the procedure below to reinstall the MP Drivers. Note To use the Run command to start the setup program, ...
Quick Start Guide
Page 67
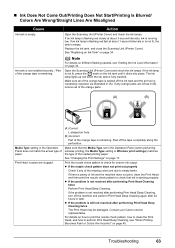
Open the Scanning Unit (Printer Cover) and check the ink lamps. Print Head nozzles are clogged. (A) Correct L-shaped air hole (B) Incorrect Part of ink and the ...setting in (A). Make sure all of the orange tape is empty. Make sure that ink is running low. Contact your Canon service representative. Action Open the Scanning Unit (Printer Cover) and check the ink lamps. See "Replacing an Ink Tank" on page 17. For details on the ink... Print Head Deep Cleaning twice The Print Head may be damaged. Replace the ink tank, and close the Scanning Unit (Printer Cover).
Open the Scanning Unit (Printer Cover) and check the ink lamps. Print Head nozzles are clogged. (A) Correct L-shaped air hole (B) Incorrect Part of ink and the ...setting in (A). Make sure all of the orange tape is empty. Make sure that ink is running low. Contact your Canon service representative. Action Open the Scanning Unit (Printer Cover) and check the ink lamps. See "Replacing an Ink Tank" on page 17. For details on the ink... Print Head Deep Cleaning twice The Print Head may be damaged. Replace the ink tank, and close the Scanning Unit (Printer Cover).


