
MP470 series Quick Start Guide
Page 5
... Directly from a Compliant Device 32 Printing Photographs Directly from a Compliant Device 32 About PictBridge Print Settings 34 Routine Maintenance 38 When Printing Becomes Faint or Colors Are Incorrect 38 Printing the Nozzle Check Pattern 39 Examining the Nozzle Check Pattern ...........40 Print Head Cleaning 42 Print Head Deep Cleaning 43 Aligning the Print Head 44 Replacing a FINE Cartridge 46 Keeping...
... Directly from a Compliant Device 32 Printing Photographs Directly from a Compliant Device 32 About PictBridge Print Settings 34 Routine Maintenance 38 When Printing Becomes Faint or Colors Are Incorrect 38 Printing the Nozzle Check Pattern 39 Examining the Nozzle Check Pattern ...........40 Print Head Cleaning 42 Print Head Deep Cleaning 43 Aligning the Print Head 44 Replacing a FINE Cartridge 46 Keeping...
MP470 series Quick Start Guide
Page 42
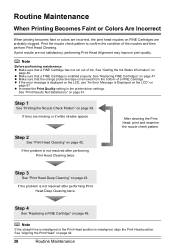
...the problem is not resolved after performing Print Head Cleaning twice Step 3 See "Print Head Deep Cleaning" on page 57. Step 1 See "Printing the Nozzle Check Pattern" on page 61. If lines are not satisfactory, performing Print Head Alignment may improve print quality. See "Replacing FINE Cartridges" ...a FINE Cartridge has not run out of the nozzles and then perform Print Head Cleaning. Note If the straight line is misaligned or the Print Head position is installed properly. See "Aligning the Print Head" on page 47. Note Before performing maintenance z Make sure that a ...
...the problem is not resolved after performing Print Head Cleaning twice Step 3 See "Print Head Deep Cleaning" on page 57. Step 1 See "Printing the Nozzle Check Pattern" on page 61. If lines are not satisfactory, performing Print Head Alignment may improve print quality. See "Replacing FINE Cartridges" ...a FINE Cartridge has not run out of the nozzles and then perform Print Head Cleaning. Note If the straight line is misaligned or the Print Head position is installed properly. See "Aligning the Print Head" on page 47. Note Before performing maintenance z Make sure that a ...
MP470 series Quick Start Guide
Page 43
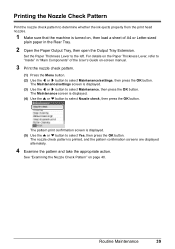
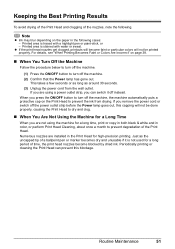
... then load a sheet of the User's Guide on page 40. Routine Maintenance 39 Printing the Nozzle Check Pattern Print the nozzle check pattern to determine whether the ink ejects properly from the print head nozzles. 1 Make sure that the machine is displayed. (4) Use the { or ...check pattern is displayed. (5) Use the { or } button to select Maintenance/settings, then press the OK button. The pattern print confirmation screen is printed, and the pattern confirmation screens are displayed alternately. 4 Examine the pattern and take the appropriate action. The Maintenance/settings screen ...
... then load a sheet of the User's Guide on page 40. Routine Maintenance 39 Printing the Nozzle Check Pattern Print the nozzle check pattern to determine whether the ink ejects properly from the print head nozzles. 1 Make sure that the machine is displayed. (4) Use the { or ...check pattern is displayed. (5) Use the { or } button to select Maintenance/settings, then press the OK button. The pattern print confirmation screen is printed, and the pattern confirmation screens are displayed alternately. 4 Examine the pattern and take the appropriate action. The Maintenance/settings screen ...

MP470 series Quick Start Guide
Page 45
The cleaning confirmation screen is displayed. (2) Select Yes and press the OK button to start Print Head Cleaning. z If Lines Are Missing or White Streaks Are Present (1) Select Also B and press the OK button. Routine Maintenance 41 See "Print Head Cleaning" on page 42.
The cleaning confirmation screen is displayed. (2) Select Yes and press the OK button to start Print Head Cleaning. z If Lines Are Missing or White Streaks Are Present (1) Select Also B and press the OK button. Routine Maintenance 41 See "Print Head Cleaning" on page 42.
MP470 series Quick Start Guide
Page 46
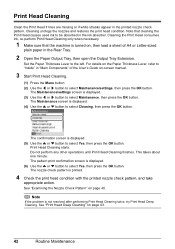
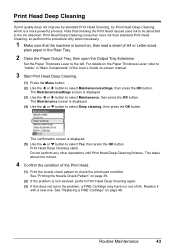
... Rear Tray. 2 Open the Paper Output Tray, then open the Output Tray Extension. The Maintenance/settings screen is printed. 4 Check the print head condition with the printed nozzle check pattern, and take appropriate action. The nozzle check pattern is displayed. (3) Use the [ or ] ...page 43. 42 Routine Maintenance Cleaning unclogs the nozzles and restores the print head condition. Cleaning the Print Head consumes ink, so perform Print Head Cleaning only when necessary. 1 Make sure that cleaning the Print Head causes used ink to select Maintenance/settings, then press the OK button...
... Rear Tray. 2 Open the Paper Output Tray, then open the Output Tray Extension. The Maintenance/settings screen is printed. 4 Check the print head condition with the printed nozzle check pattern, and take appropriate action. The nozzle check pattern is displayed. (3) Use the [ or ] ...page 43. 42 Routine Maintenance Cleaning unclogs the nozzles and restores the print head condition. Cleaning the Print Head consumes ink, so perform Print Head Cleaning only when necessary. 1 Make sure that cleaning the Print Head causes used ink to select Maintenance/settings, then press the OK button...
MP470 series Quick Start Guide
Page 47
.... (5) Use the { or } button to select Maintenance, then press the OK button. Print Head Deep Cleaning consumes more powerful process. Print Head Deep Cleaning If print quality does not improve by standard Print Head Cleaning, try Print Head Deep Cleaning, which is a more ink than standard Print Head Cleaning, so perform this does not solve the problem, a FINE Cartridge may have...
.... (5) Use the { or } button to select Maintenance, then press the OK button. Print Head Deep Cleaning consumes more powerful process. Print Head Deep Cleaning If print quality does not improve by standard Print Head Cleaning, try Print Head Deep Cleaning, which is a more ink than standard Print Head Cleaning, so perform this does not solve the problem, a FINE Cartridge may have...

MP470 series Quick Start Guide
Page 48
... Output Tray Extension. The Maintenance/settings screen is displayed. is displayed, confirm that the machine is turned on -screen manual. 3 Print the print head alignment pattern. (1) Press the Menu button. (2) Use the [ or ] button to select Yes, then press the OK button. ...The input screen for the head position adjustment values is printed correctly, use the { or } button to select Maintenance/settings, then press the OK button. Aligning the Print Head If ruled lines are printed misaligned or print results are otherwise unsatisfactory, adjust the print head position. 1 Make sure that...
... Output Tray Extension. The Maintenance/settings screen is displayed. is displayed, confirm that the machine is turned on -screen manual. 3 Print the print head alignment pattern. (1) Press the Menu button. (2) Use the [ or ] button to select Yes, then press the OK button. ...The input screen for the head position adjustment values is printed correctly, use the { or } button to select Maintenance/settings, then press the OK button. Aligning the Print Head If ruled lines are printed misaligned or print results are otherwise unsatisfactory, adjust the print head position. 1 Make sure that...

MP470 series Quick Start Guide
Page 49
... and use the [ or ] button to input the number of the pattern in column A that has the least noticeable streaks. 4 Adjust the print head position. (1) Check the printed patterns and use the [ or ] button to select the number of the pattern in column M that produces the least noticeable white streaks. (A) (B) (C) (D) (A) Less noticeable vertical...
... and use the [ or ] button to input the number of the pattern in column A that has the least noticeable streaks. 4 Adjust the print head position. (1) Check the printed patterns and use the [ or ] button to select the number of the pattern in column M that produces the least noticeable white streaks. (A) (B) (C) (D) (A) Less noticeable vertical...

MP470 series Quick Start Guide
Page 50
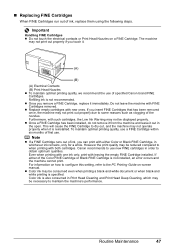
... a few seconds. (A) (A) Indicates the remaining ink volume. When ink runs out, replace the FINE Cartridge. The machine considers as Print Head Cleaning, a FINE Cartridge is low. If you install a used . In such case, refer to have a new FINE Cartridge available. Replace the ink ... z When ink has run out An error message may not be correct. z For information on compatible FINE Cartridges, see the back cover of printing following such maintenance as ink is full when a new FINE Cartridge is being performed. 46 Routine Maintenance z When ink is low Ink is probably...
... a few seconds. (A) (A) Indicates the remaining ink volume. When ink runs out, replace the FINE Cartridge. The machine considers as Print Head Cleaning, a FINE Cartridge is low. If you install a used . In such case, refer to have a new FINE Cartridge available. Replace the ink ... z When ink has run out An error message may not be correct. z For information on compatible FINE Cartridges, see the back cover of printing following such maintenance as ink is full when a new FINE Cartridge is being performed. 46 Routine Maintenance z When ink is low Ink is probably...
MP470 series Quick Start Guide
Page 51
... may be necessary to use new FINE cartridges in whichever ink remains, only for a while. Canon recommends to maintain the machine's performance. The machine may not operate properly when it . (A) (B) (A) Electrical Contacts (B) Print Head Nozzles z To maintain optimal printing quality, we recommend the use . Color ink is specified. Refilling ink is not installed, an...
... may be necessary to use new FINE cartridges in whichever ink remains, only for a while. Canon recommends to maintain the machine's performance. The machine may not operate properly when it . (A) (B) (A) Electrical Contacts (B) Print Head Nozzles z To maintain optimal printing quality, we recommend the use . Color ink is specified. Refilling ink is not installed, an...
MP470 series Quick Start Guide
Page 53
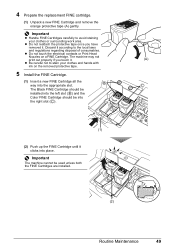
... properly if you have removed it according to stain your clothes or surrounding work area. z Do not touch the electrical contacts or Print Head Nozzles on the removed protective tape. 5 Install the FINE Cartridge. (1) Insert a new FINE Cartridge all the B way into place. The Black FINE Cartridge should be ...
... properly if you have removed it according to stain your clothes or surrounding work area. z Do not touch the electrical contacts or Print Head Nozzles on the removed protective tape. 5 Install the FINE Cartridge. (1) Insert a new FINE Cartridge all the B way into place. The Black FINE Cartridge should be ...
MP470 series Quick Start Guide
Page 54
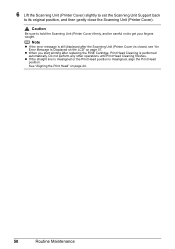
... (Printer Cover). Note z If the error message is still displayed after replacing the FINE Cartridge, Print Head Cleaning is performed automatically. z When you start printing after the Scanning Unit (Printer Cover) is misaligned, align the Print Head position. See "Aligning the Print Head" on page 57. 6 Lift the Scanning Unit (Printer Cover) slightly to set the Scanning...
... (Printer Cover). Note z If the error message is still displayed after replacing the FINE Cartridge, Print Head Cleaning is performed automatically. z When you start printing after the Scanning Unit (Printer Cover) is misaligned, align the Print Head position. See "Aligning the Print Head" on page 57. 6 Lift the Scanning Unit (Printer Cover) slightly to set the Scanning...
MP470 series Quick Start Guide
Page 55
...prevent this capping will not be done properly, causing the Print Head to turn off instead. Printed area is traced with water or sweat. Periodically printing or cleaning the Print Head can switch it is not used for high-precision printing. Printed area is stained with a highlight pen or paint-stick...Unplug the power cord from drying. Routine Maintenance 51 Numerous nozzles are not using a power outlet strip, you are installed in the Print Head for a long period of a ballpoint pen or marker becomes dry and unusable if it off the machine. (2) Confirm that the ...
...prevent this capping will not be done properly, causing the Print Head to turn off instead. Printed area is traced with water or sweat. Periodically printing or cleaning the Print Head can switch it is not used for high-precision printing. Printed area is stained with a highlight pen or paint-stick...Unplug the power cord from drying. Routine Maintenance 51 Numerous nozzles are not using a power outlet strip, you are installed in the Print Head for a long period of a ballpoint pen or marker becomes dry and unusable if it off the machine. (2) Confirm that the ...

MP470 series Quick Start Guide
Page 56
... the machine. Use a soft cloth to leave any other chemical cleaner, as this may remain inside the machine and cause problems such as a blocked Print Head and poor printing results. Important z When cleaning the exterior of the Machine Caution Be sure to maintain your machine. Be sure to turn off the power and...
... the machine. Use a soft cloth to leave any other chemical cleaner, as this may remain inside the machine and cause problems such as a blocked Print Head and poor printing results. Important z When cleaning the exterior of the Machine Caution Be sure to maintain your machine. Be sure to turn off the power and...
MP470 series Quick Start Guide
Page 62
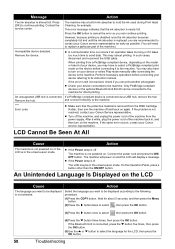
... on again. z Turn off and back on . If the same error occurs, contact your Canon Service representative. An Unintended Language Is Displayed on and the LCD will need to hold the ink used during Print Head Cleaning, for the LCD, then press the OK button. 58 Troubleshooting After a while, plug ...the power cord of your device, you want to the machine for direct printing. If the Bluetooth Unit is still not resolved, check if...
... on again. z Turn off and back on . If the same error occurs, contact your Canon Service representative. An Unintended Language Is Displayed on and the LCD will need to hold the ink used during Print Head Cleaning, for the LCD, then press the OK button. 58 Troubleshooting After a while, plug ...the power cord of your device, you want to the machine for direct printing. If the Bluetooth Unit is still not resolved, check if...
MP470 series Quick Start Guide
Page 66
... between the contact points. See "When Printing Becomes Faint or Colors Are Incorrect" on only a particular side of paper are clogged. The media is removed. (A) Print Head nozzles are made to "Print Results Not Satisfactory" in the print settings for the memory card mode. Many... types of the paper. Small dusts may be printed on page 38 and perform any necessary maintenance operation. When printing photographs or other graphics,...
... between the contact points. See "When Printing Becomes Faint or Colors Are Incorrect" on only a particular side of paper are clogged. The media is removed. (A) Print Head nozzles are made to "Print Results Not Satisfactory" in the print settings for the memory card mode. Many... types of the paper. Small dusts may be printed on page 38 and perform any necessary maintenance operation. When printing photographs or other graphics,...
MP470 series Quick Start Guide
Page 67
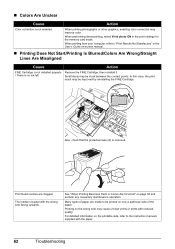
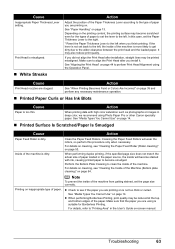
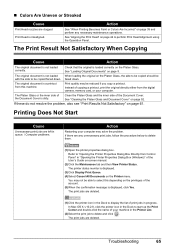
... maintenance operation. „ Printed Paper Curls or Has Ink Blots Cause Action Paper is misaligned. „ White Streaks Action Adjust the position of the Paper Thickness Lever according to perform Print Head Alignment using Photo Paper Pro or other Canon specialty paper. Inside of the... machine. Clean the Paper Feed Rollers. When performing duplex printing, if the specified page size does not match the actual size...
... maintenance operation. „ Printed Paper Curls or Has Ink Blots Cause Action Paper is misaligned. „ White Streaks Action Adjust the position of the Paper Thickness Lever according to perform Print Head Alignment using Photo Paper Pro or other Canon specialty paper. Inside of the... machine. Clean the Paper Feed Rollers. When performing duplex printing, if the specified page size does not match the actual size...

MP470 series Quick Start Guide
Page 68
... position of the Paper Thickness Lever according to the type of paper you are using plain paper to the right. Depending on the printing content, the printing surface may become stained with the other side. For Plain Paper Turn the paper over and reload it is curled. For Other Paper... paper one sheet at a time. See "Paper Handling" on a level surface. If the lever is not set back to the wider clearance between the print head and the loaded paper. Use such paper after correcting paper curl as seen below. (1) (2) (A) (3)Check to see that the paper curl is more likely...
... position of the Paper Thickness Lever according to the type of paper you are using plain paper to the right. Depending on the printing content, the printing surface may become stained with the other side. For Plain Paper Turn the paper over and reload it is curled. For Other Paper... paper one sheet at a time. See "Paper Handling" on a level surface. If the lever is not set back to the wider clearance between the print head and the loaded paper. Use such paper after correcting paper curl as seen below. (1) (2) (A) (3)Check to see that the paper curl is more likely...
MP470 series Quick Start Guide
Page 69
...Properties Dialog Box Directly from Control Panel" in the Printer List. (2)Select the print job to delete and click . You may not be reduced if you copy a printout. „ Colors Are Uneven or Streaked Cause Print Head nozzles are deleted. (1)Click the printer icon in the Dock to display the ...list of print jobs in progress. See "Aligning the Print Head" on the Platen Glass. The Platen Glass or the inner side of the Document...
...Properties Dialog Box Directly from Control Panel" in the Printer List. (2)Select the print job to delete and click . You may not be reduced if you copy a printout. „ Colors Are Uneven or Streaked Cause Print Head nozzles are deleted. (1)Click the printer icon in the Dock to display the ...list of print jobs in progress. See "Aligning the Print Head" on the Platen Glass. The Platen Glass or the inner side of the Document...
MP470 series Quick Start Guide
Page 74
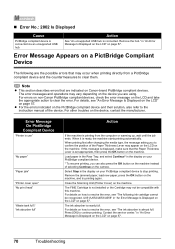
...machine. Remove the hub." in "An Error Message Is Displayed on the LCD" on the LCD and take the appropriate action to continue printing. For errors on non-Canon PictBridge compliant devices, check the error message on page 57. 70 Troubleshooting Error Message On PictBridge Compliant Device "Printer in the display on... paper in the Rear Tray, and select Continue* in use" "No paper" "Paper jam" "Printer cover open" "No print head" "Waste tank full"/ "Ink absorber full" Action If the machine is set appropriate, then press the OK button on the PictBridge compliant device and their ...
...machine. Remove the hub." in "An Error Message Is Displayed on the LCD" on the LCD and take the appropriate action to continue printing. For errors on non-Canon PictBridge compliant devices, check the error message on page 57. 70 Troubleshooting Error Message On PictBridge Compliant Device "Printer in the display on... paper in the Rear Tray, and select Continue* in use" "No paper" "Paper jam" "Printer cover open" "No print head" "Waste tank full"/ "Ink absorber full" Action If the machine is set appropriate, then press the OK button on the PictBridge compliant device and their ...


