Easy Setup Instructions
Page 1
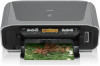
...the Scanning Unit Support down the serial number. See the reverse side of the stack. 4 Open the Paper Output Tray. (1) (3) (A) (2) The hardware setup is complete; B Do not touch! (A) • Be sure to hold the machine by grasping the Paper Support Extension or the Operation Panel. 1 ... this takes about one to two minutes. 3 Use [ ] or [ ] on the LCD, then press [OK]. (MP180) • The language setting is installed. QT5-0542-V01 xxxxxxx © CANON INC. 2006 PRINTED IN VIETNAM To prepare your machine for use , see the reverse side for purchasing the Canon PIXMA MP180/MP160.
...the Scanning Unit Support down the serial number. See the reverse side of the stack. 4 Open the Paper Output Tray. (1) (3) (A) (2) The hardware setup is complete; B Do not touch! (A) • Be sure to hold the machine by grasping the Paper Support Extension or the Operation Panel. 1 ... this takes about one to two minutes. 3 Use [ ] or [ ] on the LCD, then press [OK]. (MP180) • The language setting is installed. QT5-0542-V01 xxxxxxx © CANON INC. 2006 PRINTED IN VIETNAM To prepare your machine for use , see the reverse side for purchasing the Canon PIXMA MP180/MP160.
Easy Setup Instructions
Page 2
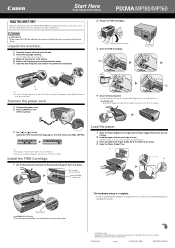
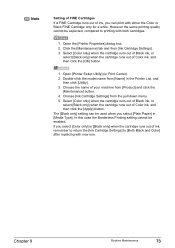
... USB cable is located inside the machine. (See "Install the FINE Cartridge." IMPORTANT If the following software programs are included on the Setup CD-ROM: On-screen Manual MP Drivers MP Navigator Easy-PhotoPrint ScanSoft OmniPage SE* ArcSoft PhotoStudio * This may not be available depending on...ensure product support. IMPORTANT • Close any open automatically, double-click the CD-ROM icon on the desktop. 3 Double-click [Setup] on the Setup CD-ROM, or click [Setup] on the item. IMPORTANT • Do not connect the USB cable until Step 4, "Connect the USB cable." • Before...
... USB cable is located inside the machine. (See "Install the FINE Cartridge." IMPORTANT If the following software programs are included on the Setup CD-ROM: On-screen Manual MP Drivers MP Navigator Easy-PhotoPrint ScanSoft OmniPage SE* ArcSoft PhotoStudio * This may not be available depending on...ensure product support. IMPORTANT • Close any open automatically, double-click the CD-ROM icon on the desktop. 3 Double-click [Setup] on the Setup CD-ROM, or click [Setup] on the item. IMPORTANT • Do not connect the USB cable until Step 4, "Connect the USB cable." • Before...

User's Guide
Page 2
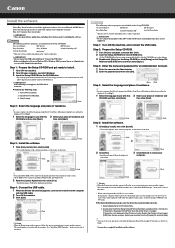
... "where to buy" instructions are subject to three full years of the product): Setup CD-ROM number (located on the front of service and support coverage at www.canonesp.com. www.canonesp.com Canon CarePAK Extended Service Plan is our helpful tech support web site. For more information ...TDD) support is available at www.canontechsupport.com. *Support program specifics are found here. 2.Email Tech Support - CarePAK must be purchased during your Canon service and support, call (1-800-385-2155), or visit our Web site at a very attractive price. Serial Number (located on the inside of ...
... "where to buy" instructions are subject to three full years of the product): Setup CD-ROM number (located on the front of service and support coverage at www.canonesp.com. www.canonesp.com Canon CarePAK Extended Service Plan is our helpful tech support web site. For more information ...TDD) support is available at www.canontechsupport.com. *Support program specifics are found here. 2.Email Tech Support - CarePAK must be purchased during your Canon service and support, call (1-800-385-2155), or visit our Web site at a very attractive price. Serial Number (located on the inside of ...
User's Guide
Page 54
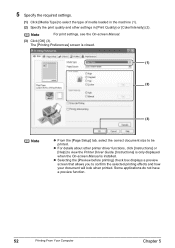
..., click [Instructions] or [Help] to view the Printer Driver Guide. [Instructions] is only displayed when the On-screen Manual is closed. (1) (2) (3) Note z From the [Page Setup] tab, select the correct document size to confirm the selected printing effects and how your document will look when printed. z Selecting the [Preview before printing...
..., click [Instructions] or [Help] to view the Printer Driver Guide. [Instructions] is only displayed when the On-screen Manual is closed. (1) (2) (3) Note z From the [Page Setup] tab, select the correct document size to confirm the selected printing effects and how your document will look when printed. z Selecting the [Preview before printing...

User's Guide
Page 56
... that your machine is selected in the Auto Sheet Feeder. (See page 23) 3 Create a document or open a file to print. 4 Select [Paper Size]. (1) Select [Page Setup] from [Paper Size] (2). (4) Click [OK] (3). (1) (2) (3) 54 Printing From Your Computer Chapter 5 For details, refer to turn ON the machine. (See page 14) 2 Load the paper...
... that your machine is selected in the Auto Sheet Feeder. (See page 23) 3 Create a document or open a file to print. 4 Select [Paper Size]. (1) Select [Page Setup] from [Paper Size] (2). (4) Click [OK] (3). (1) (2) (3) 54 Printing From Your Computer Chapter 5 For details, refer to turn ON the machine. (See page 14) 2 Load the paper...

User's Guide
Page 58
... the name of the print job. 6 Print the document. (1) Click [Print]. z Double-clicking the name of your machine in the [Printer List] of the [Printer Setup Utility] (When using Mac OS X v.10.3.x or Mac OS X v.10.2.8, click [Stop Printing]). 56 Printing From Your Computer Chapter 5 To stop a job in progress, select...
... the name of the print job. 6 Print the document. (1) Click [Print]. z Double-clicking the name of your machine in the [Printer List] of the [Printer Setup Utility] (When using Mac OS X v.10.3.x or Mac OS X v.10.2.8, click [Stop Printing]). 56 Printing From Your Computer Chapter 5 To stop a job in progress, select...

User's Guide
Page 63
...Device Settings To change the paper size or paper type, operate the device to select the PictBridge print setup mode and confirm or change the settings. Following icon will display on MP180 in the "Default setting" (selections based on the model or brand of the device. The settings ... Digital Camera 61 A PictBridge-compliant device. * This mark indicates that the product is correctly connected. z Page size z Media type z Layout z Image optimize (MP180) You can specify these settings on the LCD display of the device. When the connection between the device and machine has been established...
...Device Settings To change the paper size or paper type, operate the device to select the PictBridge print setup mode and confirm or change the settings. Following icon will display on MP180 in the "Default setting" (selections based on the model or brand of the device. The settings ... Digital Camera 61 A PictBridge-compliant device. * This mark indicates that the product is correctly connected. z Page size z Media type z Layout z Image optimize (MP180) You can specify these settings on the LCD display of the device. When the connection between the device and machine has been established...

User's Guide
Page 67
... „ IMAGE ENHANCEMENT Selects whether to optimize photos or not: SKIP/SET (VIVID/POP/REMOVE NOISE/FACE BRIGHT) (See page 48) OTHERS „ DATE/TIME SETUP Selects the shooting date format to be printed on photos: YYYY/MM/DD, MM/DD/YYYY, DD/ MM/YYYY „ READ-ONLY MODE Selects whether... for LCD messages: ENGLISH/FRENCH/SPANISH/PORTUGUESE/ GERMAN/ITALIAN/DUTCH/RUSSIAN/DANISH/NORWEGIAN/FINNISH/SWEDISH/ HUNGARIAN/CZECH/SLOVENE/POLISH/JAPANESE Chapter 8 Changing The Machine Settings (MP180) 65
... „ IMAGE ENHANCEMENT Selects whether to optimize photos or not: SKIP/SET (VIVID/POP/REMOVE NOISE/FACE BRIGHT) (See page 48) OTHERS „ DATE/TIME SETUP Selects the shooting date format to be printed on photos: YYYY/MM/DD, MM/DD/YYYY, DD/ MM/YYYY „ READ-ONLY MODE Selects whether... for LCD messages: ENGLISH/FRENCH/SPANISH/PORTUGUESE/ GERMAN/ITALIAN/DUTCH/RUSSIAN/DANISH/NORWEGIAN/FINNISH/SWEDISH/ HUNGARIAN/CZECH/SLOVENE/POLISH/JAPANESE Chapter 8 Changing The Machine Settings (MP180) 65
User's Guide
Page 75
... menu. 5. If you select [Color only] or [Black only] when the cartridge runs out of Color ink, and then click the [OK] button. 1. Open [Printer Setup Utility] (or Print Center). 2. Select [Color only] when the cartridge runs out of Black ink, or select [Black only] when the cartridge runs out of...
... menu. 5. If you select [Color only] or [Black only] when the cartridge runs out of Color ink, and then click the [OK] button. 1. Open [Printer Setup Utility] (or Print Center). 2. Select [Color only] when the cartridge runs out of Black ink, or select [Black only] when the cartridge runs out of...
User's Guide
Page 92
... may become extremely hot. Click [Display Print Queue]. 4. The print job is closed. The print job is insufficient. Use Canon IJ Status Monitor in Windows or [Printer Setup Utility] (or [Print Center]) in the [Printer] menu. When using Mac OS X v.10.2.8, double-click the Print Center...Size] in the [Printer List]. 4. Delete an undesired print job, if there is any other applications currently running. Double-click the [Printer Setup Utility] icon. Interrupt printing when appropriate, turn OFF the machine, and wait at least 15 minutes. If you are printing a document with ...
... may become extremely hot. Click [Display Print Queue]. 4. The print job is closed. The print job is insufficient. Use Canon IJ Status Monitor in Windows or [Printer Setup Utility] (or [Print Center]) in the [Printer] menu. When using Mac OS X v.10.2.8, double-click the Print Center...Size] in the [Printer List]. 4. Delete an undesired print job, if there is any other applications currently running. Double-click the [Printer Setup Utility] icon. Interrupt printing when appropriate, turn OFF the machine, and wait at least 15 minutes. If you are printing a document with ...
User's Guide
Page 93
... on page 15. Check the size of the Document Cover. The quality (image quality) displayed Set the image quality suitable for the document. (MP180) See "Adjusting Image Quality" on Image quality may need to be face down . should be copied face down . document from the digital camera,... or the your computer. On the [Page Setup] tab, click [Print Options]. 3. Chapter 10 Troubleshooting 91 Note When Reduce spool data size is loaded correctly on the disk by deleting available ...
... on page 15. Check the size of the Document Cover. The quality (image quality) displayed Set the image quality suitable for the document. (MP180) See "Adjusting Image Quality" on Image quality may need to be face down . should be copied face down . document from the digital camera,... or the your computer. On the [Page Setup] tab, click [Print Options]. 3. Chapter 10 Troubleshooting 91 Note When Reduce spool data size is loaded correctly on the disk by deleting available ...
User's Guide
Page 100
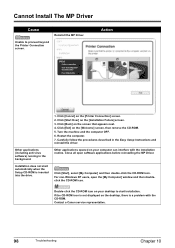
...screen, then remove the CD-ROM. 5. Restart the computer. 7. Action Other applications (including anti-virus software) running in the Easy Setup Instructions and reinstall the driver. Carefully follow the procedures described in the background. Click [Exit] on the screen that appears next. ...Connection] screen. 2. Double-click the CD-ROM icon on your desktop to proceed beyond the Printer Connection screen. Contact a Canon service representative. 98 Troubleshooting Chapter 10 Turn the machine and the computer OFF. 6. Other applications opened on your computer can ...
...screen, then remove the CD-ROM. 5. Restart the computer. 7. Action Other applications (including anti-virus software) running in the Easy Setup Instructions and reinstall the driver. Carefully follow the procedures described in the background. Click [Exit] on the screen that appears next. ...Connection] screen. 2. Double-click the CD-ROM icon on your desktop to proceed beyond the Printer Connection screen. Contact a Canon service representative. 98 Troubleshooting Chapter 10 Turn the machine and the computer OFF. 6. Other applications opened on your computer can ...

User's Guide
Page 101
...Speed cable. Obtain the latest version of the USB 2.0 Hi-Speed driver and install it on your Computer. Cause You have a defective Setup CD-ROM, please consult your sales or service representative. Action If your machine for proper MP Driver installation. Chapter 10 Troubleshooting 99 Action ...If you insert the CD-ROM. Follow the Easy Setup Instructions packaged with USB 2.0, the machine will operate at a lower speed provided under USB 1.1. If the MP Driver was forced to ...
...Speed cable. Obtain the latest version of the USB 2.0 Hi-Speed driver and install it on your Computer. Cause You have a defective Setup CD-ROM, please consult your sales or service representative. Action If your machine for proper MP Driver installation. Chapter 10 Troubleshooting 99 Action ...If you insert the CD-ROM. Follow the Easy Setup Instructions packaged with USB 2.0, the machine will operate at a lower speed provided under USB 1.1. If the MP Driver was forced to ...
User's Guide
Page 102
.... Action Restart the computer. It may not be selected. Then confirm that does not support USB 2.0 Hi-Speed. z Reattaching the USB cable. Action Set the "Setup CD-ROM" in Scanning with USB 2.0. The Feature of the application program does not support calling up ScanGear. Attach the cable to start ScanGear from...
.... Action Restart the computer. It may not be selected. Then confirm that does not support USB 2.0 Hi-Speed. z Reattaching the USB cable. Action Set the "Setup CD-ROM" in Scanning with USB 2.0. The Feature of the application program does not support calling up ScanGear. Attach the cable to start ScanGear from...
User's Guide
Page 106
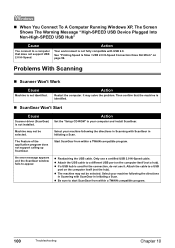
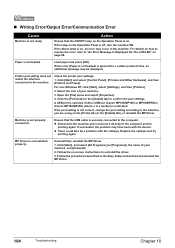
...Windows XP, click [Start], select [Settings], and then [Printers]. 2. If the lamp on , an error may occur in the Easy Setup Instructions and reinstall the MP Driver. 104 Troubleshooting Chapter 10 Open the [File] menu and select [Properties]. 4. If successful, the problem may... be a problem with the device. A USB port is selected if either USBnnn (Canon MP180/MP160) or MPUSBPRNnn (Canon MP180/MP160) (where n is a number) is not installed properly. Load paper and press [OK]. „ Writing Error/Output Error/...
...Windows XP, click [Start], select [Settings], and then [Printers]. 2. If the lamp on , an error may occur in the Easy Setup Instructions and reinstall the MP Driver. 104 Troubleshooting Chapter 10 Open the [File] menu and select [Properties]. 4. If successful, the problem may... be a problem with the device. A USB port is selected if either USBnnn (Canon MP180/MP160) or MPUSBPRNnn (Canon MP180/MP160) (where n is a number) is not installed properly. Load paper and press [OK]. „ Writing Error/Output Error/...
User's Guide
Page 107
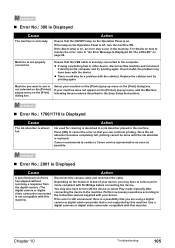
... supported by this machine. z There could also be done until the ink absorber is on the [Printer] pop-up menu on . Canon recommends to contact a Canon service representative as soon as possible. „ Error No.: 2001 Is Displayed Cause Action A specified period of your device. Perform necessary...your machine on the [Printer] pop-up menu, add the Machine following the procedures described in the machine. You may occur in the Easy Setup Instructions. „ Error No.: 1700/1710 Is Displayed Cause The ink absorber is on the [Print] dialog box. Use a digital cameras ...
... supported by this machine. z There could also be done until the ink absorber is on the [Printer] pop-up menu on . Canon recommends to contact a Canon service representative as soon as possible. „ Error No.: 2001 Is Displayed Cause Action A specified period of your device. Perform necessary...your machine on the [Printer] pop-up menu, add the Machine following the procedures described in the machine. You may occur in the Easy Setup Instructions. „ Error No.: 1700/1710 Is Displayed Cause The ink absorber is on the [Print] dialog box. Use a digital cameras ...

User's Guide
Page 108
...Scanning Guide cannot The [?] button for displaying the scanner driver operating instruction is displayed only on [Main] and [Maintenance] tabs. Set the Setup CD-ROM in your computer and install the On-screen Manual. 106 Troubleshooting Chapter 10 Action The [Instructions] button on the printer driver screen... is not displayed if the Onscreen Manual is not displayed on -screen manuals (instruction manuals) are not installed. Set the Setup CD-ROM in your computer and install the On-screen Manual. when the on the printer driver screen. For Windows Users Cause The ...
...Scanning Guide cannot The [?] button for displaying the scanner driver operating instruction is displayed only on [Main] and [Maintenance] tabs. Set the Setup CD-ROM in your computer and install the On-screen Manual. 106 Troubleshooting Chapter 10 Action The [Instructions] button on the printer driver screen... is not displayed if the Onscreen Manual is not displayed on -screen manuals (instruction manuals) are not installed. Set the Setup CD-ROM in your computer and install the On-screen Manual. when the on the printer driver screen. For Windows Users Cause The ...


