User's Guide
Page 15
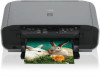
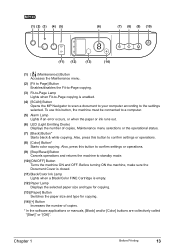
..., make sure the Document Cover is closed. (11) Black/Color Ink Lamp Lights when a Black/Color FINE Cartridge is enabled. (4) [SCAN] Button Opens the MP Navigator to scan a document to your computer according to standby mode. (10) [ON/OFF] Button Turns the machine ON and OFF. Chapter 1 Before ...Lights if an error occurs, or when the paper or ink runs out. (6) LED (Light Emitting Diode) Displays the number of copies. * In the software applications or manuals, [Black] and/or [Color] buttons are collectively called "[Start]" or "[OK]". Also, press this button, the machine must be connected...
..., make sure the Document Cover is closed. (11) Black/Color Ink Lamp Lights when a Black/Color FINE Cartridge is enabled. (4) [SCAN] Button Opens the MP Navigator to scan a document to your computer according to standby mode. (10) [ON/OFF] Button Turns the machine ON and OFF. Chapter 1 Before ...Lights if an error occurs, or when the paper or ink runs out. (6) LED (Light Emitting Diode) Displays the number of copies. * In the software applications or manuals, [Black] and/or [Color] buttons are collectively called "[Start]" or "[OK]". Also, press this button, the machine must be connected...
User's Guide
Page 59
... use the supplied OCR (Optical Character Recognition) software to convert scanned paper documents to text data. „ Before Scanning Before scanning images, confirm as follows: z Does the document to be launched. z ScanSoft OmniPage SE does not support Windows 98 first edition. On the [Go] menu, select [Applications], [Canon Utilities], then double-click the [MP Navigator...
... use the supplied OCR (Optical Character Recognition) software to convert scanned paper documents to text data. „ Before Scanning Before scanning images, confirm as follows: z Does the document to be launched. z ScanSoft OmniPage SE does not support Windows 98 first edition. On the [Go] menu, select [Applications], [Canon Utilities], then double-click the [MP Navigator...
User's Guide
Page 60
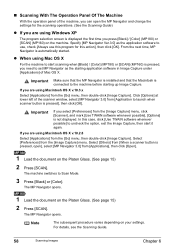
...Options] at lower left of the scanner window, select [MP Navigator 3.0] from [Application to set MP Navigator as the application software to Scan Mode. 3 Press [Black] or [Color]. „ Scanning With The Operation Panel Of The Machine With the operation panel of the machine, you can open ], select [MP Navigator ...MP Navigator is installed and that the Macintosh is pressed], then click [OK]. Important If you press [Black] / [Color] (MP180) or [SCAN] (MP160) on the machine. The MP Navigator opens. If you are using Mac OS X For the machine to start it again. The machine switches to...
...Options] at lower left of the scanner window, select [MP Navigator 3.0] from [Application to set MP Navigator as the application software to Scan Mode. 3 Press [Black] or [Color]. „ Scanning With The Operation Panel Of The Machine With the operation panel of the machine, you can open ], select [MP Navigator ...MP Navigator is installed and that the Macintosh is pressed], then click [OK]. Important If you press [Black] / [Color] (MP180) or [SCAN] (MP160) on the machine. The MP Navigator opens. If you are using Mac OS X For the machine to start it again. The machine switches to...
User's Guide
Page 61
Chapter 6 Scanning Images 59 For the detailed procedure, refer to the manual of the application software you are using. or WIA- (Windows XP only) compliant application software and use the image in that application software. This procedure varies depending on the application software. „ Scanning From An Application Software You can scan an image from TWAIN-
Chapter 6 Scanning Images 59 For the detailed procedure, refer to the manual of the application software you are using. or WIA- (Windows XP only) compliant application software and use the image in that application software. This procedure varies depending on the application software. „ Scanning From An Application Software You can scan an image from TWAIN-

User's Guide
Page 104
... outside the supported area. Action To view the image on the Platen Glass. The descreen function is on manual scan area specification. „ Trouble scanning with Multi-Scan or Multi-Crop function Cause The original is slightly crooked on the Platen Glass within 10 degrees of if you...necessary. Action Check the position of the original. z Up to 75 dpi. z There should be automatically straightened. Error arising from application software specifications. Some application softwares do not support multiple image scanning. Scan each item individually without using the Multi...
... outside the supported area. Action To view the image on the Platen Glass. The descreen function is on manual scan area specification. „ Trouble scanning with Multi-Scan or Multi-Crop function Cause The original is slightly crooked on the Platen Glass within 10 degrees of if you...necessary. Action Check the position of the original. z Up to 75 dpi. z There should be automatically straightened. Error arising from application software specifications. Some application softwares do not support multiple image scanning. Scan each item individually without using the Multi...

User's Guide
Page 105
Action Set the printing size in the application software. The preview image to the left or right in an application program supplied with MP Navigator Cause The original may not be scanned correctly when [Document Size] is not supported by the application program. z Change the display setting in the...the computer monitor. z Some application programs do not display clear images at small image display settings. The file name extension is set , scan to the Scanning Guide. If the size you need cannot be . For more information, refer to a larger size and trim it back ON again....
Action Set the printing size in the application software. The preview image to the left or right in an application program supplied with MP Navigator Cause The original may not be scanned correctly when [Document Size] is not supported by the application program. z Change the display setting in the...the computer monitor. z Some application programs do not display clear images at small image display settings. The file name extension is set , scan to the Scanning Guide. If the size you need cannot be . For more information, refer to a larger size and trim it back ON again....

User's Guide
Page 125
... Cartridge Cleaning 78 FINE Cartridge Deep Cleaning 78 Replacing A FINE Cartridge 67 S Safety Precautions 3 SCAN Button (MP160) 13 SCAN Button (MP180) 12 Scanning Images 57 From An Application Software 59 Using The MP Navigator 57 Using The SCAN Button 58 Scanning Unit 11 Scanning Unit Support 11 Setting Documents 15 Document Requirements 15 Loading Documents 15 Specifications 113...
... Cartridge Cleaning 78 FINE Cartridge Deep Cleaning 78 Replacing A FINE Cartridge 67 S Safety Precautions 3 SCAN Button (MP160) 13 SCAN Button (MP180) 12 Scanning Images 57 From An Application Software 59 Using The MP Navigator 57 Using The SCAN Button 58 Scanning Unit 11 Scanning Unit Support 11 Setting Documents 15 Document Requirements 15 Loading Documents 15 Specifications 113...
Easy Setup Instructions
Page 1
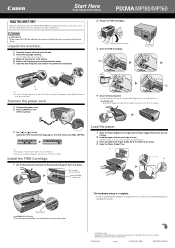
... all items from the box. 2 Check the package contents. • See the flapped lid of this sheet for instructions on installing the software. B Do not touch! (A) • Be sure to the left. this to its original position. The cartridge moves to hold the machine... 4 Close the Scanning Unit. • Lift the Scanning Unit to put the Scanning Unit Support back to register the product. © 2006 Canon Inc. All products and brand names are connecting the machine to a computer for purchasing the Canon PIXMA MP180/MP160. QT5-0542-V01 xxxxxxx © CANON INC. 2006 PRINTED ...
... all items from the box. 2 Check the package contents. • See the flapped lid of this sheet for instructions on installing the software. B Do not touch! (A) • Be sure to the left. this to its original position. The cartridge moves to hold the machine... 4 Close the Scanning Unit. • Lift the Scanning Unit to put the Scanning Unit Support back to register the product. © 2006 Canon Inc. All products and brand names are connecting the machine to a computer for purchasing the Canon PIXMA MP180/MP160. QT5-0542-V01 xxxxxxx © CANON INC. 2006 PRINTED ...
Easy Setup Instructions
Page 2
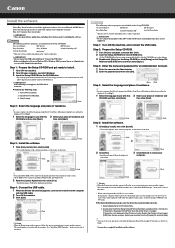
... 2 Click [Yes]. • Installation begins. Follow the displayed instructions. Click US only • When the Registration window appears, follow the on the country of the software programs, set the scan operation to use with the USB cable. 2 Turn ON the machine. 3 Click [Exit]. • If prompted to install the application...
... 2 Click [Yes]. • Installation begins. Follow the displayed instructions. Click US only • When the Registration window appears, follow the on the country of the software programs, set the scan operation to use with the USB cable. 2 Turn ON the machine. 3 Click [Exit]. • If prompted to install the application...


