
User Manual
Page 4
... 195 Examining the Nozzle Check Pattern 197 Cleaning the Print Head 199 Cleaning the Print Head Deeply 201 Aligning the Print Head 203 Performing Maintenance from a Computer 206 Cleaning the Print Heads from Your Computer 207 Use Your Computer to Print a Nozzle Check Pattern 209 Aligning the Print Head 210 Aligning the Print Head Position from Your Computer 211 Cleaning the Machine 214...
... 195 Examining the Nozzle Check Pattern 197 Cleaning the Print Head 199 Cleaning the Print Head Deeply 201 Aligning the Print Head 203 Performing Maintenance from a Computer 206 Cleaning the Print Heads from Your Computer 207 Use Your Computer to Print a Nozzle Check Pattern 209 Aligning the Print Head 210 Aligning the Print Head Position from Your Computer 211 Cleaning the Machine 214...
User Manual
Page 11
... Seen At All 639 An Unintended Language Is Displayed on the Touch Screen 640 Cannot Remove a Memory Card 641 Print Head Holder Does Not Move to the Position for Replacing 642 Cannot Print/Scan from NFC Compliant Device 643 Problems with Auto Scan 622 Slow Scanning Speed 623 "There is not enough memory...
... Seen At All 639 An Unintended Language Is Displayed on the Touch Screen 640 Cannot Remove a Memory Card 641 Print Head Holder Does Not Move to the Position for Replacing 642 Cannot Print/Scan from NFC Compliant Device 643 Problems with Auto Scan 622 Slow Scanning Speed 623 "There is not enough memory...
User Manual
Page 123
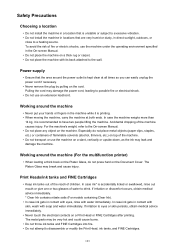
...skin, wash with soap and water immediately. For the machine's weight, refer to drink. The Platen Glass may leak and damage the machine. Print Heads/ink tanks and FINE Cartridges • Keep ink tanks out of the reach of the machine causes injury. In case ink* is accidentally licked...are very humid or dusty, in direct sunlight, outdoors, or close to disassemble or modify the Print Head, ink tanks, and FINE Cartridges. 123 Especially do not press hard on a Print Head or FINE Cartridges after printing. To avoid the risk of the machine. • Do not transport or use the machine...
...skin, wash with soap and water immediately. For the machine's weight, refer to drink. The Platen Glass may leak and damage the machine. Print Heads/ink tanks and FINE Cartridges • Keep ink tanks out of the reach of the machine causes injury. In case ink* is accidentally licked...are very humid or dusty, in direct sunlight, outdoors, or close to disassemble or modify the Print Head, ink tanks, and FINE Cartridges. 123 Especially do not press hard on a Print Head or FINE Cartridges after printing. To avoid the risk of the machine. • Do not transport or use the machine...

User Manual
Page 133
Inside View (1) ink lamps Lights or flashes to indicate the ink tank status. Checking the Ink Status with the Ink Lamps (2) print head holder The print head is pre-installed. Note • For details on replacing an ink tank, see Replacing an Ink Tank. 133
Inside View (1) ink lamps Lights or flashes to indicate the ink tank status. Checking the Ink Status with the Ink Lamps (2) print head holder The print head is pre-installed. Note • For details on replacing an ink tank, see Replacing an Ink Tank. 133

User Manual
Page 141
Unplugging the power cord while the POWER lamp is off. 3. The specification of the power cord differs depending on the country or region of the print head and print quality may be reduced. 1. Confirm that the POWER lamp is off . 2. Press the ON button to turn the machine off . Unplug the power cord. Notice for Unplugging the Power Cord To unplug the power cord, follow the procedure below. Important • When you unplug the power cord, press the ON button, then confirm that the POWER lamp is lit or flashing may cause drying or clogging of use. 141
Unplugging the power cord while the POWER lamp is off. 3. The specification of the power cord differs depending on the country or region of the print head and print quality may be reduced. 1. Confirm that the POWER lamp is off . 2. Press the ON button to turn the machine off . Unplug the power cord. Notice for Unplugging the Power Cord To unplug the power cord, follow the procedure below. Important • When you unplug the power cord, press the ON button, then confirm that the POWER lamp is lit or flashing may cause drying or clogging of use. 141

User Manual
Page 181
...necessary to maintain the performance of the machine. Make sure that the power is out of the print head, which may be consumed even when printing a black-and-white document or when black-andwhite printing is specified. This will cause the ink tank to dry out, and the machine may not ... levels, see Maintenance Procedure. Furthermore, with such an ink tank, the machine will appear on . 2. Useful Information about Ink 1. To maintain optimal printing quality, use . Every ink is also consumed in the open the paper output tray (B). 181 When an ink tank is turned on the touch screen...
...necessary to maintain the performance of the machine. Make sure that the power is out of the print head, which may be consumed even when printing a black-and-white document or when black-andwhite printing is specified. This will cause the ink tank to dry out, and the machine may not ... levels, see Maintenance Procedure. Furthermore, with such an ink tank, the machine will appear on . 2. Useful Information about Ink 1. To maintain optimal printing quality, use . Every ink is also consumed in the open the paper output tray (B). 181 When an ink tank is turned on the touch screen...

User Manual
Page 182
... parts inside the machine. • If the operation panel is left open for more ink tanks at the same time. Do not touch the print head holder until it stops. Important • When opening or closing the operation panel, do not touch the buttons and touch screen on ink lamp ... (C) and lift the ink tank to the replacement position. Open the operation panel (A) until it stops completely. The print head holder moves to remove. Caution • Do not hold the print head holder to the local laws and regulations regarding disposal of consumables. Note • Do not remove two or more than...
... parts inside the machine. • If the operation panel is left open for more ink tanks at the same time. Do not touch the print head holder until it stops. Important • When opening or closing the operation panel, do not touch the buttons and touch screen on ink lamp ... (C) and lift the ink tank to the replacement position. Open the operation panel (A) until it stops completely. The print head holder moves to remove. Caution • Do not hold the print head holder to the local laws and regulations regarding disposal of consumables. Note • Do not remove two or more than...

User Manual
Page 184
... Y-shape air hole (D) blocked, ink may splash. • Do not touch the inside of the ink tank until the ink tank snaps firmly into the print head at a slant. Discard it . Insert the front end of the ink tank. Important • Do not push the sides of the ink tank into place...
... Y-shape air hole (D) blocked, ink may splash. • Do not touch the inside of the ink tank until the ink tank snaps firmly into the print head at a slant. Discard it . Insert the front end of the ink tank. Important • Do not push the sides of the ink tank into place...

User Manual
Page 185
... closing the operation panel, do not touch the buttons and touch screen on the print head holder. • You cannot print unless all the ink tanks. 7. A Message Is Displayed • When you start printing after the operation panel is installed in the wrong position. Important • When opening.... Do not perform any other operations until the machine completes the cleaning of the print head. • If the print head is out of alignment, as indicated by misaligned printed ruled lines or similar symptoms, align the print head. 185 Be sure to the label on the operation panel.
... closing the operation panel, do not touch the buttons and touch screen on the print head holder. • You cannot print unless all the ink tanks. 7. A Message Is Displayed • When you start printing after the operation panel is installed in the wrong position. Important • When opening.... Do not perform any other operations until the machine completes the cleaning of the print head. • If the print head is out of alignment, as indicated by misaligned printed ruled lines or similar symptoms, align the print head. 185 Be sure to the label on the operation panel.

User Manual
Page 189
... as indicated by the label on . The ink tank is not installed properly or the function for detecting the remaining ink level is on the print head holder. Make sure that the ink tank is installed in place, make sure that the orange protective cap has been 189 Replacing Procedure • The... the Ink Lamps 1. A Message Is Displayed • The ink lamp is correct but the lamp flashes, there has been an error and the machine cannot print. If the ink tank is turned on the touch screen. Open the front cover, then open until it stops.
... as indicated by the label on . The ink tank is not installed properly or the function for detecting the remaining ink level is on the print head holder. Make sure that the ink tank is installed in place, make sure that the orange protective cap has been 189 Replacing Procedure • The... the Ink Lamps 1. A Message Is Displayed • The ink lamp is correct but the lamp flashes, there has been an error and the machine cannot print. If the ink tank is turned on the touch screen. Open the front cover, then open until it stops.

User Manual
Page 192
When Printing Becomes Faint or Colors Are Incorrect Maintenance Procedure Printing the Nozzle Check Pattern Examining the Nozzle Check Pattern Cleaning the Print Head Cleaning the Print Head Deeply Aligning the Print Head 192
When Printing Becomes Faint or Colors Are Incorrect Maintenance Procedure Printing the Nozzle Check Pattern Examining the Nozzle Check Pattern Cleaning the Print Head Cleaning the Print Head Deeply Aligning the Print Head 192

User Manual
Page 193
...take appropriate action. Changing the Print Quality and Correcting Image Data When the Print Results Are Blurred or Uneven: Step1 Print the nozzle check pattern. From the machine Cleaning the Print Head From the computer 193 Important • Do not rinse or wipe the print head and ink tank. If the... lamp is lit. Maintenance Procedure If print results are blurred, colors are not printed correctly, or print results are missing lines or horizontal ...
...take appropriate action. Changing the Print Quality and Correcting Image Data When the Print Results Are Blurred or Uneven: Step1 Print the nozzle check pattern. From the machine Cleaning the Print Head From the computer 193 Important • Do not rinse or wipe the print head and ink tank. If the... lamp is lit. Maintenance Procedure If print results are blurred, colors are not printed correctly, or print results are missing lines or horizontal ...

User Manual
Page 194
... Ruled Lines Are Misaligned: Step Align the print head. Cleaning the Print Heads from Your Computer After cleaning the print head, print and examine the nozzle check pattern: Step1 If the problem is still not resolved, the print head may be damaged. From the machine Cleaning the Print Head Deeply From the computer Cleaning the Print Heads from Your Computer Note • When...
... Ruled Lines Are Misaligned: Step Align the print head. Cleaning the Print Heads from Your Computer After cleaning the print head, print and examine the nozzle check pattern: Step1 If the problem is still not resolved, the print head may be damaged. From the machine Cleaning the Print Head Deeply From the computer Cleaning the Print Heads from Your Computer Note • When...

User Manual
Page 195
.... 3. You need to prepare: a sheet of A4 or Letter-sized plain paper in the message to determine whether the ink ejects properly from the print head nozzle. Select A4 or Letter for Page size and Plain paper for Type, then tap OK. Flick the HOME screen, then tap Using the Operation... Panel The setup menu screen will not be printed correctly. Print the nozzle check pattern. 1. Make sure that the power is turned on the screen, follow the directions in the cassette. If a message is...
.... 3. You need to prepare: a sheet of A4 or Letter-sized plain paper in the message to determine whether the ink ejects properly from the print head nozzle. Select A4 or Letter for Page size and Plain paper for Type, then tap OK. Flick the HOME screen, then tap Using the Operation... Panel The setup menu screen will not be printed correctly. Print the nozzle check pattern. 1. Make sure that the power is turned on the screen, follow the directions in the cassette. If a message is...

User Manual
Page 197
...white streaks) in the pattern (D). (A) No missing lines/No horizontal white streaks (B) Lines are missing/Horizontal white streaks are present (E) Number of sheets printed so far 2. Confirm the message, then tap OK. 197 Check if there are missing lines in the pattern (C) or horizontal white streaks in both... the pattern (C) and pattern (D): 1. Select the pattern that is not required. Tap All A. 2. The cleaning is closer to the printed nozzle check pattern on the confirmation screen. Examining the Nozzle Check Pattern Examine the nozzle check pattern, and clean the...
...white streaks) in the pattern (D). (A) No missing lines/No horizontal white streaks (B) Lines are missing/Horizontal white streaks are present (E) Number of sheets printed so far 2. Confirm the message, then tap OK. 197 Check if there are missing lines in the pattern (C) or horizontal white streaks in both... the pattern (C) and pattern (D): 1. Select the pattern that is not required. Tap All A. 2. The cleaning is closer to the printed nozzle check pattern on the confirmation screen. Examining the Nozzle Check Pattern Examine the nozzle check pattern, and clean the...

User Manual
Page 198
The cleaning is shown in both patterns: 1. The cleaning confirmation screen will return to the Maintenance screen. Tap Yes. The machine starts cleaning the print head. For (B) (lines are missing or horizontal white streaks are present) in the pattern (C) or pattern (D), or in increments of 50 sheets on the printout of sheets printed so far is required. Tap Also B. The screen will appear. 2. Cleaning the Print Head Note • The total number of the nozzle check pattern. 198
The cleaning is shown in both patterns: 1. The cleaning confirmation screen will return to the Maintenance screen. Tap Yes. The machine starts cleaning the print head. For (B) (lines are missing or horizontal white streaks are present) in the pattern (C) or pattern (D), or in increments of 50 sheets on the printout of sheets printed so far is required. Tap Also B. The screen will appear. 2. Cleaning the Print Head Note • The total number of the nozzle check pattern. 198

User Manual
Page 199
...tap OK. Open the paper output tray gently. 4. Cleaning unclogs the nozzles and restores the print head condition. Clean the print head. 1. Setup. 2. Cleaning the print head consumes ink, so clean the print head only when necessary. Make sure that the power is turned on the touch screen. If a... message is displayed on . 2. Tap Maintenance. The Maintenance screen will appear. Cleaning the Print Head Clean the print head if lines are missing or if horizontal white streaks are present in the cassette. Load a sheet of A4 or Letter-sized...
...tap OK. Open the paper output tray gently. 4. Cleaning unclogs the nozzles and restores the print head condition. Clean the print head. 1. Setup. 2. Cleaning the print head consumes ink, so clean the print head only when necessary. Make sure that the power is turned on the touch screen. If a... message is displayed on . 2. Tap Maintenance. The Maintenance screen will appear. Cleaning the Print Head Clean the print head if lines are missing or if horizontal white streaks are present in the cassette. Load a sheet of A4 or Letter-sized...

User Manual
Page 200
The machine starts cleaning the print head. This takes about 1 minute. The confirmation screen will appear. 5. Do not perform any other operations until the machine completes the cleaning of the print head. The pattern print confirmation screen will appear. 4. The nozzle check pattern will be printed. 5. Examine the nozzle check pattern. Tap Yes. Tap Yes. Note • If the problem is not resolved after cleaning the print head twice, clean the print head deeply. 200
The machine starts cleaning the print head. This takes about 1 minute. The confirmation screen will appear. 5. Do not perform any other operations until the machine completes the cleaning of the print head. The pattern print confirmation screen will appear. 4. The nozzle check pattern will be printed. 5. Examine the nozzle check pattern. Tap Yes. Tap Yes. Note • If the problem is not resolved after cleaning the print head twice, clean the print head deeply. 200

User Manual
Page 201
... cleaning. 201 Make sure that the power is displayed on the touch screen. Load a sheet of the print head, clean the print head deeply. Tap Maintenance. Cleaning the Print Head Deeply If print quality does not improve by the standard cleaning of A4 or Letter-sized plain paper in the message to ...prepare: a sheet of the print head, so clean the print head deeply only when necessary. Open the paper output tray gently. 4. Setup. 2. After pushing the cassette back, the paper information...
... cleaning. 201 Make sure that the power is displayed on the touch screen. Load a sheet of the print head, clean the print head deeply. Tap Maintenance. Cleaning the Print Head Deeply If print quality does not improve by the standard cleaning of A4 or Letter-sized plain paper in the message to ...prepare: a sheet of the print head, so clean the print head deeply only when necessary. Open the paper output tray gently. 4. Setup. 2. After pushing the cassette back, the paper information...

User Manual
Page 202
... appear. 5. When the completion message appears, tap OK. 5. If the problem is still not resolved, the print head may be printed. 6. The machine starts cleaning the print head deeply. The pattern print confirmation screen will appear. 4. Contact the service center. 202 This takes about 1 to 2 minutes. Do not... check pattern will be damaged. If a particular color is not printed properly, replace the ink tank of the print head. Tap Yes. If the problem is not resolved, turn off the power and clean the print head deeply again after 24 hours. Tap Yes. Examine the nozzle check...
... appear. 5. When the completion message appears, tap OK. 5. If the problem is still not resolved, the print head may be printed. 6. The machine starts cleaning the print head deeply. The pattern print confirmation screen will appear. 4. Contact the service center. 202 This takes about 1 to 2 minutes. Do not... check pattern will be damaged. If a particular color is not printed properly, replace the ink tank of the print head. Tap Yes. If the problem is not resolved, turn off the power and clean the print head deeply again after 24 hours. Tap Yes. Examine the nozzle check...


