CanoScan N670U/N676U/N1240U Toolbox3.0 for Win/Mac Guide
Page 3
... 2 Contents 3 Chapter 1 Toolbox Basics What is the Toolbox 5 Installing the Toolbox 6 System Requirements 6 Installing the Toolbox 6 Starting/Closing the Toolbox 7 Starting the Toolbox 7 Closing the Toolbox 8 Toolbox Buttons 9 Windows and Macintosh 11 Chapter 2 Using the Toolbox Copying (Printing 12 Copy Settings 13 Scanner Settings - Brightness 15 Scanner Settings - File name 23 Saving Scanned Images - Folder...
... 2 Contents 3 Chapter 1 Toolbox Basics What is the Toolbox 5 Installing the Toolbox 6 System Requirements 6 Installing the Toolbox 6 Starting/Closing the Toolbox 7 Starting the Toolbox 7 Closing the Toolbox 8 Toolbox Buttons 9 Windows and Macintosh 11 Chapter 2 Using the Toolbox Copying (Printing 12 Copy Settings 13 Scanner Settings - Brightness 15 Scanner Settings - File name 23 Saving Scanned Images - Folder...
CanoScan N670U/N676U/N1240U Toolbox3.0 for Win/Mac Guide
Page 6
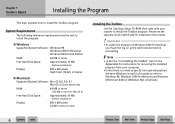
... MB or more Installing the Toolbox Use the CanoScan Setup CD-ROM that came with your computer. • Unless there is a need to specify one operating system, the term Windows is used in the Appendices for instructions for removing the installed program from your scanner to Windows 98, Windows 2000 Professional and Windows Millennium Edition (Windows Me) collectively. Please...
... MB or more Installing the Toolbox Use the CanoScan Setup CD-ROM that came with your computer. • Unless there is a need to specify one operating system, the term Windows is used in the Appendices for instructions for removing the installed program from your scanner to Windows 98, Windows 2000 Professional and Windows Millennium Edition (Windows Me) collectively. Please...
CanoScan N670U/N676U/N1240U Toolbox3.0 for Win/Mac Guide
Page 7
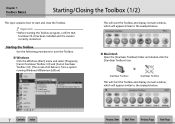
... Page Next Page s Windows Click the Windows [Start] menu and select [Programs], [Canon ScanGear Toolbox 3.0] and [Canon ScanGear Toolbox 3.0]. (The screen shot below is from a system running Windows Millennium Edition) This will start the Toolbox and display its main window, which will appear similar... to the example below . Chapter 1 Toolbox Basics Starting/Closing the Toolbox (1/2) This topic explains how to start the Toolbox. e Important • Before starting the Toolbox program, confirm that ScanGear CS-U has been installed and the scanner...
... Page Next Page s Windows Click the Windows [Start] menu and select [Programs], [Canon ScanGear Toolbox 3.0] and [Canon ScanGear Toolbox 3.0]. (The screen shot below is from a system running Windows Millennium Edition) This will start the Toolbox and display its main window, which will appear similar... to the example below . Chapter 1 Toolbox Basics Starting/Closing the Toolbox (1/2) This topic explains how to start the Toolbox. e Important • Before starting the Toolbox program, confirm that ScanGear CS-U has been installed and the scanner...

CanoScan N670U/N676U/N1240U Toolbox3.0 for Win/Mac Guide
Page 28
Select your OCR program from the CanoScan Setup CD-ROM, its name will begin to text. w w 28 Contents Index Scan Button When you click the [Scan] button on the OCR dialog, the scanner will appear here. When the scan is ...complete, the OCR program will appear in the box. Chapter 2 Using the Toolbox OCR Settings (3/3) Link Scanned Images To This setting allows you to select the OCR program used to convert the images to scan. If you installed...View Next View Previous Page Next Page If you wish to the Toolbox's main window.
Select your OCR program from the CanoScan Setup CD-ROM, its name will begin to text. w w 28 Contents Index Scan Button When you click the [Scan] button on the OCR dialog, the scanner will appear here. When the scan is ...complete, the OCR program will appear in the box. Chapter 2 Using the Toolbox OCR Settings (3/3) Link Scanned Images To This setting allows you to select the OCR program used to convert the images to scan. If you installed...View Next View Previous Page Next Page If you wish to the Toolbox's main window.
CanoScan N670U/N676U/N1240U Toolbox3.0 for Win/Mac Guide
Page 40
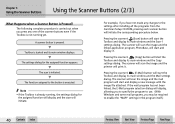
...attached. Chapter 3 Using the Scanner Buttons Using the Scanner Buttons (2/3) What Happens when a Scanner Button is pressed. A scanner button is Pressed? The scan is started and its main window and the Scan-1 settings dialog. The scanner will scan the image and...scanner will scan the image and the mail program will start and display it . The function assigned to the button is carried out when you may be required to the settings after installing all the programs from the CanoScan Setup CD-ROM, pressing each scanner button will start the Toolbox and display its main window...
...attached. Chapter 3 Using the Scanner Buttons Using the Scanner Buttons (2/3) What Happens when a Scanner Button is pressed. A scanner button is Pressed? The scan is started and its main window and the Scan-1 settings dialog. The scanner will scan the image and...scanner will scan the image and the mail program will start and display it . The function assigned to the button is carried out when you may be required to the settings after installing all the programs from the CanoScan Setup CD-ROM, pressing each scanner button will start the Toolbox and display its main window...
CanoScan N670U/N676U/N1240U ScanGear CS-U 6.2 for Win/Mac Guide
Page 9
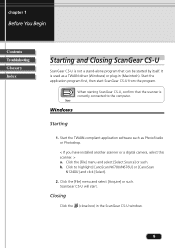
...Note Windows Starting 1. b. chapter 1 Before You Begin Contents Troubleshooting Glossary Index Starting and Closing ScanGear CS-U ScanGear CS-U is not a stand-alone program that the scanner is used as PhotoStudio or Photoshop. < If you have installed another scanner or a digital camera, select this scanner....or such. It is correctly connected to highlight [CanoScan N670U/N676U] or [CanoScan N1240U] and click [Select]. 2. Start the TWAIN-compliant application software such as a TWAIN driver (Windows) or plug-in the ScanGear CS-U window. 9 ScanGear CS-U will start ScanGear CS-U from...
...Note Windows Starting 1. b. chapter 1 Before You Begin Contents Troubleshooting Glossary Index Starting and Closing ScanGear CS-U ScanGear CS-U is not a stand-alone program that the scanner is used as PhotoStudio or Photoshop. < If you have installed another scanner or a digital camera, select this scanner....or such. It is correctly connected to highlight [CanoScan N670U/N676U] or [CanoScan N1240U] and click [Select]. 2. Start the TWAIN-compliant application software such as a TWAIN driver (Windows) or plug-in the ScanGear CS-U window. 9 ScanGear CS-U will start ScanGear CS-U from...
CanoScan N670U/N676U/N1240U ScanGear CS-U 6.2 for Win/Mac Guide
Page 56
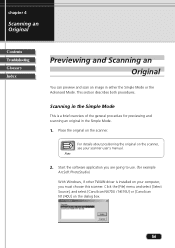
.... 1. Click the [File] menu and select [Select Source], and select [CanoScan N670U / N676U] or [CanoScan N1240U] on the scanner. Scanning in the Simple Mode This is a brief overview of the general procedure for example ArcSoft PhotoStudio) With Windows, if other TWAIN driver is installed on the scanner, see your computer, you are going to use. (for previewing...
.... 1. Click the [File] menu and select [Select Source], and select [CanoScan N670U / N676U] or [CanoScan N1240U] on the scanner. Scanning in the Simple Mode This is a brief overview of the general procedure for example ArcSoft PhotoStudio) With Windows, if other TWAIN driver is installed on the scanner, see your computer, you are going to use. (for previewing...
CanoScan N670U/N676U/N1240U ScanGear CS-U 6.2 for Win/Mac Guide
Page 79
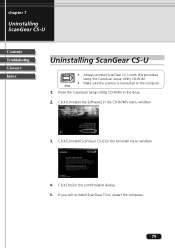
Place the CanoScan Setup Utility CD-ROM in the CD-ROM's menu window. 3. Click [Uninstall the Software] in the drive. 2. Click [Uninstall ScanGear CS-U] in the comfirmation dialog. 5. If you will re-install ScanGear CS-U, restart the computer. 79 chapter 7 Uninstalling ScanGear CS-U Contents Troubleshooting Glossary Index Uninstalling ScanGear CS-U • Always uninstall ScanGear CS-U with this procedure using the CanoScan Setup Utility CD-ROM • Make sure the scanner is connected to the computer. Click [Yes] in the Uninstall menu window. 4. Note 1.
Place the CanoScan Setup Utility CD-ROM in the CD-ROM's menu window. 3. Click [Uninstall the Software] in the drive. 2. Click [Uninstall ScanGear CS-U] in the comfirmation dialog. 5. If you will re-install ScanGear CS-U, restart the computer. 79 chapter 7 Uninstalling ScanGear CS-U Contents Troubleshooting Glossary Index Uninstalling ScanGear CS-U • Always uninstall ScanGear CS-U with this procedure using the CanoScan Setup Utility CD-ROM • Make sure the scanner is connected to the computer. Click [Yes] in the Uninstall menu window. 4. Note 1.
CanoScan N670U/N676U/N1240U Quick Start Guide
Page 2
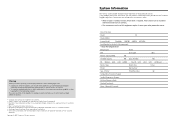
... contact our Customer Support Help Desk. Copyright © 2001 Canon Inc. All rights reserved. Date of Purchase: Dealer: Tel: Dealer Address: Scanner Model: CanoScan ❏ N670U ❏ N676U ❏ N1240U Serial Number (on the back of the equipment): •...Disk Capacity: MB Space Available: OS : Windows ❏ Me ❏ 98 ❏ 2000 Mac OS ❏ 8.6 ❏ 9.0 Monitor Type: Monitor Size: Printer: Manufacturer: Type of Printer: Printer Resolution: Installed Virus Protection Program: Installed Compression Program: On-Board Expansion Cards: ...
... contact our Customer Support Help Desk. Copyright © 2001 Canon Inc. All rights reserved. Date of Purchase: Dealer: Tel: Dealer Address: Scanner Model: CanoScan ❏ N670U ❏ N676U ❏ N1240U Serial Number (on the back of the equipment): •...Disk Capacity: MB Space Available: OS : Windows ❏ Me ❏ 98 ❏ 2000 Mac OS ❏ 8.6 ❏ 9.0 Monitor Type: Monitor Size: Printer: Manufacturer: Type of Printer: Printer Resolution: Installed Virus Protection Program: Installed Compression Program: On-Board Expansion Cards: ...
CanoScan N670U/N676U/N1240U Quick Start Guide
Page 12
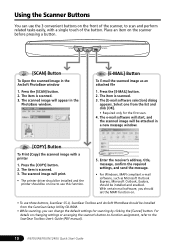
...certain mail software, you can use the 3 convenient buttons on -line to use these buttons, ScanGear CS-U, ScanGear Toolbox and ArcSoft PhotoBase should be installed from the list and click [OK]. • Required only for scanning by clicking the [Cancel] button. For details on . • To ... one from the CanoScan Setup Utility CD-ROM. • While scanning, you should be attached in a new message window. [COPY] Button To Print (Copy) the scanned image with a single touch of the scanner, to the ScanGear Toolbox User's Guide (PDF manual). 10 N670U/N676U/N1240U Quick Start Guide...
...certain mail software, you can use the 3 convenient buttons on -line to use these buttons, ScanGear CS-U, ScanGear Toolbox and ArcSoft PhotoBase should be installed from the list and click [OK]. • Required only for scanning by clicking the [Cancel] button. For details on . • To ... one from the CanoScan Setup Utility CD-ROM. • While scanning, you should be attached in a new message window. [COPY] Button To Print (Copy) the scanned image with a single touch of the scanner, to the ScanGear Toolbox User's Guide (PDF manual). 10 N670U/N676U/N1240U Quick Start Guide...
CanoScan N670U/N676U/N1240U Product Guide
Page 13
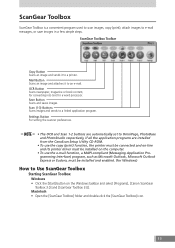
... converting into text for Windows) How to a printer. Settings Button For setting the scanner preferences. • The OCR and Scan 1-2 buttons are automatically set to OmniPage, PhotoBase and PhotoStudio respectively, if all the application programs are installed from the CanoScan Setup Utility CD-ROM....use the copy (print) function, the printer must be connected and on-line and its printer driver must be installed on the Windows taskbar and select [Programs], [Canon ScanGear Toolbox 3.0] and [ScanGear Toolbox 3.0]. Macintosh • Open the [ScanGear Toolbox] folder and double-click the ...
... converting into text for Windows) How to a printer. Settings Button For setting the scanner preferences. • The OCR and Scan 1-2 buttons are automatically set to OmniPage, PhotoBase and PhotoStudio respectively, if all the application programs are installed from the CanoScan Setup Utility CD-ROM....use the copy (print) function, the printer must be connected and on-line and its printer driver must be installed on the Windows taskbar and select [Programs], [Canon ScanGear Toolbox 3.0] and [ScanGear Toolbox 3.0]. Macintosh • Open the [ScanGear Toolbox] folder and double-click the ...
CanoScan N670U/N676U/N1240U Product Guide
Page 15
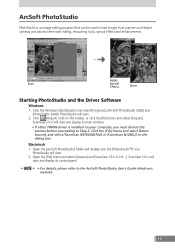
... select [Acquire] and [ScanGear CS-U 6.2.0...]. Click the [File] menu and select [Select Source], and select [CanoScan N670U/N676U] or [CanoScan N1240U] on the toolbar, or click the [File] menu and select [Acquire]. ScanGear CS-U will start and display its...enhancements. ArcSoft PhotoStudio PhotoStudio is installed on your computer, you must choose this scanner before proceeding to Step 2. PhotoStudio will start . 2. PhotoStudio will start . 2. Apply Scan Special Effects Stitch Starting PhotoStudio and the Driver Software Windows 1. Click the Windows [Start] button and select...
... select [Acquire] and [ScanGear CS-U 6.2.0...]. Click the [File] menu and select [Select Source], and select [CanoScan N670U/N676U] or [CanoScan N1240U] on the toolbar, or click the [File] menu and select [Acquire]. ScanGear CS-U will start and display its...enhancements. ArcSoft PhotoStudio PhotoStudio is installed on your computer, you must choose this scanner before proceeding to Step 2. PhotoStudio will start . 2. PhotoStudio will start . 2. Apply Scan Special Effects Stitch Starting PhotoStudio and the Driver Software Windows 1. Click the Windows [Start] button and select...
CanoScan N670U/N676U/N1240U Product Guide
Page 17
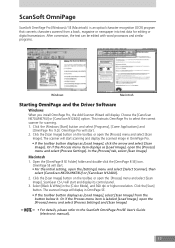
... After conversion, the text can be edited with word processors and similar programs. Windows Macintosh Starting OmniPage and the Driver Software Windows When you install OmniPage Pro, the Add Scanner Wizard will display in the [Color Mode], and 300 dpi or higher resolution.... 2. Macintosh 1. OmniPage SE will start . • For the initial setting, open the [Settings] menu and select [Select Scanner], then select [CanoScan N670U/N676U] or [CanoScan N1240U]. 2. Click the [Scan Image] button on the toolbar, or open the [Process] menu and select [Process Settings]. Click ...
... After conversion, the text can be edited with word processors and similar programs. Windows Macintosh Starting OmniPage and the Driver Software Windows When you install OmniPage Pro, the Add Scanner Wizard will display in the [Color Mode], and 300 dpi or higher resolution.... 2. Macintosh 1. OmniPage SE will start . • For the initial setting, open the [Settings] menu and select [Select Scanner], then select [CanoScan N670U/N676U] or [CanoScan N1240U]. 2. Click the [Scan Image] button on the toolbar, or open the [Process] menu and select [Process Settings]. Click ...

