
User Manual
Page 11
... and BJ Tanks 12-7 When to Replace a BJ Cartridge or BJ Tank 12-8 Testing and Cleaning the BJ Cartridge Print Head 12-10 Printing the Nozzle Check Pattern 12-10 Cleaning the BJ Cartridge Print Head 12-11 Replacing the BJ Cartridge 12-12 Replacing a BJ Tank 12-15 Transporting the MultiPASS 12-18 Preface xi
... and BJ Tanks 12-7 When to Replace a BJ Cartridge or BJ Tank 12-8 Testing and Cleaning the BJ Cartridge Print Head 12-10 Printing the Nozzle Check Pattern 12-10 Cleaning the BJ Cartridge Print Head 12-11 Replacing the BJ Cartridge 12-12 Replacing a BJ Tank 12-15 Transporting the MultiPASS 12-18 Preface xi
User Manual
Page 32
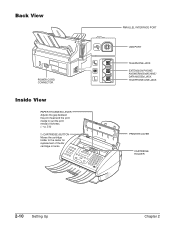
PARALLEL INTERFACE PORT USB PORT TELEPHONE JACK EXTENSION PHONE/ ANSWERING MACHINE/ DATA MODEM JACK TELEPHONE LINE JACK PRINTER COVER CARTRIDGE HOLDER 2-10 Setting Up Chapter 2 Back View POWER CORD CONNECTOR Inside View PAPER THICKNESS LEVER Adjusts the gap between the print head and the print media to suit the print media's thickness. (1 p. 5-6) C (CARTRIDGE) BUTTON Moves the cartridge holder to the center for replacement of the BJ cartridge or tanks.
PARALLEL INTERFACE PORT USB PORT TELEPHONE JACK EXTENSION PHONE/ ANSWERING MACHINE/ DATA MODEM JACK TELEPHONE LINE JACK PRINTER COVER CARTRIDGE HOLDER 2-10 Setting Up Chapter 2 Back View POWER CORD CONNECTOR Inside View PAPER THICKNESS LEVER Adjusts the gap between the print head and the print media to suit the print media's thickness. (1 p. 5-6) C (CARTRIDGE) BUTTON Moves the cartridge holder to the center for replacement of the BJ cartridge or tanks.

User Manual
Page 36
... plugged in. 2 Open the document tray. 3 Lift the document guides to the center of the unit so you plug in the MultiPASS for the first time, the cartridge holder automatically moves to open the printer cover. • If the printer cover does not open easily, slide the ... and tanks is difficult to disassemble or refill BJ cartridges or tanks. • Do not shake or drop BJ cartridges or tanks, or tip the print head downward. Follow these precautions when handling: • Carefully remove packaging from BJ cartridges and tanks. • Do not attempt to clean up if spilled...
... plugged in. 2 Open the document tray. 3 Lift the document guides to the center of the unit so you plug in the MultiPASS for the first time, the cartridge holder automatically moves to open the printer cover. • If the printer cover does not open easily, slide the ... and tanks is difficult to disassemble or refill BJ cartridges or tanks. • Do not shake or drop BJ cartridges or tanks, or tip the print head downward. Follow these precautions when handling: • Carefully remove packaging from BJ cartridges and tanks. • Do not attempt to clean up if spilled...

User Manual
Page 37
...into position. Lower the blue cartridge lock lever until it locks into the cartridge holder. Setting Up c • Do not try to the BJ cartridge print head. 1 • Install the BJ cartridge immediately after removing the cap and tape. • Spilled ink can stain any metal parts since this may ...adversely affect operation of the unit and/or affect print quality. 4 Raise the blue cartridge lock lever on the cartridge holder. c • Discard the cap and tape. Never attempt to reattach them to...
...into position. Lower the blue cartridge lock lever until it locks into the cartridge holder. Setting Up c • Do not try to the BJ cartridge print head. 1 • Install the BJ cartridge immediately after removing the cap and tape. • Spilled ink can stain any metal parts since this may ...adversely affect operation of the unit and/or affect print quality. 4 Raise the blue cartridge lock lever on the cartridge holder. c • Discard the cap and tape. Never attempt to reattach them to...

User Manual
Page 38
... takes about 55 seconds. c Do not try to unplug the MultiPASS, wait until the unit is in standby mode (date and receive mode displayed in its home position on the right side of the unit and begins cleaning the BJ cartridge print head. Otherwise the cartridge holder may damage the unit. 8 Close the...
... takes about 55 seconds. c Do not try to unplug the MultiPASS, wait until the unit is in standby mode (date and receive mode displayed in its home position on the right side of the unit and begins cleaning the BJ cartridge print head. Otherwise the cartridge holder may damage the unit. 8 Close the...
User Manual
Page 39
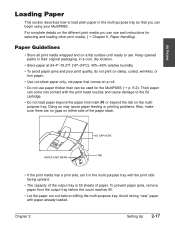
NO GAP HERE TAB PAPER LIMIT MARK • If the print media has a print side, set it in the multi-purpose tray with the print head nozzles and cause damage to the BJ cartridge. • Do not load paper beyond the paper limit mark (P) or beyond the tab on the ...50. • Let the paper run out before refilling the multi-purpose tray. Paper Guidelines • Store all print media wrapped and on a flat surface until ready to use and instructions for the MultiPASS (1 p. 5-2). Setting Up Loading Paper This section describes how to load plain paper in the multi-purpose tray so...
NO GAP HERE TAB PAPER LIMIT MARK • If the print media has a print side, set it in the multi-purpose tray with the print head nozzles and cause damage to the BJ cartridge. • Do not load paper beyond the paper limit mark (P) or beyond the tab on the ...50. • Let the paper run out before refilling the multi-purpose tray. Paper Guidelines • Store all print media wrapped and on a flat surface until ready to use and instructions for the MultiPASS (1 p. 5-2). Setting Up Loading Paper This section describes how to load plain paper in the multi-purpose tray so...
User Manual
Page 62
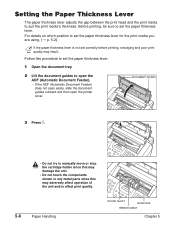
...the paper thickness lever is not set the paper thickness lever. Before printing, be sure to set correctly before printing, smudging and poor print quality may adversely affect operation of the unit and/or affect print quality. 5-6 Paper Handling ROUND SHAFT GUIDE RAIL RIBBON CABLE Chapter 5...p. 5-2). DOCUMENT GUIDES 3 Press C. c • Do not try to suit the print media's thickness. Setting the Paper Thickness Lever The paper thickness lever adjusts the gap between the print head and the print media to manually move or stop the cartridge holder since this may damage the unit....
...the paper thickness lever is not set the paper thickness lever. Before printing, be sure to set correctly before printing, smudging and poor print quality may adversely affect operation of the unit and/or affect print quality. 5-6 Paper Handling ROUND SHAFT GUIDE RAIL RIBBON CABLE Chapter 5...p. 5-2). DOCUMENT GUIDES 3 Press C. c • Do not try to suit the print media's thickness. Setting the Paper Thickness Lever The paper thickness lever adjusts the gap between the print head and the print media to manually move or stop the cartridge holder since this may damage the unit....

User Manual
Page 63
... into the MultiPASS. CIanBrktrCiBdlg-lea2Mc1akJdaepainn CIanBrktrCidCgl-eo2l1MoardJaepainn 5 Press C. • The cartridge holder moves to manually move or stop the cartridge holder since this may damage the unit. Loading Paper You can also load other types of the unit and begins cleaning the BJ cartridge print head. 4 Set... the paper thickness lever. • For details on the right side of print media in the multi-purpose tray to set for the...
... into the MultiPASS. CIanBrktrCiBdlg-lea2Mc1akJdaepainn CIanBrktrCidCgl-eo2l1MoardJaepainn 5 Press C. • The cartridge holder moves to manually move or stop the cartridge holder since this may damage the unit. Loading Paper You can also load other types of the unit and begins cleaning the BJ cartridge print head. 4 Set... the paper thickness lever. • For details on the right side of print media in the multi-purpose tray to set for the...

User Manual
Page 134
... Cartridge or BJ Tank 12-8 Testing and Cleaning the BJ Cartridge Print Head 12-10 Printing the Nozzle Check Pattern 12-10 Cleaning the BJ Cartridge Print Head 12-11 Replacing the BJ Cartridge 12-12 Replacing a BJ Tank 12-15 Transporting the MultiPASS 12-18 Maintenance Chapter 12 Maintenance 12-1 Chapter 12 Maintenance This chapter...
... Cartridge or BJ Tank 12-8 Testing and Cleaning the BJ Cartridge Print Head 12-10 Printing the Nozzle Check Pattern 12-10 Cleaning the BJ Cartridge Print Head 12-11 Replacing the BJ Cartridge 12-12 Replacing a BJ Tank 12-15 Transporting the MultiPASS 12-18 Maintenance Chapter 12 Maintenance 12-1 Chapter 12 Maintenance This chapter...

User Manual
Page 140
s BC-20 Black BJ Cartridge (Sold separately) Contains the print head unit and black ink only. Use this BJ cartridge for the Color BJ cartridge. When used with the MultiPASS) Contains the color ink for fast, black ink printing. s BCI-21 Color BJ Tank (Included with Canon High Resolution Paper, this tank. When you run out...
s BC-20 Black BJ Cartridge (Sold separately) Contains the print head unit and black ink only. Use this BJ cartridge for the Color BJ cartridge. When used with the MultiPASS) Contains the color ink for fast, black ink printing. s BCI-21 Color BJ Tank (Included with Canon High Resolution Paper, this tank. When you run out...

User Manual
Page 142
... 12-9 Try adjusting the print settings. (--> MultiPASS Suite User's Guide) 2 Perform print head cleaning. (--> p. 12-11) • You can clean the print head up to five consecutive times if necessary. 3 Print the nozzle check pattern again. (--> p. 12-10) Satisfactory You should now be able to avoid printing problems, Canon recommends that you only use the Canon BJ cartridges and tanks...
... 12-9 Try adjusting the print settings. (--> MultiPASS Suite User's Guide) 2 Perform print head cleaning. (--> p. 12-11) • You can clean the print head up to five consecutive times if necessary. 3 Print the nozzle check pattern again. (--> p. 12-10) Satisfactory You should now be able to avoid printing problems, Canon recommends that you only use the Canon BJ cartridges and tanks...

User Manual
Page 143
... installed, the pattern includes all four colors; Cleaning Set 3 Press . • The MultiPASS prints the nozzle check pattern. n Print the nozzle check pattern again after cleaning the BJ cartridge print head to time. Testing and Cleaning the BJ Cartridge Print Head The print head in the MultiPASS. yellow, magenta, cyan, and black. In the color pattern you may want to...
... installed, the pattern includes all four colors; Cleaning Set 3 Press . • The MultiPASS prints the nozzle check pattern. n Print the nozzle check pattern again after cleaning the BJ cartridge print head to time. Testing and Cleaning the BJ Cartridge Print Head The print head in the MultiPASS. yellow, magenta, cyan, and black. In the color pattern you may want to...

User Manual
Page 144
... times if necessary. • After cleaning, print the nozzle check pattern to select HEAD NOZZLE CHECK Ex: HEAD CLEANING Set 4 Press . • The MultiPASS cleans the print head. Cleaning 08 02 3 Use or CLEANING. Cleaning the BJ Cartridge Print Head If your printing is not printed, clean the BJ cartridge print head. Refer to see if the print head nozzles are operating properly (1 p. 12...
... times if necessary. • After cleaning, print the nozzle check pattern to select HEAD NOZZLE CHECK Ex: HEAD CLEANING Set 4 Press . • The MultiPASS cleans the print head. Cleaning 08 02 3 Use or CLEANING. Cleaning the BJ Cartridge Print Head If your printing is not printed, clean the BJ cartridge print head. Refer to see if the print head nozzles are operating properly (1 p. 12...

User Manual
Page 145
...one of the optional BJ cartridges. • Do not replace the BJ cartridge while the MultiPASS is printing or performing another operation. • You only need to replace the Color BJ cartridge when the print head is damaged or when you can replace individual BJ tanks (color or black) without having... to replace the entire BJ cartridge. (1 p. 12-15) Follow this procedure to replace the BJ cartridge: 1 Make sure the MultiPASS is plugged in this BJ cartridge,...
...one of the optional BJ cartridges. • Do not replace the BJ cartridge while the MultiPASS is printing or performing another operation. • You only need to replace the Color BJ cartridge when the print head is damaged or when you can replace individual BJ tanks (color or black) without having... to replace the entire BJ cartridge. (1 p. 12-15) Follow this procedure to replace the BJ cartridge: 1 Make sure the MultiPASS is plugged in this BJ cartridge,...

User Manual
Page 146
... CCoalrotrridBgJe Made in the container provided with your work area. You may adversely affect operation of the unit and/or affect print quality. • The MultiPASS has an automatic protection feature that helps keep any residual ink from spilling. • Spilled ink can stain any surface;... since this may want to place it in a plastic bag to keep it from overheating. Never attempt to reattach them to the BJ cartridge print head. 1 • Install the BJ cartridge immediately after removing the cap and tape. • Spilled ink can stain any surface; Chapter 12 ...
... CCoalrotrridBgJe Made in the container provided with your work area. You may adversely affect operation of the unit and/or affect print quality. • The MultiPASS has an automatic protection feature that helps keep any residual ink from spilling. • Spilled ink can stain any surface;... since this may want to place it in a plastic bag to keep it from overheating. Never attempt to reattach them to the BJ cartridge print head. 1 • Install the BJ cartridge immediately after removing the cap and tape. • Spilled ink can stain any surface; Chapter 12 ...

User Manual
Page 147
... home position on the right side of the unit and begins cleaning the BJ cartridge print head. This process takes about 55 seconds. c Do not try to its home position causing the BJ cartridge to unplug the MultiPASS, wait until it locks into the cartridge holder. n If you need to remain uncapped and...
... home position on the right side of the unit and begins cleaning the BJ cartridge print head. This process takes about 55 seconds. c Do not try to its home position causing the BJ cartridge to unplug the MultiPASS, wait until it locks into the cartridge holder. n If you need to remain uncapped and...

User Manual
Page 150
... Document Feeder). 10 Close the document tray. protect yourself and your work area. This process takes about 55 seconds. n If you need to unplug the MultiPASS, wait until it to manually move or stop the cartridge holder since this may not be in the LCD). Never attempt to reattach it clicks... Maintenance 12-17 6 Remove the new BJ tank from its home position on the right side of the unit and begins cleaning the BJ cartridge print head.
... Document Feeder). 10 Close the document tray. protect yourself and your work area. This process takes about 55 seconds. n If you need to unplug the MultiPASS, wait until it to manually move or stop the cartridge holder since this may not be in the LCD). Never attempt to reattach it clicks... Maintenance 12-17 6 Remove the new BJ tank from its home position on the right side of the unit and begins cleaning the BJ cartridge print head.

User Manual
Page 151
...need to prepare it so it will not be sure to wrap the MultiPASS in plastic first to prevent the packing materials from the MultiPASS. With the cartridge holder in the BJ cartridge container may leak, and the print head may spill into the unit. • If you no longer have ...removed the protective cap and tape. Follow this tray.) 8 Replace all tapes and shipping materials you removed when you first unpacked the MultiPASS. (2 p. 2-4) 9 Pack the MultiPASS and all its components in the...
...need to prepare it so it will not be sure to wrap the MultiPASS in plastic first to prevent the packing materials from the MultiPASS. With the cartridge holder in the BJ cartridge container may leak, and the print head may spill into the unit. • If you no longer have ...removed the protective cap and tape. Follow this tray.) 8 Replace all tapes and shipping materials you removed when you first unpacked the MultiPASS. (2 p. 2-4) 9 Pack the MultiPASS and all its components in the...

User Manual
Page 157
...You pressed C and the cartridge holder is returning to send or copy (1 p. 13-3) and start again. If the message remains in memory. The unit then prints automatically any faxes received in the LCD, replace the BJ cartridge (1 p. 12-12). Also appears after CHANGE CARTRIDGE displays. Set the document feed lever to... obstructing the cartridge holder and then press Resume. Clear the paper jam or whatever is calling the other party's fax machine. Clean the BJ cartridge print head (1 p. 12-10). When you want to a (automatic document feed). (1 p. 4-2) CHECK PAPER SIZE -
...You pressed C and the cartridge holder is returning to send or copy (1 p. 13-3) and start again. If the message remains in memory. The unit then prints automatically any faxes received in the LCD, replace the BJ cartridge (1 p. 12-12). Also appears after CHANGE CARTRIDGE displays. Set the document feed lever to... obstructing the cartridge holder and then press Resume. Clear the paper jam or whatever is calling the other party's fax machine. Clean the BJ cartridge print head (1 p. 12-10). When you want to a (automatic document feed). (1 p. 4-2) CHECK PAPER SIZE -

User Manual
Page 158
... T to move. If the message remains in the multi-purpose tray. The unit will then print automatically any faxes received in . The unit is all right to color document to black & convert a color document white and... print, or press # to black & white and print to cancel. The Color BJ tank in the Color BJ cartridge is empty or its ink may be an... it with the Black BJ cartridge. Then press Resume and start again. Clean the BJ cartridge print head (1 p. 12-11).
... T to move. If the message remains in the multi-purpose tray. The unit will then print automatically any faxes received in . The unit is all right to color document to black & convert a color document white and... print, or press # to black & white and print to cancel. The Color BJ tank in the Color BJ cartridge is empty or its ink may be an... it with the Black BJ cartridge. Then press Resume and start again. Clean the BJ cartridge print head (1 p. 12-11).


