User Manual
Page 10
..., printing, system settings, and speed dialing settings. Before adjusting any corresponding settings made to make changes from the operation panel or from the MultiPASS Desktop Manager. the operation panel and the MultiPASS Desktop Manager - Adjusting settings through the operation panel. For detailed instructions refer to a PC. Introduction 1-2 Detailed instructions are described in this manual.
..., printing, system settings, and speed dialing settings. Before adjusting any corresponding settings made to make changes from the operation panel or from the MultiPASS Desktop Manager. the operation panel and the MultiPASS Desktop Manager - Adjusting settings through the operation panel. For detailed instructions refer to a PC. Introduction 1-2 Detailed instructions are described in this manual.
User Manual
Page 11
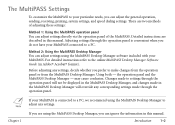
...that provides all the features of the MultiPASS. Chapter 1 Introduction 1-3 This foldout sheet describes how to unpack and set up your new MultiPASS. It includes instructions on how to send and receive faxes. I MultiPASS Desktop Manager Software Guide - It also...Start Guide - I MultiPASS C530/C560 User's Manual - This online manual describes how you use the MultiPASS Desktop Manager, which is a software application that comes with the MultiPASS, including the MultiPASS Desktop Manager for Windows®, ScanGear™ for MultiPASS, and the MultiPASS Printer Driver. color...
...that provides all the features of the MultiPASS. Chapter 1 Introduction 1-3 This foldout sheet describes how to unpack and set up your new MultiPASS. It includes instructions on how to send and receive faxes. I MultiPASS Desktop Manager Software Guide - It also...Start Guide - I MultiPASS C530/C560 User's Manual - This online manual describes how you use the MultiPASS Desktop Manager, which is a software application that comes with the MultiPASS, including the MultiPASS Desktop Manager for Windows®, ScanGear™ for MultiPASS, and the MultiPASS Printer Driver. color...

User Manual
Page 14
... a stand-alone fax machine. ❏ Guidelines for entering your sender information, which is required before using the MultiPASS Desktop Manager, you want. You will also find items you will not need this information. n If you are using ... Information 2-19 ❏ Setting the Telephone Line Type 2-21 Chapter 2 Registering Information 2-1 It briefly explains how to browse through the menus and find instructions for Entering Information Via the Operation Panel 2-2 G Using the One-Touch Speed Dialing/Special Function Buttons 2-3 G Understanding and Accessing the Menus 2-4 G...
... a stand-alone fax machine. ❏ Guidelines for entering your sender information, which is required before using the MultiPASS Desktop Manager, you want. You will also find items you will not need this information. n If you are using ... Information 2-19 ❏ Setting the Telephone Line Type 2-21 Chapter 2 Registering Information 2-1 It briefly explains how to browse through the menus and find instructions for Entering Information Via the Operation Panel 2-2 G Using the One-Touch Speed Dialing/Special Function Buttons 2-3 G Understanding and Accessing the Menus 2-4 G...

User Manual
Page 31
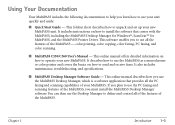
To register your fax/telephone number. Set 11. Ex: CANON :A I To enter letters, numbers, and symbols, refer to standby mode. I If you only need to change the fax/telephone number, press Stop after this step to return to the instructions on page 2-8. Alternatively you can use l to move back to the character you...
To register your fax/telephone number. Set 11. Ex: CANON :A I To enter letters, numbers, and symbols, refer to standby mode. I If you only need to change the fax/telephone number, press Stop after this step to return to the instructions on page 2-8. Alternatively you can use l to move back to the character you...
User Manual
Page 42
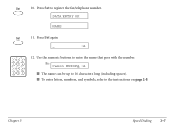
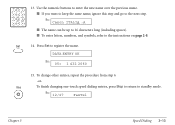
DATA ENTRY OK NAME Set 11. Use the numeric buttons to register the fax/telephone number. Ex: Canon EUROPA :A I To enter letters, numbers, and symbols, refer to 16 characters long (including spaces). Chapter 3 Speed Dialing 3-7 Press Set again. _ :A ABC 12 GHI 4 JKL 5 PRS 7 TUV 8 OPER 0 Tone DEF 3 MNO 6 WXY 9 SYMBOLS # 12. Set 10. I The name can be up to the instructions on page 2-8. Press Set to enter the name that goes with the number.
DATA ENTRY OK NAME Set 11. Use the numeric buttons to register the fax/telephone number. Ex: Canon EUROPA :A I To enter letters, numbers, and symbols, refer to 16 characters long (including spaces). Chapter 3 Speed Dialing 3-7 Press Set again. _ :A ABC 12 GHI 4 JKL 5 PRS 7 TUV 8 OPER 0 Tone DEF 3 MNO 6 WXY 9 SYMBOLS # 12. Set 10. I The name can be up to the instructions on page 2-8. Press Set to enter the name that goes with the number.
User Manual
Page 48
Use the numeric buttons to register the name. Set 14. I If you want to keep the same name, ignore this step and go to the instructions on page 2-8. DATA ENTRY OK Ex: 05= 1 432 2060 15. Ex: 12/27 FaxTel Chapter 3 Speed Dialing 3-13 I To enter letters, numbers, and symbols, refer... the next step. Press Set to enter the new name over the previous name. To change other entries, repeat the procedure from step 6. -or- Ex: Canon ITALIA :A I The name can be up to standby mode. ABC 12 GHI 4 JKL 5 PRS 7 TUV 8 OPER 0 Tone DEF 3 MNO 6 WXY 9 SYMBOLS # 13. Stop To...
Use the numeric buttons to register the name. Set 14. I If you want to keep the same name, ignore this step and go to the instructions on page 2-8. DATA ENTRY OK Ex: 05= 1 432 2060 15. Ex: 12/27 FaxTel Chapter 3 Speed Dialing 3-13 I To enter letters, numbers, and symbols, refer... the next step. Press Set to enter the new name over the previous name. To change other entries, repeat the procedure from step 6. -or- Ex: Canon ITALIA :A I The name can be up to standby mode. ABC 12 GHI 4 JKL 5 PRS 7 TUV 8 OPER 0 Tone DEF 3 MNO 6 WXY 9 SYMBOLS # 13. Stop To...
User Manual
Page 54
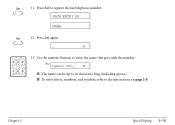
Use the numeric buttons to the instructions on page 2-8. Press Set again. _ :A ABC 12 GHI 4 JKL 5 PRS 7 TUV 8 OPER 0 Tone DEF 3 MNO 6 WXY 9 SYMBOLS # 13. I The name can be up to register the fax/telephone number. Chapter 3 Speed Dialing 3-19 DATA ENTRY OK NAME Set 12. Press Set to 16 characters long (including spaces). Ex: Canon Inc. :A I To enter letters, numbers, and symbols, refer to enter the name that goes with the number. Set 11.
Use the numeric buttons to the instructions on page 2-8. Press Set again. _ :A ABC 12 GHI 4 JKL 5 PRS 7 TUV 8 OPER 0 Tone DEF 3 MNO 6 WXY 9 SYMBOLS # 13. I The name can be up to register the fax/telephone number. Chapter 3 Speed Dialing 3-19 DATA ENTRY OK NAME Set 12. Press Set to 16 characters long (including spaces). Ex: Canon Inc. :A I To enter letters, numbers, and symbols, refer to enter the name that goes with the number. Set 11.

User Manual
Page 60
... to standby mode. Ex: Canon TOKYO :A I To enter letters, numbers, and symbols, refer to 16 characters long (including spaces). Stop To finish changing coded speed dialing entries, press Stop to return to enter the new name over the previous name. I The name can be up to the instructions on page 2-8. To change...
... to standby mode. Ex: Canon TOKYO :A I To enter letters, numbers, and symbols, refer to 16 characters long (including spaces). Stop To finish changing coded speed dialing entries, press Stop to return to enter the new name over the previous name. I The name can be up to the instructions on page 2-8. To change...
User Manual
Page 68
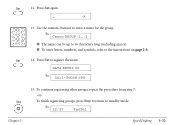
... to standby mode. Ex: 12/27 FaxTel Chapter 3 Speed Dialing 3-33 Use the numeric buttons to the instructions on page 2-8. Set 14. I The name can be up to 16 characters long (including spaces). Set 12. Ex: Canon GROUP 2_:1 I To enter letters, numbers, and symbols, refer to enter a name for the group.
... to standby mode. Ex: 12/27 FaxTel Chapter 3 Speed Dialing 3-33 Use the numeric buttons to the instructions on page 2-8. Set 14. I The name can be up to 16 characters long (including spaces). Set 12. Ex: Canon GROUP 2_:1 I To enter letters, numbers, and symbols, refer to enter a name for the group.
User Manual
Page 69
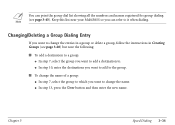
... If you want to add a destination to change the entries in a group or delete a group, follow the instructions in Creating Groups (see page 3-43). Chapter 3 Speed Dialing 3-34 Keep this list near your MultiPASS so you want to add to which you can print the group dial list showing all the numbers...
... If you want to add a destination to change the entries in a group or delete a group, follow the instructions in Creating Groups (see page 3-43). Chapter 3 Speed Dialing 3-34 Keep this list near your MultiPASS so you want to add to which you can print the group dial list showing all the numbers...
User Manual
Page 124
Chapter 5 Receiving Faxes This chapter describes the different methods for receiving faxes. You will also find instructions on setting the MultiPASS to receive color faxes. ❏ Different Ways to Receive a Fax 5-2 G Receiving Both Faxes and Telephone Calls Automatically: Fax/Tel Mode 5-3 G Receiving Faxes Manually: MANUAL MODE 5-...
Chapter 5 Receiving Faxes This chapter describes the different methods for receiving faxes. You will also find instructions on setting the MultiPASS to receive color faxes. ❏ Different Ways to Receive a Fax 5-2 G Receiving Both Faxes and Telephone Calls Automatically: Fax/Tel Mode 5-3 G Receiving Faxes Manually: MANUAL MODE 5-...
User Manual
Page 125
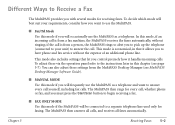
...call yourself, including fax calls. Chapter 5 Receiving Faxes 5-2 if the call is from the MultiPASS Desktop Manager (see page 5-7). You can also adjust these via the operation panel refer to the instructions later in that let you control precisely how it allows you to have phone and fax ...service without ringing; Different Ways to Receive a Fax The MultiPASS provides you with several modes for every call, whether phone or...
...call yourself, including fax calls. Chapter 5 Receiving Faxes 5-2 if the call is from the MultiPASS Desktop Manager (see page 5-7). You can also adjust these via the operation panel refer to the instructions later in that let you control precisely how it allows you to have phone and fax ...service without ringing; Different Ways to Receive a Fax The MultiPASS provides you with several modes for every call, whether phone or...
User Manual
Page 149
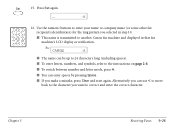
Use the numeric buttons to 24 characters long (including spaces). Ex: CANON :A I To enter letters, numbers, and symbols, refer to another Canon fax machine and displayed in step 10. Set 15. Press Set again. _ :A ABC 12 GHI 4 JKL 5 PRS 7 TUV 8 OPER 0 Tone DEF 3 MNO 6...fax recipient's identification) for the ring pattern you selected in that fax machine's LCD display as verification. I This name is transmitted to the instructions on page 2-8. I If you want to correct and enter the correct character. I To switch between number and letter mode, press T. ...
Use the numeric buttons to 24 characters long (including spaces). Ex: CANON :A I To enter letters, numbers, and symbols, refer to another Canon fax machine and displayed in step 10. Set 15. Press Set again. _ :A ABC 12 GHI 4 JKL 5 PRS 7 TUV 8 OPER 0 Tone DEF 3 MNO 6...fax recipient's identification) for the ring pattern you selected in that fax machine's LCD display as verification. I This name is transmitted to the instructions on page 2-8. I If you want to correct and enter the correct character. I To switch between number and letter mode, press T. ...


