User Manual
Page 5
... Dialing Lists...3-38 Printing the One-Touch or Coded Speed Dial List 3-38 Printing the Group Dial List ...3-42 Chapter 4: Sending Faxes Preparing to Send a Fax...4-3 Adjusting the Quality of Your Faxes 4-3 Dialing Methods...4-10 Sending Methods ...4-11 Memory Sending...4-11 Manual Sending ...4-14 Canceling Sending ...4-17 Removing the Document From the Automatic...
... Dialing Lists...3-38 Printing the One-Touch or Coded Speed Dial List 3-38 Printing the Group Dial List ...3-42 Chapter 4: Sending Faxes Preparing to Send a Fax...4-3 Adjusting the Quality of Your Faxes 4-3 Dialing Methods...4-10 Sending Methods ...4-11 Memory Sending...4-11 Manual Sending ...4-14 Canceling Sending ...4-17 Removing the Document From the Automatic...
User Manual
Page 6
...Broadcasting ...4-28 Sending a Document to More Than One Destination 4-28 Delayed Sending...4-32 Sending Other Documents While the MultiPASS Is Set for Delayed Sending 4-32 Documents Stored in Memory ...4-33 Printing a List of Documents in Memory 4-... Number 4-42 Switching Temporarily to Tone Dialing 4-44 Chapter 5: Receiving Faxes Different Ways to Receive a Fax ...5-2 Receiving Both Faxes and Telephone Calls Automatically: Fax/Tel Mode 5-3 Receiving Faxes Manually: MANUAL MODE 5-13 Receiving Faxes Automatically: FAX ONLY MODE 5-16 Receiving With an Answering Machine: ANS.MACHINE MODE ...
...Broadcasting ...4-28 Sending a Document to More Than One Destination 4-28 Delayed Sending...4-32 Sending Other Documents While the MultiPASS Is Set for Delayed Sending 4-32 Documents Stored in Memory ...4-33 Printing a List of Documents in Memory 4-... Number 4-42 Switching Temporarily to Tone Dialing 4-44 Chapter 5: Receiving Faxes Different Ways to Receive a Fax ...5-2 Receiving Both Faxes and Telephone Calls Automatically: Fax/Tel Mode 5-3 Receiving Faxes Manually: MANUAL MODE 5-13 Receiving Faxes Automatically: FAX ONLY MODE 5-16 Receiving With an Answering Machine: ANS.MACHINE MODE ...
User Manual
Page 7
Receiving While Registering, Copying, or Printing 5-37 Receiving Faxes in Memory When a Problem Occurs 5-37 Canceling Receiving...5-41 Chapter 6: Reports and Lists Summary of Lists and Reports...6-2 Abbreviations Used in Transaction Reports 6-4 Activity Report ...6-5 ...
Receiving While Registering, Copying, or Printing 5-37 Receiving Faxes in Memory When a Problem Occurs 5-37 Canceling Receiving...5-41 Chapter 6: Reports and Lists Summary of Lists and Reports...6-2 Abbreviations Used in Transaction Reports 6-4 Activity Report ...6-5 ...
User Manual
Page 11
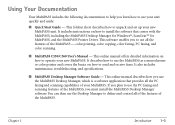
... the following documentation to help you learn how to use your unit quickly and easily: I MultiPASS C530/C560 User's Manual - color printing, color copying, color faxing, PC faxing, and color scanning. I Quick Start Guide - Chapter 1 Introduction 1-3 It describes how to use the Desktop Manager to define and control all of the features of ...
... the following documentation to help you learn how to use your unit quickly and easily: I MultiPASS C530/C560 User's Manual - color printing, color copying, color faxing, PC faxing, and color scanning. I Quick Start Guide - Chapter 1 Introduction 1-3 It describes how to use the Desktop Manager to define and control all of the features of ...
User Manual
Page 12
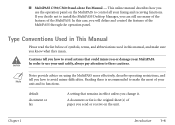
... features of paper you send or receive on using the MultiPASS more effectively, describe operating restrictions, and tell you know what they mean. A document or fax is recommended to make sure you how to use your MultiPASS. Reading these cautions. Chapter 1 Introduction 1-4 This online... on the MultiPASS to install the MultiPASS Desktop Manager, you use many of the features of your faxing and receiving functions. In this manual, and make the most of the MultiPASS. If you decide not to control all your unit and its functions. I MultiPASS C530/C560 Stand-...
... features of paper you send or receive on using the MultiPASS more effectively, describe operating restrictions, and tell you know what they mean. A document or fax is recommended to make sure you how to use your MultiPASS. Reading these cautions. Chapter 1 Introduction 1-4 This online... on the MultiPASS to install the MultiPASS Desktop Manager, you use many of the features of your faxing and receiving functions. In this manual, and make the most of the MultiPASS. If you decide not to control all your unit and its functions. I MultiPASS C530/C560 Stand-...

User Manual
Page 14
... Manager, you want. This information is provided for those using the MultiPASS as a stand-alone fax machine. ❏ Guidelines for entering your sender information, which is required before using the operation panel. Chapter 2 Registering Information This chapter describes how to Check ... Accessing the Menus 2-4 G Entering Numbers, Letters, and Symbols 2-8 ❏ Registering Required Sender Information 2-13 G Registering Sender Information 2-15 G Printing a List to enter information in the MultiPASS using your unit.
... Manager, you want. This information is provided for those using the MultiPASS as a stand-alone fax machine. ❏ Guidelines for entering your sender information, which is required before using the operation panel. Chapter 2 Registering Information This chapter describes how to Check ... Accessing the Menus 2-4 G Entering Numbers, Letters, and Symbols 2-8 ❏ Registering Required Sender Information 2-13 G Registering Sender Information 2-15 G Printing a List to enter information in the MultiPASS using your unit.
User Manual
Page 15
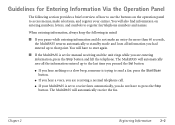
...Information Via the Operation Panel The following in mind: I If the MultiPASS is set to receive faxes automatically, you do not make selections, and register your MultiPASS is trying to press the Stop button. The MultiPASS will automatically save all information you had entered up to the last time... you pressed the Set button. The MultiPASS will automatically receive the fax. G If you are receiving a normal telephone call. You will have to send a fax: press the Start/Scan button. You will also find information on the operation panel...
...Information Via the Operation Panel The following in mind: I If the MultiPASS is set to receive faxes automatically, you do not make selections, and register your MultiPASS is trying to press the Stop button. The MultiPASS will automatically save all information you had entered up to the last time... you pressed the Set button. The MultiPASS will automatically receive the fax. G If you are receiving a normal telephone call. You will have to send a fax: press the Start/Scan button. You will also find information on the operation panel...
User Manual
Page 16
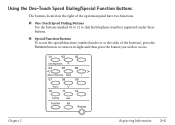
I Special Function Buttons To access the special functions (marked under or to dial fax/telephone numbers registered under these buttons. Using the One-Touch Speed Dialing/Special Function Buttons The buttons located on the right of the buttons), press ...
I Special Function Buttons To access the special functions (marked under or to dial fax/telephone numbers registered under these buttons. Using the One-Touch Speed Dialing/Special Function Buttons The buttons located on the right of the buttons), press ...
User Manual
Page 26
...Recent amendments to print this information at the top of every fax you send. This section gives details on every facsimile transmission: I Your fax number I Your personal name or company name I The time and date of transmission Your MultiPASS has been designed to the FCC rules governing the use ...of facsimile equipment in the United States state that the following sender information must , therefore, register your unit's telephone/fax number, your personal name or company name, and ...
...Recent amendments to print this information at the top of every fax you send. This section gives details on every facsimile transmission: I Your fax number I Your personal name or company name I The time and date of transmission Your MultiPASS has been designed to the FCC rules governing the use ...of facsimile equipment in the United States state that the following sender information must , therefore, register your unit's telephone/fax number, your personal name or company name, and ...
User Manual
Page 27
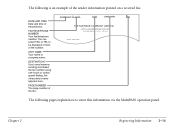
... Our Ref. 350/PJC/EAC The following is an example of the sender information printed on a received fax. 12/27/2000 10:12 FAX 123 4567 CANON CANON CANADA 001 DATE AND TIME Date and time of transmission. UNIT NAME Your name or company name. DESTINATION If you used memory sending and dialed... the fax number using one-touch or coded speed dialing, the other party's name appears here. You can select FAX or TEL to enter this information via the MultiPASS operation panel. The following pages explain how to be displayed in front...
... Our Ref. 350/PJC/EAC The following is an example of the sender information printed on a received fax. 12/27/2000 10:12 FAX 123 4567 CANON CANON CANADA 001 DATE AND TIME Date and time of transmission. UNIT NAME Your name or company name. DESTINATION If you used memory sending and dialed... the fax number using one-touch or coded speed dialing, the other party's name appears here. You can select FAX or TEL to enter this information via the MultiPASS operation panel. The following pages explain how to be displayed in front...
User Manual
Page 28
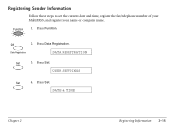
Press Set. Press Function. 01 2. DATE & TIME Chapter 2 Registering Information 2-15 Press Set. Function 1. Press Data Registration. USER SETTINGS Set 4. Data Registration DATA REGSTRATION Set 3. Registering Sender Information Follow these steps to set the current date and time, register the fax/telephone number of your MultiPASS, and register your name or company name.
Press Set. Press Function. 01 2. DATE & TIME Chapter 2 Registering Information 2-15 Press Set. Function 1. Press Data Registration. USER SETTINGS Set 4. Data Registration DATA REGSTRATION Set 3. Registering Sender Information Follow these steps to set the current date and time, register the fax/telephone number of your MultiPASS, and register your name or company name.
User Manual
Page 30
... number can use l to enter your fax/telephone number and name, continue with the steps that follow. I If you have entered the correct date and time, press Set to standby mode. Chapter 2 ... Space. Alternatively, you only need to adjust the date and time, press Stop after this step to return to register your entry. To register your fax/telephone number. Press Set again. Use the numeric buttons to delete digits from the rightmost digit. I If you can be up to 20 digits long...
... number can use l to enter your fax/telephone number and name, continue with the steps that follow. I If you have entered the correct date and time, press Set to standby mode. Chapter 2 ... Space. Alternatively, you only need to adjust the date and time, press Stop after this step to return to register your entry. To register your fax/telephone number. Press Set again. Use the numeric buttons to delete digits from the rightmost digit. I If you can be up to 20 digits long...

User Manual
Page 31
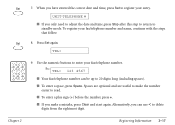
...name or company name. Press Set again. _ :A ABC 12 GHI 4 JKL 5 PRS 7 TUV 8 OPER 0 Tone DEF 3 MNO 6 WXY 9 SYMBOLS # 12. Ex: CANON :A I To enter letters, numbers, and symbols, refer to 24 characters long (including spaces). I Your name can be up to the instructions on page 2-8. Use the... numeric buttons to register your fax/telephone number. UNIT NAME I You can use l to move back to the character you make a mistake, press Clear and start again. I ...
...name or company name. Press Set again. _ :A ABC 12 GHI 4 JKL 5 PRS 7 TUV 8 OPER 0 Tone DEF 3 MNO 6 WXY 9 SYMBOLS # 12. Ex: CANON :A I To enter letters, numbers, and symbols, refer to 24 characters long (including spaces). I Your name can be up to the instructions on page 2-8. Use the... numeric buttons to register your fax/telephone number. UNIT NAME I You can use l to move back to the character you make a mistake, press Clear and start again. I ...
User Manual
Page 33
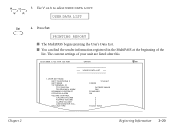
... 4. Press Set. PRINTING REPORT I You can find the sender information registered in the MultiPASS at the beginning of your unit are listed after this. 12/27/2000 17:23 FAX 123 4567 CANON 001 USER'S DATA LIST 1.USER SETTINGS UNIT TELEPHONE # UNIT NAME TX TERMINAL ID TTI...ALARM VOLUME CONTROL CALLING VOLUME KEYPAD VOLUME ALARM VOLUME LINE MONITOR VOL. TEL LINE TYPE CANON 123 4567 OUTSIDE IMAGE FAX S TA N D A R D ON 2 2 2 2 TOUCH TONE Chapter 2 Registering Information 2-20 08 02 Set 3. I The MultiPASS begins printing the User's Data List. Use d or u to select USER DATA ...
... 4. Press Set. PRINTING REPORT I You can find the sender information registered in the MultiPASS at the beginning of your unit are listed after this. 12/27/2000 17:23 FAX 123 4567 CANON 001 USER'S DATA LIST 1.USER SETTINGS UNIT TELEPHONE # UNIT NAME TX TERMINAL ID TTI...ALARM VOLUME CONTROL CALLING VOLUME KEYPAD VOLUME ALARM VOLUME LINE MONITOR VOL. TEL LINE TYPE CANON 123 4567 OUTSIDE IMAGE FAX S TA N D A R D ON 2 2 2 2 TOUCH TONE Chapter 2 Registering Information 2-20 08 02 Set 3. I The MultiPASS begins printing the User's Data List. Use d or u to select USER DATA ...
User Manual
Page 36
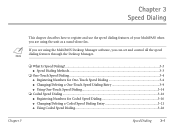
... G Using Coded Speed Dialing 3-26 Chapter 3 Speed Dialing 3-1 Chapter 3 Speed Dialing n This chapter describes how to register and use the speed dialing features of your MultiPASS when you are using the MultiPASS Desktop Manager software, you are using the unit as a stand-alone...
... G Using Coded Speed Dialing 3-26 Chapter 3 Speed Dialing 3-1 Chapter 3 Speed Dialing n This chapter describes how to register and use the speed dialing features of your MultiPASS when you are using the MultiPASS Desktop Manager software, you are using the unit as a stand-alone...
User Manual
Page 38
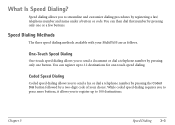
.... While coded speed dialing requires you to press more buttons, it allows you to send a fax or dial a telephone number by pressing the Coded Dial button followed by registering a fax/ telephone number and name under a button or code. Speed Dialing Methods The three speed dialing... methods available with your choice. You can register up to streamline and customize dialing procedures by a two-digit code of your MultiPASS are as follows. Coded...
.... While coded speed dialing requires you to press more buttons, it allows you to send a fax or dial a telephone number by pressing the Coded Dial button followed by registering a fax/ telephone number and name under a button or code. Speed Dialing Methods The three speed dialing... methods available with your choice. You can register up to streamline and customize dialing procedures by a two-digit code of your MultiPASS are as follows. Coded...
User Manual
Page 39
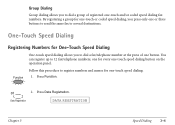
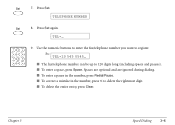
...Speed Dialing One-touch speed dialing allows you to register numbers and names for one-touch speed dialing. 1. Function Follow this procedure to dial a fax/telephone number at the press of registered one -touch speed dialing button on the operation panel. Press Data Registration. Data Registration DATA REGSTRATION Chapter ...-touch or coded speed dialing, you press only one button. By registering a group for every one -touch and/or coded speed dialing fax numbers. Press Function. 01 2. Group Dialing Group dialing allows you to dial a group of one or three buttons to send the same...
...Speed Dialing One-touch speed dialing allows you to register numbers and names for one-touch speed dialing. 1. Function Follow this procedure to dial a fax/telephone number at the press of registered one -touch speed dialing button on the operation panel. Press Data Registration. Data Registration DATA REGSTRATION Chapter ...-touch or coded speed dialing, you press only one button. By registering a group for every one -touch and/or coded speed dialing fax numbers. Press Function. 01 2. Group Dialing Group dialing allows you to dial a group of one or three buttons to send the same...
User Manual
Page 41
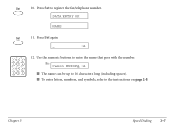
... number you want to 120 digits long (including spaces and pauses). Ex: TEL=20 545 8545_ I The fax/telephone number can be up to register. TEL=_ ABC 12 GHI 4 JKL 5 PRS 7 TUV 8 OPER 0 Tone DEF 3 MNO 6 WXY 9 SYMBOLS # 9. Spaces are optional and are ...
... number you want to 120 digits long (including spaces and pauses). Ex: TEL=20 545 8545_ I The fax/telephone number can be up to register. TEL=_ ABC 12 GHI 4 JKL 5 PRS 7 TUV 8 OPER 0 Tone DEF 3 MNO 6 WXY 9 SYMBOLS # 9. Spaces are optional and are ...
User Manual
Page 42
DATA ENTRY OK NAME Set 11. Ex: Canon EUROPA :A I To enter letters, numbers, and symbols, refer to 16 characters long (including spaces). Set 10. Use the numeric buttons to register the fax/telephone number. Chapter 3 Speed Dialing 3-7 I The name can be up to the instructions on page 2-8. Press Set again. _ :A ABC 12 GHI 4 JKL 5 PRS 7 TUV 8 OPER 0 Tone DEF 3 MNO 6 WXY 9 SYMBOLS # 12. Press Set to enter the name that goes with the number.
DATA ENTRY OK NAME Set 11. Ex: Canon EUROPA :A I To enter letters, numbers, and symbols, refer to 16 characters long (including spaces). Set 10. Use the numeric buttons to register the fax/telephone number. Chapter 3 Speed Dialing 3-7 I The name can be up to the instructions on page 2-8. Press Set again. _ :A ABC 12 GHI 4 JKL 5 PRS 7 TUV 8 OPER 0 Tone DEF 3 MNO 6 WXY 9 SYMBOLS # 12. Press Set to enter the name that goes with the number.
User Manual
Page 46
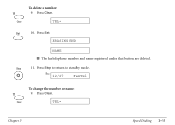
Press Set. Press Stop to return to standby mode. TEL= Set 10. TEL= Chapter 3 Speed Dialing 3-11 ERASING END NAME I The fax/telephone number and name registered under that button are deleted. 11 Clear To delete a number: 9. Ex: 12/27 FaxTel 11 Clear To change the number or name: 9. Press Clear. Press Clear. Stop 11.
Press Set. Press Stop to return to standby mode. TEL= Set 10. TEL= Chapter 3 Speed Dialing 3-11 ERASING END NAME I The fax/telephone number and name registered under that button are deleted. 11 Clear To delete a number: 9. Ex: 12/27 FaxTel 11 Clear To change the number or name: 9. Press Clear. Press Clear. Stop 11.


