
Quick Start Guide
Page 8
... on the LCD" on page 71. 2 If you are using the machine connected to a computer, turn on the machine. Important About the Power Plug When removing the power plug after turing off the machine, be sure to your computer. „ Turning off the Machine 1 To turn on your computer (or a... the Machine On and Off Turn on the machine before printing. „ Turning on the Machine Before turning on page 53. 4 Before Printing The POWER lamp flashes green, and changes to print. If you are not complete, follow the Easy Setup Instructions to complete them. 1 Open the Operation Panel and...
... on the LCD" on page 71. 2 If you are using the machine connected to a computer, turn on the machine. Important About the Power Plug When removing the power plug after turing off the machine, be sure to your computer. „ Turning off the Machine 1 To turn on your computer (or a... the Machine On and Off Turn on the machine before printing. „ Turning on the Machine Before turning on page 53. 4 Before Printing The POWER lamp flashes green, and changes to print. If you are not complete, follow the Easy Setup Instructions to complete them. 1 Open the Operation Panel and...

Quick Start Guide
Page 9
..."Other Settings" in "Changing the Machine Settings" of User's Guide on-screen manual. Press any button to copy or scan, the machine will exit from Power save mode, the internal fluorescent lamp is not operated for a certain interval. z The Screen-saver Mode The LCD goes out if the machine is turned... off, and only the POWER lamp stay lit. When you use the machine frequently, we recommend that the machine waits before the LCD goes out. You cannot change the wait...
..."Other Settings" in "Changing the Machine Settings" of User's Guide on-screen manual. Press any button to copy or scan, the machine will exit from Power save mode, the internal fluorescent lamp is not operated for a certain interval. z The Screen-saver Mode The LCD goes out if the machine is turned... off, and only the POWER lamp stay lit. When you use the machine frequently, we recommend that the machine waits before the LCD goes out. You cannot change the wait...
Quick Start Guide
Page 57
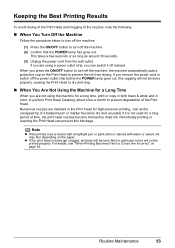
... seconds or as long as the uncapped tip of a ballpoint pen or marker becomes dry and unusable if it off the machine. (2) Confirm that the POWER lamp has gone out. z If the print head nozzles get clogged, printouts will become blocked by dried ink. Just as around 30 seconds. (3) Unplug the... outlet. Keeping the Best Printing Results To avoid drying of the Print Head and clogging of time, the print head nozzles become faint or particular colors will not be printed properly. Note z If the printed area is not used for a long time, print or copy in both black & white and in...
... seconds or as long as the uncapped tip of a ballpoint pen or marker becomes dry and unusable if it off the machine. (2) Confirm that the POWER lamp has gone out. z If the print head nozzles get clogged, printouts will become blocked by dried ink. Just as around 30 seconds. (3) Unplug the... outlet. Keeping the Best Printing Results To avoid drying of the Print Head and clogging of time, the print head nozzles become faint or particular colors will not be printed properly. Note z If the printed area is not used for a long time, print or copy in both black & white and in...
Quick Start Guide
Page 64
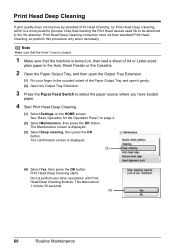
... the Operation Panel" on the HOME screen. Do not perform any other operations until Print Head Deep Cleaning finishes. Print Head Deep Cleaning consumes more powerful process. The Maintenance screen is closed. 1 Make sure that cleaning the Print Head causes used ink to select the paper source where you have loaded...
... the Operation Panel" on the HOME screen. Do not perform any other operations until Print Head Deep Cleaning finishes. Print Head Deep Cleaning consumes more powerful process. The Maintenance screen is closed. 1 Make sure that cleaning the Print Head causes used ink to select the paper source where you have loaded...
Quick Start Guide
Page 71
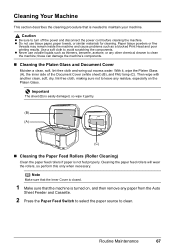
..., paper towels, or similar materials for cleaning. Then wipe with another clean, soft, dry, lint-free cloth, making sure not to turn off the power and disconnect the power cord before cleaning the machine. these can damage the machine's components. „ Cleaning the Platen Glass and Document Cover Moisten a clean, soft, lint...
..., paper towels, or similar materials for cleaning. Then wipe with another clean, soft, dry, lint-free cloth, making sure not to turn off the power and disconnect the power cord before cleaning the machine. these can damage the machine's components. „ Cleaning the Platen Glass and Document Cover Moisten a clean, soft, lint...

Quick Start Guide
Page 77
... representative. z An Ink tank error has occurred. (The lamp on . If the same error occurs, contact a Canon service representative. "The remaining level of the machine from the power supply. Replace the ink tank." See "Replacing an Ink Tank" on page 63. Slide the Scanner Lock Switch to the release ... Replace the ink tank. The Card Slot is not compatible with an ink tank that Canon shall not be correctly detected. U140 U150 z The ink tank is set to strong light. After a while, plug the power cord of A4/Letter-sized paper (MP-101) in this condition, you need to ...
... representative. z An Ink tank error has occurred. (The lamp on . If the same error occurs, contact a Canon service representative. "The remaining level of the machine from the power supply. Replace the ink tank." See "Replacing an Ink Tank" on page 63. Slide the Scanner Lock Switch to the release ... Replace the ink tank. The Card Slot is not compatible with an ink tank that Canon shall not be correctly detected. U140 U150 z The ink tank is set to strong light. After a while, plug the power cord of A4/Letter-sized paper (MP-101) in this condition, you need to ...
Quick Start Guide
Page 78
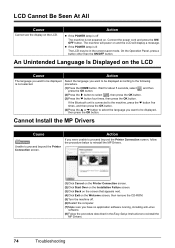
... button. Action If you want to be displayed is lit The LCD may be displayed according to reinstall the MP Drivers. 74 Troubleshooting Connect the power cord and press the ON/ OFF button. On the Operation Panel, press a button other than the ON/OFF button. LCD Cannot Be Seen At All... Cause Cannot see the display on and the LCD will display a message. The machine will power on the LCD. If the Bluetooth unit is not powered on the LCD Cause Action The language you were unable to select , then press the OK button. (3)Press the } button...
... button. Action If you want to be displayed is lit The LCD may be displayed according to reinstall the MP Drivers. 74 Troubleshooting Connect the power cord and press the ON/ OFF button. On the Operation Panel, press a button other than the ON/OFF button. LCD Cannot Be Seen At All... Cause Cannot see the display on and the LCD will display a message. The machine will power on the LCD. If the Bluetooth unit is not powered on the LCD Cause Action The language you were unable to select , then press the OK button. (3)Press the } button...
Quick Start Guide
Page 91
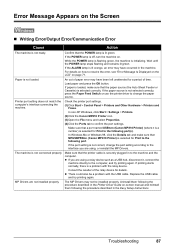
.... Load paper and press the OK button. In Windows Me or Windows 98, click the Details tab and make sure that a port named USBnnn (Canon MP810 Printer) (where n is a number) is not connected properly. The MP Drivers may have been left unattended for a period of the relay device for... > Printers. (2)Click the Canon MP810 Printer icon. (3)Open the File menu and select Properties. (4)Click the Ports tab to resolve the error, see "Error Message Is Displayed on the LCD" on page 71. If the paper source is off, turn the machine on. If the POWER lamp is not selected correctly...
.... Load paper and press the OK button. In Windows Me or Windows 98, click the Details tab and make sure that a port named USBnnn (Canon MP810 Printer) (where n is a number) is not connected properly. The MP Drivers may have been left unattended for a period of the relay device for... > Printers. (2)Click the Canon MP810 Printer icon. (3)Open the File menu and select Properties. (4)Click the Ports tab to resolve the error, see "Error Message Is Displayed on the LCD" on page 71. If the paper source is off, turn the machine on. If the POWER lamp is not selected correctly...
Quick Start Guide
Page 92
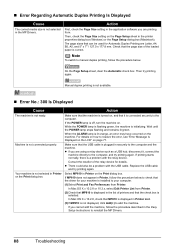
...Preferences from Printer. Select MP810 in the printer properties dialog box (Windows) or the Page Setup dialog box (Macintosh). Manual duplex printing is not available. „ Error No.: 300 Is Displayed Cause Action The machine is off, turn the machine on. While the POWER lamp is flashing green,...orange, an error may have occurred on the Print dialog box. Wait until the POWER lamp stops flashing and remains lit green. Machine is correct. z If you are printing from Printer. (2)Check that MP810 is displayed in the list of printers and that the check box is initializing. ...
...Preferences from Printer. Select MP810 in the printer properties dialog box (Windows) or the Page Setup dialog box (Macintosh). Manual duplex printing is not available. „ Error No.: 300 Is Displayed Cause Action The machine is off, turn the machine on. While the POWER lamp is flashing green,...orange, an error may have occurred on the Print dialog box. Wait until the POWER lamp stops flashing and remains lit green. Machine is correct. z If you are printing from Printer. (2)Check that MP810 is displayed in the list of printers and that the check box is initializing. ...

Quick Start Guide
Page 95
...in this condition, you need to check the machine for detecting the remaining ink level is memorized. Confirm the error message displayed on your Canon service representative. *1 To resume printing, you are not dirty. If you will need to call for servicing to replace the absorber and ... This error message indicates that the ink absorber is installed. Printing with an ink tank that was once empty may have occurred. (Machine's POWER lamp flashes green and ALARM lamp flashes orange alternately.) Disconnect the cable between the machine and the camera, turn on -screen manual. Press...
...in this condition, you need to check the machine for detecting the remaining ink level is memorized. Confirm the error message displayed on your Canon service representative. *1 To resume printing, you are not dirty. If you will need to call for servicing to replace the absorber and ... This error message indicates that the ink absorber is installed. Printing with an ink tank that was once empty may have occurred. (Machine's POWER lamp flashes green and ALARM lamp flashes orange alternately.) Disconnect the cable between the machine and the camera, turn on -screen manual. Press...
Quick Start Guide
Page 96
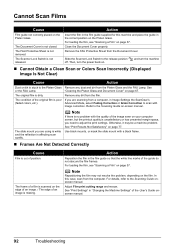
Remove the FAU Protective Sheet from the Platen Glass and the FAU Lamp. and turn the power back on. Otherwise, it may not resolve the problem, depending on your computer screen, but the printout quality is unsatisfactory or has unwanted margin space,...Lock Switch is dirty. Slide the Scanner Lock Switch to the Scanning Guide onscreen manual. Then, turn the machine „ Cannot Obtain a Clean Scan or Colors Scan Incorrectly (Displayed Image Is Not Clear) Cause Action Dust or dirt is affecting scan quality. The original film is not released. Remove any dust...
Remove the FAU Protective Sheet from the Platen Glass and the FAU Lamp. and turn the power back on. Otherwise, it may not resolve the problem, depending on your computer screen, but the printout quality is unsatisfactory or has unwanted margin space,...Lock Switch is dirty. Slide the Scanner Lock Switch to the Scanning Guide onscreen manual. Then, turn the machine „ Cannot Obtain a Clean Scan or Colors Scan Incorrectly (Displayed Image Is Not Clear) Cause Action Dust or dirt is affecting scan quality. The original film is not released. Remove any dust...
Quick Start Guide
Page 98
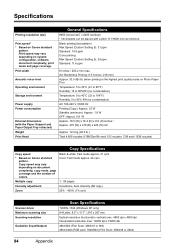
..., software, document complexity, print mode and page coverage. Print width Acoustic noise level Operating environment Storage environment Power supply Power consumption External dimensions (with the Paper Support and Paper Output Tray retracted) Weight Print Head General Specifications 9600 ...Film Scan: 48bit/48 or 24bit) 94 Appendix Specifications Printing resolution (dpi) Print speed* * Based on Canon standard pattern. Black & white: Fast mode approx. 31 cpm Color: Fast mode approx. 24 cpm Multiple copy 1 - 99 pages Intensity adjustment 9 positions, Auto intensity (...
..., software, document complexity, print mode and page coverage. Print width Acoustic noise level Operating environment Storage environment Power supply Power consumption External dimensions (with the Paper Support and Paper Output Tray retracted) Weight Print Head General Specifications 9600 ...Film Scan: 48bit/48 or 24bit) 94 Appendix Specifications Printing resolution (dpi) Print speed* * Based on Canon standard pattern. Black & white: Fast mode approx. 31 cpm Color: Fast mode approx. 24 cpm Multiple copy 1 - 99 pages Intensity adjustment 9 positions, Auto intensity (...
Quick Start Guide
Page 101
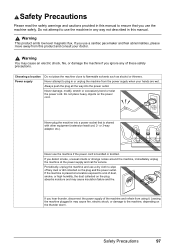
...around the machine, immediately unplug the machine at a location exposed to a lot of dust, smoke, or high humidity, the dust collected on the power cord. Never use a cardiac pacemaker and feel abnormalities, please move away from this product and consult your hands are wet. If you use the...this manual. Leaving the machine plugged in may cause fire, electric shock, or damage to the machine, depending on the plug and the power outlet. Safety Precautions 97 Do not attempt to use the machine safely. Warning This product emits low level magnetic flux. Never attempt to plug...
...around the machine, immediately unplug the machine at a location exposed to a lot of dust, smoke, or high humidity, the dust collected on the power cord. Never use a cardiac pacemaker and feel abnormalities, please move away from this product and consult your hands are wet. If you use the...this manual. Leaving the machine plugged in may cause fire, electric shock, or damage to the machine, depending on the plug and the power outlet. Safety Precautions 97 Do not attempt to use the machine safely. Warning This product emits low level magnetic flux. Never attempt to plug...

Quick Start Guide
Page 102
..., outdoors, or close to 95°F) and humidity of these safety precautions. Maintaining the machine Working around the machine Always unplug the machine from the power outlet before cleaning the machine. The machine contains high-voltage components. There are very humid or dusty, in contact with an ambient temperature range of...
..., outdoors, or close to 95°F) and humidity of these safety precautions. Maintaining the machine Working around the machine Always unplug the machine from the power outlet before cleaning the machine. The machine contains high-voltage components. There are very humid or dusty, in contact with an ambient temperature range of...

Quick Start Guide
Page 103
...press hard on a Print Head after printing. Do not throw ink tanks into the machine, unplug the power cord and call for the machine in the machine while it is kept clear at all times so you...Ink may break and cause injury. The metal parts may leak and damage the machine. Working around the power outlet is printing. AC 100-240 V, 50/60 Hz Never put your hands or fingers in the... or ink tanks. Do not transport or store the machine on the machine. Do not use a power supply source other than the one rated for service. Safety Precautions 99 Never remove the plug by pulling...
...press hard on a Print Head after printing. Do not throw ink tanks into the machine, unplug the power cord and call for the machine in the machine while it is kept clear at all times so you...Ink may break and cause injury. The metal parts may leak and damage the machine. Working around the power outlet is printing. AC 100-240 V, 50/60 Hz Never put your hands or fingers in the... or ink tanks. Do not transport or store the machine on the machine. Do not use a power supply source other than the one rated for service. Safety Precautions 99 Never remove the plug by pulling...
Easy Setup Instructions
Page 1
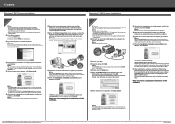
...paper (MP-101) into place. OK Note • The pattern is printed in front of the machine. Scanning Unit (Printer Cover) c Plug the power cord in "Loading Printing Paper" of the Quick Start Guide. Be sure to the right. b Twist off and discard the orange protective cap located ... than 10 minutes, the Print Head Holder moves to open the Output Tray Extension. this to turn on -screen manual. If the orange-colored protective film is not removed completely, problems with the right side of the Cover Guide, then slide the Paper Guide against the illustration...
...paper (MP-101) into place. OK Note • The pattern is printed in front of the machine. Scanning Unit (Printer Cover) c Plug the power cord in "Loading Printing Paper" of the Quick Start Guide. Be sure to the right. b Twist off and discard the orange protective cap located ... than 10 minutes, the Print Head Holder moves to open the Output Tray Extension. this to turn on -screen manual. If the orange-colored protective film is not removed completely, problems with the right side of the Cover Guide, then slide the Paper Guide against the illustration...
Easy Setup Instructions
Page 2
..., click Install. Select Custom Install in again, or turn the machine off the machine. (1) Press the ON/OFF button. (2) Make sure that the POWER lamp stops flashing. To resolve this, either unplug the USB cable then plug it back in order to choose the options you do not... which is shown in the U.S. If you are trademarks of each application. d Double-click the Setup icon. Part no. QT5-0786-V01 © 2006 Canon Inc. g When the list of the software. Now you see the Found New Hardware Wizard, remove the USB cable. Macintosh Important Since Mac® OS...
..., click Install. Select Custom Install in again, or turn the machine off the machine. (1) Press the ON/OFF button. (2) Make sure that the POWER lamp stops flashing. To resolve this, either unplug the USB cable then plug it back in order to choose the options you do not... which is shown in the U.S. If you are trademarks of each application. d Double-click the Setup icon. Part no. QT5-0786-V01 © 2006 Canon Inc. g When the list of the software. Now you see the Found New Hardware Wizard, remove the USB cable. Macintosh Important Since Mac® OS...


