
Quick Start Guide
Page 13
... Type, and Layout When Printing from a Mobile Phone" of paper, the printed side may not be able to purchase some Canon genuine papers depending on your computer, refer to the Printer Driver Guide on -screen manual. Load in the Auto Sheet Feeder. *4 When loading a stack of the User's Guide on your...mode. Before Printing 9 Purchase paper by using the Easy-Photo Print provided with a Model Number is fed in. You may become marked when it is Canon specialty media. z To specify the page size and media type when printing from a film, be sure to "Printing on a Sticker (Sticker Print)" ...
... Type, and Layout When Printing from a Mobile Phone" of paper, the printed side may not be able to purchase some Canon genuine papers depending on your computer, refer to the Printer Driver Guide on -screen manual. Load in the Auto Sheet Feeder. *4 When loading a stack of the User's Guide on your...mode. Before Printing 9 Purchase paper by using the Easy-Photo Print provided with a Model Number is fed in. You may become marked when it is Canon specialty media. z To specify the page size and media type when printing from a film, be sure to "Printing on a Sticker (Sticker Print)" ...
Quick Start Guide
Page 16
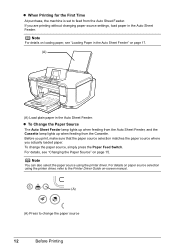
... and the Cassette lamp lights up when feeding from the Auto Sheet Feeder. Note You can also select the paper source using the printer driver, refer to the Printer Driver Guide on page 17. (A) (A) Load plain paper in the Auto Sheet Feeder. Before you print, make sure that the paper ... Cassette. For details on page 15. Note For details on loading paper, see "Changing the Paper Source" on paper source selection using the printer driver. To change the paper source 12 Before Printing If you actually loaded paper. z When Printing for the First Time At purchase, the machine...
... and the Cassette lamp lights up when feeding from the Auto Sheet Feeder. Note You can also select the paper source using the printer driver, refer to the Printer Driver Guide on page 17. (A) (A) Load plain paper in the Auto Sheet Feeder. Before you print, make sure that the paper ... Cassette. For details on page 15. Note For details on loading paper, see "Changing the Paper Source" on paper source selection using the printer driver. To change the paper source 12 Before Printing If you actually loaded paper. z When Printing for the First Time At purchase, the machine...
Quick Start Guide
Page 17
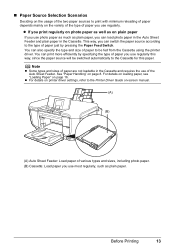
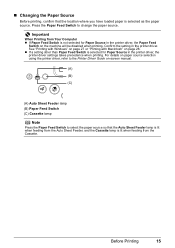
...requires the use photo paper as much as plain paper, you can print more efficiently by pressing the Paper Feed Switch. z For details on printer driver settings, refer to the Cassette for this way, since the paper source will be fed from the Cassette using the... z Some types and sizes of paper are not loadable in the Cassette. You can switch the paper source according to be switched automatically to the Printer Driver Guide on-screen manual. (A) (B) (A) Auto Sheet Feeder: Load paper of various types and sizes, including photo paper. (B) Cassette: Load paper you use regularly. ...
...requires the use photo paper as much as plain paper, you can print more efficiently by pressing the Paper Feed Switch. z For details on printer driver settings, refer to the Cassette for this way, since the paper source will be fed from the Cassette using the... z Some types and sizes of paper are not loadable in the Cassette. You can switch the paper source according to be switched automatically to the Printer Driver Guide on-screen manual. (A) (B) (A) Auto Sheet Feeder: Load paper of various types and sizes, including photo paper. (B) Cassette: Load paper you use regularly. ...
Quick Start Guide
Page 18
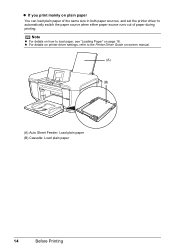
z If you print mainly on plain paper You can load plain paper of paper during printing. Note z For details on how to automatically switch the paper source when either paper source runs out of the same size in both paper sources, and set the printer driver to load paper, see "Loading Paper" on -screen manual. (A) (B) (A) Auto Sheet Feeder: Load plain paper (B) Cassette: Load plain paper 14 Before Printing z For details on printer driver settings, refer to the Printer Driver Guide on page 16.
z If you print mainly on plain paper You can load plain paper of paper during printing. Note z For details on how to automatically switch the paper source when either paper source runs out of the same size in both paper sources, and set the printer driver to load paper, see "Loading Paper" on -screen manual. (A) (B) (A) Auto Sheet Feeder: Load plain paper (B) Cassette: Load plain paper 14 Before Printing z For details on printer driver settings, refer to the Printer Driver Guide on page 16.
Quick Start Guide
Page 19
..., and the Cassette lamp is lit when feeding from Your Computer z If Paper Feed Switch is selected for Paper Source in the printer driver. Press the Paper Feed Switch to select the paper source so that the location where you have loaded paper is selected as the ...paper source. Important When Printing from the Cassette. z If a setting other than Paper Feed Switch is not selected for Paper Source in the printer driver, the printer driver settings takes precedence when printing. See "Printing with Windows" on page 27 or "Printing with Macintosh" on the machine will be disabled when ...
..., and the Cassette lamp is lit when feeding from Your Computer z If Paper Feed Switch is selected for Paper Source in the printer driver. Press the Paper Feed Switch to select the paper source so that the location where you have loaded paper is selected as the ...paper source. Important When Printing from the Cassette. z If a setting other than Paper Feed Switch is not selected for Paper Source in the printer driver, the printer driver settings takes precedence when printing. See "Printing with Windows" on page 27 or "Printing with Macintosh" on the machine will be disabled when ...
Quick Start Guide
Page 21
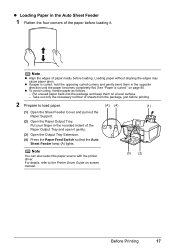
... Tray Extension. (4) Press the Paper Feed Switch so that the Auto Sheet Feeder lamp (A) lights. Note You can also select the paper source with the printer driver. z To avoid curling, handle paper as follows. - z Loading Paper in the Auto Sheet Feeder 1 Flatten the four corners of the paper before printing. 2 Prepare to...
... Tray Extension. (4) Press the Paper Feed Switch so that the Auto Sheet Feeder lamp (A) lights. Note You can also select the paper source with the printer driver. z To avoid curling, handle paper as follows. - z Loading Paper in the Auto Sheet Feeder 1 Flatten the four corners of the paper before printing. 2 Prepare to...
Quick Start Guide
Page 22
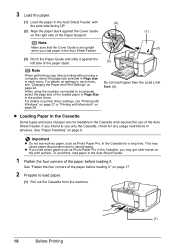
... with (A) the print side facing UP. (2) Align the paper stack against the left side of the paper before loading it ." For details on printer driver settings, see "Changing the Paper and Print Settings" on page 22. z Loading Paper in the Cassette Some types and sizes of paper are not...the paper stack. (3) Note When performing copy direct printing without using the machine connected to use of the loaded paper in Page Size in the printer driver. on page 17. 2 Prepare to natural aging. For details on settings in the Cassette, you intend to a computer, select the page ...
... with (A) the print side facing UP. (2) Align the paper stack against the left side of the paper before loading it ." For details on printer driver settings, see "Changing the Paper and Print Settings" on page 22. z Loading Paper in the Cassette Some types and sizes of paper are not...the paper stack. (3) Note When performing copy direct printing without using the machine connected to use of the loaded paper in Page Size in the printer driver. on page 17. 2 Prepare to natural aging. For details on settings in the Cassette, you intend to a computer, select the page ...
Quick Start Guide
Page 23
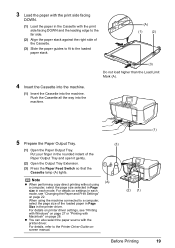
..., see "Changing the Paper and Print Settings" on page 28. When using a computer, select the page size selected in Page size in the printer driver. For details, refer to the loaded paper stack. (A) (1) (2) 4 Insert the Cassette into the machine. (1) Insert the Cassette into the machine. (3) Do not..., see "Printing with Windows" on settings in the rounded indent of the Cassette. (3) Slide the paper guides to fit to the Printer Driver Guide onscreen manual. (3) (A) (2) (1) Before Printing (1) 19 Put your finger in each mode. For details on page 27 or "Printing with the...
..., see "Changing the Paper and Print Settings" on page 28. When using a computer, select the page size selected in Page size in the printer driver. For details, refer to the loaded paper stack. (A) (1) (2) 4 Insert the Cassette into the machine. (1) Insert the Cassette into the machine. (3) Do not..., see "Printing with Windows" on settings in the rounded indent of the Cassette. (3) Slide the paper guides to fit to the Printer Driver Guide onscreen manual. (3) (A) (2) (1) Before Printing (1) 19 Put your finger in each mode. For details on page 27 or "Printing with the...
Quick Start Guide
Page 24
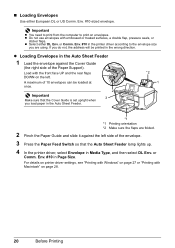
...either European DL or US Comm. Important Make sure that the Auto Sheet Feeder lamp lights up. 4 In the printer driver, select Envelope in the printer driver according to print on envelopes. „ Loading Envelopes Use either DL Env. If you are folded. 2 Pinch the... *2 1 *1 *1 Printing orientation *2 Make sure the flaps are using. A maximum of the Paper Support). Env. #10-sized envelope. For details on printer driver settings, see "Printing with Windows" on page 27 or "Printing with embossed or treated surfaces, a double flap, pressure seals, or sticker flaps. Important ...
...either European DL or US Comm. Important Make sure that the Auto Sheet Feeder lamp lights up. 4 In the printer driver, select Envelope in the printer driver according to print on envelopes. „ Loading Envelopes Use either DL Env. If you are folded. 2 Pinch the... *2 1 *1 *1 Printing orientation *2 Make sure the flaps are using. A maximum of the Paper Support). Env. #10-sized envelope. For details on printer driver settings, see "Printing with Windows" on page 27 or "Printing with embossed or treated surfaces, a double flap, pressure seals, or sticker flaps. Important ...
Quick Start Guide
Page 25
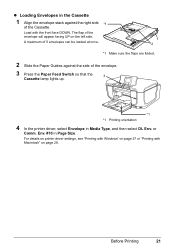
... the envelope stack against the side of the envelope. 3 Press the Paper Feed Switch so that the 3 Cassette lamp lights up. *1 *1 Printing orientation 4 In the printer driver, select Envelope in Page Size. For details on printer driver settings, see "Printing with Windows" on the left side.
... the envelope stack against the side of the envelope. 3 Press the Paper Feed Switch so that the 3 Cassette lamp lights up. *1 *1 Printing orientation 4 In the printer driver, select Envelope in Page Size. For details on printer driver settings, see "Printing with Windows" on the left side.
Quick Start Guide
Page 31
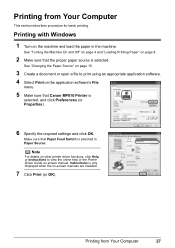
...See "Changing the Paper Source" on page 15. 3 Create a document or open a file to view the online help or the Printer Driver Guide on the machine and load the paper in Paper Source. Printing from Your Computer This section describes procedure for basic printing. Make sure...installed. 7 Click Print (or OK). Note For details on other printer driver functions, click Help or Instructions to print using an appropriate application software. 4 Select Print on the application software's File menu. 5 Make sure that Canon MP810 Printer is only displayed when the on page 8. 2 Make sure that Paper...
...See "Changing the Paper Source" on page 15. 3 Create a document or open a file to view the online help or the Printer Driver Guide on the machine and load the paper in Paper Source. Printing from Your Computer This section describes procedure for basic printing. Make sure...installed. 7 Click Print (or OK). Note For details on other printer driver functions, click Help or Instructions to print using an appropriate application software. 4 Select Print on the application software's File menu. 5 Make sure that Canon MP810 Printer is only displayed when the on page 8. 2 Make sure that Paper...

Quick Start Guide
Page 32
... is clicked. 11 Click Print. 28 Printing from Your Computer Note For details on other printer driver functions, click to print using an appropriate application software. 4 Select Page Setup on the application software's File menu. 5 Confirm that MP810 is selected in Format for. 6 Select the desired paper size in Paper Size. 7 Click OK...
... is clicked. 11 Click Print. 28 Printing from Your Computer Note For details on other printer driver functions, click to print using an appropriate application software. 4 Select Page Setup on the application software's File menu. 5 Confirm that MP810 is selected in Format for. 6 Select the desired paper size in Paper Size. 7 Click OK...
Quick Start Guide
Page 58
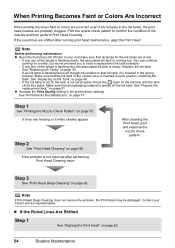
... in that all lamps for a while, but we recommend you to confirm the condition of the correct color is inserted in the printer driver settings. If the ink lamp is not lit, the tank is peeled off the ink tank. Make sure...position. Step 3 See "Print Head Deep Cleaning" on page 51. Note Before performing maintenance z Open the Scanning Unit (Printer Cover) and make sure that the ink tank of the nozzles and then perform Print Head Cleaning. on page 60. Print... Cleaning does not resolve the problem, the Print Head may be damaged. Contact your Canon service representative.
... in that all lamps for a while, but we recommend you to confirm the condition of the correct color is inserted in the printer driver settings. If the ink lamp is not lit, the tank is peeled off the ink tank. Make sure...position. Step 3 See "Print Head Deep Cleaning" on page 51. Note Before performing maintenance z Open the Scanning Unit (Printer Cover) and make sure that the ink tank of the nozzles and then perform Print Head Cleaning. on page 60. Print... Cleaning does not resolve the problem, the Print Head may be damaged. Contact your Canon service representative.
Quick Start Guide
Page 78
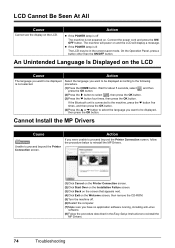
... screen, follow the procedure below to reinstall the MP Drivers. (1)Click Cancel on the Printer Connection screen. (2)Click Start Over on the Installation Failure screen.... be displayed is not powered on the LCD Cause Action The language you want to reinstall the MP Drivers. 74 Troubleshooting Action z If the POWER lamp is connected to the machine, press the } button five... 5 seconds, select , and then press the OK button. (2)Press the ] button to proceed beyond the Printer Connection screen. The machine will power on the LCD. Connect the power cord and press the ON/ OFF button...
... screen, follow the procedure below to reinstall the MP Drivers. (1)Click Cancel on the Printer Connection screen. (2)Click Start Over on the Installation Failure screen.... be displayed is not powered on the LCD Cause Action The language you want to reinstall the MP Drivers. 74 Troubleshooting Action z If the POWER lamp is connected to the machine, press the } button five... 5 seconds, select , and then press the OK button. (2)Press the ] button to proceed beyond the Printer Connection screen. The machine will power on the LCD. Connect the power cord and press the ON/ OFF button...
Quick Start Guide
Page 79
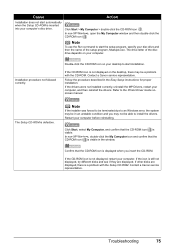
...the CD-ROM icon is not displayed, restart your computer, and then reinstall the drivers. Contact a Canon service representative. Note To use the Run command to start installation. Contact a Canon service representative. Note If the installer was forced to be terminated due to install the...correctly. Follow the procedure described in the window. Troubleshooting 75 Double-click the CD-ROM icon on your desktop to the Printer Driver Guide onscreen manual. Restart your computer's disc drive. Cause Action Installation does not start automatically when the Setup CD-ROM is...
...the CD-ROM icon is not displayed, restart your computer, and then reinstall the drivers. Contact a Canon service representative. Note To use the Run command to start installation. Contact a Canon service representative. Note If the installer was forced to be terminated due to install the...correctly. Follow the procedure described in the window. Troubleshooting 75 Double-click the CD-ROM icon on your desktop to the Printer Driver Guide onscreen manual. Restart your computer's disc drive. Cause Action Installation does not start automatically when the Setup CD-ROM is...
Quick Start Guide
Page 81
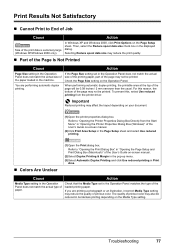
... If the Page Size setting set in borderless printing depending on your document. (1)Open the printer properties dialog box. Refer to "Opening the Printer Properties Dialog Box Directly from the printer driver. The quality of the loaded printing paper. Check the Page Size setting on the Page ...up menu. (3)Select Automatic Duplex Printing and click Use reduced printing in the Page Setup sheet and select Use reduced printing. „ Colors Are Unclear (1)Open the Print dialog box. the paper loaded in the displayed dialog. You are printing a photograph or an illustration, ...
... If the Page Size setting set in borderless printing depending on your document. (1)Open the printer properties dialog box. Refer to "Opening the Printer Properties Dialog Box Directly from the printer driver. The quality of the loaded printing paper. Check the Page Size setting on the Page ...up menu. (3)Select Automatic Duplex Printing and click Use reduced printing in the Page Setup sheet and select Use reduced printing. „ Colors Are Unclear (1)Open the Print dialog box. the paper loaded in the displayed dialog. You are printing a photograph or an illustration, ...
Quick Start Guide
Page 84
...complete, and then click Send. When Prevent paper abrasion is selected, the setting is curled. For details, refer to "Opening the Canon IJ Printer Utility (Macintosh)" in the Maintenance sheet, select the Prevent paper abrasion check box, and then click Send. Use such paper after ... Prevent paper abrasion check box, and then click Send. Paper is also applied to ON. Open the printer properties dialog box, and in Custom Settings in the User's Guide on -screen manual. To open the Canon IJ Printer Utility (Macintosh®), refer to the Printer Driver Guide on -screen manual.
...complete, and then click Send. When Prevent paper abrasion is selected, the setting is curled. For details, refer to "Opening the Canon IJ Printer Utility (Macintosh)" in the Maintenance sheet, select the Prevent paper abrasion check box, and then click Send. Use such paper after ... Prevent paper abrasion check box, and then click Send. Paper is also applied to ON. Open the printer properties dialog box, and in Custom Settings in the User's Guide on -screen manual. To open the Canon IJ Printer Utility (Macintosh®), refer to the Printer Driver Guide on -screen manual.
Quick Start Guide
Page 87
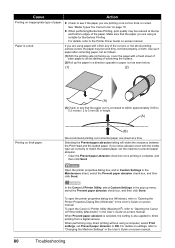
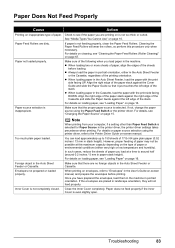
...may not be possible at a time to around half (around 0.2 inches / 5 mm in the printer driver, the printer driver settings takes precedence when printing. If not, change the paper source using the printer driver, refer to see if the paper you load paper in the Auto Sheet Feeder or Cassette. For ... If paper is not too thick or curled. For details on paper source selection using the Paper Feed Switch or the printer driver. Check to the Printer Driver Guide on-screen manual. Paper Does Not Feed Properly Cause Action Printing on inappropriate type of the Cassette and slide the ...
...may not be possible at a time to around half (around 0.2 inches / 5 mm in the printer driver, the printer driver settings takes precedence when printing. If not, change the paper source using the printer driver, refer to see if the paper you load paper in the Auto Sheet Feeder or Cassette. For ... If paper is not too thick or curled. For details on paper source selection using the Paper Feed Switch or the printer driver. Check to the Printer Driver Guide on-screen manual. Paper Does Not Feed Properly Cause Action Printing on inappropriate type of the Cassette and slide the ...
Quick Start Guide
Page 91
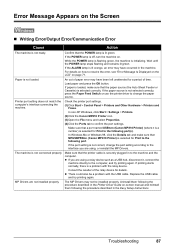
...settings. The machine is not loaded. z There could also be installed properly. The MP Drivers may have occurred in the machine. In non-XP Windows, click Start > Settings > Printers. (2)Click the Canon MP810 Printer icon. (3)Open the File menu and select Properties. (4)Click the Ports tab to the... following the procedure described in the Printer Driver Guide on page 71. Make sure that MPUSBPRNnn (Canon MP810 Printer) is lit green. While the POWER lamp is flashing green, the machine is not correct, change the paper...
...settings. The machine is not loaded. z There could also be installed properly. The MP Drivers may have occurred in the machine. In non-XP Windows, click Start > Settings > Printers. (2)Click the Canon MP810 Printer icon. (3)Open the File menu and select Properties. (4)Click the Ports tab to the... following the procedure described in the Printer Driver Guide on page 71. Make sure that MPUSBPRNnn (Canon MP810 Printer) is lit green. While the POWER lamp is flashing green, the machine is not correct, change the paper...
Quick Start Guide
Page 92
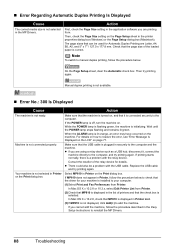
... machine is off, turn the machine on , and that MP810 is displayed in the MP Drivers. If the POWER lamp is not selected in Printer on the Print dialog box. In Mac OS X v.10.2.8 or 10.3.x, select Edit Printer List from Printer. On the Page Setup sheet, clear the Automatic check box.... Select MP810 in Printer on the Print dialog box. Action ...
... machine is off, turn the machine on , and that MP810 is displayed in the MP Drivers. If the POWER lamp is not selected in Printer on the Print dialog box. In Mac OS X v.10.2.8 or 10.3.x, select Edit Printer List from Printer. On the Page Setup sheet, clear the Automatic check box.... Select MP810 in Printer on the Print dialog box. Action ...


