Getting Started
Page 9
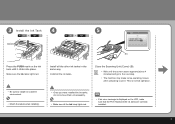
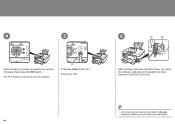
... the Ink Tank 4 5 (B) Press the PUSH mark on the LCD, make some operating noises when preparing to print. Make sure the Ink lamp lights red. Install all the Ink lamp lights red. • If an error message is normal operation. • Be sure to the next step. • The machine may make...
... the Ink Tank 4 5 (B) Press the PUSH mark on the LCD, make some operating noises when preparing to print. Make sure the Ink lamp lights red. Install all the Ink lamp lights red. • If an error message is normal operation. • Be sure to the next step. • The machine may make...
Getting Started
Page 15
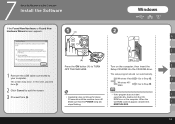
The setup program should run automatically. MSETUP4.EXE. 13 Make sure that the POWER lamp (B) ROM icon on the computer, then insert the E OFF THE MACHINE. The screen may close. Windows Vista Go to quit the screen. 3 Proceed from . When ...
The setup program should run automatically. MSETUP4.EXE. 13 Make sure that the POWER lamp (B) ROM icon on the computer, then insert the E OFF THE MACHINE. The screen may close. Windows Vista Go to quit the screen. 3 Proceed from . When ...
Getting Started
Page 64
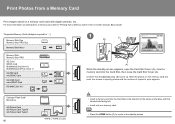
.... • Insert only one memory card. • Press the HOME button (C) to return to the standby screen. MS Duo SD MS Confirm that the Access lamp (B) has lit up. Print Photos from a Memory Card" in the on-screen manual: Basic Guide. *Supported Memory Cards (Adapter required for .) Memory Stick Duo Memory...
.... • Insert only one memory card. • Press the HOME button (C) to return to the standby screen. MS Duo SD MS Confirm that the Access lamp (B) has lit up. Print Photos from a Memory Card" in the on-screen manual: Basic Guide. *Supported Memory Cards (Adapter required for .) Memory Stick Duo Memory...
Getting Started
Page 66
The Print Settings Confirmation Screen appears. (F) Press the Color button (F). Saved data may be damaged. 64 Printing will start. 6 (A) (B) After printing, open the Card Slot Cover (A), pinch the memory card and pull it straight out, then close the Card Slot Cover (A). • Do not remove the memory card while the Access lamp (B) is flashing. 4 5 Press the [+] or [-] button to specify the number of copies, then press the OK button.
The Print Settings Confirmation Screen appears. (F) Press the Color button (F). Saved data may be damaged. 64 Printing will start. 6 (A) (B) After printing, open the Card Slot Cover (A), pinch the memory card and pull it straight out, then close the Card Slot Cover (A). • Do not remove the memory card while the Access lamp (B) is flashing. 4 5 Press the [+] or [-] button to specify the number of copies, then press the OK button.


