Quick Start Guide
Page 4
... in this manual are trademarks of Microsoft Corporation in the U.S. When Using Mac OS X v.10.5.x For details on the printer driver functions, refer to the PC Printing Guide on your application program, operations may be transmitted or copied in the U.S. has determined .... No representation is a trademark or registered trademark of your Canon PIXMA MP190 series Photo All-In-One. The steps described in this manual and in Windows Vista operating system Ultimate Edition (hereafter referred to be understood to as "Windows Vista") and Mac® OS X v.10.4.x. and/or...
... in this manual are trademarks of Microsoft Corporation in the U.S. When Using Mac OS X v.10.5.x For details on the printer driver functions, refer to the PC Printing Guide on your application program, operations may be transmitted or copied in the U.S. has determined .... No representation is a trademark or registered trademark of your Canon PIXMA MP190 series Photo All-In-One. The steps described in this manual and in Windows Vista operating system Ultimate Edition (hereafter referred to be understood to as "Windows Vista") and Mac® OS X v.10.4.x. and/or...
Quick Start Guide
Page 5
... Settings 21 Using Useful Copy Function 21 Printing from Your Computer 22 Printing with Windows 22 Printing with Macintosh 23 Scanning Images 24 Scanning Methods 24 Routine Maintenance 25 List ...of Maintenance Codes 25 When Printing Becomes Faint or Colors Are Incorrect 26 Printing the Nozzle Check Pattern 27 Examining the Nozzle Check Pattern ...on the LED .......44 LED Cannot Be Seen At All 46 Cannot Install the MP Drivers 47 Cannot Connect to Computer Properly.........48 Print Results Not Satisfactory 49 Print Results Not Satisfactory...
... Settings 21 Using Useful Copy Function 21 Printing from Your Computer 22 Printing with Windows 22 Printing with Macintosh 23 Scanning Images 24 Scanning Methods 24 Routine Maintenance 25 List ...of Maintenance Codes 25 When Printing Becomes Faint or Colors Are Incorrect 26 Printing the Nozzle Check Pattern 27 Examining the Nozzle Check Pattern ...on the LED .......44 LED Cannot Be Seen At All 46 Cannot Install the MP Drivers 47 Cannot Connect to Computer Properly.........48 Print Results Not Satisfactory 49 Print Results Not Satisfactory...

Quick Start Guide
Page 20
... Adjust the position of the Rear Tray. (3) Pinch the Paper Guide and slide it is fed. For details on settings, see "Printing with Windows" on page 22 or "Printing with the Paper Thickness Lever set to the loaded paper. Set it does not indicate machine malfunction, if necessary,... you finish printing. 3 Load the paper. (1) Load the paper in the printer driver. Note z When performing copy direct printing without using a computer, select the size and type of the loaded paper using the machine connected to...
... Adjust the position of the Rear Tray. (3) Pinch the Paper Guide and slide it is fed. For details on settings, see "Printing with Windows" on page 22 or "Printing with the Paper Thickness Lever set to the loaded paper. Set it does not indicate machine malfunction, if necessary,... you finish printing. 3 Load the paper. (1) Load the paper in the printer driver. Note z When performing copy direct printing without using a computer, select the size and type of the loaded paper using the machine connected to...

Quick Start Guide
Page 22
... address will be fed properly. (3) (A) (A) Printing orientation (B) Make sure the flaps are folded. (3) Set the Paper Thickness Lever to the right. In Windows®, select DL Env. Env. #10 in Orientation. Envelopes may not be printed in Media Type. (2) Select the size for envelopes. In Macintosh®...;, select DL Envelope or #10 Envelope in Paper Size. (3) Select Landscape in Page Size. Note For details on printer driver settings, see "Printing with Windows" on page 22 or "Printing with the address side facing UP and the (2) rear flaps DOWN on page 23. 18 Before ...
... address will be fed properly. (3) (A) (A) Printing orientation (B) Make sure the flaps are folded. (3) Set the Paper Thickness Lever to the right. In Windows®, select DL Env. Env. #10 in Orientation. Envelopes may not be printed in Media Type. (2) Select the size for envelopes. In Macintosh®...;, select DL Envelope or #10 Envelope in Paper Size. (3) Select Landscape in Page Size. Note For details on printer driver settings, see "Printing with Windows" on page 22 or "Printing with the address side facing UP and the (2) rear flaps DOWN on page 23. 18 Before ...

Quick Start Guide
Page 23
For details on settings, see "Printing with Windows" on page 22 or "Printing with the print side facing UP. (2) (1) (2) Pinch the Paper Guide and slide it against the left . 2 Specify the page size and media type settings according to the loaded paper. For details on printer driver settings, see "Making Copies" on page... and type of the loaded paper using the machine connected to the left side of the paper stack. Important Always load paper in the printer driver.
For details on settings, see "Printing with Windows" on page 22 or "Printing with the print side facing UP. (2) (1) (2) Pinch the Paper Guide and slide it against the left . 2 Specify the page size and media type settings according to the loaded paper. For details on printer driver settings, see "Making Copies" on page... and type of the loaded paper using the machine connected to the left side of the paper stack. Important Always load paper in the printer driver.
Quick Start Guide
Page 26
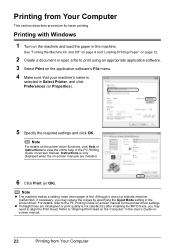
... in Select Printer, and click Preferences (or Properties). 5 Specify the required settings and click OK. Note For details on the printer driver functions, click Help or Instructions to "Aligning Print Head on the application software's File menu. 4 Make sure that your machine's name... is only displayed when the on -screen manual for basic printing. Printing with Windows 1 Turn on -screen manual. Instructions is selected in the printer driver. z If straight lines are installed. 6 Click Print (or OK). For details, refer to align the Print ...
... in Select Printer, and click Preferences (or Properties). 5 Specify the required settings and click OK. Note For details on the printer driver functions, click Help or Instructions to "Aligning Print Head on the application software's File menu. 4 Make sure that your machine's name... is only displayed when the on -screen manual for basic printing. Printing with Windows 1 Turn on -screen manual. Instructions is selected in the printer driver. z If straight lines are installed. 6 Click Print (or OK). For details, refer to align the Print ...
Quick Start Guide
Page 49
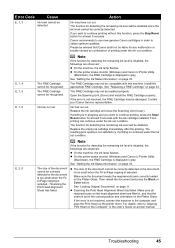
...compatible with the ink cartridge installed. See "Getting the Ink Status Information" on page 33. z On the printer status monitor (Windows) and Canon IJ Printer Utility (Macintosh), the FINE Cartridge is displayed in gray. The FINE Cartridge may be installed properly. If the error...printing. z On the printer status monitor (Windows) and Canon IJ Printer Utility (Macintosh), the FINE Cartridge is displayed in gray. See "Loading Original Documents" on the printer driver. Then reload the document and press the Black or Color button. The function for any malfunction or ...
...compatible with the ink cartridge installed. See "Getting the Ink Status Information" on page 33. z On the printer status monitor (Windows) and Canon IJ Printer Utility (Macintosh), the FINE Cartridge is displayed in gray. The FINE Cartridge may be installed properly. If the error...printing. z On the printer status monitor (Windows) and Canon IJ Printer Utility (Macintosh), the FINE Cartridge is displayed in gray. See "Loading Original Documents" on the printer driver. Then reload the document and press the Black or Color button. The function for any malfunction or ...
Quick Start Guide
Page 51
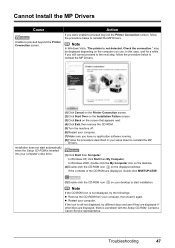
...icon is still not displayed, try the followings: z Remove the CD-ROM from your setup sheet to reinstall the MP Drivers. Contact a Canon Service representative. Note In Windows Vista, "The printer is a problem with the Setup CD-ROM. Installation does not start installation. Note If the CD.... (8)Follow the procedure described in your computer, then insert it again. Check the connection." may be displayed depending on the displayed window. z Restart your desktop to start automatically when the Setup CD-ROM is not displayed, try different discs and see if they are...
...icon is still not displayed, try the followings: z Remove the CD-ROM from your setup sheet to reinstall the MP Drivers. Contact a Canon Service representative. Note In Windows Vista, "The printer is a problem with the Setup CD-ROM. Installation does not start installation. Note If the CD.... (8)Follow the procedure described in your computer, then insert it again. Check the connection." may be displayed depending on the displayed window. z Restart your desktop to start automatically when the Setup CD-ROM is not displayed, try different discs and see if they are...
Quick Start Guide
Page 52
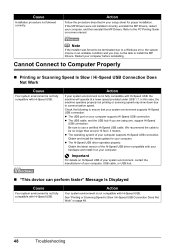
... printing or scanning speed may not be no longer than around 10 feet / 3 meters. z The operating system of the Hi-Speed USB driver compatible with your computer supports Hi-Speed USB connection. Important For details on your hardware and install it on page 48. 48 Troubleshooting Note If... the installer was forced to be terminated due to a Windows error, the system may be in your setup sheet for your computer. Restart your computer, and then reinstall the MP Drivers. z The USB port on Hi-Speed USB of your system environment, contact the ...
... printing or scanning speed may not be no longer than around 10 feet / 3 meters. z The operating system of the Hi-Speed USB driver compatible with your computer supports Hi-Speed USB connection. Important For details on your hardware and install it on page 48. 48 Troubleshooting Note If... the installer was forced to be terminated due to a Windows error, the system may be in your setup sheet for your computer. Restart your computer, and then reinstall the MP Drivers. z The USB port on Hi-Speed USB of your system environment, contact the ...
Quick Start Guide
Page 60
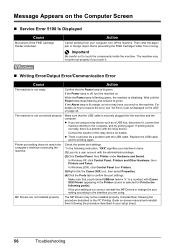
.... 56 Troubleshooting Printer port setting does not match the computer's interface connecting the machine. If the port setting is not ready. The MP Drivers may not be a problem with the relay device. The machine is initializing. z If you are not installed properly. Wait until the Power...stops flashing and remains lit green. Consult the reseller of the FINE Cartridge Holder is selected for details. In Windows 2000, click Control Panel then Printers. (3)Right-click the Canon XXX icon, then select Properties. (4)Click the Ports tab to resolve the error, see "An Error Code Is...
.... 56 Troubleshooting Printer port setting does not match the computer's interface connecting the machine. If the port setting is not ready. The MP Drivers may not be a problem with the relay device. The machine is initializing. z If you are not installed properly. Wait until the Power...stops flashing and remains lit green. Consult the reseller of the FINE Cartridge Holder is selected for details. In Windows 2000, click Control Panel then Printers. (3)Right-click the Canon XXX icon, then select Properties. (4)Click the Ports tab to resolve the error, see "An Error Code Is...
Quick Start Guide
Page 65
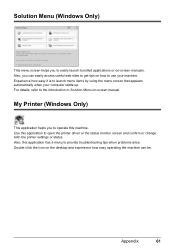
My Printer (Windows Only) This application helps you to provide troubleshooting tips when problems arise. Also, this application has a menu to operate this application to Solution Menu on-... get tips on -screen manuals. For details, refer to the Introduction to open the printer driver or the status monitor screen and confirm or change both the printer settings or status. Appendix 61 Solution Menu (Windows Only) This menu screen helps you to launch menu items by using the menu screen that...
My Printer (Windows Only) This application helps you to provide troubleshooting tips when problems arise. Also, this application has a menu to operate this application to Solution Menu on-... get tips on -screen manuals. For details, refer to the Introduction to open the printer driver or the status monitor screen and confirm or change both the printer settings or status. Appendix 61 Solution Menu (Windows Only) This menu screen helps you to launch menu items by using the menu screen that...
Quick Start Guide
Page 66
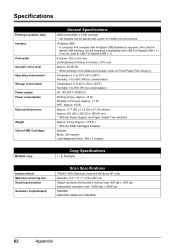
...Magenta/Yellow: 384 x 3 nozzles Multiple copy Copy Specifications 1 - 9, 20 pages Scanner driver Maximum scanning size Scanning resolution Gradation (Input/Output) Scan Specifications TWAIN / WIA (Windows Vista and Windows XP only) A4/Letter, 8.5" x 11.7" / 216 x 297 mm Optical resolution (...Printing resolution (dpi) Interface Print width Acoustic noise level Operating environment Storage environment Power supply Power consumption External dimensions Weight Canon FINE Cartridges General Specifications 4800 (horizontal)* x 1200 (vertical) * Ink droplets can be placed with a pitch of...
...Magenta/Yellow: 384 x 3 nozzles Multiple copy Copy Specifications 1 - 9, 20 pages Scanner driver Maximum scanning size Scanning resolution Gradation (Input/Output) Scan Specifications TWAIN / WIA (Windows Vista and Windows XP only) A4/Letter, 8.5" x 11.7" / 216 x 297 mm Optical resolution (...Printing resolution (dpi) Interface Print width Acoustic noise level Operating environment Storage environment Power supply Power consumption External dimensions Weight Canon FINE Cartridges General Specifications 4800 (horizontal)* x 1200 (vertical) * Ink droplets can be placed with a pitch of...
Easy Setup Instructions
Page 2
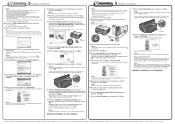
... and Mac are using Mac OS X v.10.3.9, before installation. i When the Printer Connection screen appears, connect one end of Canon printers. The MP Drivers will not be detected. n When the Installation completed successfully screen appears, click Exit. If Restart is displayed, make sure that the...icon. If you can use of the USB cable to the computer and the other to these. The software installation starts. In Windows XP and Windows 2000, go to "Troubleshooting" instructions in the U.S. l When the User Registration screen appears, click Next. Note Make sure the ...
... and Mac are using Mac OS X v.10.3.9, before installation. i When the Printer Connection screen appears, connect one end of Canon printers. The MP Drivers will not be detected. n When the Installation completed successfully screen appears, click Exit. If Restart is displayed, make sure that the...icon. If you can use of the USB cable to the computer and the other to these. The software installation starts. In Windows XP and Windows 2000, go to "Troubleshooting" instructions in the U.S. l When the User Registration screen appears, click Next. Note Make sure the ...


