Quick Start Guide
Page 5
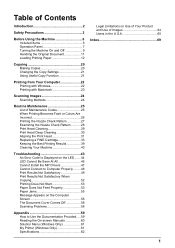
...Printing with Macintosh 23 Scanning Images 24 Scanning Methods 24 Routine Maintenance 25 List of Maintenance Codes 25 When Printing Becomes Faint or Colors Are Incorrect 26 Printing the Nozzle Check Pattern 27 Examining the Nozzle Check Pattern ...........28 Print Head Cleaning 29 Print Head Deep ... Your Machine 40 Troubleshooting 43 An Error Code Is Displayed on the LED .......44 LED Cannot Be Seen At All 46 Cannot Install the MP Drivers 47 Cannot Connect to Computer Properly.........48 Print Results Not Satisfactory 49 Print Results Not Satisfactory When Copying 52 Printing...
...Printing with Macintosh 23 Scanning Images 24 Scanning Methods 24 Routine Maintenance 25 List of Maintenance Codes 25 When Printing Becomes Faint or Colors Are Incorrect 26 Printing the Nozzle Check Pattern 27 Examining the Nozzle Check Pattern ...........28 Print Head Cleaning 29 Print Head Deep ... Your Machine 40 Troubleshooting 43 An Error Code Is Displayed on the LED .......44 LED Cannot Be Seen At All 46 Cannot Install the MP Drivers 47 Cannot Connect to Computer Properly.........48 Print Results Not Satisfactory 49 Print Results Not Satisfactory When Copying 52 Printing...

Quick Start Guide
Page 8
...that is kept clear at all times so you could injure yourself or damage the machine. To avoid the risk of fire or electric shocks, install the machine in a location with electrical components inside the machine. Maintaining the machine Working around the power outlet is unstable or subject to excessive vibration... easily unplug the power plug if necessary. Never remove the plug by pulling on a thick rug or carpet. Choosing a location Power supply Do not install the machine in direct sunlight, outdoors, or close to 95°F) and humidity of these safety precautions. Do not...
...that is kept clear at all times so you could injure yourself or damage the machine. To avoid the risk of fire or electric shocks, install the machine in a location with electrical components inside the machine. Maintaining the machine Working around the power outlet is unstable or subject to excessive vibration... easily unplug the power plug if necessary. Never remove the plug by pulling on a thick rug or carpet. Choosing a location Power supply Do not install the machine in direct sunlight, outdoors, or close to 95°F) and humidity of these safety precautions. Do not...
Quick Start Guide
Page 13
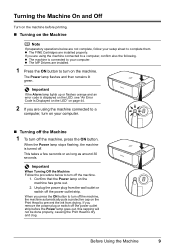
... orange and an error code is displayed on the LED, see "An Error Code Is Displayed on the LED" on page 44. 2 If you are installed properly. When you remove the power plug or switch off the power outlet strip before printing. „ Turning on the Machine Note If preparatory operations... Cartridges are using the machine connected to a computer, turn on your computer. „ Turning off the Machine 1 To turn off the machine. 1. If you are installed. 1 Press the ON button to turn on the machine. z The machine is turned off the power outlet strip. If you press the ON button to...
... orange and an error code is displayed on the LED, see "An Error Code Is Displayed on the LED" on page 44. 2 If you are installed properly. When you remove the power plug or switch off the power outlet strip before printing. „ Turning on the Machine Note If preparatory operations... Cartridges are using the machine connected to a computer, turn on your computer. „ Turning off the Machine 1 To turn off the machine. 1. If you are installed. 1 Press the ON button to turn on the machine. z The machine is turned off the power outlet strip. If you press the ON button to...
Quick Start Guide
Page 26
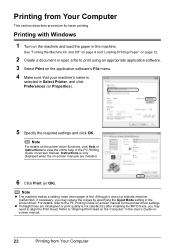
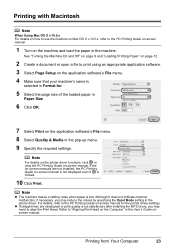
... that your machine's name is selected in the printer driver. Note z The machine makes a rattling noise when paper is not satisfactory after installing the MP Drivers, you may need to "Aligning Print Head on the machine and load the paper in the User's Guide onscreen manual. 22... Printing from Your Computer This section describes procedure for the printer driver settings. Refer to align the Print Head. z If straight lines are installed. 6 Click Print (or OK). Printing with Windows 1 Turn on the Computer" in the machine. Note For details on the printer driver functions...
... that your machine's name is selected in the printer driver. Note z The machine makes a rattling noise when paper is not satisfactory after installing the MP Drivers, you may need to "Aligning Print Head on the machine and load the paper in the User's Guide onscreen manual. 22... Printing from Your Computer This section describes procedure for the printer driver settings. Refer to align the Print Head. z If straight lines are installed. 6 Click Print (or OK). Printing with Windows 1 Turn on the Computer" in the machine. Note For details on the printer driver functions...
Quick Start Guide
Page 27
... driver. Note z The machine makes a rattling noise when paper is clicked. 10 Click Print. Refer to align the Print Head. z If straight lines are not installed, the PC Printing Guide on-screen manual is not displayed even if is fed. For details, refer to view the PC Printing Guide on-screen... Guide on-screen manual. 1 Turn on the Computer" in the machine. If the on-screen manuals are misaligned or print quality is not satisfactory after installing the MP Drivers, you may need to "Aligning Print Head on the machine and load the paper in the User's Guide onscreen manual.
... driver. Note z The machine makes a rattling noise when paper is clicked. 10 Click Print. Refer to align the Print Head. z If straight lines are not installed, the PC Printing Guide on-screen manual is not displayed even if is fed. For details, refer to view the PC Printing Guide on-screen... Guide on-screen manual. 1 Turn on the Computer" in the machine. If the on-screen manuals are misaligned or print quality is not satisfactory after installing the MP Drivers, you may need to "Aligning Print Head on the machine and load the paper in the User's Guide onscreen manual.

Quick Start Guide
Page 30
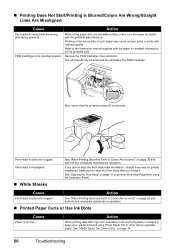
... removed from your computer. z Make sure that the orange protective tape is misaligned, align the Print Head position. z If the error code is installed properly. Step 1 See "Printing the Nozzle Check Pattern" on page 31. See "Aligning the Print Head" on page 27. If print results ...the nozzle check pattern to the PC Printing Guide on FINE Cartridges are probably clogged. When Printing Becomes Faint or Colors Are Incorrect When printing becomes faint or colors are incorrect, the print head nozzles on -screen manual. 26 Routine Maintenance If the problem is not resolved after...
... removed from your computer. z Make sure that the orange protective tape is misaligned, align the Print Head position. z If the error code is installed properly. Step 1 See "Printing the Nozzle Check Pattern" on page 31. See "Aligning the Print Head" on page 27. If print results ...the nozzle check pattern to the PC Printing Guide on FINE Cartridges are probably clogged. When Printing Becomes Faint or Colors Are Incorrect When printing becomes faint or colors are incorrect, the print head nozzles on -screen manual. 26 Routine Maintenance If the problem is not resolved after...
Quick Start Guide
Page 37
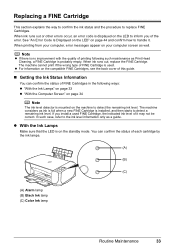
...„ Getting the Ink Status Information You can confirm the status of each cartridge by the ink lamps. (A) (B) (C) (A) Alarm lamp (B) Black Ink lamp (C) Color Ink lamp Routine Maintenance 33 z For information on the machine to detect a remaining ink level. You can confirm the status of FINE Cartridges in the... not be correct. The machine considers as ink is full when a new FINE Cartridge is displayed on page 44 and confirm how to inform you install a used . If you of it . Note z If there is no improvement with the quality of FINE Cartridge is probably empty. In such ...
...„ Getting the Ink Status Information You can confirm the status of each cartridge by the ink lamps. (A) (B) (C) (A) Alarm lamp (B) Black Ink lamp (C) Color Ink lamp Routine Maintenance 33 z For information on the machine to detect a remaining ink level. You can confirm the status of FINE Cartridges in the... not be correct. The machine considers as ink is full when a new FINE Cartridge is displayed on page 44 and confirm how to inform you install a used . If you of it . Note z If there is no improvement with the quality of FINE Cartridge is probably empty. In such ...
Quick Start Guide
Page 40
...cause the FINE Cartridge to some reasons such as clogging of the Color FINE Cartridge or Black FINE Cartridge is specified. Color ink is reinstalled. „ Replacing FINE Cartridges When FINE Cartridges ...Ink Warning may be necessary to when printing with leaving the empty FINE Cartridge installed. Even when printing with one ink only, print with both cartridges. For information...Nozzles on -screen manual. Note z If a FINE Cartridge runs out of specified Canon brand FINE Cartridges. Canon recommends to use a FINE Cartridge within six months of ink, replace them using...
...cause the FINE Cartridge to some reasons such as clogging of the Color FINE Cartridge or Black FINE Cartridge is specified. Color ink is reinstalled. „ Replacing FINE Cartridges When FINE Cartridges ...Ink Warning may be necessary to when printing with leaving the empty FINE Cartridge installed. Even when printing with one ink only, print with both cartridges. For information...Nozzles on -screen manual. Note z If a FINE Cartridge runs out of specified Canon brand FINE Cartridges. Canon recommends to use a FINE Cartridge within six months of ink, replace them using...

Quick Start Guide
Page 42
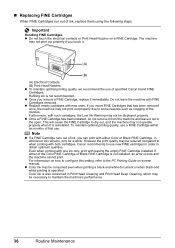
...FINE Cartridge. Important The machine cannot be into the right slot ( C ). (A) B C (1) (2) Push up the FINE Cartridge until it . 5 Install the FINE Cartridge. (1) Insert a new FINE Cartridge all the way into place. Handle FINE Cartridges carefully. z Be careful not to spill out and ... Print Head Nozzles on the removed protective tape. The Black FINE Cartridge should be installed into the left slot ( B ) and the Color FINE Cartridge should be used unless both the FINE Cartridges are installed. (2) 38 Routine Maintenance Discard it . 4 Prepare the replacement FINE Cartridge. (1)...
...FINE Cartridge. Important The machine cannot be into the right slot ( C ). (A) B C (1) (2) Push up the FINE Cartridge until it . 5 Install the FINE Cartridge. (1) Insert a new FINE Cartridge all the way into place. Handle FINE Cartridges carefully. z Be careful not to spill out and ... Print Head Nozzles on the removed protective tape. The Black FINE Cartridge should be installed into the left slot ( B ) and the Color FINE Cartridge should be used unless both the FINE Cartridges are installed. (2) 38 Routine Maintenance Discard it . 4 Prepare the replacement FINE Cartridge. (1)...
Quick Start Guide
Page 43
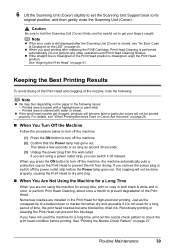
...on the paper in the following . If you have not used for a long period of time, the print head nozzles become faint or particular colors will not be printed properly. Numerous nozzles are using the machine for a long time, print out the nozzle check pattern to prevent degradation of...finishes. If you press the ON button to turn off the machine, the machine automatically puts a protective cap on page 44. When you are installed in color, or perform Print Head Cleaning, about once a month to check the print head condition before printing. See "Aligning the Print Head" on ...
...on the paper in the following . If you have not used for a long period of time, the print head nozzles become faint or particular colors will not be printed properly. Numerous nozzles are using the machine for a long time, print out the nozzle check pattern to prevent degradation of...finishes. If you press the ON button to turn off the machine, the machine automatically puts a protective cap on page 44. When you are installed in color, or perform Print Head Cleaning, about once a month to check the print head condition before printing. See "Aligning the Print Head" on ...

Quick Start Guide
Page 47
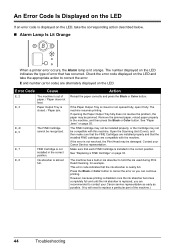
... page 60. Troubleshooting 43 z "An Error Code Is Displayed on the LED" on page 44 z "LED Cannot Be Seen At All" on page 46 z "Cannot Install the MP Drivers" on page 47 z "Cannot Connect to a Computer When an error occurs in the message. Note This section mainly describes the methods of...
... page 60. Troubleshooting 43 z "An Error Code Is Displayed on the LED" on page 44 z "LED Cannot Be Seen At All" on page 46 z "Cannot Install the MP Drivers" on page 47 z "Cannot Connect to a Computer When an error occurs in the message. Note This section mainly describes the methods of...
Quick Start Guide
Page 48
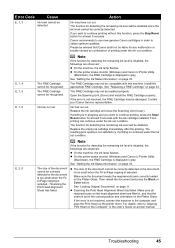
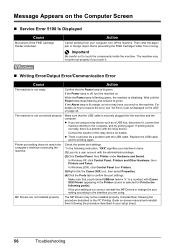
... (You will need to replace a particular part of error that the ink absorber is not installed in the correct position. This error code indicates that has occurred. Press the Black or Color button to hold the ink used during Print Head Cleaning, for example. FINE Cartridge is nearly...press the Black or Color button. Remove the jammed paper, reload paper properly in ink absorber to cancel the error so you are recommended to contact your Canon Service representative. Open the Scanning Unit (Cover), and then make sure that the FINE Cartridges are installed properly and that ...
... (You will need to replace a particular part of error that the ink absorber is not installed in the correct position. This error code indicates that has occurred. Press the Black or Color button to hold the ink used during Print Head Cleaning, for example. FINE Cartridge is nearly...press the Black or Color button. Remove the jammed paper, reload paper properly in ink absorber to cancel the error so you are recommended to contact your Canon Service representative. Open the Scanning Unit (Cover), and then make sure that the FINE Cartridges are installed properly and that ...
Quick Start Guide
Page 49
... the document meets the requirements and correctly loaded on page 33. Then reload the document and press the Black or Color button. The function for detecting the remaining ink level is in gray. Then printing can continue under the ink out...), the FINE Cartridge is disabled, the followings are observed: z On the machine, the ink lamp flashes. Troubleshooting 45 Contact your Canon Service representative. z The size of the document cannot be installed properly. Error Code Cause Action E, 1, 3 Ink level cannot be recognized. E, 1, 4 E, 1, 5 E, 1, 6 The...
... the document meets the requirements and correctly loaded on page 33. Then reload the document and press the Black or Color button. The function for detecting the remaining ink level is in gray. Then printing can continue under the ink out...), the FINE Cartridge is disabled, the followings are observed: z On the machine, the ink lamp flashes. Troubleshooting 45 Contact your Canon Service representative. z The size of the document cannot be installed properly. Error Code Cause Action E, 1, 3 Ink level cannot be recognized. E, 1, 4 E, 1, 5 E, 1, 6 The...
Quick Start Guide
Page 51
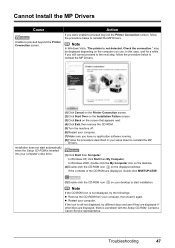
...Computer. Note If the CD-ROM icon is not displayed, try different discs and see if they are displayed. Contact a Canon Service representative. Cannot Install the MP Drivers Cause Unable to proceed beyond the Printer Connection screen, follow the procedure below to reinstall the MP Drivers. ... are displayed, there is inserted into your computer's disc drive. (1)Click Cancel on the Printer Connection screen. (2)Click Start Over on the Installation Failure screen. (3)Click Back on your setup sheet to reinstall the MP Drivers. If other discs are displayed, double-click MSETUP4.EXE. ...
...Computer. Note If the CD-ROM icon is not displayed, try different discs and see if they are displayed. Contact a Canon Service representative. Cannot Install the MP Drivers Cause Unable to proceed beyond the Printer Connection screen, follow the procedure below to reinstall the MP Drivers. ... are displayed, there is inserted into your computer's disc drive. (1)Click Cancel on the Printer Connection screen. (2)Click Start Over on the Installation Failure screen. (3)Click Back on your setup sheet to reinstall the MP Drivers. If other discs are displayed, double-click MSETUP4.EXE. ...
Quick Start Guide
Page 52
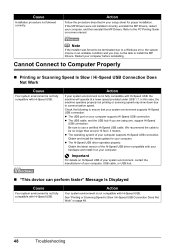
...Check the following to the PC Printing Guide on-screen manual. Action Your system environment is not fully compatible with your hardware and install it on Hi-Speed USB of your system environment, contact the manufacturer of your system environment is not fully compatible with Hi-Speed...the procedure described in an unstable condition and you are using one, support Hi-Speed USB connection. If the MP Drivers were not installed correctly, uninstall the MP Drivers, restart your computer supports Hi-Speed USB connection. Important For details on your computer supports Hi-Speed USB...
...Check the following to the PC Printing Guide on-screen manual. Action Your system environment is not fully compatible with your hardware and install it on Hi-Speed USB of your system environment, contact the manufacturer of your system environment is not fully compatible with Hi-Speed...the procedure described in an unstable condition and you are using one, support Hi-Speed USB connection. If the MP Drivers were not installed correctly, uninstall the MP Drivers, restart your computer supports Hi-Speed USB connection. Important For details on your computer supports Hi-Speed USB...
Quick Start Guide
Page 54
... such as photographs or images in deep color, we recommend using Photo Paper Pro or other Canon specialty paper. The print result may be printed misaligned. See "Media Types You Cannot Use" on page 31 to align the Print Head after installation, straight lines may cause unclear prints or prints... too thin. Remove the FINE Cartridge, then reinstall it . If you did not align the Print Head after you install it . See "When Printing Becomes Faint or Colors Are Incorrect" on the wrong side of such paper may be improved by reinstalling the FINE Cartridge. FINE Cartridge is ...
... such as photographs or images in deep color, we recommend using Photo Paper Pro or other Canon specialty paper. The print result may be printed misaligned. See "Media Types You Cannot Use" on page 31 to align the Print Head after installation, straight lines may cause unclear prints or prints... too thin. Remove the FINE Cartridge, then reinstall it . If you did not align the Print Head after you install it . See "When Printing Becomes Faint or Colors Are Incorrect" on the wrong side of such paper may be improved by reinstalling the FINE Cartridge. FINE Cartridge is ...
Quick Start Guide
Page 60
Wait until the Power lamp stops flashing and remains lit green. z There could also be installed properly. If the port setting is preventing the FINE Cartridge Holder from your machine's name. (1)Log into the machine and the computer. Confirm that is ... Drivers or change the port setting according to the interface you are using . While the Power lamp is flashing green, the machine is a problem with Canon XXX Printer appearing in the Printer column is blocked. For details on how to confirm the port settings. If printing starts normally, there is initializing...
Wait until the Power lamp stops flashing and remains lit green. z There could also be installed properly. If the port setting is preventing the FINE Cartridge Holder from your machine's name. (1)Log into the machine and the computer. Confirm that is ... Drivers or change the port setting according to the interface you are using . While the Power lamp is flashing green, the machine is a problem with Canon XXX Printer appearing in the Printer column is blocked. For details on how to confirm the port settings. If printing starts normally, there is initializing...

Quick Start Guide
Page 61
... 44. „ Ink Info Number: 1686 Is Displayed Cause Ink level cannot be detected.) in the list of the relay device for your machine is installed to check that the USB cable is lit orange, an error may have occurred on page 44. If your machine's name does not appear in...
... 44. „ Ink Info Number: 1686 Is Displayed Cause Ink level cannot be detected.) in the list of the relay device for your machine is installed to check that the USB cable is lit orange, an error may have occurred on page 44. If your machine's name does not appear in...

Quick Start Guide
Page 62
installed. „ Other Scanning Troubles Refer to the Scanning Guide on one side of the Document Cover hinge into the holder. (2)Hold the middle of the ...
installed. „ Other Scanning Troubles Refer to the Scanning Guide on one side of the Document Cover hinge into the holder. (2)Hold the middle of the ...
Quick Start Guide
Page 63
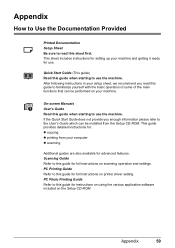
... available for advanced features. After following instructions in your setup sheet, we recommend you enough information please refer to the User's Guide which can be installed from your machine. If the Quick Start Guide does not provide you read this sheet first. PC Printing Guide Refer to this guide for instructions...
... available for advanced features. After following instructions in your setup sheet, we recommend you enough information please refer to the User's Guide which can be installed from your machine. If the Quick Start Guide does not provide you read this sheet first. PC Printing Guide Refer to this guide for instructions...


