
User's Guide
Page 53
...in the Auto Sheet Feeder. (See page 23) 3 Create a document or open a file to print. 4 Open the printer properties dialog box. (1) Select [Print] from the application software's [File] menu. For details, refer to the documentation for printing in Windows XP Service Pack 2 (hereafter, called Windows ...XP SP2). 1 Press [ON/OFF] to turn ON the machine. 2 Load the paper in this section are for each software application you use . (3) Click [Preferences] or [Properties] (2). Note If another name of machine is selected, click the name of the [Preferences]...
...in the Auto Sheet Feeder. (See page 23) 3 Create a document or open a file to print. 4 Open the printer properties dialog box. (1) Select [Print] from the application software's [File] menu. For details, refer to the documentation for printing in Windows XP Service Pack 2 (hereafter, called Windows ...XP SP2). 1 Press [ON/OFF] to turn ON the machine. 2 Load the paper in this section are for each software application you use . (3) Click [Preferences] or [Properties] (2). Note If another name of machine is selected, click the name of the [Preferences]...
User's Guide
Page 57
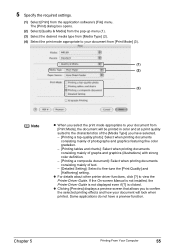
...when printing documents consisting mainly of photographs and graphics featuring fine color gradation. - [Printing tables and charts]: Select when printing documents consisting mainly of graphs and graphics (illustrations) with strong color definition. - [Printing a composite document]: Select when printing... application software's [File] menu. z Clicking [Preview] displays a preview screen that allows you have a preview function. 5 Specify the required settings. (1) Select [Print] from [Print Mode], the document will look when printed. z For details about other printer driver functions...
...when printing documents consisting mainly of photographs and graphics featuring fine color gradation. - [Printing tables and charts]: Select when printing documents consisting mainly of graphs and graphics (illustrations) with strong color definition. - [Printing a composite document]: Select when printing... application software's [File] menu. z Clicking [Preview] displays a preview screen that allows you have a preview function. 5 Specify the required settings. (1) Select [Print] from [Print Mode], the document will look when printed. z For details about other printer driver functions...
User's Guide
Page 100
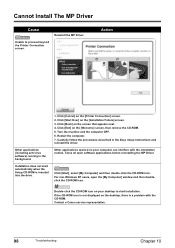
... drive. 1. Turn the machine and the computer OFF. 6. Other applications opened on the [Printer Connection] screen. 2. Click [Cancel] on your desktop to proceed beyond the Printer Connection screen. Click [Start], select [My Computer] and then double-click the CD-ROM ... on the [Welcome] screen, then remove the CD-ROM. 5. For non-Windows XP users, open software applications before reinstalling the MP Driver. Contact a Canon service representative. 98 Troubleshooting Chapter 10 Installation does not start installation. Cannot Install The MP Driver Cause Reinstall ...
... drive. 1. Turn the machine and the computer OFF. 6. Other applications opened on the [Printer Connection] screen. 2. Click [Cancel] on your desktop to proceed beyond the Printer Connection screen. Click [Start], select [My Computer] and then double-click the CD-ROM ... on the [Welcome] screen, then remove the CD-ROM. 5. For non-Windows XP users, open software applications before reinstalling the MP Driver. Contact a Canon service representative. 98 Troubleshooting Chapter 10 Installation does not start installation. Cannot Install The MP Driver Cause Reinstall ...
Easy Setup Instructions
Page 2
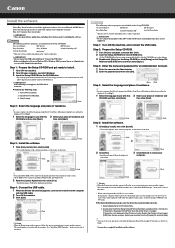
... ScanSoft OmniPage SE* ArcSoft PhotoStudio * This may cause the machine not to install the application software, On-screen Manual and MP drivers. Step 4: Connect the USB cable. 1 When the [Printer Connection] appears, connect the machine to ensure product support. The serial number is located inside ..., follow the on the country of the software. then click [Next]. If the printer is displayed in order to be installed in the [Printer List] and select [USB] from the [Go] menu. 2. Select Easy Install in the [Printer List], the printer driver is installed. Step 1: Prepare the ...
... ScanSoft OmniPage SE* ArcSoft PhotoStudio * This may cause the machine not to install the application software, On-screen Manual and MP drivers. Step 4: Connect the USB cable. 1 When the [Printer Connection] appears, connect the machine to ensure product support. The serial number is located inside ..., follow the on the country of the software. then click [Next]. If the printer is displayed in order to be installed in the [Printer List] and select [USB] from the [Go] menu. 2. Select Easy Install in the [Printer List], the printer driver is installed. Step 1: Prepare the ...


