imageCLASS MF8180c Basic Guide
Page 19
... as this may cause the toner remaining inside the cartridge to prevent the toner on the edges of the machine, do not touch the fuser unit and its surroundings inside the machine. Improper adjustment could result in personal injury and/or damage requiring extensive repair that are covered in ...; When removing paper which are no user serviceable parts inside the machine may become dirty, wash them immediately with your Limited Warranty. • The fuser unit and its surroundings, as doing so may not be covered under your hands or clothing, as explained in burns or a fire.
... as this may cause the toner remaining inside the cartridge to prevent the toner on the edges of the machine, do not touch the fuser unit and its surroundings inside the machine. Improper adjustment could result in personal injury and/or damage requiring extensive repair that are covered in ...; When removing paper which are no user serviceable parts inside the machine may become dirty, wash them immediately with your Limited Warranty. • The fuser unit and its surroundings, as doing so may not be covered under your hands or clothing, as explained in burns or a fire.
imageCLASS MF8180c Basic Guide
Page 23
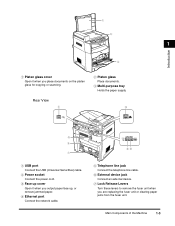
... up cover Open it when you place documents on the platen glass for copying or scanning. g Lock Release Levers Turn these levers to remove the fuser unit when you are replacing the fuser unit or clearing paper jams from the...
... up cover Open it when you place documents on the platen glass for copying or scanning. g Lock Release Levers Turn these levers to remove the fuser unit when you are replacing the fuser unit or clearing paper jams from the...
imageCLASS MF8180c Basic Guide
Page 127
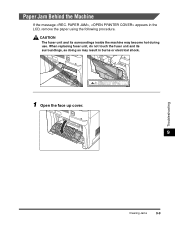
Paper Jam Behind the Machine If the message , appears in burns or electrical shock. 1 Open the face up cover. 9 Troubleshooting Clearing Jams 9-9 When replacing fuser unit, do not touch the fuser unit and its surroundings inside the machine may result in the LCD, remove the paper using the following procedure. CAUTION The fuser unit and its surroundings, as doing so may become hot during use.
Paper Jam Behind the Machine If the message , appears in burns or electrical shock. 1 Open the face up cover. 9 Troubleshooting Clearing Jams 9-9 When replacing fuser unit, do not touch the fuser unit and its surroundings inside the machine may result in the LCD, remove the paper using the following procedure. CAUTION The fuser unit and its surroundings, as doing so may become hot during use.
imageCLASS MF8180c Basic Guide
Page 128
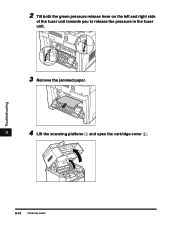
2 Tilt both the green pressure release lever on the left and right side of the fuser unit towards you to release the pressure in the fuser unit. 3 Remove the jammed paper. a b 9-10 Clearing Jams Troubleshooting 9 4 Lift the scanning platform a and open the cartridge cover b.
2 Tilt both the green pressure release lever on the left and right side of the fuser unit towards you to release the pressure in the fuser unit. 3 Remove the jammed paper. a b 9-10 Clearing Jams Troubleshooting 9 4 Lift the scanning platform a and open the cartridge cover b.
imageCLASS MF8180c Basic Guide
Page 131
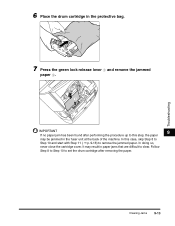
... close the cartridge cover. 6 Place the drum cartridge in paper jams that are difficult to remove the jammed paper. It may be jammed in the fuser unit at the back of the machine. b a IMPORTANT 9 If no paper jam has been found after removing the paper. In this step, the paper may...
... close the cartridge cover. 6 Place the drum cartridge in paper jams that are difficult to remove the jammed paper. It may be jammed in the fuser unit at the back of the machine. b a IMPORTANT 9 If no paper jam has been found after removing the paper. In this step, the paper may...
imageCLASS MF8180c Basic Guide
Page 134
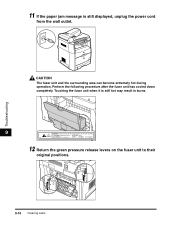
Perform the following procedure after the fuser unit has cooled down completely. CAUTION The fuser unit and the surrounding area can become extremely hot during operation. Touching the fuser unit when it is still displayed, unplug the power cord from the wall outlet. Troubleshooting 11 If the paper jam message is still hot may result in burns. 9 12 Return the green pressure release levers on the fuser unit to their original positions. 9-16 Clearing Jams
Perform the following procedure after the fuser unit has cooled down completely. CAUTION The fuser unit and the surrounding area can become extremely hot during operation. Touching the fuser unit when it is still displayed, unplug the power cord from the wall outlet. Troubleshooting 11 If the paper jam message is still hot may result in burns. 9 12 Return the green pressure release levers on the fuser unit to their original positions. 9-16 Clearing Jams
imageCLASS MF8180c Basic Guide
Page 135
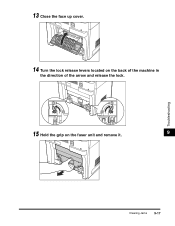
13 Close the face up cover. 14 Turn the lock release levers located on the back of the machine in the direction of the arrow and release the lock. 15 Hold the grip on the fuser unit and remove it. 9 Troubleshooting Clearing Jams 9-17
13 Close the face up cover. 14 Turn the lock release levers located on the back of the machine in the direction of the arrow and release the lock. 15 Hold the grip on the fuser unit and remove it. 9 Troubleshooting Clearing Jams 9-17

imageCLASS MF8180c Basic Guide
Page 136
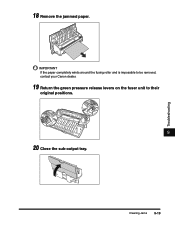
CAUTION The fuser unit weighs approximately 3.7 lb (1.7 kg), and it is heavier on the back side 16 Open the sub-output tray. Troubleshooting 17 Tilt both the green pressure release lever on the left and right side 9 of the fuser unit towards you to hold the grip securely when carrying a fuser unit. Be sure to release the pressure in personal injuries. Heavier on the back side. Dropping the unit may result in the fuser unit. 9-18 Clearing Jams
CAUTION The fuser unit weighs approximately 3.7 lb (1.7 kg), and it is heavier on the back side 16 Open the sub-output tray. Troubleshooting 17 Tilt both the green pressure release lever on the left and right side 9 of the fuser unit towards you to hold the grip securely when carrying a fuser unit. Be sure to release the pressure in personal injuries. Heavier on the back side. Dropping the unit may result in the fuser unit. 9-18 Clearing Jams
imageCLASS MF8180c Basic Guide
Page 137
Clearing Jams 9-19 IMPORTANT If the paper completely winds around the fusing roller and is impossible to be removed, contact your Canon dealer. 19 Return the green pressure release levers on the fuser unit to their original positions. 9 20 Close the sub-output tray. Troubleshooting 18 Remove the jammed paper.
Clearing Jams 9-19 IMPORTANT If the paper completely winds around the fusing roller and is impossible to be removed, contact your Canon dealer. 19 Return the green pressure release levers on the fuser unit to their original positions. 9 20 Close the sub-output tray. Troubleshooting 18 Remove the jammed paper.

imageCLASS MF8180c Basic Guide
Page 138
If the message is still displayed after turning on the machine. Troubleshooting 9 23 Connect the power cord and all pieces of the machine and remove all interface cables. 24 Plug the power cord in the direction of torn paper may still be remaining inside the machine. 9-20 Clearing Jams 21 Hold the grip on the fuser unit and install it securely. 22 Lock the fuser unit by turning the two lock release levers in the wall outlet to turn on the machine, pieces of the arrow. Re-check the various sections of the jammed paper from inside .
If the message is still displayed after turning on the machine. Troubleshooting 9 23 Connect the power cord and all pieces of the machine and remove all interface cables. 24 Plug the power cord in the direction of torn paper may still be remaining inside the machine. 9-20 Clearing Jams 21 Hold the grip on the fuser unit and install it securely. 22 Lock the fuser unit by turning the two lock release levers in the wall outlet to turn on the machine, pieces of the arrow. Re-check the various sections of the jammed paper from inside .
imageCLASS MF8180c Basic Guide
Page 163
...some page may partially appear on the operating environment (especially the humid environment) some colors especially red, blue, and green that are used , some images may cause a problem such as winding around the fuser unit. Depending on the other pages, select . If the paper is still output... curled or some images partially appear on other pages. Machine Settings When label sheets are made by 10 more than two colors may look patchy. In this case...
...some page may partially appear on the operating environment (especially the humid environment) some colors especially red, blue, and green that are used , some images may cause a problem such as winding around the fuser unit. Depending on the other pages, select . If the paper is still output... curled or some images partially appear on other pages. Machine Settings When label sheets are made by 10 more than two colors may look patchy. In this case...
imageCLASS MF8180c Basic Guide
Page 169
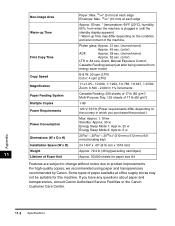
... 52 sec. (color) LTR or A4 size, direct, Manual Exposure Control, Cassette Feeding (except just after being restored from when the machine is plugged in which you have any questions about paper and transparencies, consult Canon Authorized Service Facilities or the Canon Customer Care Center. ...11-2 Specifications Non-image Area Paper: Max. 13/64" (5 mm) at each edge Warm-up time may not be suitable for paper size A4 Features are subject to change without notice due to product improvements. Some types of Fuser...
... 52 sec. (color) LTR or A4 size, direct, Manual Exposure Control, Cassette Feeding (except just after being restored from when the machine is plugged in which you have any questions about paper and transparencies, consult Canon Authorized Service Facilities or the Canon Customer Care Center. ...11-2 Specifications Non-image Area Paper: Max. 13/64" (5 mm) at each edge Warm-up time may not be suitable for paper size A4 Features are subject to change without notice due to product improvements. Some types of Fuser...


