

LV-X1 Brochure
Page 1
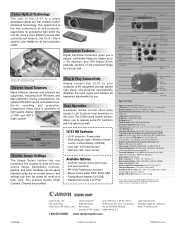
...Stylish Design Weighing only 6 pounds, the portable and stylish LV-X1 is for the presenter on the go. That's why the LV-X1 performs quietly, at 85% uniform brightness. www.canonprojectors.com Discover the key to a winning presentation, the Canon LV-X1. Quiet Operation When you're sharing your ideas to ...a small group of people, the last thing you can project a 200" image at only 37dB, thanks to an intelligent design that packs a punch. Even though it's one of the most compact and lightweight projectors ...
...Stylish Design Weighing only 6 pounds, the portable and stylish LV-X1 is for the presenter on the go. That's why the LV-X1 performs quietly, at 85% uniform brightness. www.canonprojectors.com Discover the key to a winning presentation, the Canon LV-X1. Quiet Operation When you're sharing your ideas to ...a small group of people, the last thing you can project a 200" image at only 37dB, thanks to an intelligent design that packs a punch. Even though it's one of the most compact and lightweight projectors ...
LV-X1 Brochure
Page 2
...: 0.6 in the room. Component Video input is a newly developed optical box that contains Canon advanced technology. q Notebook or desktop PC LV-X1 q Document camera q PR-200S Presentation Assistant q Digital camera q Digital video camcorder q DVD or VCR q HDTV LV-X1 Kit Contents: • LV-X1 projector • Power cable • VGA computer cable • Wireless remote control • Lithium...
...: 0.6 in the room. Component Video input is a newly developed optical box that contains Canon advanced technology. q Notebook or desktop PC LV-X1 q Document camera q PR-200S Presentation Assistant q Digital camera q Digital video camcorder q DVD or VCR q HDTV LV-X1 Kit Contents: • LV-X1 projector • Power cable • VGA computer cable • Wireless remote control • Lithium...

Owners Manual
Page 2
... REPLACEMENT. THIS SYMBOL INDICATES THAT THERE ARE IMPORTANT OPERATING AND MAINTENANCE INSTRUCTIONS IN THE OWNER'S MANUAL WITH THIS UNIT. 2 q This projector produces intense light from the power outlet. Be especially careful that children do not stare directly into the lens as possible. Heat build... THIS SYMBOL INDICATES THAT DANGEROUS VOLTAGE CONSTITUTING A RISK OF ELECTRIC SHOCK IS PRESENT WITHIN THIS UNIT. TO THE OWNER Before operating this projector, read this manual again, check operations and cable connections and try the solutions in the "Trouble-shooting" section of the end of...
... REPLACEMENT. THIS SYMBOL INDICATES THAT THERE ARE IMPORTANT OPERATING AND MAINTENANCE INSTRUCTIONS IN THE OWNER'S MANUAL WITH THIS UNIT. 2 q This projector produces intense light from the power outlet. Be especially careful that children do not stare directly into the lens as possible. Heat build... THIS SYMBOL INDICATES THAT DANGEROUS VOLTAGE CONSTITUTING A RISK OF ELECTRIC SHOCK IS PRESENT WITHIN THIS UNIT. TO THE OWNER Before operating this projector, read this manual again, check operations and cable connections and try the solutions in the "Trouble-shooting" section of the end of...

Owners Manual
Page 3
...before cleaning. If you to dangerous voltage or other controls may result in fire or electric shock. Refer all servicing to the projector. When the projector exhibits a distinct change in a wet basement, near a swimming pool, etc... Unauthorized substitutions may result in damage and will...in installation such as a book case unless proper ventilation is provided. Follow all of time, unplug it from the wall outlet. This projector should use near or over a radiator or heat register. Do not overload wall outlets and extension cords as the original part. d....
...before cleaning. If you to dangerous voltage or other controls may result in fire or electric shock. Refer all servicing to the projector. When the projector exhibits a distinct change in a wet basement, near a swimming pool, etc... Unauthorized substitutions may result in damage and will...in installation such as a book case unless proper ventilation is provided. Follow all of time, unplug it from the wall outlet. This projector should use near or over a radiator or heat register. Do not overload wall outlets and extension cords as the original part. d....

Owners Manual
Page 4
...device must accept any changes or modifications to the equipment unless otherwise specified in residential, commercial and light industry environment. One Canon Plaza, Lake Success, NY 11042, U.S.A. AC Power Cord for the United States and Canada : AC Power Cord used in... digital device, pursuant to part 15 of the Canadian Interference-Causing Equipment Regulations. COMPLIANCES Federal Communication Commission Notice Multimedia Projector, Model : LV-X1U, LV-X1E This device complies with the instructions, may cause harmful interference to radio communications. Connect the equipment into an ...
...device must accept any changes or modifications to the equipment unless otherwise specified in residential, commercial and light industry environment. One Canon Plaza, Lake Success, NY 11042, U.S.A. AC Power Cord for the United States and Canada : AC Power Cord used in... digital device, pursuant to part 15 of the Canadian Interference-Causing Equipment Regulations. COMPLIANCES Federal Communication Commission Notice Multimedia Projector, Model : LV-X1U, LV-X1E This device complies with the instructions, may cause harmful interference to radio communications. Connect the equipment into an ...
Owners Manual
Page 5
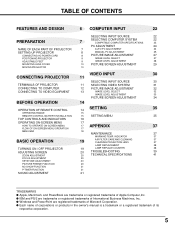
... BASIC OPERATION 19 AIR FILTER CARE AND CLEANING CLEANING PROJECTION LENS 37 37 LAMP REPLACEMENT 38 TURNING ON / OFF PROJECTOR 19 LAMP REPLACE COUNTER 38 ADJUSTING SCREEN 20 TROUBLESHOOTING 39 ZOOM ADJUSTMENT 20 TECHNICAL SPECIFICATIONS 41 FOCUS ADJUSTMENT 20 KEYSTONE ... 9 IMAGE LEVEL ADJUSTMENT 28 MOUNTING LENS COVER 10 PICTURE SCREEN ADJUSTMENT 29 MOVING PROJECTOR 10 VIDEO INPUT 30 CONNECTING PROJECTOR 11 SELECTING INPUT SOURCE 30 TERMINALS OF PROJECTOR 11 SELECTING VIDEO SYSTEM 31 CONNECTING TO COMPUTER 12 PICTURE IMAGE ADJUSTMENT 32 CONNECTING...
... BASIC OPERATION 19 AIR FILTER CARE AND CLEANING CLEANING PROJECTION LENS 37 37 LAMP REPLACEMENT 38 TURNING ON / OFF PROJECTOR 19 LAMP REPLACE COUNTER 38 ADJUSTING SCREEN 20 TROUBLESHOOTING 39 ZOOM ADJUSTMENT 20 TECHNICAL SPECIFICATIONS 41 FOCUS ADJUSTMENT 20 KEYSTONE ... 9 IMAGE LEVEL ADJUSTMENT 28 MOUNTING LENS COVER 10 PICTURE SCREEN ADJUSTMENT 29 MOVING PROJECTOR 10 VIDEO INPUT 30 CONNECTING PROJECTOR 11 SELECTING INPUT SOURCE 30 TERMINALS OF PROJECTOR 11 SELECTING VIDEO SYSTEM 31 CONNECTING TO COMPUTER 12 PICTURE IMAGE ADJUSTMENT 32 CONNECTING...
Owners Manual
Page 6
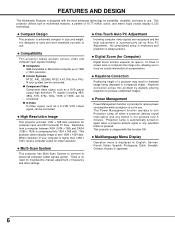
...provided to almost all computer output signals quickly. q Computers IBM-compatible or Macintosh computer up to focus on again when a projector detects signal or any button is automatically turned on crucial information at a presentation. x One-Touch Auto PC Adjustment Incoming computer... the most advanced technology for computer input and 550 horizontal TV lines. x Compact Design This projector is extremely compact in ; x Keystone Correction Positioning height of a projector may result in distorted image being displayed in multimedia features, a palette of 16.77 million ...
...provided to almost all computer output signals quickly. q Computers IBM-compatible or Macintosh computer up to focus on again when a projector detects signal or any button is automatically turned on crucial information at a presentation. x One-Touch Auto PC Adjustment Incoming computer... the most advanced technology for computer input and 550 horizontal TV lines. x Compact Design This projector is extremely compact in ; x Keystone Correction Positioning height of a projector may result in distorted image being displayed in multimedia features, a palette of 16.77 million ...
Owners Manual
Page 7
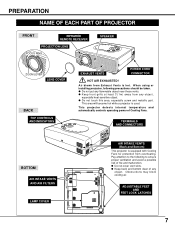
... q Keep front grills at least 3'(1m) away from Exhaust Vents is hot. Obstructions may block cooling air. When using or installing projector, following to the following precautions should be taken. Pay attention to ensure proper ventilation and avoid a possible risk of Cooling Fans. q... Do not put any object. This projector detects internal temperature and automatically controls operating power of fire and malfunction. TERMINALS AND CONNECTORS BOTTOM AIR INTAKE VENTS AND AIR FILTERS ...
... q Keep front grills at least 3'(1m) away from Exhaust Vents is hot. Obstructions may block cooling air. When using or installing projector, following to the following precautions should be taken. Pay attention to ensure proper ventilation and avoid a possible risk of Cooling Fans. q... Do not put any object. This projector detects internal temperature and automatically controls operating power of fire and malfunction. TERMINALS AND CONNECTORS BOTTOM AIR INTAKE VENTS AND AIR FILTERS ...

Owners Manual
Page 8
...Canada For Continental Europe Ground To POWER CORD CONNECTOR on . (Refer to the outlet with a peripheral equipment before turning a projector on your projector. Consult your sales dealer. Connect a projector with AC Power Cord, an appliance is not used . To reduce risk of electrical shock, do not plug into any .... If supplied AC Power Cord does not match your AC outlet, contact your authorized dealer or service station if you use . Projector side AC Outlet side For the U.S.A. When this equipment and must be easily accessible. The AC outlet must be near this...
...Canada For Continental Europe Ground To POWER CORD CONNECTOR on . (Refer to the outlet with a peripheral equipment before turning a projector on your projector. Consult your sales dealer. Connect a projector with AC Power Cord, an appliance is not used . To reduce risk of electrical shock, do not plug into any .... If supplied AC Power Cord does not match your AC outlet, contact your authorized dealer or service station if you use . Projector side AC Outlet side For the U.S.A. When this equipment and must be easily accessible. The AC outlet must be near this...

Owners Manual
Page 9
... and tilt. 3 To retract ADJUSTABLE FEET, lift the front of a projector and pull FEET LOCK LATCHES on picture quality. It is designed to adjust a screen size. PREPARATION POSITIONING PROJECTOR q This projector is recommended to limit ambient lighting in a room has a great influence ...on the both sides of a projector. 2 Release FEET LOCK LATCHES to lock ADJUSTABLE FEET and rotate ADJUSTABLE FEET...
... and tilt. 3 To retract ADJUSTABLE FEET, lift the front of a projector and pull FEET LOCK LATCHES on picture quality. It is designed to adjust a screen size. PREPARATION POSITIONING PROJECTOR q This projector is recommended to limit ambient lighting in a room has a great influence ...on the both sides of a projector. 2 Release FEET LOCK LATCHES to lock ADJUSTABLE FEET and rotate ADJUSTABLE FEET...

Owners Manual
Page 10
... an extended period, put other things on the bottom of Lens Cover. 2 Turn projector upside down and secure Strap for Lens Cover through a hole of projector with the projector. Do not transport a projector through a courier or transport services with a screw. PREPARATION MOUNTING LENS COVER When moving... (carrying bag) supplied with a screw. CAUTION IN CARRYING OR TRANSPORTING THE PROJECTOR q Do not drop or bump a projector, otherwise damages or malfunctions may cause damage to the hole with this projector or when it is not used for best way. 10 Before replacing Lens ...
... an extended period, put other things on the bottom of Lens Cover. 2 Turn projector upside down and secure Strap for Lens Cover through a hole of projector with the projector. Do not transport a projector through a courier or transport services with a screw. PREPARATION MOUNTING LENS COVER When moving... (carrying bag) supplied with a screw. CAUTION IN CARRYING OR TRANSPORTING THE PROJECTOR q Do not drop or bump a projector, otherwise damages or malfunctions may cause damage to the hole with this projector or when it is not used for best way. 10 Before replacing Lens ...

Owners Manual
Page 11
...AUDIO IN CONTROL AV AUDIO IN S-VIDEO IN AUDIO OUT RGB IN CONTROL PORT CONNECTOR When controlling the computer with Remote Control Unit of this projector, connect the mouse port of your personal computer to this connector. (Refer to P12.) RGB INPUT TERMINAL (ANALOG) Connect the computer output .... (Refer to P12, 13.) AUDIO INPUT JACK Connect the audio output from video equipment to this jack. (Refer to P13.) 11 CONNECTING PROJECTOR TERMINALS OF PROJECTOR This projector has input and output terminals on pages 11 to be done by pressing RESET button with Remote Control Unit of this...
...AUDIO IN CONTROL AV AUDIO IN S-VIDEO IN AUDIO OUT RGB IN CONTROL PORT CONNECTOR When controlling the computer with Remote Control Unit of this projector, connect the mouse port of your personal computer to this connector. (Refer to P12.) RGB INPUT TERMINAL (ANALOG) Connect the computer output .... (Refer to P12, 13.) AUDIO INPUT JACK Connect the audio output from video equipment to this jack. (Refer to P13.) 11 CONNECTING PROJECTOR TERMINALS OF PROJECTOR This projector has input and output terminals on pages 11 to be done by pressing RESET button with Remote Control Unit of this...

Owners Manual
Page 12
...IN AUDIO OUT RGB IN NOTE : When connecting the cable, the power cords of these Control Cables or USB Cable corresponding with this projector.) • VGA Cable (HDB 15 pin) • MAC Adapter (When connecting to use before the computer is not supplied with the ... depending on RESOLUTION MODE that you want to Macintosh computer) ✽ • Control Cable for connection (✽ = Cable or adapter is switched on projector and computer. RGB IN ANALOG CONTROL PORT VIDEO IN RESET Y -- Audio Cable ✽ (stereo) USB Cable ✽ VGA Cable USB COMPUTER AUDIO...
...IN AUDIO OUT RGB IN NOTE : When connecting the cable, the power cords of these Control Cables or USB Cable corresponding with this projector.) • VGA Cable (HDB 15 pin) • MAC Adapter (When connecting to use before the computer is not supplied with the ... depending on RESOLUTION MODE that you want to Macintosh computer) ✽ • Control Cable for connection (✽ = Cable or adapter is switched on projector and computer. RGB IN ANALOG CONTROL PORT VIDEO IN RESET Y -- Audio Cable ✽ (stereo) USB Cable ✽ VGA Cable USB COMPUTER AUDIO...

Owners Manual
Page 13
... TO VIDEO EQUIPMENT Cables used for connection (✽ = Cable is not supplied with this projector.) • Video Cable (RCA x 1 or RCA x 3) ✽ • S-VIDEO Cable ✽ • ...Y - Pr / Cr COMPUTER AUDIO IN CONTROL AV AUDIO IN S-VIDEO IN AUDIO OUT RGB IN Terminals of the Projector Audio Input External Audio Equipment Audio Amplifier Audio Speaker (stereo) NOTE : When connecting the cable, the power cords of ... has priority over VIDEO jack. • When both the projector and the external equipment should be disconnected from AC outlet. 13 Pb / Cb -- Pb/Cb -
... TO VIDEO EQUIPMENT Cables used for connection (✽ = Cable is not supplied with this projector.) • Video Cable (RCA x 1 or RCA x 3) ✽ • S-VIDEO Cable ✽ • ...Y - Pr / Cr COMPUTER AUDIO IN CONTROL AV AUDIO IN S-VIDEO IN AUDIO OUT RGB IN Terminals of the Projector Audio Input External Audio Equipment Audio Amplifier Audio Speaker (stereo) NOTE : When connecting the cable, the power cords of ... has priority over VIDEO jack. • When both the projector and the external equipment should be disconnected from AC outlet. 13 Pb / Cb -- Pb/Cb -

Owners Manual
Page 14
... pointer on the MENU, to adjust the item, or to pan the image in DIGITAL ZOOM mode. (P29) NO SHOW BUTTON Used to turn the projector on or off. (P19) D.ZOOM BUTTONS Used to select DIGITAL ZOOM mode and resize the image. (P29) KEYSTONE BUTTONS Used to correct the keystone distortion...
... pointer on the MENU, to adjust the item, or to pan the image in DIGITAL ZOOM mode. (P29) NO SHOW BUTTON Used to turn the projector on or off. (P19) D.ZOOM BUTTONS Used to select DIGITAL ZOOM mode and resize the image. (P29) KEYSTONE BUTTONS Used to correct the keystone distortion...

Owners Manual
Page 15
...To insure safe operation, please observe the following precautions : q Use only specified battery. Improper battery may cause malfunction of the projector. 16.4' (5 m) 30° 30° REMOTE CONTROL BATTERY INSTALLATION 1 Pull out Battery Holder. 2 Replace with battery (+),(-)... marks properly. BEFORE OPERATION OPERATING RANGE Point Remote Control Unit toward projector (Receiver Window) whenever pressing any button. BATTERY LITHIUM BATTERY CR2025 (3.0V) (+) mark indicates its (+) polarity. q Dispose used ...
...To insure safe operation, please observe the following precautions : q Use only specified battery. Improper battery may cause malfunction of the projector. 16.4' (5 m) 30° 30° REMOTE CONTROL BATTERY INSTALLATION 1 Pull out Battery Holder. 2 Replace with battery (+),(-)... marks properly. BEFORE OPERATION OPERATING RANGE Point Remote Control Unit toward projector (Receiver Window) whenever pressing any button. BATTERY LITHIUM BATTERY CR2025 (3.0V) (+) mark indicates its (+) polarity. q Dispose used ...
Owners Manual
Page 16
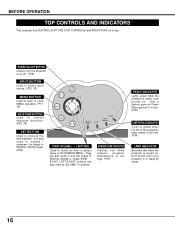
.... 16 LAMP READY LAMP REPLACE SET BUTTON Used to select an item or adjust value in DIGITAL ZOOM +/- buttons. And bright when the projector is in Power Management mode. (P36) LAMP REPLACE INDICATOR Turns to yellow when the life of the projection lamp draws to an end. ... distortion. (P20, 35) INPUT POWER MENU VOL VOL - + KEY STONE SET WARNING TEMP. INDICATOR Flashes red when internal projector temperature is too high. (P37) READY INDICATOR Lights green when the projector is also used to expand / compress the image in DIGITAL ZOOM mode. (P29) POINT (VOLUME + / - ) BUTTONS...
.... 16 LAMP READY LAMP REPLACE SET BUTTON Used to select an item or adjust value in DIGITAL ZOOM +/- buttons. And bright when the projector is in Power Management mode. (P36) LAMP REPLACE INDICATOR Turns to yellow when the life of the projection lamp draws to an end. ... distortion. (P20, 35) INPUT POWER MENU VOL VOL - + KEY STONE SET WARNING TEMP. INDICATOR Flashes red when internal projector temperature is too high. (P37) READY INDICATOR Lights green when the projector is also used to expand / compress the image in DIGITAL ZOOM mode. (P29) POINT (VOLUME + / - ) BUTTONS...

Owners Manual
Page 17
... DATA by pressing POINT RIGHT / LEFT buttons. BEFORE OPERATION OPERATING ON-SCREEN MENU HOW TO OPERATE ON-SCREEN MENU You can control and adjust this projector through ON-SCREEN MENU 3 Press POINT DOWN button and move POINTER (red frame or red arrow) to ITEM that you want to move the Pointer...
... DATA by pressing POINT RIGHT / LEFT buttons. BEFORE OPERATION OPERATING ON-SCREEN MENU HOW TO OPERATE ON-SCREEN MENU You can control and adjust this projector through ON-SCREEN MENU 3 Press POINT DOWN button and move POINTER (red frame or red arrow) to ITEM that you want to move the Pointer...
Owners Manual
Page 18
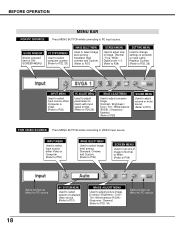
... adjust picture image. [Contrast / Brightness / Color / Tint / White balance (R/G/B) / Sharpness / Gamma] (Refer to select image level among ; AV SYSTEM MENU Used to select system of projector or reset Lamp Replace Counter. (Refer to P35, 36) INPUT MENU Used to select input source either Video or Computer. (Refer to P30) IMAGE SELECT...
... adjust picture image. [Contrast / Brightness / Color / Tint / White balance (R/G/B) / Sharpness / Gamma] (Refer to select image level among ; AV SYSTEM MENU Used to select system of projector or reset Lamp Replace Counter. (Refer to P35, 36) INPUT MENU Used to select input source either Video or Computer. (Refer to P30) IMAGE SELECT...

Owners Manual
Page 19
... TEMP. Indicator continues to operate. Clean Air Filters. (See "AIR FILTER CARE AND CLEANING" section on projector again. BASIC OPERATION TURNING ON / OFF PROJECTOR TURNING ON PROJECTOR 1 Complete peripheral connections (with Computer, VCR, etc.) before turning on page 37.) 4. LAMP Indicator dims... procedures below: 1. LAMP Indicator lights bright and READY Indicator turns off . Refer to "CONNECTING TO PROJECTOR" on page 36. Indicator flashes red, projector is ON, projector detects signal interruption and turns off ? appears on a screen. 2 Press POWER ON-OFF button again...
... TEMP. Indicator continues to operate. Clean Air Filters. (See "AIR FILTER CARE AND CLEANING" section on projector again. BASIC OPERATION TURNING ON / OFF PROJECTOR TURNING ON PROJECTOR 1 Complete peripheral connections (with Computer, VCR, etc.) before turning on page 37.) 4. LAMP Indicator dims... procedures below: 1. LAMP Indicator lights bright and READY Indicator turns off . Refer to "CONNECTING TO PROJECTOR" on page 36. Indicator flashes red, projector is ON, projector detects signal interruption and turns off ? appears on a screen. 2 Press POWER ON-OFF button again...


