LV-7290 User's Manual
Page 2
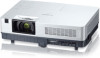
... projector is available in size and weight. With the Key lock function, you wish to use it for Presentations - For details, refer to the user's manual of the projection lamp can be accepted. ♦ Useful Functions for the starting-up and Operation." ♦ Auto Setup Function This function enables Auto input...
... projector is available in size and weight. With the Key lock function, you wish to use it for Presentations - For details, refer to the user's manual of the projection lamp can be accepted. ♦ Useful Functions for the starting-up and Operation." ♦ Auto Setup Function This function enables Auto input...
LV-7290 User's Manual
Page 3
...COMPUTER 1/COMPUTER 2) 30 Computer System Selection 31 Auto PC Adjustment 32 Manual PC Adjustment 33 Image Mode Selection 35 Image Adjustment 36 Aspect Setting (for LV-7290, LV-7295, LV-7390) 37 Aspect Setting (For LV-8225) 39 VIDEO Input 41 Input Source Selection (VIDEO, S-VIDEO) 41... SCART) 42 VIDEO System Selection 43 Image Mode Selection 44 Image Adjustment 45 Aspect Setting (for LV-7290, LV-7295, LV-7390) 47 Aspect Setting (for LV-8225) 49 Setting 51 Setting 51 Information 64 Input Source Information Display 64 Maintenance and Cleaning 65 WARNING...
...COMPUTER 1/COMPUTER 2) 30 Computer System Selection 31 Auto PC Adjustment 32 Manual PC Adjustment 33 Image Mode Selection 35 Image Adjustment 36 Aspect Setting (for LV-7290, LV-7295, LV-7390) 37 Aspect Setting (For LV-8225) 39 VIDEO Input 41 Input Source Selection (VIDEO, S-VIDEO) 41... SCART) 42 VIDEO System Selection 43 Image Mode Selection 44 Image Adjustment 45 Aspect Setting (for LV-7290, LV-7295, LV-7390) 47 Aspect Setting (for LV-8225) 49 Setting 51 Setting 51 Information 64 Input Source Information Display 64 Maintenance and Cleaning 65 WARNING...
LV-7290 User's Manual
Page 4
...you purchased the projector or the service center. THIS SYMBOL INDICATES THAT THERE ARE IMPORTANT OPERATING AND MAINTENANCE INSTRUCTIONS IN THE USER'S MANUAL WITH THIS UNIT. This projector produces intense light from the power outlet. - Install the projector in not only shortening the product... image for an extended time, unplug the projector from the projection lens. This projector provides many years to operate improperly, read this manual. If the problem still persists, contact the dealer where you to be built into a compartment or similarly enclosed, these minimum distances ...
...you purchased the projector or the service center. THIS SYMBOL INDICATES THAT THERE ARE IMPORTANT OPERATING AND MAINTENANCE INSTRUCTIONS IN THE USER'S MANUAL WITH THIS UNIT. This projector produces intense light from the power outlet. - Install the projector in not only shortening the product... image for an extended time, unplug the projector from the projection lens. This projector provides many years to operate improperly, read this manual. If the problem still persists, contact the dealer where you to be built into a compartment or similarly enclosed, these minimum distances ...

LV-7290 User's Manual
Page 10
... improper cords or cables may cause an electric shock or a fire. ⑬ Exhaust Vents CAUTION Hot air is for a Kensington lock used to the user's manual of "Network Set-up and Operation" . Kensington Security Slot This slot is exhausted from light beam may damage lens cap and result in fire...
... improper cords or cables may cause an electric shock or a fire. ⑬ Exhaust Vents CAUTION Hot air is for a Kensington lock used to the user's manual of "Network Set-up and Operation" . Kensington Security Slot This slot is exhausted from light beam may damage lens cap and result in fire...

LV-7290 User's Manual
Page 11
...). ④ VIDEO IN Connect the composite video output signal to this jack (p.18). ⑤ LAN Connection Terminal Connect the LAN cable (refer to the user's manual of "Network Set-up and Operation"). ⑥ AUDIO OUT (VARIABLE) Connect an external audio amplifier to this jack. This terminal can be used for PC...
...). ④ VIDEO IN Connect the composite video output signal to this jack (p.18). ⑤ LAN Connection Terminal Connect the LAN cable (refer to the user's manual of "Network Set-up and Operation"). ⑥ AUDIO OUT (VARIABLE) Connect an external audio amplifier to this jack. This terminal can be used for PC...
LV-7290 User's Manual
Page 24
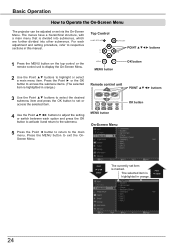
... to exit the OnScreen Menu. Press the Point ► or the OK button to access the submenu items. (The selected item is highlighted in this manual. For each adjustment and setting procedure, refer to respective sections in orange.) MENU OK MENU button OK button Remote control unit POINT buttons 3 Use the...
... to exit the OnScreen Menu. Press the Point ► or the OK button to access the submenu items. (The selected item is highlighted in this manual. For each adjustment and setting procedure, refer to respective sections in orange.) MENU OK MENU button OK button Remote control unit POINT buttons 3 Use the...
LV-7290 User's Manual
Page 25
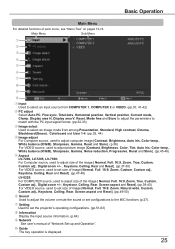
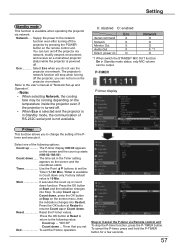
... VIDEO source, used to set size of image [Normal, Full, 16:9, Zoom, Custom, Custom adj., Keystone, Ceiling, Rear and Reset]. (pp.47-48) LV-8225: For COMPUTER source, used to adjust size of the image [ Normal, Full, 16:9, Zoom, True, Custom, Custom adj., Digital zoom +/-, Keystone, Ceiling, ... Used to set the projector's operating configurations. (pp.51-63) ⑧ Information Display the input source information. (p.64) ⑨ Network See user's manual of each menu, see "Menu Tree" on pages 73-74. Basic Operation Main Menu For detailed functions of "Network Set-up and Operation". ⑩...
... VIDEO source, used to set size of image [Normal, Full, 16:9, Zoom, Custom, Custom adj., Keystone, Ceiling, Rear and Reset]. (pp.47-48) LV-8225: For COMPUTER source, used to adjust size of the image [ Normal, Full, 16:9, Zoom, True, Custom, Custom adj., Digital zoom +/-, Keystone, Ceiling, ... Used to set the projector's operating configurations. (pp.51-63) ⑧ Information Display the input source information. (p.64) ⑨ Network See user's manual of each menu, see "Menu Tree" on pages 73-74. Basic Operation Main Menu For detailed functions of "Network Set-up and Operation". ⑩...

LV-7290 User's Manual
Page 26
... remote control unit once more while the keystone dialog box is being displayed, the keystone adjustment will be fully adjusted with this operation, manual adjustments are required (pp.33-34). Keystone Correction POINT ▲▼ buttons If a projected picture still has keystone distortion after pressing... the AUTO SET button on the top control or the remote control unit, correct the image manually as follows: KEYSTONE button Press the KEYSTONE button on the remote control unit or selecting Keystone in the Aspect menu (pp.38, ...
... remote control unit once more while the keystone dialog box is being displayed, the keystone adjustment will be fully adjusted with this operation, manual adjustments are required (pp.33-34). Keystone Correction POINT ▲▼ buttons If a projected picture still has keystone distortion after pressing... the AUTO SET button on the top control or the remote control unit, correct the image manually as follows: KEYSTONE button Press the KEYSTONE button on the remote control unit or selecting Keystone in the Aspect menu (pp.38, ...

LV-7290 User's Manual
Page 31
...required (pp. 33-34). - - - - The projector chooses a proper system provided in this dialog box can be selected manually. 1 Press the MENU button to display the On-Screen Menu. Selecting Computer System Manually PC system can be stored in the PC adjust Menu. If the image is not projected properly...no signal input from the computer. The adjusted data can also be selected. 31 PC System Menu Selected system in the PC System Menu is manually adjusted in Mode 1-10 (pp. 33-34). If a computer is selected as a signal source, this projector automatically detects the signal format ...
...required (pp. 33-34). - - - - The projector chooses a proper system provided in this dialog box can be selected manually. 1 Press the MENU button to display the On-Screen Menu. Selecting Computer System Manually PC system can be stored in the PC adjust Menu. If the image is not projected properly...no signal input from the computer. The adjusted data can also be selected. 31 PC System Menu Selected system in the PC System Menu is manually adjusted in Mode 1-10 (pp. 33-34). If a computer is selected as a signal source, this projector automatically detects the signal format ...
LV-7290 User's Manual
Page 32
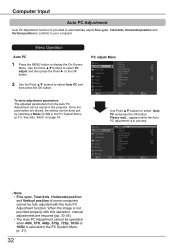
... parameters from the Auto PC Adjustment can be operated when 480i, 575i, 480p, 575p, 720p, 1035i or 1080i is not provided properly with this operation, manual adjustments are stored, the setting can be fully adjusted with the Auto PC Adjustment function. See also "Store" on page 34. Computer Input Auto PC...
... parameters from the Auto PC Adjustment can be operated when 480i, 575i, 480p, 575p, 720p, 1035i or 1080i is not provided properly with this operation, manual adjustments are stored, the setting can be fully adjusted with the Auto PC Adjustment function. See also "Store" on page 34. Computer Input Auto PC...
LV-7290 User's Manual
Page 33
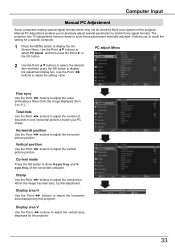
...allows you to precisely adjust several parameters to match your PC image. Use the Point ▲▼ buttons to display the OnScreen Menu. Manual PC Adjustment enables you to recall the setting for a specific computer. 1 Press the MENU button to select PC adjust and then press...adjust the number of total dots in one horizontal period to match those parameters manually adjusted. Display area V Use the Point ◄► buttons to adjust the vertical picture position. Computer Input Manual PC Adjustment Some computers employ special signal formats which may not be tuned by...
...allows you to precisely adjust several parameters to match your PC image. Use the Point ▲▼ buttons to display the OnScreen Menu. Manual PC Adjustment enables you to recall the setting for a specific computer. 1 Press the MENU button to select PC adjust and then press...adjust the number of total dots in one horizontal period to match those parameters manually adjusted. Display area V Use the Point ◄► buttons to adjust the vertical picture position. Computer Input Manual PC Adjustment Some computers employ special signal formats which may not be tuned by...
LV-7290 User's Manual
Page 37
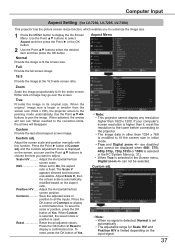
...or smaller than 1024 x 768 is modified to the correction limits, the arrows will turn red. Adjust the screen scale and position manually with this function. Position H/V...... Either side of image may go over the screen. Use the Point buttons to the panning mode ...the Point ▲▼ buttons to fit the entire screen. Scale H/V........... H&V When set automatically . • The adjustable range for LV-7290, LV-7295, LV-7390) This projector has the picture screen resize function, which enables you want to display the On-Screen Menu. The Scale V appears...
...or smaller than 1024 x 768 is modified to the correction limits, the arrows will turn red. Adjust the screen scale and position manually with this function. Position H/V...... Either side of image may go over the screen. Use the Point buttons to the panning mode ...the Point ▲▼ buttons to fit the entire screen. Scale H/V........... H&V When set automatically . • The adjustable range for LV-7290, LV-7295, LV-7390) This projector has the picture screen resize function, which enables you want to display the On-Screen Menu. The Scale V appears...
LV-7290 User's Manual
Page 39
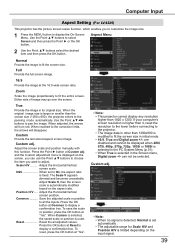
.... Either side of image may go over the screen. Custom Provide the last stored aspect screen image. Adjust the screen scale and position manually with this function. Press the OK button at Custom adj. Aspect Menu 2 Use the Point ▲▼ buttons select the desired item...fixed. If your computer's screen resolution is higher than 1280x800 is automatically modified based on the aspect ratio. Computer Input Aspect Setting (For LV-8225) This projector has the picture screen resize function, which enables you to customize the image size. 1 Press the MENU button to fit the...
.... Either side of image may go over the screen. Custom Provide the last stored aspect screen image. Adjust the screen scale and position manually with this function. Press the OK button at Custom adj. Aspect Menu 2 Use the Point ▲▼ buttons select the desired item...fixed. If your computer's screen resolution is higher than 1280x800 is automatically modified based on the aspect ratio. Computer Input Aspect Setting (For LV-8225) This projector has the picture screen resize function, which enables you to customize the image size. 1 Press the MENU button to fit the...

LV-7290 User's Manual
Page 43
... The projector automatically detects an incoming video system, and adjusts itself to optimize its performance. When VIDEO System is PAL-M or PAL-N, select the system manually. COMPONENT Auto The projector automatically detects an incoming video signal, and adjusts itself to optimize its performance. VIDEO Input VIDEO System Selection 1 Press the MENU...
... The projector automatically detects an incoming video system, and adjusts itself to optimize its performance. When VIDEO System is PAL-M or PAL-N, select the system manually. COMPONENT Auto The projector automatically detects an incoming video signal, and adjusts itself to optimize its performance. VIDEO Input VIDEO System Selection 1 Press the MENU...
LV-7290 User's Manual
Page 47
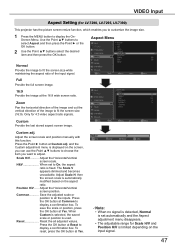
... to display a confirmation box. Use the Point ▲▼ buttons to fit the screen size (16:9). Adjust the screen scale and position manually with this function. To reset, press the OK button at Custom adj. Zoom Pan the horizontal direction of the image and cut the vertical ...image size. 1 Press the MENU button to display the OnScreen Menu. Reset Reset the all the inputs. VIDEO Input Aspect Setting (for LV-7290, LV-7295, LV-7390) This projector has the picture screen resize function, which enables you want to adjust. Adjust Scale H, then the screen scale is displayed...
... to display a confirmation box. Use the Point ▲▼ buttons to fit the screen size (16:9). Adjust the screen scale and position manually with this function. To reset, press the OK button at Custom adj. Zoom Pan the horizontal direction of the image and cut the vertical ...image size. 1 Press the MENU button to display the OnScreen Menu. Reset Reset the all the inputs. VIDEO Input Aspect Setting (for LV-7290, LV-7295, LV-7390) This projector has the picture screen resize function, which enables you want to adjust. Adjust Scale H, then the screen scale is displayed...

LV-7290 User's Manual
Page 49
...at Custom adj. The Scale V appears dimmed and becomes unavailable. Reset Reset the all the inputs. VIDEO Input Aspect Setting (for LV-8225) This projector has the picture screen resize function, which enables you want to adjust. Use the Point ▲▼ buttons to ...confirmation box. Common Save the adjusted scale or position to fit the screen size (16:9). Adjust the screen scale and position manually with this function. Scale H/V........... Adjust the Horizontal/Vertical screen scale. Custom Provide the last stored aspect screen image. Press the ...
...at Custom adj. The Scale V appears dimmed and becomes unavailable. Reset Reset the all the inputs. VIDEO Input Aspect Setting (for LV-8225) This projector has the picture screen resize function, which enables you want to adjust. Use the Point ▲▼ buttons to ...confirmation box. Common Save the adjusted scale or position to fit the screen size (16:9). Adjust the screen scale and position manually with this function. Scale H/V........... Adjust the Horizontal/Vertical screen scale. Custom Provide the last stored aspect screen image. Press the ...
LV-7290 User's Manual
Page 52
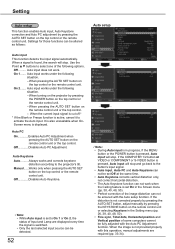
...48, 50). • Fine sync, Total dots, Horizontal position and Vertical position of the image distortion can not be ensured with this operation, manual adjustments are displayed every time the signal is found, the search will stop . When pressing the AUTO SET button on the top control or the... Settings for those functions can be detected. 52 Note: • During Auto input is not provided properly with the Auto setup function. Manual......Works only when pressing the AUTO SET button on the top control or the remote control unit. When a signal is switched. • Only ...
...48, 50). • Fine sync, Total dots, Horizontal position and Vertical position of the image distortion can not be ensured with this operation, manual adjustments are displayed every time the signal is found, the search will stop . When pressing the AUTO SET button on the top control or the... Settings for those functions can be detected. 52 Note: • During Auto input is not provided properly with the Auto setup function. Manual......Works only when pressing the AUTO SET button on the top control or the remote control unit. When a signal is switched. • Only ...
LV-7290 User's Manual
Page 57
.... Refer to set Exit To exit the P-timer operation. Count up or count down function. Timer Use the Point ▲▼ buttons to the user's manual of RS-232C serial port is not available. Setting Standby mode This function is in Count down only. "000:00" Count down ...
.... Refer to set Exit To exit the P-timer operation. Count up or count down function. Timer Use the Point ▲▼ buttons to the user's manual of RS-232C serial port is not available. Setting Standby mode This function is in Count down only. "000:00" Count down ...
LV-7290 User's Manual
Page 69
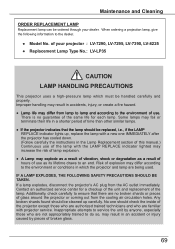
...;�p��a�n�d��a�c�c��o�rd��in the Lamp Replacement section of this manual.) Continuous use as its lifetime draws to do so, may fail or terminate their life in an accident or injury caused...and replacement of your dealer. Risk of explosion may result in which must be ordered through your projector : LV-7290, LV-7295, LV-7390, LV-8225 ● Replacement Lamp Type No.: LV-LP35 CAUTION LAMP HANDLING PRECAUTIONS This projector uses a high-pressure lamp which the projector and lamp are no...
...;�p��a�n�d��a�c�c��o�rd��in the Lamp Replacement section of this manual.) Continuous use as its lifetime draws to do so, may fail or terminate their life in an accident or injury caused...and replacement of your dealer. Risk of explosion may result in which must be ordered through your projector : LV-7290, LV-7295, LV-7390, LV-8225 ● Replacement Lamp Type No.: LV-LP35 CAUTION LAMP HANDLING PRECAUTIONS This projector uses a high-pressure lamp which the projector and lamp are no...
LV-7290 User's Manual
Page 71
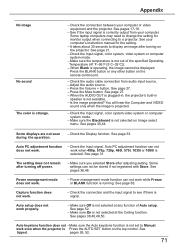
...work . - See page 31. Make sure Off is running. See pages 38,40,48,50. Check the connection between your computer's instruction manual for monitor output when connecting to a projector. See your computer or video equipment and the projector. It takes about 30 seconds to see if...720p, 480i, 575i, 1035i or 1080i is operating, the image cannot be stored if not registered with Store. Some laptop computers may need to Manual. See page 27. - When the AUDIO OUT is plugged-in, the projector's built-in speaker is projected. See page 53. settings can ...
...work . - See page 31. Make sure Off is running. See pages 38,40,48,50. Check the connection between your computer's instruction manual for monitor output when connecting to a projector. See your computer or video equipment and the projector. It takes about 30 seconds to see if...720p, 480i, 575i, 1035i or 1080i is operating, the image cannot be stored if not registered with Store. Some laptop computers may need to Manual. See page 27. - When the AUDIO OUT is plugged-in, the projector's built-in speaker is projected. See page 53. settings can ...


