User Manual
Page 2
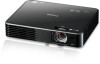
... as PC, video, HDMI, USB, and SD card, allow you to connect a wide variety of devices. • Built-in this Canon product. The Power Projector LE-5W (from here on . There is also an audio out terminal. • Easy-to enjoy audio with a true sense of symbols used in stereo speaker The 2.5 watt stereo speaker allows you to -use On-screen Display (OSD) menu. • Wide...
... as PC, video, HDMI, USB, and SD card, allow you to connect a wide variety of devices. • Built-in this Canon product. The Power Projector LE-5W (from here on . There is also an audio out terminal. • Easy-to enjoy audio with a true sense of symbols used in stereo speaker The 2.5 watt stereo speaker allows you to -use On-screen Display (OSD) menu. • Wide...

User Manual
Page 3
... instructions 5 Introduction 17 Contents of package 18 Projector part names 19 Control panel and indicators .........20 Remote control 21 Third party software 23 Projecting 25 Basic operations 26 Connecting the power cord ...........26 Turning on the projector 27 Adjusting the focus 27 Setting the language 28 Switching the input signal 28 Adjusting volume 29 Hiding the image 30 Turning off the projector 30 Storing the projector in the carrying bag 31 Positioning the projector 32 Adjusting the size of the image...
... instructions 5 Introduction 17 Contents of package 18 Projector part names 19 Control panel and indicators .........20 Remote control 21 Third party software 23 Projecting 25 Basic operations 26 Connecting the power cord ...........26 Turning on the projector 27 Adjusting the focus 27 Setting the language 28 Switching the input signal 28 Adjusting volume 29 Hiding the image 30 Turning off the projector 30 Storing the projector in the carrying bag 31 Positioning the projector 32 Adjusting the size of the image...

User Manual
Page 4
Appendix 87 LED Indicators 88 Troubleshooting 89 The projector does not turn on......89 No image 90 No sound 91 Blurred image 91 The image does not display properly 92 Power shuts down 92 Remote control does not work ......93 Care and Cleaning 94 Cleaning the lens 94 Cleaning the projector 94 Timing chart 95 Projector specifications 98 Copyright information 100 Notes on copyrights 100 Trademarks 100 On-screen menu tree 101 Setup menu configuration .......... 102 4
Appendix 87 LED Indicators 88 Troubleshooting 89 The projector does not turn on......89 No image 90 No sound 91 Blurred image 91 The image does not display properly 92 Power shuts down 92 Remote control does not work ......93 Care and Cleaning 94 Cleaning the lens 94 Cleaning the projector 94 Timing chart 95 Projector specifications 98 Copyright information 100 Notes on copyrights 100 Trademarks 100 On-screen menu tree 101 Setup menu configuration .......... 102 4
User Manual
Page 5
... NOT REMOVE COVER (OR BACK). THIS SYMBOL INDICATES THAT THERE ARE IMPORTANT OPERATING AND MAINTENANCE INSTRUCTIONS FOR THIS UNIT IN THE OWNER'S MANUAL. If your projector does not seem to come. This projector provides many years to be operating properly, read this manual again, check operations and cable connections, and try the solutions in the "Troubleshooting" section in the user's manual. REFER SERVICING TO QUALIFIED SERVICE PERSONNEL. If the problem still...
... NOT REMOVE COVER (OR BACK). THIS SYMBOL INDICATES THAT THERE ARE IMPORTANT OPERATING AND MAINTENANCE INSTRUCTIONS FOR THIS UNIT IN THE OWNER'S MANUAL. If your projector does not seem to come. This projector provides many years to be operating properly, read this manual again, check operations and cable connections, and try the solutions in the "Troubleshooting" section in the user's manual. REFER SERVICING TO QUALIFIED SERVICE PERSONNEL. If the problem still...
User Manual
Page 6
... light from the AC power supply before beginning to be built into the lens, otherwise eye damage could result. Heat build-up can reduce the service life of the instructions given here and retain them for later use liquid or aerosol cleaners on the top, sides, and rear of the projector cabinet is to operate the product. DO NOT SET THE PROJECTOR...
... light from the AC power supply before beginning to be built into the lens, otherwise eye damage could result. Heat build-up can reduce the service life of the instructions given here and retain them for later use liquid or aerosol cleaners on the top, sides, and rear of the projector cabinet is to operate the product. DO NOT SET THE PROJECTOR...

User Manual
Page 7
... operated using only the type of any kind into the projector. c If the projector has been exposed to service this projector where the cord may be placed in a built-in a fire or electric shock. Never spill liquid of power source indicated on the marking label. Do not attempt to rain or water. Adjust only those controls that could result in installation such as opening...
... operated using only the type of any kind into the projector. c If the projector has been exposed to service this projector where the cord may be placed in a built-in a fire or electric shock. Never spill liquid of power source indicated on the marking label. Do not attempt to rain or water. Adjust only those controls that could result in installation such as opening...

User Manual
Page 10
... a residential installation. Use of FCC Rules. Tel No. 1-800-OK-CANON (1-800-652-2666) 10 Federal Communication Commission Notice Multimedia Projector, Model: LE-5W This device complies with the limits for help. These limits are designed to provide reasonable protection against harmful interference in Subpart B of Part 15 of a shielded cable is encouraged to try to correct the interference by turning the...
... a residential installation. Use of FCC Rules. Tel No. 1-800-OK-CANON (1-800-652-2666) 10 Federal Communication Commission Notice Multimedia Projector, Model: LE-5W This device complies with the limits for help. These limits are designed to provide reasonable protection against harmful interference in Subpart B of Part 15 of a shielded cable is encouraged to try to correct the interference by turning the...
User Manual
Page 13
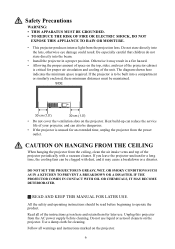
... snow, by light from the projector or disassemble it is required, contact the Canon Customer Support Center. • Do not disassemble or modify the projector (including consumable parts) or the remote control. • Do not insert any object into the projector lens. Warning Pay attention to the following points regarding installation and handling of the projector. If inspection, maintenance or repair is projecting an image, conduct...
... snow, by light from the projector or disassemble it is required, contact the Canon Customer Support Center. • Do not disassemble or modify the projector (including consumable parts) or the remote control. • Do not insert any object into the projector lens. Warning Pay attention to the following points regarding installation and handling of the projector. If inspection, maintenance or repair is projecting an image, conduct...

User Manual
Page 20
... input signals in the base Air intake Speaker Air exhaust Air exhaust Speaker Air intake Air intake Control panel and indicators 1 1. Air intake vent Air exhaust Air exhaust in order. (P28) Press and hold for 3 seconds to overheat and may be damaged. Blocking the vents can cause your projector to enable or disable the key lock. (P74) Introduction 20 POWER button/POWER LED indicator 2 Lights up or flashes when the 3 projector is operating. STATUS LED indicator The LEDs indicate...
... input signals in the base Air intake Speaker Air exhaust Air exhaust Speaker Air intake Air intake Control panel and indicators 1 1. Air intake vent Air exhaust Air exhaust in order. (P28) Press and hold for 3 seconds to overheat and may be damaged. Blocking the vents can cause your projector to enable or disable the key lock. (P74) Introduction 20 POWER button/POWER LED indicator 2 Lights up or flashes when the 3 projector is operating. STATUS LED indicator The LEDs indicate...

User Manual
Page 27
... the image is displayed. Open the lens shutter. 3. Press the POWER button on the projector or the II POWER button on the remote control to the projector. 5. When the projector turns on the projector. Turning on the projector 1. If the frequency/resolution of the input signal exceeds the projector's supported range, the message "Out of Range" is not clear, adjust the focus with the focus ring. 7. Change to an input signal that is turned on all devices connected to turn on , the power indicator LED lights blue. Connect...
... the image is displayed. Open the lens shutter. 3. Press the POWER button on the projector or the II POWER button on the remote control to the projector. 5. When the projector turns on the projector. Turning on the projector 1. If the frequency/resolution of the input signal exceeds the projector's supported range, the message "Out of Range" is not clear, adjust the focus with the focus ring. 7. Change to an input signal that is turned on all devices connected to turn on , the power indicator LED lights blue. Connect...

User Manual
Page 37
... information about USB Display, and page 56 for Mac. • Do not disconnect the USB cable while the files are being copied, as this could result in loss of data or damage to the projector. • The connection does not end if files on the internal memory are open on the trash, and then disconnect the USB cable. • USB Display is not...
... information about USB Display, and page 56 for Mac. • Do not disconnect the USB cable while the files are being copied, as this could result in loss of data or damage to the projector. • The connection does not end if files on the internal memory are open on the trash, and then disconnect the USB cable. • USB Display is not...

User Manual
Page 38
Also check the cable connections. HDMI provides a pure, high quality digital viewing and listening experience. 1. Connect the other end of the cable to the HDMI output jack of video quality. Jack name HDMI input jack Jack shape Notes Transmits high resolution digital images and audio with a single cable Component video input jack Transmits high resolution analog signals Video input jack Transmits analog images If the selected video input is not projected even when the projector is on (P27), check that the video device is...
Also check the cable connections. HDMI provides a pure, high quality digital viewing and listening experience. 1. Connect the other end of the cable to the HDMI output jack of video quality. Jack name HDMI input jack Jack shape Notes Transmits high resolution digital images and audio with a single cable Component video input jack Transmits high resolution analog signals Video input jack Transmits analog images If the selected video input is not projected even when the projector is on (P27), check that the video device is...
User Manual
Page 59
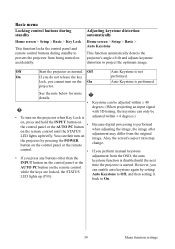
Basic menu Locking control buttons during standby Home screen > Setup > Basic > Key Lock This function locks the control panel and remote control buttons during standby to project the optimum image. projector. adjustment from the OSD, the auto keystone function is disabled until the next time the projector is adjusted within ± 40 degrees. (When projecting an input signal with 3D timing, the keystone can only be • To turn on the remote control until the STATUS LED lights up (P88). See the note below for more details...
Basic menu Locking control buttons during standby Home screen > Setup > Basic > Key Lock This function locks the control panel and remote control buttons during standby to project the optimum image. projector. adjustment from the OSD, the auto keystone function is disabled until the next time the projector is adjusted within ± 40 degrees. (When projecting an input signal with 3D timing, the keystone can only be • To turn on the remote control until the STATUS LED lights up (P88). See the note below for more details...

User Manual
Page 82
... the BACK button. Press the / buttons to confirm your selection. * 1 When projecting an input signal with the OK button, started. brightness of electricity consumed and the noise. Use this if you can enable auto keystone again by setting Auto Keystone to Off, and then setting it back to On. By changing the LED mode, you cannot correct the distortion using Auto Keystone. However, you can reduce the amount of the LED light source.
... the BACK button. Press the / buttons to confirm your selection. * 1 When projecting an input signal with the OK button, started. brightness of electricity consumed and the noise. Use this if you can enable auto keystone again by setting Auto Keystone to Off, and then setting it back to On. By changing the LED mode, you cannot correct the distortion using Auto Keystone. However, you can reduce the amount of the LED light source.

User Manual
Page 83
... "Extended". Press the MENU button or the BACK button. 83 Menu function settings Auto Full Limit Automatically selects the signal level. Press the OK button to the home screen's Setup screen from the OSD. This may not be supported depending on the video device. This function allows you to move to display the home screen's Setup screen. Select when the HDMI output for the video device is set to confirm your selection...
... "Extended". Press the MENU button or the BACK button. 83 Menu function settings Auto Full Limit Automatically selects the signal level. Press the OK button to the home screen's Setup screen from the OSD. This may not be supported depending on the video device. This function allows you to move to display the home screen's Setup screen. Select when the HDMI output for the video device is set to confirm your selection...

User Manual
Page 85
... a computer cable or an HDMI cable. * When connecting the projector to a computer, make sure you cannot see 3D objects, change the image mode when viewing 3D content. Also, if there are not supported. If this happens, turn down or turn off the fluorescent light. • You cannot change the "3D Invert" setting from the computer connected to work correctly. Connect the projector to a computer with graphics board and software capable of...
... a computer cable or an HDMI cable. * When connecting the projector to a computer, make sure you cannot see 3D objects, change the image mode when viewing 3D content. Also, if there are not supported. If this happens, turn down or turn off the fluorescent light. • You cannot change the "3D Invert" setting from the computer connected to work correctly. Connect the projector to a computer with graphics board and software capable of...

User Manual
Page 88
LED Indicators The LED indicators display the operating status of the projector. Operating status Standby Warm up Projecting Button pressed when Key Lock is on (Except buttons operations in order to release Key Lock.) Key Lock switched between on and off STATUS Off Off Off LED Indicator POWER Red solid on Blue blinking Blue solid on Red lamp lights for 3 seconds Standby: Red solid on Projecting: Blue solid on Lights up red for 0.5 second Standby: Red solid on Projecting: Blue solid on Temperature abnormality Flashes red 1 times Off Fan abnormality Flashes red 4 times Off Appendix...
LED Indicators The LED indicators display the operating status of the projector. Operating status Standby Warm up Projecting Button pressed when Key Lock is on (Except buttons operations in order to release Key Lock.) Key Lock switched between on and off STATUS Off Off Off LED Indicator POWER Red solid on Blue blinking Blue solid on Red lamp lights for 3 seconds Standby: Red solid on Projecting: Blue solid on Lights up red for 0.5 second Standby: Red solid on Projecting: Blue solid on Temperature abnormality Flashes red 1 times Off Fan abnormality Flashes red 4 times Off Appendix...

User Manual
Page 91
... image using PC/Component, HDMI or video input, if the input signal is projecting from a cold area to the screen. The projector and the screen are not properly aligned. If the projector is on the remote control. (P21) Use a resistance-free audio cable. Dirty lens. The projector was moved to the screen is not properly connected. No image. No sound Cause The audio cable is appropriate. Clean the lens. (P94) 91 Appendix Press the MUTE button on the remote control. (P21) Adjust...
... image using PC/Component, HDMI or video input, if the input signal is projecting from a cold area to the screen. The projector and the screen are not properly aligned. If the projector is on the remote control. (P21) Use a resistance-free audio cable. Dirty lens. The projector was moved to the screen is not properly connected. No image. No sound Cause The audio cable is appropriate. Clean the lens. (P94) 91 Appendix Press the MUTE button on the remote control. (P21) Adjust...
User Manual
Page 92
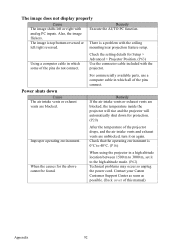
... pins do not connect. Remedy Execute the AUTO PC function. After the temperature of this manual) Appendix 92 Using a computer cable in a high altitude location between 1500 m to the high altitude mode. (P62) Technical problems may occur so unplug the power cord. The image does not display properly Cause The image shifts left /right reversed. Power shuts down for protection. (P20) Improper operating environment. Remedy If the air intake vents...
... pins do not connect. Remedy Execute the AUTO PC function. After the temperature of this manual) Appendix 92 Using a computer cable in a high altitude location between 1500 m to the high altitude mode. (P62) Technical problems may occur so unplug the power cord. The image does not display properly Cause The image shifts left /right reversed. Power shuts down for protection. (P20) Improper operating environment. Remedy If the air intake vents...

User Manual
Page 93
... POWER button, does the STATUS LED light up? There is something between the remote control receiver on the remote control to release the key lock. (P74) 93 Appendix If batteries are inserted correctly. Make sure that the remote control is being operated from a position free of the remote control is ON. Remote control operation has stopped because of the remote control receiver on the projector. (P22) Remove any obstructions between the remote control and projector. Remedy Check...
... POWER button, does the STATUS LED light up? There is something between the remote control receiver on the remote control to release the key lock. (P74) 93 Appendix If batteries are inserted correctly. Make sure that the remote control is being operated from a position free of the remote control is ON. Remote control operation has stopped because of the remote control receiver on the projector. (P22) Remove any obstructions between the remote control and projector. Remedy Check...


