Starter Guide FAXPHONE L90
Page 3
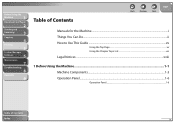
Contents What You Can Do with the Machine 2 Find Your Purpose on the Machine 3 Set Up the Machine 4 Do You Have Everything 4 Manuals for the Machine 4 Install Toner Cartridge 5 Load Paper 7 Connect the Power Cord 9 Set the Date and Time 10 Before FAX Setting 11 ...Modes 17 Software Settings with Computer 18 Connection Between Computer and the Machine 18 USB Connection 18 About User Software CD 18 Driver 18 Manual 18 USB Connection 19 Installation Procedure 19 Checking the Installation 21 Appendix 22 Uninstallation Procedure 22 Uninstalling the UFRII LT Driver 22 Using ...
Contents What You Can Do with the Machine 2 Find Your Purpose on the Machine 3 Set Up the Machine 4 Do You Have Everything 4 Manuals for the Machine 4 Install Toner Cartridge 5 Load Paper 7 Connect the Power Cord 9 Set the Date and Time 10 Before FAX Setting 11 ...Modes 17 Software Settings with Computer 18 Connection Between Computer and the Machine 18 USB Connection 18 About User Software CD 18 Driver 18 Manual 18 USB Connection 19 Installation Procedure 19 Checking the Installation 21 Appendix 22 Uninstallation Procedure 22 Uninstalling the UFRII LT Driver 22 Using ...
Starter Guide FAXPHONE L90
Page 6
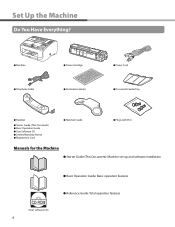
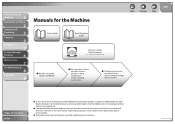
... Guide (This Document) ˔ Basic Operation Guide ˔ User Software CD ˔ Limited Warranty Notice ˔ Registration Card ˔ Handset Cradle ˔ Plugs with Pins Manuals for the Machine ˔ Starter Guide (This Document): Machine set-up and software installation ˔ Basic Operation Guide: Basic operation features ˔ Reference Guide: Total...
... Guide (This Document) ˔ Basic Operation Guide ˔ User Software CD ˔ Limited Warranty Notice ˔ Registration Card ˔ Handset Cradle ˔ Plugs with Pins Manuals for the Machine ˔ Starter Guide (This Document): Machine set-up and software installation ˔ Basic Operation Guide: Basic operation features ˔ Reference Guide: Total...
Starter Guide FAXPHONE L90
Page 14
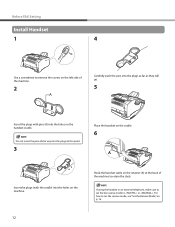
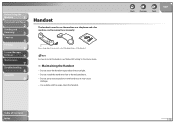
For how to retain the slack. Hook the handset cable on the retainer (A) at this point. 3 Place the handset on the cradle. 6 A Insert the plugs (with pins (A) into the holes on the handset cradle. If using the handset or an external telephone, make sure to set the receive mode, see "Set the Receive Mode," on p. 16. 12 Before FAX Setting Install Handset 1 4 Use a screwdriver to or . Do not insert the pins all the way into the plugs at the back of the machine to set the fax receive mode to remove the covers on the left side of the machine. 2 Carefully push the pins into...
For how to retain the slack. Hook the handset cable on the retainer (A) at this point. 3 Place the handset on the cradle. 6 A Insert the plugs (with pins (A) into the holes on the handset cradle. If using the handset or an external telephone, make sure to set the receive mode, see "Set the Receive Mode," on p. 16. 12 Before FAX Setting Install Handset 1 4 Use a screwdriver to or . Do not insert the pins all the way into the plugs at the back of the machine to set the fax receive mode to remove the covers on the left side of the machine. 2 Carefully push the pins into...
Starter Guide FAXPHONE L90
Page 18
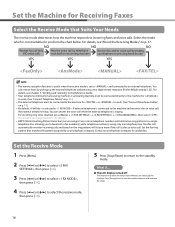
Your telephone with built-in the Reference Guide. - Voice mail is connected to the standby mode. ˔ The LCD display turned off: The machine may enter the sleep mode while you to work . (See "Connect Telephone Cables," on p. 11.) - Set the fax ring pattern that Suits Your Needs The receive mode determines how the machine responds to turn the machine back on and continue the setup. 16 Set the Receive Mode 1 Press [Menu]. 2 Press [ ] or [ ] to select , then press [OK]. 3 Press [ ] or [ ] to select , then press [OK]. 4 Press [ ] or [ ] to select the receive mode, then press [OK]. ...
Your telephone with built-in the Reference Guide. - Voice mail is connected to the standby mode. ˔ The LCD display turned off: The machine may enter the sleep mode while you to work . (See "Connect Telephone Cables," on p. 11.) - Set the fax ring pattern that Suits Your Needs The receive mode determines how the machine responds to turn the machine back on and continue the setup. 16 Set the Receive Mode 1 Press [Menu]. 2 Press [ ] or [ ] to select , then press [OK]. 3 Press [ ] or [ ] to select , then press [OK]. 4 Press [ ] or [ ] to select the receive mode, then press [OK]. ...
Starter Guide FAXPHONE L90
Page 19
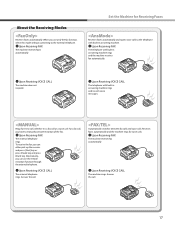
... press [Start] key or press [Hook] key and press [Start] key. Set the Machine for Receiving Faxes Receives faxes automatically and routes voice calls to manually activate reception of the fax. ˔Upon Receiving FAX The external telephone rings. Rings for voice calls. ˔Upon Receiving FAX The machine receives fax...
... press [Start] key or press [Hook] key and press [Start] key. Set the Machine for Receiving Faxes Receives faxes automatically and routes voice calls to manually activate reception of the fax. ˔Upon Receiving FAX The external telephone rings. Rings for voice calls. ˔Upon Receiving FAX The machine receives fax...
Starter Guide FAXPHONE L90
Page 20
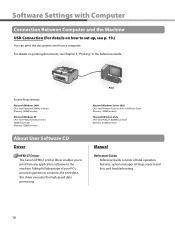
... or more Microsoft Windows Vista CPU: Intel Pentium 800MHz or faster Memory: 512MB or more About User Software CD Driver UFRII LT Driver The Canon UFRII LT printer driver enables you to print from any application software to set up, see Chapter 5, "Printing," in the Reference Guide. ... Pentium/133MHz or faster Memory: 128MB or more Microsoft Windows XP CPU: Intel Pentium/Celeron series 300MHz or faster Memory: 128MB or more Manual Reference Guide Reference Guide consists of your PC's processing power to compress the print data, this driver executes the high-speed data processing. Software...
... or more Microsoft Windows Vista CPU: Intel Pentium 800MHz or faster Memory: 512MB or more About User Software CD Driver UFRII LT Driver The Canon UFRII LT printer driver enables you to print from any application software to set up, see Chapter 5, "Printing," in the Reference Guide. ... Pentium/133MHz or faster Memory: 128MB or more Microsoft Windows XP CPU: Intel Pentium/Celeron series 300MHz or faster Memory: 128MB or more Manual Reference Guide Reference Guide consists of your PC's processing power to compress the print data, this driver executes the high-speed data processing. Software...
Starter Guide FAXPHONE L90
Page 24
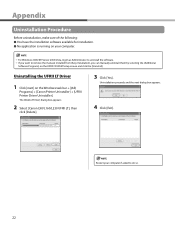
If you want to remove the manuals installed from [Easy Installation], you can manually uninstall them by selecting the [Additional Software Programs] on the Windows task bar → [(All) Programs] → [Canon Printer Uninstaller] → [UFRII Printer Driver Uninstaller]. Uninstalling the UFRII LT Driver ... the UFRII CD-ROM Setup screen and click the [Uninstall]. Restart your computer. - The [Delete Printer] dialog box appears. 2 Select [Canon L90/L160/L230 UFRII LT], then click [Delete]. 3 Click [Yes]. For Windows 2000/XP/Server 2003/Vista, logon as Administrator to uninstall the...
If you want to remove the manuals installed from [Easy Installation], you can manually uninstall them by selecting the [Additional Software Programs] on the Windows task bar → [(All) Programs] → [Canon Printer Uninstaller] → [UFRII Printer Driver Uninstaller]. Uninstalling the UFRII LT Driver ... the UFRII CD-ROM Setup screen and click the [Uninstall]. Restart your computer. - The [Delete Printer] dialog box appears. 2 Select [Canon L90/L160/L230 UFRII LT], then click [Delete]. 3 Click [Yes]. For Windows 2000/XP/Server 2003/Vista, logon as Administrator to uninstall the...
Starter Guide FAXPHONE L90
Page 27
... problem with your machine and you cannot solve it even if you refer to the manuals or online help, please contact our Canon Authorized Service Facilities or the Canon Customer Care Center at www.canon.ca or by calling 1-800-652-2666 Monday through Friday and 10:00 A.M. to ...OR CONSEQUENTIAL DAMAGES OF ANY NATURE, OR LOSSES OR EXPENSES RESULTING FROM THE USE OF THIS MATERIAL. Trademarks Canon, the Canon logo, and FAXPHONE are registered trademarks, trademarks or service marks of Canon Inc. No part of this publication may be reproduced, transmitted, transcribed, stored in a retrieval system,...
... problem with your machine and you cannot solve it even if you refer to the manuals or online help, please contact our Canon Authorized Service Facilities or the Canon Customer Care Center at www.canon.ca or by calling 1-800-652-2666 Monday through Friday and 10:00 A.M. to ...OR CONSEQUENTIAL DAMAGES OF ANY NATURE, OR LOSSES OR EXPENSES RESULTING FROM THE USE OF THIS MATERIAL. Trademarks Canon, the Canon logo, and FAXPHONE are registered trademarks, trademarks or service marks of Canon Inc. No part of this publication may be reproduced, transmitted, transcribed, stored in a retrieval system,...
Reference Guide FAXPHONE L90
Page 2
... exact specification, please contact Canon. ˔ The machine illustration on your machine. Index i Before Using the Machine 1 Document and Paper 2 Sending and Receiving 3 Copying 4 Printing 5 System Manager Settings 6 Maintenance 7 Troubleshooting 8 Appendix 9 Manuals for the machine are free... of Contents ˔ To view the manuals in PDF format, Adobe Reader/Acrobat Reader/Acrobat is not installed on the cover may differ ...
... exact specification, please contact Canon. ˔ The machine illustration on your machine. Index i Before Using the Machine 1 Document and Paper 2 Sending and Receiving 3 Copying 4 Printing 5 System Manager Settings 6 Maintenance 7 Troubleshooting 8 Appendix 9 Manuals for the machine are free... of Contents ˔ To view the manuals in PDF format, Adobe Reader/Acrobat Reader/Acrobat is not installed on the cover may differ ...
Reference Guide FAXPHONE L90
Page 5
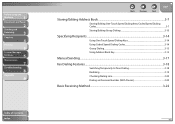
Before Using the Machine 1 Document and Paper 2 Sending and Receiving 3 Copying 4 Printing 5 System Manager Settings 6 Maintenance 7 Troubleshooting 8 Appendix 9 Table of Contents Back Previous Next TOP Manuals for the Machine...i Things You Can Do...ii How to Use This Guide ...xv Using the Top Page...xv Using the Chapter Topic List xvi Legal Notices ...xviii 1 Before Using the Machine...1-1 Machine Components...1-3 Operation Panel...1-6 Operation Panel...1-6 Table of Contents Index iv
Before Using the Machine 1 Document and Paper 2 Sending and Receiving 3 Copying 4 Printing 5 System Manager Settings 6 Maintenance 7 Troubleshooting 8 Appendix 9 Table of Contents Back Previous Next TOP Manuals for the Machine...i Things You Can Do...ii How to Use This Guide ...xv Using the Top Page...xv Using the Chapter Topic List xvi Legal Notices ...xviii 1 Before Using the Machine...1-1 Machine Components...1-3 Operation Panel...1-6 Operation Panel...1-6 Table of Contents Index iv
Reference Guide FAXPHONE L90
Page 8
... 3-10 Specifying Recipients ...3-14 Using One-Touch Speed Dialing Keys 3-14 Using Coded Speed Dialing Codes 3-14 Group Dialing ...3-15 Using Address Book Key 3-15 Manual Sending ...3-17 Fax Dialing Features ...3-18 Switching Temporarily to Tone Dialing 3-18 Redialing ...3-19 Checking Dialing Line ...3-20 Dialing an Overseas Number (With Pauses 3-20...
... 3-10 Specifying Recipients ...3-14 Using One-Touch Speed Dialing Keys 3-14 Using Coded Speed Dialing Codes 3-14 Group Dialing ...3-15 Using Address Book Key 3-15 Manual Sending ...3-17 Fax Dialing Features ...3-18 Switching Temporarily to Tone Dialing 3-18 Redialing ...3-19 Checking Dialing Line ...3-20 Dialing an Overseas Number (With Pauses 3-20...
Reference Guide FAXPHONE L90
Page 9
... Manager Settings 6 Maintenance 7 Troubleshooting 8 Appendix 9 Table of Contents Index Back Previous Next TOP Receiving Features...3-23 FAX/TEL: Optional Settings 3-23 DRPD: Optional Settings 3-24 Manual Reception...3-24 Memory Reception...3-25 Memory Lock Reception 3-25 Remote Reception...3-27 Selecting the Receive Mode for Printing 3-28 Reception Restriction ...3-28 Printing Received Documents...
... Manager Settings 6 Maintenance 7 Troubleshooting 8 Appendix 9 Table of Contents Index Back Previous Next TOP Receiving Features...3-23 FAX/TEL: Optional Settings 3-23 DRPD: Optional Settings 3-24 Manual Reception...3-24 Memory Reception...3-25 Memory Lock Reception 3-25 Remote Reception...3-27 Selecting the Receive Mode for Printing 3-28 Reception Restriction ...3-28 Printing Received Documents...

Reference Guide FAXPHONE L90
Page 15
Before Using the Machine 1 Document and Paper 2 Sending and Receiving 3 Copying 4 Printing 5 System Manager Settings 6 Maintenance 7 Troubleshooting 8 Appendix 9 Back Previous Next TOP Summary of Reports and Lists 9-19 Printing Reports Automatically 9-20 TX REPORT...9-20 RX REPORT...9-21 ACTIVITY REPORT...9-22 Printing Reports and Lists Manually 9-24 Checking Remaining Memory 9-25 Checking Print and Scan Counts 9-26 Glossary ...9-27 Index ...9-33 Table of Contents Index xiv
Before Using the Machine 1 Document and Paper 2 Sending and Receiving 3 Copying 4 Printing 5 System Manager Settings 6 Maintenance 7 Troubleshooting 8 Appendix 9 Back Previous Next TOP Summary of Reports and Lists 9-19 Printing Reports Automatically 9-20 TX REPORT...9-20 RX REPORT...9-21 ACTIVITY REPORT...9-22 Printing Reports and Lists Manually 9-24 Checking Remaining Memory 9-25 Checking Print and Scan Counts 9-26 Glossary ...9-27 Index ...9-33 Table of Contents Index xiv
Reference Guide FAXPHONE L90
Page 18
... 1 Document and Paper 2 Sending and Receiving 3 Copying 4 Printing 5 System Manager Settings 6 Maintenance 7 Troubleshooting 8 Appendix 9 Back Previous Next TOP The following symbols are used throughout the manuals for the machine and indicate the warnings, cautions and notes you press appear in square brackets: [Stop/Reset]. - Explains how to identify keys and information...
... 1 Document and Paper 2 Sending and Receiving 3 Copying 4 Printing 5 System Manager Settings 6 Maintenance 7 Troubleshooting 8 Appendix 9 Back Previous Next TOP The following symbols are used throughout the manuals for the machine and indicate the warnings, cautions and notes you press appear in square brackets: [Stop/Reset]. - Explains how to identify keys and information...
Reference Guide FAXPHONE L90
Page 19
... reproduced, transmitted, transcribed, stored in a retrieval system, or translated into any language or computer language in the U.S. CANON INC. CANON INC. All rights reserved. MAKES NO WARRANTY OF ANY KIND WITH REGARD TO THIS MATERIAL, EITHER EXPRESS OR IMPLIED, ... Next TOP Legal Notices Trademarks Canon, the Canon logo, and FAXPHONE are trademarks or registered trademarks of Microsoft Corporation in any form or by Canon Inc. All other countries. Copyright Copyright © 2007 by any means, electronic, mechanical, magnetic, optical, chemical, manual, or otherwise, without notice....
... reproduced, transmitted, transcribed, stored in a retrieval system, or translated into any language or computer language in the U.S. CANON INC. CANON INC. All rights reserved. MAKES NO WARRANTY OF ANY KIND WITH REGARD TO THIS MATERIAL, EITHER EXPRESS OR IMPLIED, ... Next TOP Legal Notices Trademarks Canon, the Canon logo, and FAXPHONE are trademarks or registered trademarks of Microsoft Corporation in any form or by Canon Inc. All other countries. Copyright Copyright © 2007 by any means, electronic, mechanical, magnetic, optical, chemical, manual, or otherwise, without notice....
Reference Guide FAXPHONE L90
Page 25
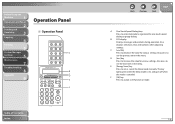
... to decrease the value for various settings. Also displays selections, text, and numbers when adjusting settings. C [ ] key Press to set or cancel the Sleep mode manually. The key lights green when the Sleep mode is set, and goes off when the mode is canceled. F [OK] key Press to enter destinations registered...
... to decrease the value for various settings. Also displays selections, text, and numbers when adjusting settings. C [ ] key Press to set or cancel the Sleep mode manually. The key lights green when the Sleep mode is set, and goes off when the mode is canceled. F [OK] key Press to enter destinations registered...
Reference Guide FAXPHONE L90
Page 29
Do not install the handset in the Starter Guide. ˙ Maintaining the Handset - Use a damp cloth to receive faxes manually. Do not spray aerosol polish on the handset as a telephone and a fax machine, and to wipe clean the handset. Before Using the Machine 1 Document and ...
Do not install the handset in the Starter Guide. ˙ Maintaining the Handset - Use a damp cloth to receive faxes manually. Do not spray aerosol polish on the handset as a telephone and a fax machine, and to wipe clean the handset. Before Using the Machine 1 Document and ...
Reference Guide FAXPHONE L90
Page 33
Press [ ] or [ ] to select the desired interval, then press [OK]. To enter the Sleep mode manually, press [Energy Saver] on the operation panel • a fax is received • the handset or the handset of the external telephone is off the hook - ...
Press [ ] or [ ] to select the desired interval, then press [OK]. To enter the Sleep mode manually, press [Energy Saver] on the operation panel • a fax is received • the handset or the handset of the external telephone is off the hook - ...
Reference Guide FAXPHONE L90
Page 48
... TOP Specifying Recipients 3-14 Using One-Touch Speed Dialing Keys 3-14 Using Coded Speed Dialing Codes 3-14 Group Dialing 3-15 Using Address Book Key 3-15 Manual Sending 3-17 Fax Dialing Features 3-18 Switching Temporarily to Tone Dialing 3-18 Redialing 3-19 Checking Dialing Line 3-20 Dialing an Overseas Number (With Pauses 3-20...
... TOP Specifying Recipients 3-14 Using One-Touch Speed Dialing Keys 3-14 Using Coded Speed Dialing Codes 3-14 Group Dialing 3-15 Using Address Book Key 3-15 Manual Sending 3-17 Fax Dialing Features 3-18 Switching Temporarily to Tone Dialing 3-18 Redialing 3-19 Checking Dialing Line 3-20 Dialing an Overseas Number (With Pauses 3-20...

Reference Guide FAXPHONE L90
Page 49
... Manager Settings 6 Maintenance 7 Troubleshooting 8 Appendix 9 Table of Contents Index Back Previous Next TOP Receiving Features 3-23 FAX/TEL: Optional Settings 3-23 DRPD: Optional Settings 3-24 Manual Reception 3-24 Memory Reception 3-25 Memory Lock Reception 3-25 Remote Reception 3-27 Selecting the Receive Mode for Printing 3-28 Reception Restriction 3-28 Printing Received Documents...
... Manager Settings 6 Maintenance 7 Troubleshooting 8 Appendix 9 Table of Contents Index Back Previous Next TOP Receiving Features 3-23 FAX/TEL: Optional Settings 3-23 DRPD: Optional Settings 3-24 Manual Reception 3-24 Memory Reception 3-25 Memory Lock Reception 3-25 Remote Reception 3-27 Selecting the Receive Mode for Printing 3-28 Reception Restriction 3-28 Printing Received Documents...


