Software User's Guide for FAXPHONE L75
Page 4
Chapter 4 Frequently Asked Questions 4-1 Printer Cannot Be Initialized 4-2 Installation Is Displaying Unexpected Behavior 4-2 Documents Are Not Printing Correctly 4-4 Paper Is Not Loading Correctly 4-6 The Print Quality Is Not Satisfactory 4-6 Appendix A Sharing Your Printer Cross-Platform in Windows 2000/XP A-1 Appendix B Installing from a Local or Network Drive B-1 Installing the Software B-1 Glossary ...G-1 Index ...I-1 iv Contents
Chapter 4 Frequently Asked Questions 4-1 Printer Cannot Be Initialized 4-2 Installation Is Displaying Unexpected Behavior 4-2 Documents Are Not Printing Correctly 4-4 Paper Is Not Loading Correctly 4-6 The Print Quality Is Not Satisfactory 4-6 Appendix A Sharing Your Printer Cross-Platform in Windows 2000/XP A-1 Appendix B Installing from a Local or Network Drive B-1 Installing the Software B-1 Glossary ...G-1 Index ...I-1 iv Contents
Software User's Guide for FAXPHONE L75
Page 45
Chapter 4 4Frequently Asked Questions Contents of this chapter: ❏ Printer Cannot Be Initialized 4-2 ❏ Installation Is Displaying Unexpected Behavior 4-2 ❏ Documents Are Not Printing Correctly 4-4 ❏ Paper Is Not Loading Correctly 4-6 ❏ The Print Quality Is Not Satisfactory 4-6 Frequently Asked Questions Chapter 4 Frequently Asked Questions 4-1
Chapter 4 4Frequently Asked Questions Contents of this chapter: ❏ Printer Cannot Be Initialized 4-2 ❏ Installation Is Displaying Unexpected Behavior 4-2 ❏ Documents Are Not Printing Correctly 4-4 ❏ Paper Is Not Loading Correctly 4-6 ❏ The Print Quality Is Not Satisfactory 4-6 Frequently Asked Questions Chapter 4 Frequently Asked Questions 4-1
Software User's Guide for FAXPHONE L75
Page 50
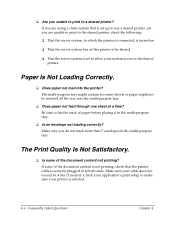
...shared ❏ That the server system is selected. 4-6 Frequently Asked Questions Chapter 4 If some of paper before placing it in the multi-purpose tray. ❏ Is an envelope not loading correctly? Make sure you unable to print to allow your cable does not exceed 16.4 feet (5 ...the document content not printing? ❏ Are you do not stack more than 7 envelopes in at a time? Paper Is Not Loading Correctly. 4 ❏ Does paper not load into the multi-purpose tray. ❏ Does paper not feed through one sheet at both ends. Be sure to the shared printer.
...shared ❏ That the server system is selected. 4-6 Frequently Asked Questions Chapter 4 If some of paper before placing it in the multi-purpose tray. ❏ Is an envelope not loading correctly? Make sure you unable to print to allow your cable does not exceed 16.4 feet (5 ...the document content not printing? ❏ Are you do not stack more than 7 envelopes in at a time? Paper Is Not Loading Correctly. 4 ❏ Does paper not load into the multi-purpose tray. ❏ Does paper not feed through one sheet at both ends. Be sure to the shared printer.
Setup Instructions for FAXPHONE L75
Page 1
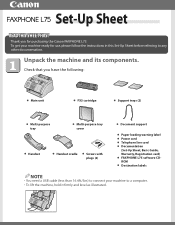
... G Screws with plugs (2) G Document support G Paper loading warning label G Power cord G Telephone line cord G Documentation (Set-Up Sheet, Basic Guide, Warranty, Registration card) G FAXPHONE L75 software CDROM G Destination labels NOTE • You need a USB cable (less than 16.4ft./5m) to connect your machine ready for purchasing the Canon FAXPHONE L75. Unpack the machine and its components.
... G Screws with plugs (2) G Document support G Paper loading warning label G Power cord G Telephone line cord G Documentation (Set-Up Sheet, Basic Guide, Warranty, Registration card) G FAXPHONE L75 software CDROM G Destination labels NOTE • You need a USB cable (less than 16.4ft./5m) to connect your machine ready for purchasing the Canon FAXPHONE L75. Unpack the machine and its components.
Setup Instructions for FAXPHONE L75
Page 2
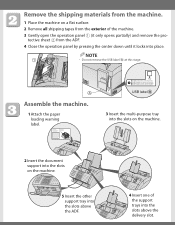
... the ADF. 4 Close the operation panel by pressing the center down until it only opens partially) and remove the pro- A Assemble the machine. 1 Attach the paper loading warning label. tective sheet 2 from the exterior of the machine. 3 Gently open the operation panel 1 (it locks into the slots above the ADF. 4 Insert one...
... the ADF. 4 Close the operation panel by pressing the center down until it only opens partially) and remove the pro- A Assemble the machine. 1 Attach the paper loading warning label. tective sheet 2 from the exterior of the machine. 3 Gently open the operation panel 1 (it locks into the slots above the ADF. 4 Insert one...
Setup Instructions for FAXPHONE L75
Page 3
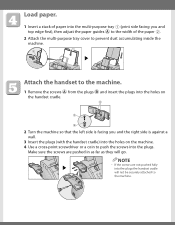
Make sure the screws are not pushed fully into the plugs the handset cradle will go. Load paper. 1 Insert a stack of the paper 2. 2 Attach the multi-purpose tray cover to prevent dust accumulating inside the machine. 1 A 2 2 Attach the handset to the machine. NOTE • If the screws are ... on the handset cradle. B A B 2 Turn the machine so that the left side is facing you and top edge first), then adjust the paper guides A to the width of paper into the multi-purpose tray 1 (print side facing you and the right side is against a wall. 3 Insert the plugs (with the handset cradle...
Make sure the screws are not pushed fully into the plugs the handset cradle will go. Load paper. 1 Insert a stack of the paper 2. 2 Attach the multi-purpose tray cover to prevent dust accumulating inside the machine. 1 A 2 2 Attach the handset to the machine. NOTE • If the screws are ... on the handset cradle. B A B 2 Turn the machine so that the left side is facing you and top edge first), then adjust the paper guides A to the width of paper into the multi-purpose tray 1 (print side facing you and the right side is against a wall. 3 Insert the plugs (with the handset cradle...
User Guide
Page 9
... 2-8 Connecting the Telephone Line Cord and External Devices 2-8 Connecting the Power Cord 2-9 Connecting the FAXPHONE to Your PC 2-10 Main Components of the FAXPHONE 2-11 Operation Panel 2-12 Special Function Buttons 2-12 Installing the cartridge 2-13 Loading Paper...2-16 Testing the FAXPHONE 2-18 Chapter 3: Registering Information Guidelines for Entering Numbers, Letters, and Symbols 3-2 Correcting a Mistake...
... 2-8 Connecting the Telephone Line Cord and External Devices 2-8 Connecting the Power Cord 2-9 Connecting the FAXPHONE to Your PC 2-10 Main Components of the FAXPHONE 2-11 Operation Panel 2-12 Special Function Buttons 2-12 Installing the cartridge 2-13 Loading Paper...2-16 Testing the FAXPHONE 2-18 Chapter 3: Registering Information Guidelines for Entering Numbers, Letters, and Symbols 3-2 Correcting a Mistake...
User Guide
Page 10
Chapter 5: Print Media Handling Print Media Requirements 5-2 Printable Areas 5-3 Selecting and Loading Print Media 5-4 Paper ...5-4 Envelopes ...5-4 Transparencies 5-6 Selecting Face-Up or Face-Down Delivery 5-7 Changing the Paper Size Setting 5-9 Adjusting the Toner Saver Setting 5-11 Chapter 6: Speed Dialing What is Speed Dialing 6-2 Speed Dialing Methods 6-2 Registering One-Touch Speed Dialing 6-3 Registering Coded ...
Chapter 5: Print Media Handling Print Media Requirements 5-2 Printable Areas 5-3 Selecting and Loading Print Media 5-4 Paper ...5-4 Envelopes ...5-4 Transparencies 5-6 Selecting Face-Up or Face-Down Delivery 5-7 Changing the Paper Size Setting 5-9 Adjusting the Toner Saver Setting 5-11 Chapter 6: Speed Dialing What is Speed Dialing 6-2 Speed Dialing Methods 6-2 Registering One-Touch Speed Dialing 6-3 Registering Coded ...
User Guide
Page 25
... 2-8 Connecting the Telephone Line Cord and External Devices 2-8 Connecting the Power Cord 2-9 Connecting the FAXPHONE to Your PC 2-10 Main Components of the FAXPHONE 2-11 Operation Panel 2-12 Special Function Buttons 2-12 Installing the cartridge 2-13 Loading Paper 2-16 Testing the FAXPHONE 2-18 Chapter 2 Setting Up 2-1 Choosing a Location for unpacking, assembling, and connecting your machine...
... 2-8 Connecting the Telephone Line Cord and External Devices 2-8 Connecting the Power Cord 2-9 Connecting the FAXPHONE to Your PC 2-10 Main Components of the FAXPHONE 2-11 Operation Panel 2-12 Special Function Buttons 2-12 Installing the cartridge 2-13 Loading Paper 2-16 Testing the FAXPHONE 2-18 Chapter 2 Setting Up 2-1 Choosing a Location for unpacking, assembling, and connecting your machine...
User Guide
Page 40
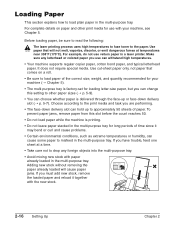
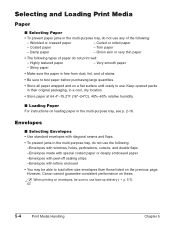
...media and task you are performing. • The face-down delivery slot (1 p. 5-7). To prevent paper jams, remove paper from this setting to misfeed in the multi-purpose tray. Before loading paper, be sure to read the following: c The laser printing process uses high temperatures to fuse toner to..., do not use with your machine (1 Chapter 5). • The multi-purpose tray is factory-set for loading letter-size paper, but you must add new stock, remove the loaded paper and reload it may bend or curl and cause problems. • Certain environmental conditions, such as extreme temperatures...
...media and task you are performing. • The face-down delivery slot (1 p. 5-7). To prevent paper jams, remove paper from this setting to misfeed in the multi-purpose tray. Before loading paper, be sure to read the following: c The laser printing process uses high temperatures to fuse toner to..., do not use with your machine (1 Chapter 5). • The multi-purpose tray is factory-set for loading letter-size paper, but you must add new stock, remove the loaded paper and reload it may bend or curl and cause problems. • Certain environmental conditions, such as extreme temperatures...
User Guide
Page 42
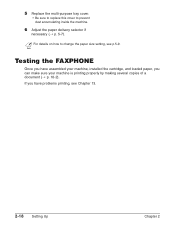
If you can make sure your machine, installed the cartridge, and loaded paper, you have assembled your machine is printing properly by making several copies of a document (1 p. 10-2). Testing the FAXPHONE Once you have problems printing, see p.5-9. 5 Replace the multi-purpose tray cover. • Be sure to replace this cover to change the paper size setting, see Chapter 13. 2-18 Setting Up Chapter 2 n For details on how to prevent dust accumulating inside the machine. 6 Adjust the paper delivery selector if necessary (1 p. 5-7).
If you can make sure your machine, installed the cartridge, and loaded paper, you have assembled your machine is printing properly by making several copies of a document (1 p. 10-2). Testing the FAXPHONE Once you have problems printing, see p.5-9. 5 Replace the multi-purpose tray cover. • Be sure to replace this cover to change the paper size setting, see Chapter 13. 2-18 Setting Up Chapter 2 n For details on how to prevent dust accumulating inside the machine. 6 Adjust the paper delivery selector if necessary (1 p. 5-7).
User Guide
Page 60
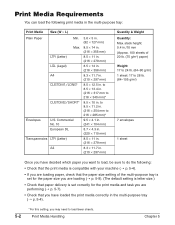
...Chapter 5 Print Media Requirements You can load the following : • Check that the print media is compatible with your machine (1 p. 5-4). • If you are loading paper, check that the paper size setting of the multi-purpose tray is set for the paper size you are loading (1 p. 5-9). (The default setting... is letter size.) • Check that paper delivery is set correctly for the print media and ...
...Chapter 5 Print Media Requirements You can load the following : • Check that the print media is compatible with your machine (1 p. 5-4). • If you are loading paper, check that the paper size setting of the multi-purpose tray is set for the paper size you are loading (1 p. 5-9). (The default setting... is letter size.) • Check that paper delivery is set correctly for the print media and ...
User Guide
Page 62
...24°C), 40%-60% relative humidity. 3 Loading Paper For instructions on a flat surface until ready to use. Wrinkled or creased paper - Curled or rolled paper - Coated paper - Highly textured paper - Very smooth paper - Shiny paper • Make sure the paper is free from dust, lint, and oil stains...purpose tray, do not use face-up delivery (1 p. 5-7). 5-4 Print Media Handling Chapter 5 Torn paper - However, Canon cannot guarantee consistent performance on envelopes, be able to load other size envelopes than those listed on the previous page. Onion skin or very thin...
...24°C), 40%-60% relative humidity. 3 Loading Paper For instructions on a flat surface until ready to use. Wrinkled or creased paper - Curled or rolled paper - Coated paper - Highly textured paper - Very smooth paper - Shiny paper • Make sure the paper is free from dust, lint, and oil stains...purpose tray, do not use face-up delivery (1 p. 5-7). 5-4 Print Media Handling Chapter 5 Torn paper - However, Canon cannot guarantee consistent performance on envelopes, be able to load other size envelopes than those listed on the previous page. Onion skin or very thin...
User Guide
Page 168
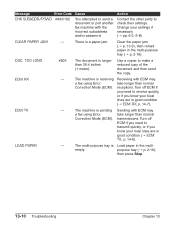
... longer than normal Correction Mode (ECM). The machine is longer than 39.4 inches (1 meter). ECM TX - transmissions. There is Load paper in good condition (1 ECM TX, p. 14-6). Clear the paper jam (1 p. 13-3), then reload paper in good condition (1 ECM RX, p. 14-7). Turn off ECM if you need to receive quickly, or if you know... Error take longer than normal Correction Mode (ECM). Action Contact the other party to make a reduced copy of the document and then send the copy. LOAD PAPER - Change your local lines are in the multi-purpose tray (1 p. 2-16).
... longer than normal Correction Mode (ECM). The machine is longer than 39.4 inches (1 meter). ECM TX - transmissions. There is Load paper in good condition (1 ECM TX, p. 14-6). Clear the paper jam (1 p. 13-3), then reload paper in good condition (1 ECM RX, p. 14-7). Turn off ECM if you need to receive quickly, or if you know... Error take longer than normal Correction Mode (ECM). Action Contact the other party to make a reduced copy of the document and then send the copy. LOAD PAPER - Change your local lines are in the multi-purpose tray (1 p. 2-16).
User Guide
Page 169
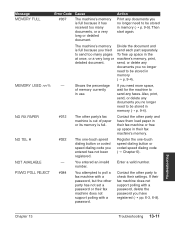
...(1 p. 9-4). Troubleshooting Chapter 13 Troubleshooting 13-11 The machine's memory is full. Also, print, send, or delete any documents you have them load paper in memory (1 p. 9-4). Register the one -touch speed dialing button or coded speed dialing code you no longer need to be stored in their... a password. number. Action Print any documents you need to send too many documents, or a very long or detailed document. NO RX PAPER #012 The other party has not set a password or their fax machine does not support polling with a password, delete the password you...
...(1 p. 9-4). Troubleshooting Chapter 13 Troubleshooting 13-11 The machine's memory is full. Also, print, send, or delete any documents you have them load paper in memory (1 p. 9-4). Register the one -touch speed dialing button or coded speed dialing code you no longer need to be stored in their... a password. number. Action Print any documents you need to send too many documents, or a very long or detailed document. NO RX PAPER #012 The other party has not set a password or their fax machine does not support polling with a password, delete the password you...

User Guide
Page 170
...Contact the other party to fax machine with a check their settings. subaddress. TX/RX CANCELLED - sending or receiving. The loaded paper size Load the correct paper in (nnnn) is full. cancel a transaction. The number shown This number appears in may not match the size the...the other party to document with a check their settings. the fax in the multi- REC'D IN MEMORY The machine received Load paper in memory purpose tray (1 p. 2-16), because paper or toner replace the cartridge - TX/RX NO. If their fax machine does not support reception with a password, delete...
...Contact the other party to fax machine with a check their settings. subaddress. TX/RX CANCELLED - sending or receiving. The loaded paper size Load the correct paper in (nnnn) is full. cancel a transaction. The number shown This number appears in may not match the size the...the other party to document with a check their settings. the fax in the multi- REC'D IN MEMORY The machine received Load paper in memory purpose tray (1 p. 2-16), because paper or toner replace the cartridge - TX/RX NO. If their fax machine does not support reception with a password, delete...
User Guide
Page 175
...error code (1 p. 13-8). The cartridge may be installed properly. • Make sure the cartridge is loaded in memory (1 p. 9-4). The multi-purpose tray may not be empty. • Make sure paper is installed properly (1 p. 2-13). You may not send the CNG signal that tells your machine ... Make sure you have them check that an answering machine is turned on (1 ECM RX, p. 14-7). ■ Faxes do not print. If you load paper that it is connected to be replaced. • Replace the cartridge (1 p. 12-6). ■ No automatic switching between telephone and fax calls. •...
...error code (1 p. 13-8). The cartridge may be installed properly. • Make sure the cartridge is loaded in memory (1 p. 9-4). The multi-purpose tray may not be empty. • Make sure paper is installed properly (1 p. 2-13). You may not send the CNG signal that tells your machine ... Make sure you have them check that an answering machine is turned on (1 ECM RX, p. 14-7). ■ Faxes do not print. If you load paper that it is connected to be replaced. • Replace the cartridge (1 p. 12-6). ■ No automatic switching between telephone and fax calls. •...
User Guide
Page 179
... power failure or accidental unplugging, a built-in the multi-purpose tray when power is restored, the LCD displays CHANGE CARTRIDGE or LOAD PAPER. Troubleshooting Chapter 13 Troubleshooting 13-21 During a power failure, functions are limited as a result of the power failure. 12/27... FILES DELETED CONNECTION TEL/ID [A 01] Canon TOKYO [ 01] Canon CANADA [A 02] Canon FRANCE [ 03] Canon ITALIA [ 04] Canon U.S.A. [ 08] Canon OPTICS PGS. In these cases, the MEMORY CLEAR REPORT will be printed even after the cartridge is replaced or paper is loaded. If a Power Failure Occurs If power ...
... power failure or accidental unplugging, a built-in the multi-purpose tray when power is restored, the LCD displays CHANGE CARTRIDGE or LOAD PAPER. Troubleshooting Chapter 13 Troubleshooting 13-21 During a power failure, functions are limited as a result of the power failure. 12/27... FILES DELETED CONNECTION TEL/ID [A 01] Canon TOKYO [ 01] Canon CANADA [A 02] Canon FRANCE [ 03] Canon ITALIA [ 04] Canon U.S.A. [ 08] Canon OPTICS PGS. In these cases, the MEMORY CLEAR REPORT will be printed even after the cartridge is replaced or paper is loaded. If a Power Failure Occurs If power ...
User Guide
Page 197
See Fax/Tel Mode Features, FAXPHONE 1-3 FILE NAME setting 9-12, 14-9 Fixing assembly 2-11 Front cover 2-11 FX3. See also individual list names summary 11-2 LOAD PAPER message 13-10 Loading document 4-3, 4-4 envelopes 5-5, 5-6 paper 2-16 to 2-18 transparencies 5-6 Location choosing 2-2 safety instructions 1-8, 1-9 LTR setting 5-2, 5-9, 14-8 M Machine 2-4 assembling 2-6 choosing location for 8-4, 8-5 FaxOnly setting. See Cartridge G GROUP DIAL...
See Fax/Tel Mode Features, FAXPHONE 1-3 FILE NAME setting 9-12, 14-9 Fixing assembly 2-11 Front cover 2-11 FX3. See also individual list names summary 11-2 LOAD PAPER message 13-10 Loading document 4-3, 4-4 envelopes 5-5, 5-6 paper 2-16 to 2-18 transparencies 5-6 Location choosing 2-2 safety instructions 1-8, 1-9 LTR setting 5-2, 5-9, 14-8 M Machine 2-4 assembling 2-6 choosing location for 8-4, 8-5 FaxOnly setting. See Cartridge G GROUP DIAL...
User Guide
Page 198
...-5 description 11-2 sample 11-5 MULTI TX/RX REPORT. See LCD messages MID PAUSE SET setting 14-6 Mistake, correcting 3-4 Multi-purpose tray 2-11 capacity 5-2 cover 2-4, 2-6, 2-11 loading paper in 2-16 to 9-8 printing document in 9-5 printing list of documents in 9-6, 9-7 MEMORY CLEAR REPORT 13-21 description 11-2 sample 13-21 MEMORY FULL message 13...
...-5 description 11-2 sample 11-5 MULTI TX/RX REPORT. See LCD messages MID PAUSE SET setting 14-6 Mistake, correcting 3-4 Multi-purpose tray 2-11 capacity 5-2 cover 2-4, 2-6, 2-11 loading paper in 2-16 to 9-8 printing document in 9-5 printing list of documents in 9-6, 9-7 MEMORY CLEAR REPORT 13-21 description 11-2 sample 13-21 MEMORY FULL message 13...


