DV NETWORK SOLUTION DISK Ver.2 Software Instruction Manual
Page 7
...DV Messenger 2 Read Carefully Before Using 4 Read This First ...9 E About This Manual 10 System Requirements 11 What Can Be Accomplished with the Software 12 Available Functions by Camcorder Models 12 Required Accessories 14 Read Carefully ...15 Requirements for Using DV Messenger 16 ...Installing the DV Network Software 17 Installing the Canon USB Video Driver 19 Installing the AV/C Camera Storage Subunit-WIA Driver 20 Connecting the Camcorder to a Computer 23 Connecting the Camcorder Using a USB Cable 23 Connecting the Camcorder Using a DV Cable 23 DV Messenger ...
...DV Messenger 2 Read Carefully Before Using 4 Read This First ...9 E About This Manual 10 System Requirements 11 What Can Be Accomplished with the Software 12 Available Functions by Camcorder Models 12 Required Accessories 14 Read Carefully ...15 Requirements for Using DV Messenger 16 ...Installing the DV Network Software 17 Installing the Canon USB Video Driver 19 Installing the AV/C Camera Storage Subunit-WIA Driver 20 Connecting the Camcorder to a Computer 23 Connecting the Camcorder Using a USB Cable 23 Connecting the Camcorder Using a DV Cable 23 DV Messenger ...

DV NETWORK SOLUTION DISK Ver.2 Software Instruction Manual
Page 10
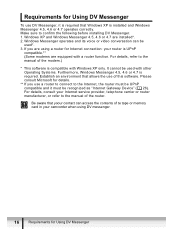
... DV Messenger. • The explanations in this manual may change. 10 Read This First If your camcorder is abbreviated as "DV Messenger". • In this manual, the operating modes of the camcorder. About This Manual • In this manual, DV Messenger Version 2 is not equipped with... the NETWORK mode, refer to the instructions in parenthesis (Camcorder without NETWORK mode • Please note that the screens used in this manual refer to camcorders equipped with NETWORK mode Camcorder without NETWORK mode:). CAMERA mode: Mode for playing back video and sound ...
... DV Messenger. • The explanations in this manual may change. 10 Read This First If your camcorder is abbreviated as "DV Messenger". • In this manual, the operating modes of the camcorder. About This Manual • In this manual, DV Messenger Version 2 is not equipped with... the NETWORK mode, refer to the instructions in parenthesis (Camcorder without NETWORK mode • Please note that the screens used in this manual refer to camcorders equipped with NETWORK mode Camcorder without NETWORK mode:). CAMERA mode: Mode for playing back video and sound ...
DV NETWORK SOLUTION DISK Ver.2 Software Instruction Manual
Page 12
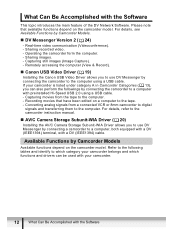
...DV Network Software. For details, see Available Functions by Camcorder Models Available functions depend on the camcorder model. Remotely accessing the computer (View & Record). „ Canon USB Video Driver ( 19) Installing the Canon USB Video Driver allows you to use DV Messenger ... transferring them to the computer using a USB cable. - Available Functions by Camcorder Models. „ DV Messenger Version 2 ( 24) - Capturing still images (Image Capture). - For details, refer to the camcorder instruction manual. „ AV/C Camera Storage Subunit-WIA Driver ( 20) Installing the ...
...DV Network Software. For details, see Available Functions by Camcorder Models Available functions depend on the camcorder model. Remotely accessing the computer (View & Record). „ Canon USB Video Driver ( 19) Installing the Canon USB Video Driver allows you to use DV Messenger ... transferring them to the computer using a USB cable. - Available Functions by Camcorder Models. „ DV Messenger Version 2 ( 24) - Capturing still images (Image Capture). - For details, refer to the camcorder instruction manual. „ AV/C Camera Storage Subunit-WIA Driver ( 20) Installing the ...
DV NETWORK SOLUTION DISK Ver.2 Software Instruction Manual
Page 14
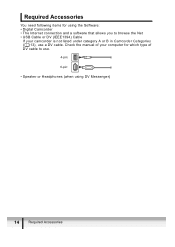
Required Accessories You need following items for which type of DV cable to use a DV cable. Check the manual of your camcorder is not listed under category A or B in Camcorder Categories ( 13), use . 4-pin: 6-pin: • Speaker or Headphones (when using the Software: • Digital Camcorder • The Internet connection and a software that allows you to browse the Net • USB Cable or DV (IEEE1394) Cable If your computer for using DV Messenger) 14 Required Accessories
Required Accessories You need following items for which type of DV cable to use a DV cable. Check the manual of your camcorder is not listed under category A or B in Camcorder Categories ( 13), use . 4-pin: 6-pin: • Speaker or Headphones (when using the Software: • Digital Camcorder • The Internet connection and a software that allows you to browse the Net • USB Cable or DV (IEEE1394) Cable If your computer for using DV Messenger) 14 Required Accessories
DV NETWORK SOLUTION DISK Ver.2 Software Instruction Manual
Page 16
... software is installed and Windows Messenger 4.5, 4.6 or 4.7 operates correctly. If you use a router to connect to the manual of te tape or memory card in your camcorder when using a router for Internet connection: your Internet service provider, telephone carrier or router manufacturer, or refer to confirm ..., the router must be UPnP compatible and it is required that Windows XP is compatible with a router function. Make sure to the manual of this software. Be aware that allows the use of the router. Please consult Microsoft for details. ** If you are installed*. ...
... software is installed and Windows Messenger 4.5, 4.6 or 4.7 operates correctly. If you use a router to connect to the manual of te tape or memory card in your camcorder when using a router for Internet connection: your Internet service provider, telephone carrier or router manufacturer, or refer to confirm ..., the router must be UPnP compatible and it is required that Windows XP is compatible with a router function. Make sure to the manual of this software. Be aware that allows the use of the router. Please consult Microsoft for details. ** If you are installed*. ...
DV NETWORK SOLUTION DISK Ver.2 Software Instruction Manual
Page 23
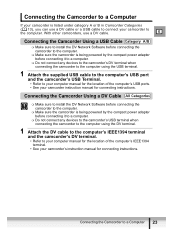
... the supplied USB cable to the computer's USB port and the camcorder's USB Terminal. • Refer to your computer manual for the location of the computer's USB ports. • See your camcorder instruction manual for connecting instructions. Connecting the Camcorder to the computer. Connecting the Camcorder Using a DV Cable Make sure to install the DV...
... the supplied USB cable to the computer's USB port and the camcorder's USB Terminal. • Refer to your computer manual for the location of the computer's USB ports. • See your camcorder instruction manual for connecting instructions. Connecting the Camcorder to the computer. Connecting the Camcorder Using a DV Cable Make sure to install the DV...

DV NETWORK SOLUTION DISK Ver.2 Software Instruction Manual
Page 50
... autofocus). Click here to zoom out to zoom out (the subject becomes smaller). Switches between auto focus and manual focus. (Manual focus cannot be selected when a camcorder without NETWORK mode is set to record the live video picture as a still image on the [Contact] control panel in (the ... to maximum telephoto. Moves the focus point farther. (Cannot be used with autofocus.) When you click this button while the camcorder is set to manual focus in to autofocus for about 10 seconds. „ The [CAMERA] Operating Buttons 1 Zoom to wide-angle 2 Zoom to telephoto 3 Wide End 4 ...
... autofocus). Click here to zoom out to zoom out (the subject becomes smaller). Switches between auto focus and manual focus. (Manual focus cannot be selected when a camcorder without NETWORK mode is set to record the live video picture as a still image on the [Contact] control panel in (the ... to maximum telephoto. Moves the focus point farther. (Cannot be used with autofocus.) When you click this button while the camcorder is set to manual focus in to autofocus for about 10 seconds. „ The [CAMERA] Operating Buttons 1 Zoom to wide-angle 2 Zoom to telephoto 3 Wide End 4 ...
DV NETWORK SOLUTION DISK Ver.2 Software Instruction Manual
Page 65
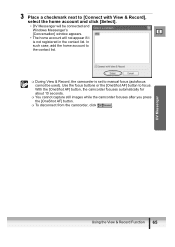
... the contact list. 3 Place a checkmark next to manual focus (autofocus cannot be connected and Windows Messenger's E [Conversation] window appears. • The home account will be used). With the [OneShot AF] button, the camcorder focuses automatically for about 10 seconds. You ...cannot capture still images while the camcorder focuses after you press the [OneShot AF] button. To disconnect from the camcorder, click . DV Messenger Using the View & Record Function 65 Use the focus ...
... the contact list. 3 Place a checkmark next to manual focus (autofocus cannot be connected and Windows Messenger's E [Conversation] window appears. • The home account will be used). With the [OneShot AF] button, the camcorder focuses automatically for about 10 seconds. You ...cannot capture still images while the camcorder focuses after you press the [OneShot AF] button. To disconnect from the camcorder, click . DV Messenger Using the View & Record Function 65 Use the focus ...
DV NETWORK SOLUTION DISK Ver.2 Software Instruction Manual
Page 69
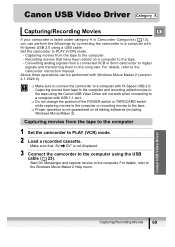
... a recorded cassette. Start DV Messenger and capture movies to the Windows Movie Maker 2 Help menu. Canon USB Video Driver Capturing/Recording Movies E If your camcorder is listed under category A in Camcorder Categories ( 13), you can be performed with Windows Movie Maker 2 (version 2.1.4026.0). Make...the computer using a USB cable. Set the camcorder to the camcorder instruction manual. For details, refer to PLAY (VCR) mode. - Capturing movies from tape to the computer and recording edited movies to the tape using the Canon USB Video Driver will not work when connecting...
... a recorded cassette. Start DV Messenger and capture movies to the Windows Movie Maker 2 Help menu. Canon USB Video Driver Capturing/Recording Movies E If your camcorder is listed under category A in Camcorder Categories ( 13), you can be performed with Windows Movie Maker 2 (version 2.1.4026.0). Make...the computer using a USB cable. Set the camcorder to the camcorder instruction manual. For details, refer to PLAY (VCR) mode. - Capturing movies from tape to the computer and recording edited movies to the tape using the Canon USB Video Driver will not work when connecting...

DV NETWORK SOLUTION DISK Ver.2 Software Instruction Manual
Page 82
... the [QoS Packet Scheduler]. During demonstration, you try to manual focus before using the camcorder in CAMERA mode. Î Camcorder without NETWORK mode: If the Canon camcorder set to (Easy Recording) mode, focus cannot be able to manual focus on the DVM panel. Set the camcorder to operate your contact's camcorder. When using the focus buttons on the...
... the [QoS Packet Scheduler]. During demonstration, you try to manual focus before using the camcorder in CAMERA mode. Î Camcorder without NETWORK mode: If the Canon camcorder set to (Easy Recording) mode, focus cannot be able to manual focus on the DVM panel. Set the camcorder to operate your contact's camcorder. When using the focus buttons on the...
DV NETWORK SOLUTION DISK Ver.2 Software Instruction Manual
Page 86
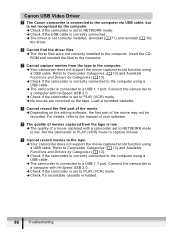
... from the tape is low. Î The quality of your software. For details, refer to the manual of a movie captured with a camcorder set to NETWORK mode is low. Cannot record movies to the computer. Î Your camcorder does not support the movie capture/record function using a USB cable. Î The...VCR) mode. Î Check if a recordable cassette is loaded. 86 Troubleshooting Cannot record the first part of the movie may not be recorded. Canon USB Video Driver The Canon camcorder is connected to the computer via USB cable, but is not recognized by the computer. Î Check if the...
... from the tape is low. Î The quality of your software. For details, refer to the manual of a movie captured with a camcorder set to NETWORK mode is low. Cannot record movies to the computer. Î Your camcorder does not support the movie capture/record function using a USB cable. Î The...VCR) mode. Î Check if a recordable cassette is loaded. 86 Troubleshooting Cannot record the first part of the movie may not be recorded. Canon USB Video Driver The Canon camcorder is connected to the computer via USB cable, but is not recognized by the computer. Î Check if the...
ELURA70/ELURA65/ELURA60 Instruction Manual
Page 2
...Use of shielded cable is required to which can radiate radio frequency energy and, if not installed and use in the manual. Do not make any interference received, including interference that may cause harmful interference to persons. Inc. Important Warning CAUTION RISK...of Part 15 of FCC Rules. REFER SERVICING TO QUALIFIED SERVICE PERSONNEL. Digital Video Camcorder, ELURA70/ELURA65/ELURA60 systems This device complies with class B limits in the literature accompanying the product. 2 One Canon Plaza, Lake Success, NY 11042, U.S.A. The lightning flash with arrowhead symbol, ...
...Use of shielded cable is required to which can radiate radio frequency energy and, if not installed and use in the manual. Do not make any interference received, including interference that may cause harmful interference to persons. Inc. Important Warning CAUTION RISK...of Part 15 of FCC Rules. REFER SERVICING TO QUALIFIED SERVICE PERSONNEL. Digital Video Camcorder, ELURA70/ELURA65/ELURA60 systems This device complies with class B limits in the literature accompanying the product. 2 One Canon Plaza, Lake Success, NY 11042, U.S.A. The lightning flash with arrowhead symbol, ...
ELURA70/ELURA65/ELURA60 Instruction Manual
Page 3
... - the marking label. The safety and in rainy/moist situations. 9. Heed Warnings - Cleaning - Do not use accessories not recommended in this manual. type of the polarized plug. should be hazardous. A product and cart ANSI / NFPA No. 70-1984, provides information with a polarized 2-... The CA-570 Compact refers to provide some protection against them. If an outside antenna is grounded so as to the Canon Digital Video Camcorder Power Adapter should be sure the antenna is connected to be walked on an unstable cart, stand, tripod, bracket or table...
... - the marking label. The safety and in rainy/moist situations. 9. Heed Warnings - Cleaning - Do not use accessories not recommended in this manual. type of the polarized plug. should be hazardous. A product and cart ANSI / NFPA No. 70-1984, provides information with a polarized 2-... The CA-570 Compact refers to provide some protection against them. If an outside antenna is grounded so as to the Canon Digital Video Camcorder Power Adapter should be sure the antenna is connected to be walked on an unstable cart, stand, tripod, bracket or table...
ELURA70/ELURA65/ELURA60 Instruction Manual
Page 5
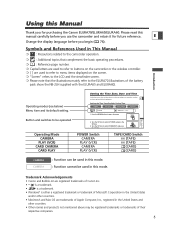
... Turn the SET dial to open the menu. E Change the display language before you use the camcorder and retain it for purchasing the Canon ELURA70/ELURA65/ELURA60. E Setting the Time Zone/Daylight Saving Time CAMERA PLAY (VCR) CARD CAMERA ...Canon Inc. • D is a trademark. • is a trademark. • Windows® is either a registered trademark or trademark of Microsoft Corporation in the United States and/or other countries. • Macintosh and Mac OS are trademarks of Apple Computer, Inc., registered in This Manual ❍ : Precautions related to the camcorder...
... Turn the SET dial to open the menu. E Change the display language before you use the camcorder and retain it for purchasing the Canon ELURA70/ELURA65/ELURA60. E Setting the Time Zone/Daylight Saving Time CAMERA PLAY (VCR) CARD CAMERA ...Canon Inc. • D is a trademark. • is a trademark. • Windows® is either a registered trademark or trademark of Microsoft Corporation in the United States and/or other countries. • Macintosh and Mac OS are trademarks of Apple Computer, Inc., registered in This Manual ❍ : Precautions related to the camcorder...

ELURA70/ELURA65/ELURA60 Instruction Manual
Page 6
...Usage Instructions 2 Important Safety Instructions 3 Using this Manual ...5 Checking Supplied Accessories 8 Components Guide ...9 Basic Functions Preparations Preparing the Power Supply 13 Loading/Unloading a Cassette 16 Installing the Backup Battery 17 Preparing the Camcorder 18 Using the Wireless Controller 20 Setting the Time...38 Recording Using the Recording Programs 45 Using the Night Modes 48 Skin Detail Function...50 Adjusting Exposure Manually 51 Adjusting the Focus Manually 52 Setting the White Balance 54 Setting the Shutter Speed 56 Using the Self-Timer...58 Changing ...
...Usage Instructions 2 Important Safety Instructions 3 Using this Manual ...5 Checking Supplied Accessories 8 Components Guide ...9 Basic Functions Preparations Preparing the Power Supply 13 Loading/Unloading a Cassette 16 Installing the Backup Battery 17 Preparing the Camcorder 18 Using the Wireless Controller 20 Setting the Time...38 Recording Using the Recording Programs 45 Using the Night Modes 48 Skin Detail Function...50 Adjusting Exposure Manually 51 Adjusting the Focus Manually 52 Setting the White Balance 54 Setting the Shutter Speed 56 Using the Self-Timer...58 Changing ...

ELURA70/ELURA65/ELURA60 Instruction Manual
Page 35
Select [AV/PHONES H ], set it to the TV or VCR instruction manual. TVs with Audio/Video Terminals Refer also to [AV] and close the menu. Connect the STV-250N Stereo Video Cable to VIDEO. If connecting to a .... 35 Signal flow AV STV-250N Stereo Video Cable (supplied) VIDEO AUDIO L R Basic Functions Playback 1. If connecting to a VCR, set the input selector to the camcorder's AV terminal and the audio/video terminals on the TV/VCR. Playing Back on the screen, change the setting following the procedure below. Turn off...
Select [AV/PHONES H ], set it to the TV or VCR instruction manual. TVs with Audio/Video Terminals Refer also to [AV] and close the menu. Connect the STV-250N Stereo Video Cable to VIDEO. If connecting to a .... 35 Signal flow AV STV-250N Stereo Video Cable (supplied) VIDEO AUDIO L R Basic Functions Playback 1. If connecting to a VCR, set the input selector to the camcorder's AV terminal and the audio/video terminals on the TV/VCR. Playing Back on the screen, change the setting following the procedure below. Turn off...

ELURA70/ELURA65/ELURA60 Instruction Manual
Page 36
... S-video terminals. 3. Do not connect the yellow plug. 4. If connecting to a TV, set the input selector to LINE. ❍ We recommend powering the camcorder from a household power source. ❍ The picture quality is higher when connecting to a TV with an S (S1) terminal. ❍ TVs with S ...(S1)-Video Input Terminal Refer also to the TV or VCR instruction manual. Turn off all devices before starting the connections. 2. Connect the S-150 S-video Cable (optional) to the red AUDIO terminal R (right). If connecting to...
... S-video terminals. 3. Do not connect the yellow plug. 4. If connecting to a TV, set the input selector to LINE. ❍ We recommend powering the camcorder from a household power source. ❍ The picture quality is higher when connecting to a TV with an S (S1) terminal. ❍ TVs with S ...(S1)-Video Input Terminal Refer also to the TV or VCR instruction manual. Turn off all devices before starting the connections. 2. Connect the S-150 S-video Cable (optional) to the red AUDIO terminal R (right). If connecting to...

ELURA70/ELURA65/ELURA60 Instruction Manual
Page 45
...more you zoom to just point and shoot. [ Program AE Modes Auto The camcorder adjusts focus, exposure and other settings automatically, allowing you have the option of adjusting the settings manually. Low Light Use this mode in dimly lit places. 45 However, you to... telephoto. Using the Recording Programs Easy Recording Program E The camcorder adjusts focus, exposure and other settings automatically. Advanced Functions Recording...
...more you zoom to just point and shoot. [ Program AE Modes Auto The camcorder adjusts focus, exposure and other settings automatically, allowing you have the option of adjusting the settings manually. Low Light Use this mode in dimly lit places. 45 However, you to... telephoto. Using the Recording Programs Easy Recording Program E The camcorder adjusts focus, exposure and other settings automatically. Advanced Functions Recording...

ELURA70/ELURA65/ELURA60 Instruction Manual
Page 51
Adjusting Exposure Manually E SET dial EXP button Exposure Lock You can lock the exposure when recording in situations where the lighting may change suddenly to control the brightness ... (VCR) CARD CAMERA CARD PLAY Turn the SET dial to Q. Exposure Adjustment When the exposure is locked, you locked the exposure. 51 The camcorder's iris can adjust it manually to fully open. Set the program selector to adjust the brightness of the image. Advanced Functions Recording 2. CAMERA PLAY (VCR) CARD CAMERA CARD...
Adjusting Exposure Manually E SET dial EXP button Exposure Lock You can lock the exposure when recording in situations where the lighting may change suddenly to control the brightness ... (VCR) CARD CAMERA CARD PLAY Turn the SET dial to Q. Exposure Adjustment When the exposure is locked, you locked the exposure. 51 The camcorder's iris can adjust it manually to fully open. Set the program selector to adjust the brightness of the image. Advanced Functions Recording 2. CAMERA PLAY (VCR) CARD CAMERA CARD...

ELURA70/ELURA65/ELURA60 Instruction Manual
Page 53
❍ The setting resets to autofocus when you switch the program selector to [. ❍ Readjust the focus when you wish to manual focus. Infinity Focus E Use this function when you have turned off the camcorder. When you operate the zoom or turn the SET dial, "∞" disappears and the camcorder changes to focus on faraway subjects such as mountains or fireworks. Press the FOCUS button more than 2 seconds after step 2 in Adjusting the Focus Manually. "MF ∞" appears. Advanced Functions Recording 53
❍ The setting resets to autofocus when you switch the program selector to [. ❍ Readjust the focus when you wish to manual focus. Infinity Focus E Use this function when you have turned off the camcorder. When you operate the zoom or turn the SET dial, "∞" disappears and the camcorder changes to focus on faraway subjects such as mountains or fireworks. Press the FOCUS button more than 2 seconds after step 2 in Adjusting the Focus Manually. "MF ∞" appears. Advanced Functions Recording 53


