DV NETWORK SOLUTION DISK Ver.2 Software Instruction Manual
Page 7
...the Software 17 Installing the DV Network Software 17 Installing the Canon USB Video Driver 19 Installing the AV/C Camera Storage Subunit-WIA Driver 20 Connecting the Camcorder to a Computer 23 Connecting the Camcorder Using a USB Cable 23 Connecting the Camcorder Using a DV Cable 23 DV Messenger Preparations for DV Messenger... 55 Using the Image Capture Function 57 Setting of Image Capture 57 Changing the Capture Mode 59 Capturing with Your Camcorder 60 Capturing with Your Contact's Camcorder 61 Using the View & Record Function 62 Setting of View & Record 62 Contents 7
...the Software 17 Installing the DV Network Software 17 Installing the Canon USB Video Driver 19 Installing the AV/C Camera Storage Subunit-WIA Driver 20 Connecting the Camcorder to a Computer 23 Connecting the Camcorder Using a USB Cable 23 Connecting the Camcorder Using a DV Cable 23 DV Messenger Preparations for DV Messenger... 55 Using the Image Capture Function 57 Setting of Image Capture 57 Changing the Capture Mode 59 Capturing with Your Camcorder 60 Capturing with Your Contact's Camcorder 61 Using the View & Record Function 62 Setting of View & Record 62 Contents 7

ELURA70/ELURA65/ELURA60 Instruction Manual
Page 6
... Preparing the Power Supply 13 Loading/Unloading a Cassette 16 Installing the Backup Battery 17 Preparing the Camcorder 18 Using the Wireless Controller 20 Setting the Time Zone, Date and Time 21 Recording Recording Movies... on a Tape 24 Zooming ...29 Tips for Making Better Videos 31 Playback Playing Back a Tape ...32 Adjusting the Volume 34 Playing Back on a TV ... Using the Self-Timer...58 Changing the Recording Mode (SP/LP 59 Audio Recording ...60 Using Digital Effects...62 Playback Magnifying the Image 69 Displaying the Data Code 70 End ...
... Preparing the Power Supply 13 Loading/Unloading a Cassette 16 Installing the Backup Battery 17 Preparing the Camcorder 18 Using the Wireless Controller 20 Setting the Time Zone, Date and Time 21 Recording Recording Movies... on a Tape 24 Zooming ...29 Tips for Making Better Videos 31 Playback Playing Back a Tape ...32 Adjusting the Volume 34 Playing Back on a TV ... Using the Self-Timer...58 Changing the Recording Mode (SP/LP 59 Audio Recording ...60 Using Digital Effects...62 Playback Magnifying the Image 69 Displaying the Data Code 70 End ...

ELURA70/ELURA65/ELURA60 Instruction Manual
Page 39
ANIMATION CORNER, STRAIGHT, RANDOM AUTO, 1/60, 1/100, 1/250, 1/500, 1/1000, 56 1/2000 ON, OFF 57 ELURA70 ELURA65 ELURA60 30 ...NIGHT+, S.NIGHT 48 SOFT, NORMAL 50 OFF, FINE, NORMAL 97 SP, LP 59 AV, PHONES H 61 AUTO, OFF 60 16bit, 12bit 60 61 26 ON, OFF 25 ON, OFF 136 ON, OFF 23 DEUTSCH, ENGLISH, ESPAÑOL, FRANÇAIS, ...76 ITALIANO, , , 76 ON, OFF 79 * ELURA70/ELURA65 only. ( ): Appears when you attach the optional VFL-1 Video Flash Light...
ANIMATION CORNER, STRAIGHT, RANDOM AUTO, 1/60, 1/100, 1/250, 1/500, 1/1000, 56 1/2000 ON, OFF 57 ELURA70 ELURA65 ELURA60 30 ...NIGHT+, S.NIGHT 48 SOFT, NORMAL 50 OFF, FINE, NORMAL 97 SP, LP 59 AV, PHONES H 61 AUTO, OFF 60 16bit, 12bit 60 61 26 ON, OFF 25 ON, OFF 136 ON, OFF 23 DEUTSCH, ENGLISH, ESPAÑOL, FRANÇAIS, ...76 ITALIANO, , , 76 ON, OFF 79 * ELURA70/ELURA65 only. ( ): Appears when you attach the optional VFL-1 Video Flash Light...

ELURA70/ELURA65/ELURA60 Instruction Manual
Page 42
... H VOLUME DISPLAY SETUP/ BRIGHTNESS LCD MIRROR TV SCREEN D/T DISPLAY LANGUAGE DATE FORMAT DEMO MODE SYSTEM WL. REMOTE BEEP T.ZONE/DST D/TIME SET Setting Options AUTO, 1/60, 1/100, 1/250 56 ON, OFF 57 ELURA70 ELURA65 ELURA60 30 OFF, 72× OFF, 64× OFF, 56× AUTO, SET W, INDOOR T, OUTDOOR ..., A2, OFF B 77 ON, OFF 78 See list of time zones. 21 21 * ELURA70/ELURA65 only. ( ): Appears when you attach the optional VFL-1 Video Flash Light and set it to ON. 42 ND NIGHT MODE* SKIN DETAIL REVIEW CARD SETUP IMG QUALITY IMAGE SIZE MOVIE SIZE FILE NOS. ZOOM...
... H VOLUME DISPLAY SETUP/ BRIGHTNESS LCD MIRROR TV SCREEN D/T DISPLAY LANGUAGE DATE FORMAT DEMO MODE SYSTEM WL. REMOTE BEEP T.ZONE/DST D/TIME SET Setting Options AUTO, 1/60, 1/100, 1/250 56 ON, OFF 57 ELURA70 ELURA65 ELURA60 30 OFF, 72× OFF, 64× OFF, 56× AUTO, SET W, INDOOR T, OUTDOOR ..., A2, OFF B 77 ON, OFF 78 See list of time zones. 21 21 * ELURA70/ELURA65 only. ( ): Appears when you attach the optional VFL-1 Video Flash Light and set it to ON. 42 ND NIGHT MODE* SKIN DETAIL REVIEW CARD SETUP IMG QUALITY IMAGE SIZE MOVIE SIZE FILE NOS. ZOOM...
ELURA70/ELURA65/ELURA60 Instruction Manual
Page 153
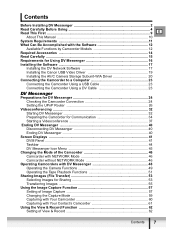
...8226; When the Wide-converter is attached, a shadow may appear in the picture when you to the camcorder's accessory shoe and is attached, a shadow may appear in the picture when you record with video light (ELURA70/ELURA65: or with the CA-920 Compact Power Adapter or CH-910 Dual Battery Charger/... difficult lighting conditions. WD-H34 Wide-converter This lens decreases focal length by BP-900 series battery packs. • Approximate usage time: BP-915: 60 min., BP-930: 120 min., BP-945: 170 min. • BP-900 series battery packs are charged with assist lamp or flash). Additional ...
...8226; When the Wide-converter is attached, a shadow may appear in the picture when you to the camcorder's accessory shoe and is attached, a shadow may appear in the picture when you record with video light (ELURA70/ELURA65: or with the CA-920 Compact Power Adapter or CH-910 Dual Battery Charger/... difficult lighting conditions. WD-H34 Wide-converter This lens decreases focal length by BP-900 series battery packs. • Approximate usage time: BP-915: 60 min., BP-930: 120 min., BP-945: 170 min. • BP-900 series battery packs are charged with assist lamp or flash). Additional ...
ELURA70/ELURA65/ELURA60 Instruction Manual
Page 155
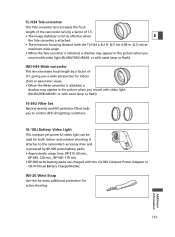
... 120 pixels, 15 frames/sec. cassette) Fast Forward/Rewind Time Approx. 2 min. 20 sec. (with a 60 min. Specifications ELURA70/ELURA65/ELURA60 E System Video Recording System 2 rotary heads, helical scanning DV system (consumer digital VCR SD system), digital component recording Audio Recording ... pixels Tape Format Videocassettes bearing the "MiniDV" mark. audio data: WAVE (monaural)) Additional Information 155 TFT color, approx. 123,000 pixels Viewfinder 0.33-inch. File Format Design rule for enhancing the communication between camcorders and printers. TFT color, approx....
... 120 pixels, 15 frames/sec. cassette) Fast Forward/Rewind Time Approx. 2 min. 20 sec. (with a 60 min. Specifications ELURA70/ELURA65/ELURA60 E System Video Recording System 2 rotary heads, helical scanning DV system (consumer digital VCR SD system), digital component recording Audio Recording ... pixels Tape Format Videocassettes bearing the "MiniDV" mark. audio data: WAVE (monaural)) Additional Information 155 TFT color, approx. 123,000 pixels Viewfinder 0.33-inch. File Format Design rule for enhancing the communication between camcorders and printers. TFT color, approx....
ELURA70/ELURA65/ELURA60 Instruction Manual
Page 156
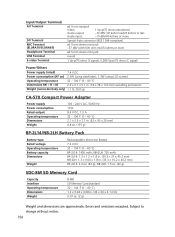
...Terminal MIC Terminal (ELURA70/ELURA65) Headphone Terminal USB Terminal S-video Terminal ø3.5 mm minijack Video: Audio output: Audio input: 1 Vp-p/75 ohms unbalanced ...215; 3.1 × 5.1 in. (74 × 78 × 130 mm) excluding protrusions Weight (camcorder body only) 1.1 lb. (500 g) CA-570 Compact Power Adapter Power supply Power consumption Rated output Operating temperature Dimensions Weight... 100 - 240 V AC, 50/60 Hz 17W 8.4 V DC, 1.5 A 32 - 104 ˚F (0 - 40 ˚C) 2.1 × 3.5 ...
...Terminal MIC Terminal (ELURA70/ELURA65) Headphone Terminal USB Terminal S-video Terminal ø3.5 mm minijack Video: Audio output: Audio input: 1 Vp-p/75 ohms unbalanced ...215; 3.1 × 5.1 in. (74 × 78 × 130 mm) excluding protrusions Weight (camcorder body only) 1.1 lb. (500 g) CA-570 Compact Power Adapter Power supply Power consumption Rated output Operating temperature Dimensions Weight... 100 - 240 V AC, 50/60 Hz 17W 8.4 V DC, 1.5 A 32 - 104 ˚F (0 - 40 ˚C) 2.1 × 3.5 ...
ELURA70/ELURA65/ELURA60 Instruction Manual
Page 159
...101 Recording movies (tape 24 Recording programs 45 Recording still images (memory card 96 Remote sensor 77 Review 100 Rewind 32 S S1 video terminal 36 Sample images 116 Sand & Snow mode 45 Screen displays 136 SD Memory Card 92 Self-timer 58 Shoulder strap 19 Shutter... 31 Troubleshooting 148 TV Screen 35, 136 U USB terminal 119, 130 V Video heads 143 Video light 153, 154 Videocassettes 16 Viewfinder 18 W White balance 54 Wide attachment 19 Widescreen 78 Wind screen 60 Wireless controller 20 Z Zero set memory 73 Zooming 29 Additional Information 159 Memory ...
...101 Recording movies (tape 24 Recording programs 45 Recording still images (memory card 96 Remote sensor 77 Review 100 Rewind 32 S S1 video terminal 36 Sample images 116 Sand & Snow mode 45 Screen displays 136 SD Memory Card 92 Self-timer 58 Shoulder strap 19 Shutter... 31 Troubleshooting 148 TV Screen 35, 136 U USB terminal 119, 130 V Video heads 143 Video light 153, 154 Videocassettes 16 Viewfinder 18 W White balance 54 Wide attachment 19 Widescreen 78 Wind screen 60 Wireless controller 20 Z Zero set memory 73 Zooming 29 Additional Information 159 Memory ...
Digital Video Software (Windows) Ver.11 Instruction Manual
Page 60
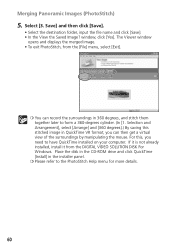
..., click [Yes]. Merging Panoramic Images (PhotoStitch) 5. The Viewer window opens and displays the merged image. • To exit PhotoStitch, from the DIGITAL VIDEO SOLUTION DISK For Windows. Selection and Arrangement], select [Arrange] and [360 degrees].) By saving this , you can record the surroundings in 360 degrees, and...CD-ROM drive and click QuickTime [Install] in QuickTime VR format, you need to the PhotoStitch Help menu for more details. 60 For this stitched image in the installer panel. ❍ Please refer to have QuickTime installed on your computer. Select [3.
..., click [Yes]. Merging Panoramic Images (PhotoStitch) 5. The Viewer window opens and displays the merged image. • To exit PhotoStitch, from the DIGITAL VIDEO SOLUTION DISK For Windows. Selection and Arrangement], select [Arrange] and [360 degrees].) By saving this , you can record the surroundings in 360 degrees, and...CD-ROM drive and click QuickTime [Install] in QuickTime VR format, you need to the PhotoStitch Help menu for more details. 60 For this stitched image in the installer panel. ❍ Please refer to have QuickTime installed on your computer. Select [3.

