Instruction Manual
Page 5
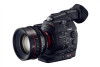
...freedom of using double slot recording (A 46) lets you can output the signal from the 3G-SDI terminal with an external recorder. The EOS C500 PL features a PL lens mount, allowing you to use CINEMA preset (A 58) to be rotated 270° for on a CF card. For example, you use ...terminals (A 41) that captures video at an ISO level of 20,0002 - Highlights of the EOS C500/C500 PL The Canon Digital Cinema Camera EOS C500/C500 PL has been designed with ease. In 4K mode, the camera outputs Canon RAW image data, which is free of your creative vision into reality. 5 4K Recording System ...
...freedom of using double slot recording (A 46) lets you can output the signal from the 3G-SDI terminal with an external recorder. The EOS C500 PL features a PL lens mount, allowing you to use CINEMA preset (A 58) to be rotated 270° for on a CF card. For example, you use ...terminals (A 41) that captures video at an ISO level of 20,0002 - Highlights of the EOS C500/C500 PL The Canon Digital Cinema Camera EOS C500/C500 PL has been designed with ease. In 4K mode, the camera outputs Canon RAW image data, which is free of your creative vision into reality. 5 4K Recording System ...

Instruction Manual
Page 16
Names of Parts 2 16 33 37 2 EF Lens mount 33 Mount handle (A 33) 34 EF Lens mount index (A 32) 35 EF-S Lens mount index (A 32) 36 EF Lens contacts (A 32) 37 START/STOP button (A 51) 3 38 34 35 39 40 36 37 3 PL Lens mount 38 Bayonet ring handles (A 35) 39 PL Lens index pin (A 35) 40 Bayonet ring (A 35)
Names of Parts 2 16 33 37 2 EF Lens mount 33 Mount handle (A 33) 34 EF Lens mount index (A 32) 35 EF-S Lens mount index (A 32) 36 EF Lens contacts (A 32) 37 START/STOP button (A 51) 3 38 34 35 39 40 36 37 3 PL Lens mount 38 Bayonet ring handles (A 35) 39 PL Lens index pin (A 35) 40 Bayonet ring (A 35)

Instruction Manual
Page 18
Names of Parts 18 65 66 67 64 68 67 64 Tape measure hooks Use the hooks to accurately measure the distance from the focal plane. 65 Focal plane marks 66 Socket for the WFT Attachment Bracket (A 49) 67 Strap mounts (A 39) 68 Accessory shoe with mounting hole for 0.64 cm (1/4 in.) screws For attaching accessories such as the optional VL-10Li II Battery Video Light. 71 72 69 70 69 TB-1 Tripod Base for tripods with 0.95 cm (3/8 in.) screws (A 38) 70 Tripod socket (A 38) 71 Attachment sockets for the optional TA-100 Tripod Adapter (A 38) 72 Tripod base screws (A 38)
Names of Parts 18 65 66 67 64 68 67 64 Tape measure hooks Use the hooks to accurately measure the distance from the focal plane. 65 Focal plane marks 66 Socket for the WFT Attachment Bracket (A 49) 67 Strap mounts (A 39) 68 Accessory shoe with mounting hole for 0.64 cm (1/4 in.) screws For attaching accessories such as the optional VL-10Li II Battery Video Light. 71 72 69 70 69 TB-1 Tripod Base for tripods with 0.95 cm (3/8 in.) screws (A 38) 70 Tripod socket (A 38) 71 Attachment sockets for the optional TA-100 Tripod Adapter (A 38) 72 Tripod base screws (A 38)

Instruction Manual
Page 19
Monitor Unit Operation panel (A 20) 1 LCD panel 2 MIRROR button (A 37) 3 Microphone lock screw (A 92) Handle Unit 1 2 Names of Parts 19 1 2 3 4 5 6 4 Microphone holder (A 92) 5 Microphone cable clamp (A 92) 6 XLR terminals CH1 (right) and CH2 (left) (A 92) 3 4 1 Mounting hole for 0.64 cm (1/4 in.) screws 2 Front accessory shoe 3 Top accessory shoe 4 Lock screw (A 39)
Monitor Unit Operation panel (A 20) 1 LCD panel 2 MIRROR button (A 37) 3 Microphone lock screw (A 92) Handle Unit 1 2 Names of Parts 19 1 2 3 4 5 6 4 Microphone holder (A 92) 5 Microphone cable clamp (A 92) 6 XLR terminals CH1 (right) and CH2 (left) (A 92) 3 4 1 Mounting hole for 0.64 cm (1/4 in.) screws 2 Front accessory shoe 3 Top accessory shoe 4 Lock screw (A 39)

Instruction Manual
Page 32
...light sources. Also, be careful not to obstruct in a clean environment free of the lens used. NOTES • Be careful not to touch the lens mount or any way the cooling fan's air vents. Preparing the Camera Preparing the Camera This section outlines the basic preparations for easy carrying Exhaust vent...and handle for the camera such as possible, attach and remove the lens quickly and in any components inside the lens mount area. • Replace the body cap to the lens mount immediately after removing the lens from the camera. • Keep the body cap clean and free from dust or ...
...light sources. Also, be careful not to obstruct in a clean environment free of the lens used. NOTES • Be careful not to touch the lens mount or any way the cooling fan's air vents. Preparing the Camera Preparing the Camera This section outlines the basic preparations for easy carrying Exhaust vent...and handle for the camera such as possible, attach and remove the lens quickly and in any components inside the lens mount area. • Replace the body cap to the lens mount immediately after removing the lens from the camera. • Keep the body cap clean and free from dust or ...

Instruction Manual
Page 33
... to use the power zoom function on lenses with the white EF-S Lens mount index mark on the camera. 5 After the lens is attached to the camera, without turning the lens, turn ...battery pack. Preparing the Camera 2 Attaching an EF Lens 1 Set the Q switch to OFF. 2 Turn the mount handle clockwise until it stops. 3 Remove the body cap from the camera and any dust caps from the lens. 4 Align... index marks are aligned. • EF lenses: Align the red mark on the lens with the red EF Lens mount index mark on the camera. • EF-S lenses: Align the white mark on the lens with that function. ...
... to use the power zoom function on lenses with the white EF-S Lens mount index mark on the camera. 5 After the lens is attached to the camera, without turning the lens, turn ...battery pack. Preparing the Camera 2 Attaching an EF Lens 1 Set the Q switch to OFF. 2 Turn the mount handle clockwise until it stops. 3 Remove the body cap from the camera and any dust caps from the lens. 4 Align... index marks are aligned. • EF lenses: Align the red mark on the lens with the red EF Lens mount index mark on the camera. • EF-S lenses: Align the white mark on the lens with that function. ...

Instruction Manual
Page 35
... lock screw. 4 Connect the monitor unit's cables to the camera. • Align the Î marks on the mount. 3 Turn the bayonet ring clockwise to fix the lens in place. 3 Removing a PL Lens 1 Turn the bayonet ring handles counter-clockwise. 2 Remove the lens and replace the body cap to the camera... monitor unit to attach it to the camera. Further ahead you will find details about using non-Canon lenses, peripheral illumination will not be corrected. Then, connect cable number 1 (with the PL lens index pin on the cables and terminals. When using the LCD panel and adjusting the LCD...
... lock screw. 4 Connect the monitor unit's cables to the camera. • Align the Î marks on the mount. 3 Turn the bayonet ring clockwise to fix the lens in place. 3 Removing a PL Lens 1 Turn the bayonet ring handles counter-clockwise. 2 Remove the lens and replace the body cap to the camera... monitor unit to attach it to the camera. Further ahead you will find details about using non-Canon lenses, peripheral illumination will not be corrected. Then, connect cable number 1 (with the PL lens index pin on the cables and terminals. When using the LCD panel and adjusting the LCD...

Instruction Manual
Page 37
... image is displayed in the correct orientation. • Repeatedly pressing the MIRROR button will change the displayed image in a different direction or angle (for Shoulder Mounted Use 1 Open the LCD panel 90º until it into the rubber portion of the pixels operating to the desired position. Attach the viewfinder cap...
... image is displayed in the correct orientation. • Repeatedly pressing the MIRROR button will change the displayed image in a different direction or angle (for Shoulder Mounted Use 1 Open the LCD panel 90º until it into the rubber portion of the pixels operating to the desired position. Attach the viewfinder cap...

Instruction Manual
Page 38
...or [Backlight] and then press SET. 3 Adjust the setting and then press SET. • Repeat steps 2 and 3 to adjust other . You can mount the camera on and off. These 38 adjustments will still be displayed in color. Operating modes: 1 Open the [LCD/VF B&W] submenu. [£ LCD... screen display in color by default but do not use tripods with 0.95 cm (3/8 in.) screws. Operating modes: 1 Open the setup menu for tripods with mounting screws longer than 5.5 mm (0.2 in.) as necessary. [£ LCD/VF Setup] [LCD Setup] [VF Setup] [Brightness: ±0] [Contrast: ±0] [Color: &#...
...or [Backlight] and then press SET. 3 Adjust the setting and then press SET. • Repeat steps 2 and 3 to adjust other . You can mount the camera on and off. These 38 adjustments will still be displayed in color. Operating modes: 1 Open the [LCD/VF B&W] submenu. [£ LCD... screen display in color by default but do not use tripods with 0.95 cm (3/8 in.) screws. Operating modes: 1 Open the setup menu for tripods with mounting screws longer than 5.5 mm (0.2 in.) as necessary. [£ LCD/VF Setup] [LCD Setup] [VF Setup] [Brightness: ±0] [Contrast: ±0] [Color: &#...

Instruction Manual
Page 39
...8226; Be careful not to drop the camera when attaching or adjusting the shoulder strap. Attaching a Shoulder Strap Pass the ends through the strap mount and adjust the length of the handle unit to the camera's accessory shoe. 2 Tighten the handle unit's lock screw while gently pressing it down...and then remove the base. 2 Attach the supplied tripod adapter base for 0.64 cm (1/4 in the tripod screw. Using a Tripod with 0.64 cm (1/4 in.) Mounting Screws To use the accessory shoe or the socket for 0.64 cm (1/4 in.) tripods. • Firmly screw in the 4 screws. 3 Attach the tripod. •...
...8226; Be careful not to drop the camera when attaching or adjusting the shoulder strap. Attaching a Shoulder Strap Pass the ends through the strap mount and adjust the length of the handle unit to the camera's accessory shoe. 2 Tighten the handle unit's lock screw while gently pressing it down...and then remove the base. 2 Attach the supplied tripod adapter base for 0.64 cm (1/4 in the tripod screw. Using a Tripod with 0.64 cm (1/4 in.) Mounting Screws To use the accessory shoe or the socket for 0.64 cm (1/4 in.) tripods. • Firmly screw in the 4 screws. 3 Attach the tripod. •...

Instruction Manual
Page 48
In such case, perform the procedure again. This is set to the lens mount. [ABB] • If a lens was attached, remove the lens and replace the body cap. 3 Select [OK] and then press SET. • The automatic black balance ...
In such case, perform the procedure again. This is set to the lens mount. [ABB] • If a lens was attached, remove the lens and replace the body cap. 3 Select [OK] and then press SET. • The automatic black balance ...

Instruction Manual
Page 52
... the upper right of the screen. The tally lamp illuminates and [ÜREC] appears on the upper center of the camera (next to the lens mount), or the monitor unit. 5 Press the START/STOP button to pause the recording. • Recording stops and a signal is sent instructing it to start recording...
... the upper right of the screen. The tally lamp illuminates and [ÜREC] appears on the upper center of the camera (next to the lens mount), or the monitor unit. 5 Press the START/STOP button to pause the recording. • Recording stops and a signal is sent instructing it to start recording...
Instruction Manual
Page 189
...] > [Photo Numbering] setting to the external monitor. You opened the CF card slot cover while the camera was a decoder error. Then, wipe the lens mount and lens contacts with External Devices Video is not set to which you are using this does not solve the problem, consult... there is not connected correctly to [Reset] and insert a new SD card. Continue using the correct connection (A 144). - List of the TV. Guide for Canon Camcorders' (A 34). Remove the lens while making sure that does not bear the Intelligent System mark. - Save your clips (A 153) and initialize the CF card...
...] > [Photo Numbering] setting to the external monitor. You opened the CF card slot cover while the camera was a decoder error. Then, wipe the lens mount and lens contacts with External Devices Video is not set to which you are using this does not solve the problem, consult... there is not connected correctly to [Reset] and insert a new SD card. Continue using the correct connection (A 144). - List of the TV. Guide for Canon Camcorders' (A 34). Remove the lens while making sure that does not bear the Intelligent System mark. - Save your clips (A 153) and initialize the CF card...

Instruction Manual
Page 193
... lens. avoid also water, mud or salt. Be careful especially when using the camera, make sure to attach the body cap to the lens mount and the lens cap and dust cap to temperature higher than 30 °C (86 °F). Handling Precautions Handling Precautions Camera Be sure to observe...modify it. • Do not drop it or subject it to avoid dust and dirt particles accumulating on the lens mount. The camera is not waterproof - Battery Pack DANGER! Consult a Canon Service Center as soon as this may become damaged due to concentration of a car parked under direct sunlight), or ...
... lens. avoid also water, mud or salt. Be careful especially when using the camera, make sure to attach the body cap to the lens mount and the lens cap and dust cap to temperature higher than 30 °C (86 °F). Handling Precautions Handling Precautions Camera Be sure to observe...modify it. • Do not drop it or subject it to avoid dust and dirt particles accumulating on the lens mount. The camera is not waterproof - Battery Pack DANGER! Consult a Canon Service Center as soon as this may become damaged due to concentration of a car parked under direct sunlight), or ...

Instruction Manual
Page 198
Consult a Canon Service Center for information on plug adapters for overseas use the compact power adapter to operate the camera and to turn the ND filter as ... 100 and 240 V AC, 50/60 Hz. Using the Camera Abroad Power Sources You can check the position of the ND filter through the lens mount. 4 Return the cover and tighten the screw.
Consult a Canon Service Center for information on plug adapters for overseas use the compact power adapter to operate the camera and to turn the ND filter as ... 100 and 240 V AC, 50/60 Hz. Using the Camera Abroad Power Sources You can check the position of the ND filter through the lens mount. 4 Return the cover and tighten the screw.

Instruction Manual
Page 201
... 95 BP-955 155 95 BP-970G 220 135 BP-975 235 140 CB-920 Car Battery Adapter Use the car battery adapter to quickly mount/unmount the camera on/from the 3G-SDI terminals, MON. SBR-1000 Shooting Brace Using the SBR-1000 for MXF mode The following are the... the camera with the monitor unit attached (LCD screen and viewfinder on) and output from the HD/SD SDI terminal on. This mark identifies genuine Canon video accessories. The car battery adapter plugs into your car's cigarette lighter socket and runs off a 12-24 V DC negative ground battery. terminals and HD...
... 95 BP-955 155 95 BP-970G 220 135 BP-975 235 140 CB-920 Car Battery Adapter Use the car battery adapter to quickly mount/unmount the camera on/from the 3G-SDI terminals, MON. SBR-1000 Shooting Brace Using the SBR-1000 for MXF mode The following are the... the camera with the monitor unit attached (LCD screen and viewfinder on) and output from the HD/SD SDI terminal on. This mark identifies genuine Canon video accessories. The car battery adapter plugs into your car's cigarette lighter socket and runs off a 12-24 V DC negative ground battery. terminals and HD...

Instruction Manual
Page 202
... 16 bits, 48 kHz, 2 channels File type: MXF Photos: DCF (Design rule for Camera File system), compatible with Canon EF lenses (including EF-S lenses) 3 PL Lens mount without data interface terminals Lens multiplication factor (for 4K and 2K Modes 4K mode: Mode: RAW, HRAW, 4K1K RAW (...C500 / C500 PL System • Video Configuration for 35mm equivalent focal length): Approx. 1.46 (when the horizontal resolution is 4096 or 2048) Approx. 1.53 (when the horizontal resolution is 3840 or 1920) • ND Filter: Built-in .), approx. 1,555,000 dots, 100% coverage • Lens Mount 2 Canon EF mount...
... 16 bits, 48 kHz, 2 channels File type: MXF Photos: DCF (Design rule for Camera File system), compatible with Canon EF lenses (including EF-S lenses) 3 PL Lens mount without data interface terminals Lens multiplication factor (for 4K and 2K Modes 4K mode: Mode: RAW, HRAW, 4K1K RAW (...C500 / C500 PL System • Video Configuration for 35mm equivalent focal length): Approx. 1.46 (when the horizontal resolution is 4096 or 2048) Approx. 1.53 (when the horizontal resolution is 3840 or 1920) • ND Filter: Built-in .), approx. 1,555,000 dots, 100% coverage • Lens Mount 2 Canon EF mount...

Instruction Manual
Page 207
... 94, 95 Audio reference signal 99 B Battery pack 23 Bit rate 60 Black balance 48 Built-in backup battery 195 C C. Gamut 142 Camera settings 124 Canon Log gamma 58 CF card Inserting 43 Recording method 46 Recovering data 47 Removing 44 Switching CF card slots 46, 126 Check marks 103, 132... DCI-P3 142 Developing RAW clips 150 Direct setting mode 66 Double slot recording 46 Drop frame (time code 85 E Edge monitor 101 EF lens mount 32 EXT 1/2 terminals 35 External recorder 41 Eye cup 36 F Focus-related functions 79 Frame rate 60 Frame recording mode 106 Free-run (time ...
... 94, 95 Audio reference signal 99 B Battery pack 23 Bit rate 60 Black balance 48 Built-in backup battery 195 C C. Gamut 142 Camera settings 124 Canon Log gamma 58 CF card Inserting 43 Recording method 46 Recovering data 47 Removing 44 Switching CF card slots 46, 126 Check marks 103, 132... DCI-P3 142 Developing RAW clips 150 Direct setting mode 66 Double slot recording 46 Drop frame (time code 85 E Edge monitor 101 EF lens mount 32 EXT 1/2 terminals 35 External recorder 41 Eye cup 36 F Focus-related functions 79 Frame rate 60 Frame recording mode 106 Free-run (time ...

Instruction Manual
Page 208
... 22, 146 P Peaking 80 Peripheral illumination correction 34 Phantom power (microphone 93 Photos Copying custom picture files 166 Deleting 164 Protecting 165 Viewing 163 PL lens mount 35 Playback Clips 126 Photos 163 Power supply 23 POWER switch 26 Pre-recording mode 110 R RAW 60 Rear panel 57 Rec run (time code...
... 22, 146 P Peaking 80 Peripheral illumination correction 34 Phantom power (microphone 93 Photos Copying custom picture files 166 Deleting 164 Protecting 165 Viewing 163 PL lens mount 35 Playback Clips 126 Photos 163 Power supply 23 POWER switch 26 Pre-recording mode 110 R RAW 60 Rear panel 57 Rec run (time code...
