Instruction Manual
Page 5
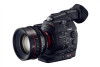
... and MXF modes In 4K and 2K modes, the camera outputs image data for shooting with Canon Log gamma. terminals (A 41) are two CF card slots, when one without interruption when you use a vast array of cinematography lenses compatible with a Canon PL lens mount and other one CF card slot becomes full, the recording will let you may want . Highlights of the EOS C500/C500 PL The Canon Digital Cinema Camera EOS C500/C500 PL has been...
... and MXF modes In 4K and 2K modes, the camera outputs image data for shooting with Canon Log gamma. terminals (A 41) are two CF card slots, when one without interruption when you use a vast array of cinematography lenses compatible with a Canon PL lens mount and other one CF card slot becomes full, the recording will let you may want . Highlights of the EOS C500/C500 PL The Canon Digital Cinema Camera EOS C500/C500 PL has been...

Instruction Manual
Page 6
... monitor the image through live view and remotely control the focus, shutter speed, ISO speed/gain and other subjects with little movement) or record a certain number of frames at a set interval (ideal for aiding the production workflow The Cinema RAW Development software, which allows multiple C500 / C500 PL cameras to use the MIC terminal for stop motion animation). This helps make a smooth transition to the camera and operate it as a standard file type such as...
... monitor the image through live view and remotely control the focus, shutter speed, ISO speed/gain and other subjects with little movement) or record a certain number of frames at a set interval (ideal for aiding the production workflow The Cinema RAW Development software, which allows multiple C500 / C500 PL cameras to use the MIC terminal for stop motion animation). This helps make a smooth transition to the camera and operate it as a standard file type such as...

Instruction Manual
Page 7
... Removing an SD Card 44 Initializing the Recording Media 45 Switching Between the CF Card Slots 46 Selecting the CF Card Recording Method 46 Checking the Available Recording Time for CF Cards 47 Recovering Data on the CF Card 47 Adjusting the Black Balance 48 Remote Operation Via the Wi-Fi Remote Application 49 Preparing the System for MXF Mode 64 Changing Main Camera Functions with the ACES Workflow 22 2. or 2K-Compatible External Recorder 41 7 Preparing Recording Media...
... Removing an SD Card 44 Initializing the Recording Media 45 Switching Between the CF Card Slots 46 Selecting the CF Card Recording Method 46 Checking the Available Recording Time for CF Cards 47 Recovering Data on the CF Card 47 Adjusting the Black Balance 48 Remote Operation Via the Wi-Fi Remote Application 49 Preparing the System for MXF Mode 64 Changing Main Camera Functions with the ACES Workflow 22 2. or 2K-Compatible External Recorder 41 7 Preparing Recording Media...

Instruction Manual
Page 8
... Time Code Signal Input 89 Reference Video Signal Output 90 Time Code Signal Output 91 Recording Audio 92 Connecting an External Microphone or External Audio Input Source to the Last Clip Recorded 103 Remote Operation Using Wi-Fi Remote 103 Reviewing an MXF Clip 104 Special Recording Modes 105 Interval Recording Mode 105 Frame Recording Mode 106 Slow & Fast Motion Mode 108 Pre-recording Mode 110 4. Customization 111 Assignable Buttons 111 Changing the Assigned Function 111 Using an Assignable Button 112 Custom Picture Settings 114 Selecting Custom Picture Files 114 Editing a Custom Picture...
... Time Code Signal Input 89 Reference Video Signal Output 90 Time Code Signal Output 91 Recording Audio 92 Connecting an External Microphone or External Audio Input Source to the Last Clip Recorded 103 Remote Operation Using Wi-Fi Remote 103 Reviewing an MXF Clip 104 Special Recording Modes 105 Interval Recording Mode 105 Frame Recording Mode 106 Slow & Fast Motion Mode 108 Pre-recording Mode 110 4. Customization 111 Assignable Buttons 111 Changing the Assigned Function 111 Using an Assignable Button 112 Custom Picture Settings 114 Selecting Custom Picture Files 114 Editing a Custom Picture...

Instruction Manual
Page 9
... Playing Back Clips 126 Onscreen Displays 127 Playback Controls 128 Audio Output 129 MXF Clip Operations 130 Using the Clip Menu 130 Displaying Clip Information 131 Adding $ Marks or % Marks 132 Deleting $ Marks or % Marks 132 Copying Clips 133 Deleting Clips 134 Deleting the User Memo 134 Copying a Custom Picture File Embedded in MEDIA Mode 161 Photo Playback 163 Displaying the [Photos] Index Screen 163 Viewing Photos 163 Photo Operations 164 Using the Photo Menu 164 Deleting Photos 164 Protecting Photos 165 Copying Custom Picture Files 166 Photo Numbering 167 8. External Connections...
... Playing Back Clips 126 Onscreen Displays 127 Playback Controls 128 Audio Output 129 MXF Clip Operations 130 Using the Clip Menu 130 Displaying Clip Information 131 Adding $ Marks or % Marks 132 Deleting $ Marks or % Marks 132 Copying Clips 133 Deleting Clips 134 Deleting the User Memo 134 Copying a Custom Picture File Embedded in MEDIA Mode 161 Photo Playback 163 Displaying the [Photos] Index Screen 163 Viewing Photos 163 Photo Operations 164 Using the Photo Menu 164 Deleting Photos 164 Protecting Photos 165 Copying Custom Picture Files 166 Photo Numbering 167 8. External Connections...

Instruction Manual
Page 12
... OUT terminal. When a function requires the use the menus, refer to [Rec Run] during normal shooting and slow & fast recording mode; During 4K and 2K modes, the running mode depends on the [Run] setting. [Rec Run]: The time code runs only while recording so clips recorded consecutively on the same CF card will have continuous time codes. [¤ TC/UB Setup] [Time Code] [Mode] [Preset] [¤ TC/UB Setup] [Time Code] [Run] [Free Run] When a procedure...
... OUT terminal. When a function requires the use the menus, refer to [Rec Run] during normal shooting and slow & fast recording mode; During 4K and 2K modes, the running mode depends on the [Run] setting. [Rec Run]: The time code runs only while recording so clips recorded consecutively on the same CF card will have continuous time codes. [¤ TC/UB Setup] [Time Code] [Mode] [Preset] [¤ TC/UB Setup] [Time Code] [Run] [Free Run] When a procedure...

Instruction Manual
Page 23
... the battery charger. 2 Plug the power cord into a power outlet. ቤ ቢ 3 Attach the battery pack to 104 ºF), charging will not start. • If there is not expressly recommended for use . Therefore, charge them on when charging has completed. Charge battery packs before , to ensure a full charge. • We recommend that you might need. IMPORTANT • Do not connect to 3 times longer than you think you can check...
... the battery charger. 2 Plug the power cord into a power outlet. ቤ ቢ 3 Attach the battery pack to 104 ºF), charging will not start. • If there is not expressly recommended for use . Therefore, charge them on when charging has completed. Charge battery packs before , to ensure a full charge. • We recommend that you might need. IMPORTANT • Do not connect to 3 times longer than you think you can check...
Instruction Manual
Page 34
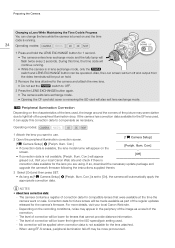
... local Canon Web site and check if there is not available for the camera's firmware. Preparing the Camera Changing a Lens While Maintaining the Time Code's Progress You can be lower for 1 second. • The camera enters lens exchange mode and the tally lamp will automatically apply the appropriate correction data. During this correction data to use. 2 Open the peripheral illumination correction screen. [~ Camera Setup] [~ Camera Setup] > [Periph. If the camera has correction data...
... local Canon Web site and check if there is not available for the camera's firmware. Preparing the Camera Changing a Lens While Maintaining the Time Code's Progress You can be lower for 1 second. • The camera enters lens exchange mode and the tally lamp will automatically apply the appropriate correction data. During this correction data to use. 2 Open the peripheral illumination correction screen. [~ Camera Setup] [~ Camera Setup] > [Periph. If the camera has correction data...

Instruction Manual
Page 43
... CF cards. Compatible CF cards You can use both slots. 1 Slide the CF card slot cover switch in MB/s). Checking the Status of the CF Card Slots You can be used, visit your local Canon Web site. * The Ultra Direct Memory Access (UDMA) specification allows data to record even when using a UDMAcompatible CF card. The camera is not correctly inserted. NOTES • Proper operation cannot be transferred between the CF card and device...
... CF cards. Compatible CF cards You can use both slots. 1 Slide the CF card slot cover switch in MB/s). Checking the Status of the CF Card Slots You can be used, visit your local Canon Web site. * The Ultra Direct Memory Access (UDMA) specification allows data to record even when using a UDMAcompatible CF card. The camera is not correctly inserted. NOTES • Proper operation cannot be transferred between the CF card and device...

Instruction Manual
Page 53
... access indicator is recorded. Do not open the CF card slot cover of data. You can set the initial clip name in advance using becomes full while recording, the clip will continue uninterrupted on the other device will be recorded as a running counter that is included with a long recording time (approximately every 1 GB during slow motion recording). Do not disconnect the power source or turn off the camera...
... access indicator is recorded. Do not open the CF card slot cover of data. You can set the initial clip name in advance using becomes full while recording, the clip will continue uninterrupted on the other device will be recorded as a running counter that is included with a long recording time (approximately every 1 GB during slow motion recording). Do not disconnect the power source or turn off the camera...

Instruction Manual
Page 66
... camera functions -shutter speed, white balance and ISO speed/gain- Button Changing Main Camera Functions with the FUNC. Operating modes: Using the Direct Setting Mode 1 Press the FUNC. If the menu, custom picture menu or a status screen was opened. - Changing Main Camera Functions with the FUNC. using only the rear panel, which is convenient when the monitor unit is set and the camera will exit the direct setting mode. • On the screen: The onscreen display of the direct setting mode. In direct setting mode, you operate the control dial while adjusting...
... camera functions -shutter speed, white balance and ISO speed/gain- Button Changing Main Camera Functions with the FUNC. Operating modes: Using the Direct Setting Mode 1 Press the FUNC. If the menu, custom picture menu or a status screen was opened. - Changing Main Camera Functions with the FUNC. using only the rear panel, which is convenient when the monitor unit is set and the camera will exit the direct setting mode. • On the screen: The onscreen display of the direct setting mode. In direct setting mode, you operate the control dial while adjusting...

Instruction Manual
Page 92
... microphones (XLR terminal, MIC terminal) or line 92 input (XLR terminal). Recording Audio Recording Audio The camera features two-channel linear PCM audio recording and playback with the video signal from the 3G-SDI terminals, MON. You can select the audio input independently for channel 1 and channel 2. In addition to XLR microphones, you can also connect to pass the microphone cable in front of 48 kHz. To connect an external device...
... microphones (XLR terminal, MIC terminal) or line 92 input (XLR terminal). Recording Audio Recording Audio The camera features two-channel linear PCM audio recording and playback with the video signal from the 3G-SDI terminals, MON. You can select the audio input independently for channel 1 and channel 2. In addition to XLR microphones, you can also connect to pass the microphone cable in front of 48 kHz. To connect an external device...
Instruction Manual
Page 114
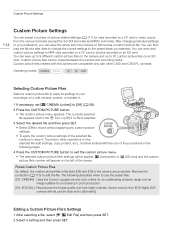
... other C500 and C500 PL cameras. You can then load the file at a later date to change the current settings to the preset levels you can save up to 9 different custom picture files on the camera and up to [Standard]. Remove the protection (A 115) to the - You can be applied. / (camcorder) or . (SD card) and the custom picture file's number will be copied between the camera and recording media. After changing individual settings to your recordings...
... other C500 and C500 PL cameras. You can then load the file at a later date to change the current settings to the preset levels you can save up to 9 different custom picture files on the camera and up to [Standard]. Remove the protection (A 115) to the - You can be applied. / (camcorder) or . (SD card) and the custom picture file's number will be copied between the camera and recording media. After changing individual settings to your recordings...

Instruction Manual
Page 127
... video or audio playback between clips. Do not disconnect the power source or turn off the camera. - Playing Back MXF Clips • Press the Ò button again or press SET to pause/resume the playback. • Press the Ñ button to stop the playback and return to [On]. 3 When playing back clips that were recorded using slow & fast motion mode, the shooting frame rate and playback frame rate will both be displayed. Onscreen Displays...
... video or audio playback between clips. Do not disconnect the power source or turn off the camera. - Playing Back MXF Clips • Press the Ò button again or press SET to pause/resume the playback. • Press the Ñ button to stop the playback and return to [On]. 3 When playing back clips that were recorded using slow & fast motion mode, the shooting frame rate and playback frame rate will both be displayed. Onscreen Displays...

Instruction Manual
Page 161
... mode or you want to capture. 4 Press the assignable button to capture a photo. • The screen will flash as if a camera shutter had released. • * and the number of available photos appear on the upper right of the clip that the photo is 1280x720. * At this size, the camera can save approximately 670 photos on ([w Other Functions] > [Wi-Fi Remote] > [Select] is set an assignable button to stop playback. Operating modes: 1 Set an assignable button to [Photo...
... mode or you want to capture. 4 Press the assignable button to capture a photo. • The screen will flash as if a camera shutter had released. • * and the number of available photos appear on the upper right of the clip that the photo is 1280x720. * At this size, the camera can save approximately 670 photos on ([w Other Functions] > [Wi-Fi Remote] > [Select] is set an assignable button to stop playback. Operating modes: 1 Set an assignable button to [Photo...

Instruction Manual
Page 176
... Display]: Displays the date and time of recording and/or the camera data (shutter speed, aperture value, gain) during playback of an MXF clip. [¤ TC/UB Setup] menu ( mode only) Menu item Submenu Setting options A [Time Code] [Mode]1 [Preset], [Regen.] 84 [Run]1 [Rec Run], [Free Run] 84 [DF/NDF]2 [DF], [NDF] 85 [Setting] [Set], [Reset] 85 [TC In/Out] [In], [Out] 89 [24P TC/Sync] [XF Legacy], [Normal] - [User Bit] [Rec Mode] [Internal], [External] 89 [Output Mode] [Fixed], [Pulldown] 91 [Type] [Setting], [Time], [Date...
... Display]: Displays the date and time of recording and/or the camera data (shutter speed, aperture value, gain) during playback of an MXF clip. [¤ TC/UB Setup] menu ( mode only) Menu item Submenu Setting options A [Time Code] [Mode]1 [Preset], [Regen.] 84 [Run]1 [Rec Run], [Free Run] 84 [DF/NDF]2 [DF], [NDF] 85 [Setting] [Set], [Reset] 85 [TC In/Out] [In], [Out] 89 [24P TC/Sync] [XF Legacy], [Normal] - [User Bit] [Rec Mode] [Internal], [External] 89 [Output Mode] [Fixed], [Pulldown] 91 [Type] [Setting], [Time], [Date...

Instruction Manual
Page 188
.... Check the audio level meter on the CF card. - Recording Media and Accessories Cannot insert the recording media. - Delete some clips (A 134) to [On], turn on and off repeatedly. - Troubleshooting 188 appears in yellow on the screen. - Picture and Sound Screen displays turn off the microphone attenuator (A 95, 96). Video noise appears on the screen. - Horizontal bands appear on screen. - When using the MIC terminal: [Audio Setup] > [Audio Input] > [MIC Mode] is set to M, and the recording level is set to free some types of...
.... Check the audio level meter on the CF card. - Recording Media and Accessories Cannot insert the recording media. - Delete some clips (A 134) to [On], turn on and off repeatedly. - Troubleshooting 188 appears in yellow on the screen. - Picture and Sound Screen displays turn off the microphone attenuator (A 95, 96). Video noise appears on the screen. - Horizontal bands appear on screen. - When using the MIC terminal: [Audio Setup] > [Audio Input] > [MIC Mode] is set to M, and the recording level is set to free some types of...
Instruction Manual
Page 189
... problem, consult a Canon Service Center. • Corrupted file control information cannot be a problem with the camera or battery pack. Battery information can be read by the camera. Turn off and then on again. You opened the CF card slot cover while the camera was a decoder error. Camera Q Lens communication error. Troubleshooting Cannot record on a nearby TV screen. - Save your photos and initialize the SD card (A 45). 189 Connections with corrupt file control information cannot be displayed only for Canon Camcorders...
... problem, consult a Canon Service Center. • Corrupted file control information cannot be a problem with the camera or battery pack. Battery information can be read by the camera. Turn off and then on again. You opened the CF card slot cover while the camera was a decoder error. Camera Q Lens communication error. Troubleshooting Cannot record on a nearby TV screen. - Save your photos and initialize the SD card (A 45). 189 Connections with corrupt file control information cannot be displayed only for Canon Camcorders...

Instruction Manual
Page 191
... mode. Photos must be working properly. Replace or charge the battery pack. % / $ Mark Error - mode, try to view them back. Check the SD card - Number of the following operations cannot be accessed. If data on the CF card, set [4K/2K/MXF Setup] > [System Frequency] to the clip index screen. Open the cover. Save your clips (A 153) and initialize the CF card (A 45). Change the battery pack - You inserted a MultiMedia Card (MMC) into the camera. Please open...
... mode. Photos must be working properly. Replace or charge the battery pack. % / $ Mark Error - mode, try to view them back. Check the SD card - Number of the following operations cannot be accessed. If data on the CF card, set [4K/2K/MXF Setup] > [System Frequency] to the clip index screen. Open the cover. Save your clips (A 153) and initialize the CF card (A 45). Change the battery pack - You inserted a MultiMedia Card (MMC) into the camera. Please open...

Instruction Manual
Page 208
... Phantom power (microphone 93 Photos Copying custom picture files 166 Deleting 164 Protecting 165 Viewing 163 PL lens mount 35 Playback Clips 126 Photos 163 Power supply 23 POWER switch 26 Pre-recording mode 110 R RAW 60 Rear panel 57 Rec run (time code 84 Recording Clips 51 Photos 161 Recording mode 60 Relay recording 46 Remaining battery 24 Remote operation 49 Resetting all camera settings 177 Resolution (frame size 60 Reviewing an MXF clip 104 RGB, 4:4:4 60 Running mode (time code 84 S Safety zone 82 Saving...
... Phantom power (microphone 93 Photos Copying custom picture files 166 Deleting 164 Protecting 165 Viewing 163 PL lens mount 35 Playback Clips 126 Photos 163 Power supply 23 POWER switch 26 Pre-recording mode 110 R RAW 60 Rear panel 57 Rec run (time code 84 Recording Clips 51 Photos 161 Recording mode 60 Relay recording 46 Remaining battery 24 Remote operation 49 Resetting all camera settings 177 Resolution (frame size 60 Reviewing an MXF clip 104 RGB, 4:4:4 60 Running mode (time code 84 S Safety zone 82 Saving...


