
User Manual
Page 1
DR-9050C/DR-7550C User Manual DR-6050C Please read this manual, keep it in a safe place for future reference. After you finish reading this manual before using the scanner.
DR-9050C/DR-7550C User Manual DR-6050C Please read this manual, keep it in a safe place for future reference. After you finish reading this manual before using the scanner.

User Manual
Page 2
...any changes or modifications to the following measures: - Canon U.S.A. The program backs the development and dissemination of the FCC Rules. The standards and logos are office equipment, such as set out in a residential installation. DR-7550C: Model M11069 - These limits are designed to radio...will not occur in the manual. It is an international program that effectively reduce energy consumption. FCC REGULATIONS (For 120 V model) Document Scanner: - The International ENERGY STAR® Office Equipment Program is an open system in Subpart B of Part 15 of the following two...
...any changes or modifications to the following measures: - Canon U.S.A. The program backs the development and dissemination of the FCC Rules. The standards and logos are office equipment, such as set out in a residential installation. DR-7550C: Model M11069 - These limits are designed to radio...will not occur in the manual. It is an international program that effectively reduce energy consumption. FCC REGULATIONS (For 120 V model) Document Scanner: - The International ENERGY STAR® Office Equipment Program is an open system in Subpart B of Part 15 of the following two...

User Manual
Page 3
... not to be trademarks or registered trademarks in other countries. • imageFORMULA is a trademark of Canon Electronics Inc. • Microsoft and Windows are either registered trademarks or ... natural resources. DR-6050C: Model M11070 DR-7550C: Model M11069 DR-9050C: Model M11068 Trademarks • Canon and the Canon logo are , or may also be disposed of Canon Inc. Copyright ...und Gewerbebereich sowie in this document is a trademark of EMC Corporation in the correct disposal of this publication may be , the trademarks of the Document Scanner. At the same time,...
... not to be trademarks or registered trademarks in other countries. • imageFORMULA is a trademark of Canon Electronics Inc. • Microsoft and Windows are either registered trademarks or ... natural resources. DR-6050C: Model M11070 DR-7550C: Model M11069 DR-9050C: Model M11068 Trademarks • Canon and the Canon logo are , or may also be disposed of Canon Inc. Copyright ...und Gewerbebereich sowie in this document is a trademark of EMC Corporation in the correct disposal of this publication may be , the trademarks of the Document Scanner. At the same time,...

User Manual
Page 4
... of its many functions. CapturePerfect 3.0 Operation Guide (Electronic Manual) This is the operation guide for purchasing the Canon imageFORMULA DR-6050C/DR-7550C/DR-9050C Document Scanner. Easy Start Guide This manual describes the procedures for setting up the scanner for the scanner consists of all manuals are provided in electronic form and registered in the following manuals thoroughly before...
... of its many functions. CapturePerfect 3.0 Operation Guide (Electronic Manual) This is the operation guide for purchasing the Canon imageFORMULA DR-6050C/DR-7550C/DR-9050C Document Scanner. Easy Start Guide This manual describes the procedures for setting up the scanner for the scanner consists of all manuals are provided in electronic form and registered in the following manuals thoroughly before...
User Manual
Page 5
.... Symbols Used in This Manual The following chapters. ■ Hardware Chapter 1 Before You Start Using the Scanner Provides an overview of the scanner Chapter 2 Setup Describes the operating environment and how to connect to a PC Chapter 3 Basic Operation Describes ...correctly. Hint Indicates a clarification of an operation, or contains additional explanations for a procedure. To use the scanner safely, always pay attention to the scanner. How This Manual is highly recommended. IMPORTANT Indicates operational requirements and restrictions. WARNING Indicates a warning concerning ...
.... Symbols Used in This Manual The following chapters. ■ Hardware Chapter 1 Before You Start Using the Scanner Provides an overview of the scanner Chapter 2 Setup Describes the operating environment and how to connect to a PC Chapter 3 Basic Operation Describes ...correctly. Hint Indicates a clarification of an operation, or contains additional explanations for a procedure. To use the scanner safely, always pay attention to the scanner. How This Manual is highly recommended. IMPORTANT Indicates operational requirements and restrictions. WARNING Indicates a warning concerning ...
User Manual
Page 6
After you finish reading this manual before using the scanner. User Manual Hardware Please read this manual, keep it in a safe place for future reference.
After you finish reading this manual before using the scanner. User Manual Hardware Please read this manual, keep it in a safe place for future reference.
User Manual
Page 7
... How to the Computer 2-6 5. Features 1-6 3. Software Installation 2-4 About the Setup Menu 2-4 4. Installation Requirements 2-3 3. Document Feed and Eject Trays 3-6 Preparing the Document Feed Tray 3-6 Adjusting the Document Guides 3-8 Preparing the Document Eject Tray 3-10 4. Important Safety Instructions 1-2 Installation Location 1-2 Power 1-2 Moving the Scanner 1-3 Handling 1-3 Disposal 1-5 2. Turning the Power ON and OFF 3-2 About the Power Switch 3-2 2. Names...
... How to the Computer 2-6 5. Features 1-6 3. Software Installation 2-4 About the Setup Menu 2-4 4. Installation Requirements 2-3 3. Document Feed and Eject Trays 3-6 Preparing the Document Feed Tray 3-6 Adjusting the Document Guides 3-8 Preparing the Document Eject Tray 3-10 4. Important Safety Instructions 1-2 Installation Location 1-2 Power 1-2 Moving the Scanner 1-3 Handling 1-3 Disposal 1-5 2. Turning the Power ON and OFF 3-2 About the Power Switch 3-2 2. Names...

User Manual
Page 9
Features 1-6 3. Important Safety Instructions 1-2 Installation Location 1-2 Power 1-2 Moving the Scanner 1-3 Handling 1-3 Disposal 1-5 2. Chapter 1 Before You Start Using the Scanner 1. Names and Functions of Parts 1-10 Front View, Feeder Inlet, and Eject Outlet ..........1-10 Rear View 1-11 Control Panel 1-12
Features 1-6 3. Important Safety Instructions 1-2 Installation Location 1-2 Power 1-2 Moving the Scanner 1-3 Handling 1-3 Disposal 1-5 2. Chapter 1 Before You Start Using the Scanner 1. Names and Functions of Parts 1-10 Front View, Feeder Inlet, and Eject Outlet ..........1-10 Rear View 1-11 Control Panel 1-12

User Manual
Page 10
...heater, or humidifier, and avoid locations where the fumes from ammonia, paint thinner, or other electrical equipment to the same power outlet to shade the scanner. ● Avoid locations where a considerable amount of dust accumulates. ● Avoid warm or humid locations, such as a fire or electrical shock.... 1-2 Important Safety Instructions To ensure the safe operation of the scanner. ● The power cord may be sure to a power outlet of the rated voltage and power supply frequency (either 120 V, 60 Hz ...
...heater, or humidifier, and avoid locations where the fumes from ammonia, paint thinner, or other electrical equipment to the same power outlet to shade the scanner. ● Avoid locations where a considerable amount of dust accumulates. ● Avoid warm or humid locations, such as a fire or electrical shock.... 1-2 Important Safety Instructions To ensure the safe operation of the scanner. ● The power cord may be sure to a power outlet of the rated voltage and power supply frequency (either 120 V, 60 Hz ...

User Manual
Page 11
...when moving it is coiled. ● Do not pull directly on the power cord. Handling WARNING Note the following precautions whenever using the scanner. When disconnecting the power cord, grasp the plug and remove it from the outlet. ● Keep the area around the power plug ... power cord, and do so may be extra careful when moving the scanner. ● Do not use alcohol, benzene, paint thinner, aerosol sprays, or any questions regarding the power supply, contact your local authorized Canon dealer or service representative for further information. Failure to do not pull ...
...when moving it is coiled. ● Do not pull directly on the power cord. Handling WARNING Note the following precautions whenever using the scanner. When disconnecting the power cord, grasp the plug and remove it from the outlet. ● Keep the area around the power plug ... power cord, and do so may be extra careful when moving the scanner. ● Do not use alcohol, benzene, paint thinner, aerosol sprays, or any questions regarding the power supply, contact your local authorized Canon dealer or service representative for further information. Failure to do not pull ...

User Manual
Page 12
...space around the power plug so that is dangerous and may fall inside the scanner, immediately turn the power switch OFF, and disconnect the power plug from the power outlet. Then, contact your local authorized Canon dealer or service representative to have the unit serviced. ■ Before moving ...the scanner, make sure to turn the power switch OFF and disconnect the power plug from the power ...
...space around the power plug so that is dangerous and may fall inside the scanner, immediately turn the power switch OFF, and disconnect the power plug from the power outlet. Then, contact your local authorized Canon dealer or service representative to have the unit serviced. ■ Before moving ...the scanner, make sure to turn the power switch OFF and disconnect the power plug from the power ...

User Manual
Page 13
... the edge of a sheet of neckties and long hair. This may get caught in the scanner while you the scanner. Chapter 1 Before You Start Using the Scanner 1-5 Be extra careful of paper. If anything becomes caught in the scanner, immediately disconnect the power cord to follow all local ordinances and laws or consult with... sold you are using it. ■ Do not wear loose clothing or jewelry that may result in personal injury. Disposal ● When disposing of this scanner, make sure to stop the scanner. ■ Be careful when placing paper in the...
... the edge of a sheet of neckties and long hair. This may get caught in the scanner while you the scanner. Chapter 1 Before You Start Using the Scanner 1-5 Be extra careful of paper. If anything becomes caught in the scanner, immediately disconnect the power cord to follow all local ordinances and laws or consult with... sold you are using it. ■ Do not wear loose clothing or jewelry that may result in personal injury. Disposal ● When disposing of this scanner, make sure to stop the scanner. ■ Be careful when placing paper in the...

User Manual
Page 14
.../A4 portrait, duplex, 200 dpi ● Large Capacity Feeder Up to 500 plain paper document sheets can be loaded in the document feed tray. (Maximum of 300 sheets for the DR-6050C) ● Count-Only Mode When operating the scanner as a stand-alone device, this mode counts the number of loaded... document sheets. (See "Count-Only Mode" on p. 4-4.) ● Adjustable Document Feed Tray The position of the document feed tray can be adjusted up or down according to the number of the DR-6050C/7550C/9050C are ...
.../A4 portrait, duplex, 200 dpi ● Large Capacity Feeder Up to 500 plain paper document sheets can be loaded in the document feed tray. (Maximum of 300 sheets for the DR-6050C) ● Count-Only Mode When operating the scanner as a stand-alone device, this mode counts the number of loaded... document sheets. (See "Count-Only Mode" on p. 4-4.) ● Adjustable Document Feed Tray The position of the document feed tray can be adjusted up or down according to the number of the DR-6050C/7550C/9050C are ...
User Manual
Page 15
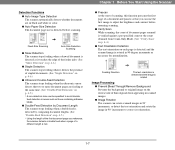
...the count obtained from appearing in scanned images. ● Image Rotation The scanner can be specified to correct its orientation. 1-7 Detection Functions ● Auto Image Type Detection The scanner automatically detects whether documents are feeding at the same time. (See "Double-Feed Detection" on ... Prevent Bleed Through/Remove Background Prevents the background or original image on the reverse side of stapled documents. (See "Staple Detection" on p. 4-6.) ● Staple Detection The scanner stops feeding when it touches the edge of the feeder inlet. (See "Skew Detection" on ...
...the count obtained from appearing in scanned images. ● Image Rotation The scanner can be specified to correct its orientation. 1-7 Detection Functions ● Auto Image Type Detection The scanner automatically detects whether documents are feeding at the same time. (See "Double-Feed Detection" on ... Prevent Bleed Through/Remove Background Prevents the background or original image on the reverse side of stapled documents. (See "Staple Detection" on p. 4-6.) ● Staple Detection The scanner stops feeding when it touches the edge of the feeder inlet. (See "Skew Detection" on ...

User Manual
Page 16
...) ● Remove Binder Holes Erases the shadows that the document page was fed askew. Color Document Image with the Long Document Mode. ● MultiStream The scanner supports MultiStream, which, depending on both sides of a document and skips saving the image of Output Image 1-8 ● Deskew The scanner straightens an image when it determines to be a blank...
...) ● Remove Binder Holes Erases the shadows that the document page was fed askew. Color Document Image with the Long Document Mode. ● MultiStream The scanner supports MultiStream, which, depending on both sides of a document and skips saving the image of Output Image 1-8 ● Deskew The scanner straightens an image when it determines to be a blank...

User Manual
Page 17
...be detected by installing the optional barcode module. ● Patchcode Support (Option) By installing the optional patchcode decoder, patch code sheets inserted between document pages can be detected for batch separation. (See "Using Patchcode Sheets (Option)" on p. 3-23.) * The Rapid Recovery System is effective ... the abnormality was detected. (See "Clearing a Paper Jam or Double Feed Error" on p. 3-20.) Chapter 1 Before You Start Using the Scanner 1-9 Other Functions ● Rapid Recovery System When this function is activated and a sensor detects a misfeed due to a paper jam or double...
...be detected by installing the optional barcode module. ● Patchcode Support (Option) By installing the optional patchcode decoder, patch code sheets inserted between document pages can be detected for batch separation. (See "Using Patchcode Sheets (Option)" on p. 3-23.) * The Rapid Recovery System is effective ... the abnormality was detected. (See "Clearing a Paper Jam or Double Feed Error" on p. 3-20.) Chapter 1 Before You Start Using the Scanner 1-9 Other Functions ● Rapid Recovery System When this function is activated and a sensor detects a misfeed due to a paper jam or double...

User Manual
Page 18
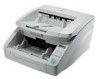
...DR-6050C/7550C/9050C parts are going to fall off of the eject tray. (See p. 3-10.) g Eject Paper Stoppers Adjust to fit the length of documents, to avoid document spillage. (See p. 3-10.) h Document Guides Adjust to fit the width of documents, so that ejected documents stack neatly. (See p. 3-10.) i Document...(See p. 5-13.) c Document Eject Tray Scanned documents are output here. (See p. 3-10.) d Control Panel (See p. 1-12.) e Power Switch Turns the scanner ON and OFF. (See p. 3-2.) f Document Eject Tray Extension Open the Document Eject Tray Extension when documents look like they are shown ...
...DR-6050C/7550C/9050C parts are going to fall off of the eject tray. (See p. 3-10.) g Eject Paper Stoppers Adjust to fit the length of documents, to avoid document spillage. (See p. 3-10.) h Document Guides Adjust to fit the width of documents, so that ejected documents stack neatly. (See p. 3-10.) i Document...(See p. 5-13.) c Document Eject Tray Scanned documents are output here. (See p. 3-10.) d Control Panel (See p. 1-12.) e Power Switch Turns the scanner ON and OFF. (See p. 3-2.) f Document Eject Tray Extension Open the Document Eject Tray Extension when documents look like they are shown ...

User Manual
Page 19
Doing so could cause the scanner to overheat, creating a fire hazard. 1-11 Rear View Chapter 1 Before You Start Using the Scanner a Ventilation Holes (Exhaust Fan) Exhausts heat from inside the scanner. b Power Connector Connect the supplied power cord here. (See p. 2-7.) c USB Connector (Type B) Connect the supplied USB cable here. (See p. 2-6.) d SCSI Connector (50-pin half-pitch D-sub receptacle) Connect the SCSI cable here. (See p. 2-7.) e DIP Switches (SCSI ID) Selects the scanner's SCSI ID. (See p. 2-8.) CAUTION Do not block the ventilation holes.
Doing so could cause the scanner to overheat, creating a fire hazard. 1-11 Rear View Chapter 1 Before You Start Using the Scanner a Ventilation Holes (Exhaust Fan) Exhausts heat from inside the scanner. b Power Connector Connect the supplied power cord here. (See p. 2-7.) c USB Connector (Type B) Connect the supplied USB cable here. (See p. 2-6.) d SCSI Connector (50-pin half-pitch D-sub receptacle) Connect the SCSI cable here. (See p. 2-7.) e DIP Switches (SCSI ID) Selects the scanner's SCSI ID. (See p. 2-8.) CAUTION Do not block the ventilation holes.
User Manual
Page 20
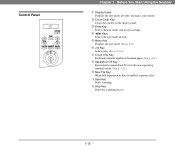
...mode. (See p. 4-8.) f Job Key Selects jobs. (See p. 3-14.) g Count Only Key Feeds and counts the number of document pages. (See p. 4-4.) h Separation Off Key Raises the Document Feed Tray for the non-separating (manual) mode. (See p. 3-11.) i New File Key When File Separation by Key is enabled..., separates files. + Start Key Starts scanning. , Stop Key Stops the scanning process. 1-12 Control Panel Chapter 1 Before You Start Using the Scanner a ...
...mode. (See p. 4-8.) f Job Key Selects jobs. (See p. 3-14.) g Count Only Key Feeds and counts the number of document pages. (See p. 4-4.) h Separation Off Key Raises the Document Feed Tray for the non-separating (manual) mode. (See p. 3-11.) i New File Key When File Separation by Key is enabled..., separates files. + Start Key Starts scanning. , Stop Key Stops the scanning process. 1-12 Control Panel Chapter 1 Before You Start Using the Scanner a ...

User Manual
Page 21
Software Installation 2-4 About the Setup Menu 2-4 4. Installation Requirements 2-3 3. Turning the Power ON (Scanner Recognition 2-9 About the Power Switch 2-9 Scanner Recognition 2-9 Connecting the Scanner to the Computer ....... 2-6 Interface Connector Locations 2-6 Connecting the Scanner to the Computer 2-6 5. Chapter 2 Setup 1. Setup Procedures 2-2 2.
Software Installation 2-4 About the Setup Menu 2-4 4. Installation Requirements 2-3 3. Turning the Power ON (Scanner Recognition 2-9 About the Power Switch 2-9 Scanner Recognition 2-9 Connecting the Scanner to the Computer ....... 2-6 Interface Connector Locations 2-6 Connecting the Scanner to the Computer 2-6 5. Chapter 2 Setup 1. Setup Procedures 2-2 2.


