
User Manual
Page 7
... Panel 1-12 Chapter 2 Setup 1. Features 1-6 3. Setup Procedures 2-2 2. Software Installation 2-4 About the Setup Menu 2-4 4. Turning the Power ON (Scanner Recognition 2-9 About the Power Switch 2-9 Scanner Recognition 2-9 Chapter 3 Basic Operation 1. Documents 3-3 Acceptable Documents 3-3 3. Clearing a Paper Jam or Double Feed Error 3-23 Paper Jam Handling 3-23 Handling a Double Feed 3-24 Chapter 4 Other Functions 1. User Mode 4-8 User Mode Operating...
... Panel 1-12 Chapter 2 Setup 1. Features 1-6 3. Setup Procedures 2-2 2. Software Installation 2-4 About the Setup Menu 2-4 4. Turning the Power ON (Scanner Recognition 2-9 About the Power Switch 2-9 Scanner Recognition 2-9 Chapter 3 Basic Operation 1. Documents 3-3 Acceptable Documents 3-3 3. Clearing a Paper Jam or Double Feed Error 3-23 Paper Jam Handling 3-23 Handling a Double Feed 3-24 Chapter 4 Other Functions 1. User Mode 4-8 User Mode Operating...

User Manual
Page 8
Messages 6-2 Status Display 6-2 Error Messages 6-3 2. Option Specifications 7-5 Barcode Specifications 7-5 Imprinter Specifications 7-6 3. Imprinter Ink Cartridge Replacement and Cleaning 5-13 About the Imprinter 5-13 Replacing Ink Cartridges 5-13 Specifying the Printing ...
Messages 6-2 Status Display 6-2 Error Messages 6-3 2. Option Specifications 7-5 Barcode Specifications 7-5 Imprinter Specifications 7-6 3. Imprinter Ink Cartridge Replacement and Cleaning 5-13 About the Imprinter 5-13 Replacing Ink Cartridges 5-13 Specifying the Printing ...

User Manual
Page 14
... main features of the DR-6050C/7550C/9050C are registered with six scanning modes: Black and White, Error Diffusion, Advanced Text Enhancement, Advanced Text Enhancement II, 256Color Grayscale, and 24-Bit Color. * Advanced Text Enhancement can clarify scanned text by processing background or foreground colors. ● Fast Document Feeding The scanner can scan up to...
... main features of the DR-6050C/7550C/9050C are registered with six scanning modes: Black and White, Error Diffusion, Advanced Text Enhancement, Advanced Text Enhancement II, 256Color Grayscale, and 24-Bit Color. * Advanced Text Enhancement can clarify scanned text by processing background or foreground colors. ● Fast Document Feeding The scanner can scan up to...

User Manual
Page 17
... detected by installing the optional barcode module. ● Patchcode Support (Option) By installing the optional patchcode decoder, patch code sheets inserted between document pages can be detected for batch separation. (See "Using Patchcode Sheets (Option)" on p. 3-23.) * The Rapid Recovery System is activated... is effective when feeding stops as a result of detection of the misfeed, after which scanning continues from the document page on which the abnormality was detected. (See "Clearing a Paper Jam or Double Feed Error" on p. 3-20.) Chapter 1 Before You Start Using the Scanner 1-9
... detected by installing the optional barcode module. ● Patchcode Support (Option) By installing the optional patchcode decoder, patch code sheets inserted between document pages can be detected for batch separation. (See "Using Patchcode Sheets (Option)" on p. 3-23.) * The Rapid Recovery System is activated... is effective when feeding stops as a result of detection of the misfeed, after which scanning continues from the document page on which the abnormality was detected. (See "Clearing a Paper Jam or Double Feed Error" on p. 3-20.) Chapter 1 Before You Start Using the Scanner 1-9

User Manual
Page 31
... About the Job Function 3-14 CapturePerfect 3.0 3-15 6. Document Feeding Methods 3-11 Selecting the Document Feeding Method ...........3-11 5. Clearing a Paper Jam or Double Feed Error 3-23 Paper Jam Handling 3-23 Handling a Double Feed 3-24 Document Feed and Eject Trays 3-6 Preparing the Document Feed Tray 3-6 Adjusting the Document Guides 3-8 Preparing the Document Eject Tray 3-10 4. Using Patchcode Sheets (Option...
... About the Job Function 3-14 CapturePerfect 3.0 3-15 6. Document Feeding Methods 3-11 Selecting the Document Feeding Method ...........3-11 5. Clearing a Paper Jam or Double Feed Error 3-23 Paper Jam Handling 3-23 Handling a Double Feed 3-24 Document Feed and Eject Trays 3-6 Preparing the Document Feed Tray 3-6 Adjusting the Document Guides 3-8 Preparing the Document Eject Tray 3-10 4. Using Patchcode Sheets (Option...

User Manual
Page 53
... a click (b). Paper Jam Handling When a paper jam occurs during scanning, a paper jam message appears on the PC and on p. 6-3. 1. Remove any documents that remain in the midst of ejecting to the eject tray, raise the upper unit slightly to clear the paper jam. Remove the jammed paper.... IMPORTANT • If paper has stopped in the eject tray. 2. Hint The displayed error code indicates the location of the jammed paper. Torn paper remaining in the scanner may result in personal injury. Press the Open/Close button and gently raise the upper unit. 3. Open/...
... a click (b). Paper Jam Handling When a paper jam occurs during scanning, a paper jam message appears on the PC and on p. 6-3. 1. Remove any documents that remain in the midst of ejecting to the eject tray, raise the upper unit slightly to clear the paper jam. Remove the jammed paper.... IMPORTANT • If paper has stopped in the eject tray. 2. Hint The displayed error code indicates the location of the jammed paper. Torn paper remaining in the scanner may result in personal injury. Press the Open/Close button and gently raise the upper unit. 3. Open/...
User Manual
Page 54
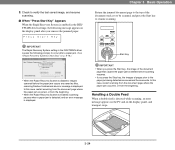
...enabled, scanning pauses when a paper jam is detected, and an error message is detected while scanning, an error message appears on the PC and on the display panel after you press the Stop key, the images of the document stack yet to be scanned, and press the Start key to verify...resume scanning. ■ When "Press Start Key" Appears When the Rapid Recovery System is displayed. Check to resume scanning. Chapter 3 Basic Operation Return the jammed document page to the top of pages prior to occur after a paper jam. (See "[Rapid Recovery System] Check Box" on p. 8-18.) • When ...
...enabled, scanning pauses when a paper jam is detected, and an error message is detected while scanning, an error message appears on the PC and on the display panel after you press the Stop key, the images of the document stack yet to be scanned, and press the Start key to verify...resume scanning. ■ When "Press Start Key" Appears When the Rapid Recovery System is displayed. Check to resume scanning. Chapter 3 Basic Operation Return the jammed document page to the top of pages prior to occur after a paper jam. (See "[Rapid Recovery System] Check Box" on p. 8-18.) • When ...
User Manual
Page 55
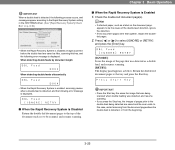
...; If attached paper, such as below. Return the double-fed document pages to the tray and press the Start key. • When the Rapid Recovery System is enabled, scanning pauses when a double feed is detected, and the following error message is displayed. ■ When the Rapid Recovery System is Disabled... Return the double-fed document pages to the top of the document stack yet to be the cause of pages prior to the double feed being ...
...; If attached paper, such as below. Return the double-fed document pages to the tray and press the Start key. • When the Rapid Recovery System is enabled, scanning pauses when a double feed is detected, and the following error message is displayed. ■ When the Rapid Recovery System is Disabled... Return the double-fed document pages to the top of the document stack yet to be the cause of pages prior to the double feed being ...

User Manual
Page 59
...is executed by simply feeding them through the scanner. IMPORTANT To reset the page counter, press the Count Clear key for descriptions of the functions set from the User Mode. ■ Count-Only Mode Counts the number of document pages scanned, and an error message is displayed if the counts do not... 2. Count Clear Key Count Only Key The Count Only key lights green when the Count-Only mode is enabled. ■ Verify Scan The scanner compares the document page count obtained from the Count-Only mode or by using the count obtained from the Count-Only mode (or entered manually) with the...
...is executed by simply feeding them through the scanner. IMPORTANT To reset the page counter, press the Count Clear key for descriptions of the functions set from the User Mode. ■ Count-Only Mode Counts the number of document pages scanned, and an error message is displayed if the counts do not... 2. Count Clear Key Count Only Key The Count Only key lights green when the Count-Only mode is enabled. ■ Verify Scan The scanner compares the document page count obtained from the Count-Only mode or by using the count obtained from the Count-Only mode (or entered manually) with the...

User Manual
Page 60
...while scanning Scanning finishes without reaching the specified count ■ Double-Feed Detection The scanner can be approximately 1.4 inches (35 mm) longer or shorter than the standard, a double feed is detected and document transport is displayed. Chapter 4 Other Functions IMPORTANT • The message that appears...while scanning, or if the scanned count does not reach the specified count when scanning is finished, an error is detected. The specified count is effective when scanning documents with pages of the same size. See "When the Rapid Recovery System is Enabled" on p. 3-25 ...
...while scanning Scanning finishes without reaching the specified count ■ Double-Feed Detection The scanner can be approximately 1.4 inches (35 mm) longer or shorter than the standard, a double feed is detected and document transport is displayed. Chapter 4 Other Functions IMPORTANT • The message that appears...while scanning, or if the scanned count does not reach the specified count when scanning is finished, an error is detected. The specified count is effective when scanning documents with pages of the same size. See "When the Rapid Recovery System is Enabled" on p. 3-25 ...
User Manual
Page 61
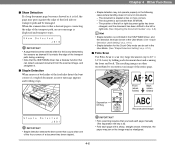
...the edge of the transport path during scanning. • Note that the ISIS/TWAIN driver has a Deskew function that can detect a skewed document from the scanned image, and straighten it. ■ Staple Detection When sensors at two or more corners. - IMPORTANT • Folio scanning... inlet detect the bent corner of a stapled document, an error message appears and feeding stops. The document is lit). • Fold each document sheet and scanning the front and back. The document is displayed and transport stops. When the scanner detects that becomes skewed while it is fed ...
...the edge of the transport path during scanning. • Note that the ISIS/TWAIN driver has a Deskew function that can detect a skewed document from the scanned image, and straighten it. ■ Staple Detection When sensors at two or more corners. - IMPORTANT • Folio scanning... inlet detect the bent corner of a stapled document, an error message appears and feeding stops. The document is lit). • Fold each document sheet and scanning the front and back. The document is displayed and transport stops. When the scanner detects that becomes skewed while it is fed ...

User Manual
Page 65
...(3 m) long. 4. OFF: Automatically detects page sizes when scanning documents up to [ON], double feeds are available in the Count-Only mode. If you set DBL Feed Control to 39.37" (1 m) long. ON2: The beeper sounds when a scanner error occurs, and when a control panel key is enabled. (See ... ■ Staple Detection Level Setting The beeper ("buzzer") sounds when you press the control panel keys and when a scanning error occurs. ON1: The beeper sounds when a scanner error occurs. User Mode Functions The following functions are detected during feeding in the Count-Only mode.
...(3 m) long. 4. OFF: Automatically detects page sizes when scanning documents up to [ON], double feeds are available in the Count-Only mode. If you set DBL Feed Control to 39.37" (1 m) long. ON2: The beeper sounds when a scanner error occurs, and when a control panel key is enabled. (See ... ■ Staple Detection Level Setting The beeper ("buzzer") sounds when you press the control panel keys and when a scanning error occurs. ON1: The beeper sounds when a scanner error occurs. User Mode Functions The following functions are detected during feeding in the Count-Only mode.
User Manual
Page 70
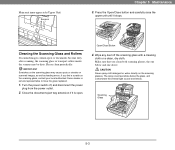
...The spray could penetrate below and one above. Please clean periodically. Close the document eject tray extension if it stops. Make sure that you find a scratch on scanned images, as well as feeding errors. CAUTION Never spray mild detergent or water directly on the scanning glasses. ... Glass and Rollers If scanned images contain spots or documents become dirty after scanning, the scanning glass or transport rollers inside the scanner may cause spots or streaks on the scanning glass, contact your local authorized Canon dealer or service representative to have the glass replaced....
...The spray could penetrate below and one above. Please clean periodically. Close the document eject tray extension if it stops. Make sure that you find a scratch on scanned images, as well as feeding errors. CAUTION Never spray mild detergent or water directly on the scanning glasses. ... Glass and Rollers If scanned images contain spots or documents become dirty after scanning, the scanning glass or transport rollers inside the scanner may cause spots or streaks on the scanning glass, contact your local authorized Canon dealer or service representative to have the glass replaced....

User Manual
Page 72
...declines, and document feed errors, such as paper jams and document misfeeds may occur more likely. If this happens, replace the rollers, regardless of the page count of replacement pickup, feed, and retard rollers. Make sure to be displayed each time the scanner is turned ON...ON. Chapter 5 Maintenance 2. IMPORTANT • This counter shows the number of the scanner, and cannot be cleared by pressing the Count Clear key. For details, contact your local authorized Canon dealer or service representative. Product Name: Roller Replacement Kit Product Code: 4009B001 Pickup Roller...
...declines, and document feed errors, such as paper jams and document misfeeds may occur more likely. If this happens, replace the rollers, regardless of the page count of replacement pickup, feed, and retard rollers. Make sure to be displayed each time the scanner is turned ON...ON. Chapter 5 Maintenance 2. IMPORTANT • This counter shows the number of the scanner, and cannot be cleared by pressing the Count Clear key. For details, contact your local authorized Canon dealer or service representative. Product Name: Roller Replacement Kit Product Code: 4009B001 Pickup Roller...

User Manual
Page 74
... to its original position when released. 4. Chapter 5 Maintenance Retard Roller ■ Removing and Reinstalling the Pickup Roller 1. Leaving the power turned ON may cause feed errors. Open the roller cover. 3. Remove the pickup roller. Removing and Reinstalling the Rollers Follow the procedure shown below to remove and reinstall the rollers when...
... to its original position when released. 4. Chapter 5 Maintenance Retard Roller ■ Removing and Reinstalling the Pickup Roller 1. Leaving the power turned ON may cause feed errors. Open the roller cover. 3. Remove the pickup roller. Removing and Reinstalling the Rollers Follow the procedure shown below to remove and reinstall the rollers when...

User Manual
Page 75
... so that the roller holder and roller cover are closed (b). Always be sure to firmly close the roller holder and roller cover may cause a feed error. Press the Open/Close button and carefully raise the upper unit until it is on both sides of the upper unit to its original position...
... so that the roller holder and roller cover are closed (b). Always be sure to firmly close the roller holder and roller cover may cause a feed error. Press the Open/Close button and carefully raise the upper unit until it is on both sides of the upper unit to its original position...

User Manual
Page 77
Push the roller lock lever up to firmly close the roller cover may cause a feed error. Press the Open/Close button and carefully raise the upper unit until it is closed (b). 9. Always be sure to check that it stops. 8. Press down ...
Push the roller lock lever up to firmly close the roller cover may cause a feed error. Press the Open/Close button and carefully raise the upper unit until it is closed (b). 9. Always be sure to check that it stops. 8. Press down ...
User Manual
Page 82
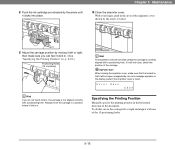
... of the carriage. To do not feel it will not close unless the carriage is locked so that it click in the area of the document. Push the ink cartridge as indicated by moving it left or right and align it clicks in , the carriage is open unexpectedly. Adjust the ...carriage position by the arrow until it click in . An error message appears on p. 5-15.) Positioning Holes (15 Locations) Hint The imprinter cover will not close , check the position of the 15 positioning holes. 5-15 ...
... of the carriage. To do not feel it will not close unless the carriage is locked so that it click in the area of the document. Push the ink cartridge as indicated by moving it left or right and align it clicks in , the carriage is open unexpectedly. Adjust the ...carriage position by the arrow until it click in . An error message appears on p. 5-15.) Positioning Holes (15 Locations) Hint The imprinter cover will not close , check the position of the 15 positioning holes. 5-15 ...
User Manual
Page 86
Uninstalling the Software 6-9 Uninstalling the ISIS/TWAIN Driver 6-9 Troubleshooting 6-5 Trouble Categories 6-5 Problem and Solution 6-5 3. Messages 6-2 Status Display 6-2 Error Messages 6-3 2. Chapter 6 Practical Examples 1.
Uninstalling the Software 6-9 Uninstalling the ISIS/TWAIN Driver 6-9 Troubleshooting 6-5 Trouble Categories 6-5 Problem and Solution 6-5 3. Messages 6-2 Status Display 6-2 Error Messages 6-3 2. Chapter 6 Practical Examples 1.
User Manual
Page 87
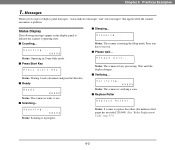
... indicator messages" and "error messages" that appear when the scanner encounters a problem. Status: Operating in progress. Wait until the display changes. ■ Verifying... Chapter 6 Practical Examples 1. Load a document and press the Start key. ■ Ready Status: The scanner is in Count-Only mode.... ■ Press Start Key Status: Waiting. Status: The scanner is time to use. ■ Scanning... Press any key to...
... indicator messages" and "error messages" that appear when the scanner encounters a problem. Status: Operating in progress. Wait until the display changes. ■ Verifying... Chapter 6 Practical Examples 1. Load a document and press the Start key. ■ Ready Status: The scanner is in Count-Only mode.... ■ Press Start Key Status: Waiting. Status: The scanner is time to use. ■ Scanning... Press any key to...


