
User Manual
Page 1
Startup Manual Read this manual thoroughly before using this manual in a safe place for future reference. Keep this scanner.
Startup Manual Read this manual thoroughly before using this manual in a safe place for future reference. Keep this scanner.

User Manual
Page 2
.... Note: This equipment has been tested and found to model M11037. However, there is identical to comply with class B limits in the manual. Canon U.S.A. Inc. RÈGLEMENT SUR LE BROUILLAGE RADIOÉLECTRIQUE (For 120 V models) Cet appareil numérique respecte les limites de ...sur le matériel brouilleur: "Appareils Numériques", NMB-003 édictée par l'Industrie Canada. MODEL NAMES Model DR-3080CII is no guarantee that to radio or television reception, which the receiver is an open system in accordance with the instructions, may cause undesired...
.... Note: This equipment has been tested and found to model M11037. However, there is identical to comply with class B limits in the manual. Canon U.S.A. Inc. RÈGLEMENT SUR LE BROUILLAGE RADIOÉLECTRIQUE (For 120 V models) Cet appareil numérique respecte les limites de ...sur le matériel brouilleur: "Appareils Numériques", NMB-003 édictée par l'Industrie Canada. MODEL NAMES Model DR-3080CII is no guarantee that to radio or television reception, which the receiver is an open system in accordance with the instructions, may cause undesired...

User Manual
Page 4
... prior written permission of Adobe Systems Incorporated in the United States and/or other copyrighted works is the registered trademark of CANON ELECTRONICS INC. Preface Thank you for identification purposes only and may be reproduced, transmitted, transcribed, stored in a retrieval ...noncommercial purposes. CAUTION Be aware of the following points when using this manual thoroughly before using the scanner in the United Status. • Intel and Pentium are for purchasing the Canon DR-3080CII scanner. Trademarks • Microsoft, Windows and Windows NT are registered trademarks...
... prior written permission of Adobe Systems Incorporated in the United States and/or other copyrighted works is the registered trademark of CANON ELECTRONICS INC. Preface Thank you for identification purposes only and may be reproduced, transmitted, transcribed, stored in a retrieval ...noncommercial purposes. CAUTION Be aware of the following points when using this manual thoroughly before using the scanner in the United Status. • Intel and Pentium are for purchasing the Canon DR-3080CII scanner. Trademarks • Microsoft, Windows and Windows NT are registered trademarks...

User Manual
Page 5
... performed correctly. In order to use the machine safely, always pay attention to these symbols and their meanings before reading this manual are explained below. Reading these items carefully in this manual. Be sure to read these notes is highly recommended. Familiarize yourself with these warnings. In order to use the machine...
... performed correctly. In order to use the machine safely, always pay attention to these symbols and their meanings before reading this manual are explained below. Reading these items carefully in this manual. Be sure to read these notes is highly recommended. Familiarize yourself with these warnings. In order to use the machine...

User Manual
Page 6
... Ensure Safe Operation 5 Installation Location 5 Power ...6 Moving the Scanner 6 Notes on Normal Handling 7 Notes Concerning Disposal 8 Features of the DR-3080CII 9 Checking the Packing List 11 Removing the Protective Tape and Protective Sheet 12 Names and Functions of Parts 13 Installing the Scanner 15 Installation ...Tray and the Document Eject Tray 39 Installing the Document Eject Guide 41 Loading a Document for Scanning 43 Automatic Feeding 43 Manual Feeding ...46 Scanning Folio (Folded Documents 47 Patch Code Sheets 48 About Patch Code Sheets 48 Functions of Patch Code ...
... Ensure Safe Operation 5 Installation Location 5 Power ...6 Moving the Scanner 6 Notes on Normal Handling 7 Notes Concerning Disposal 8 Features of the DR-3080CII 9 Checking the Packing List 11 Removing the Protective Tape and Protective Sheet 12 Names and Functions of Parts 13 Installing the Scanner 15 Installation ...Tray and the Document Eject Tray 39 Installing the Document Eject Guide 41 Loading a Document for Scanning 43 Automatic Feeding 43 Manual Feeding ...46 Scanning Folio (Folded Documents 47 Patch Code Sheets 48 About Patch Code Sheets 48 Functions of Patch Code ...
User Manual
Page 13
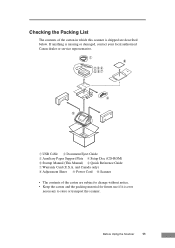
Before Using the Scanner 11 q USB Cable w Document Eject Guide e Auxiliary Paper Support Plate r Setup Disc (CD-ROM) t Startup Manual (This Manual) y Quick Reference Guide u Warranty Card (U.S.A. and Canada only) i Adjustment Sheet o Power Cord !0 Scanner • The contents of the carton in which... notice. • Keep the carton and the packing material for future use if it is missing or damaged, contact your local authorized Canon dealer or service representative. If anything is ever necessary to store or transport the scanner. Checking the Packing List The contents of the ...
Before Using the Scanner 11 q USB Cable w Document Eject Guide e Auxiliary Paper Support Plate r Setup Disc (CD-ROM) t Startup Manual (This Manual) y Quick Reference Guide u Warranty Card (U.S.A. and Canada only) i Adjustment Sheet o Power Cord !0 Scanner • The contents of the carton in which... notice. • Keep the carton and the packing material for future use if it is missing or damaged, contact your local authorized Canon dealer or service representative. If anything is ever necessary to store or transport the scanner. Checking the Packing List The contents of the ...
User Manual
Page 40
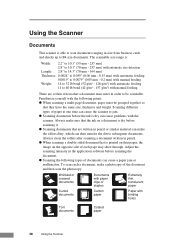
Scanning different types of documents can cause problems with manual feeding There are written in pencil or similar material can make the rollers dirty, which can then transfer the dirt to be grouped together so ... Length: 2.8" to 14.3" (70 mm - 364 mm) Thickness: 0.0024" to 0.059" (0.06 mm - 0.15 mm) with automatic feeding 0.0019" to 0.0079" (0.05 mm - 0.2 mm) with manual feeding Weight: 14 to 32 lb bond (52 g/m2 - 128 g/m2) with automatic feeding 11 to B4 size documents. The scannable size range is dry...
Scanning different types of documents can cause problems with manual feeding There are written in pencil or similar material can make the rollers dirty, which can then transfer the dirt to be grouped together so ... Length: 2.8" to 14.3" (70 mm - 364 mm) Thickness: 0.0024" to 0.059" (0.06 mm - 0.15 mm) with automatic feeding 0.0019" to 0.0079" (0.05 mm - 0.2 mm) with manual feeding Weight: 14 to 32 lb bond (52 g/m2 - 128 g/m2) with automatic feeding 11 to B4 size documents. The scannable size range is dry...
User Manual
Page 45
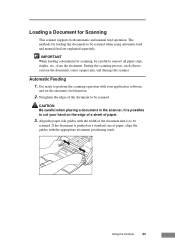
... edges of paper. 3. It is printed on the edge of a sheet of the document to be careful to be scanned when using automatic feed and manual feed are explained separately. CAUTION Be careful when placing a document in the scanner. If the document is possible to be scanned. Automatic Feeding 1. IMPORTANT When... for loading the document to cut your application software, and set the automatic feed function. 2. The methods for Scanning This scanner supports both automatic and manual feed operation.
... edges of paper. 3. It is printed on the edge of a sheet of the document to be careful to be scanned when using automatic feed and manual feed are explained separately. CAUTION Be careful when placing a document in the scanner. If the document is possible to be scanned. Automatic Feeding 1. IMPORTANT When... for loading the document to cut your application software, and set the automatic feed function. 2. The methods for Scanning This scanner supports both automatic and manual feed operation.

User Manual
Page 48
... single sheet of paper, align the guides with the appropriate document positioning mark. 3. Align the paper side guides with your application software, and set the manual feed function. The scanner will begin to perform the scanning operation with the width of the document that is set ; if "automatic feed" is to... feed pages in the upper position as long as "manual feed" is printed on a standard size of the document in and scan it into the document feed opening. If the document is set , the...
... single sheet of paper, align the guides with the appropriate document positioning mark. 3. Align the paper side guides with your application software, and set the manual feed function. The scanner will begin to perform the scanning operation with the width of the document that is set ; if "automatic feed" is to... feed pages in the upper position as long as "manual feed" is printed on a standard size of the document in and scan it into the document feed opening. If the document is set , the...

User Manual
Page 49
... feeding it on the front of the image. ● Combined images can be a maximum A3 size. ● A seem may be difficult to manually feed a sheet that is unusually thin or that are joined if the document or the fold in accordance with the normal operating procedure for your... application software, and continue to manually feed sheets into the scanner. 4. Using the Scanner 47 Scanning Folio (Folded Documents) The scanner uses a folio scanning method to scan documents ...
... feeding it on the front of the image. ● Combined images can be a maximum A3 size. ● A seem may be difficult to manually feed a sheet that is unusually thin or that are joined if the document or the fold in accordance with the normal operating procedure for your... application software, and continue to manually feed sheets into the scanner. 4. Using the Scanner 47 Scanning Folio (Folded Documents) The scanner uses a folio scanning method to scan documents ...

User Manual
Page 59
... NT 4.0 Workstation Click Start - Cause Action Cause Action The scanner is not correctly installed in the PC. Refer to the instruction manual for the SCSI board and correctly install the SCSI board in the PC, and any other SCSI devices connected to the SCSI Controller ...entry. If the system dose not recognize the SCSI board properly, refer to the instruction manual for the SCSI board and make the SCSI board settings again. Settings - Control Panel - Control Panel - Windows 2000 Professional Click Start ...
... NT 4.0 Workstation Click Start - Cause Action Cause Action The scanner is not correctly installed in the PC. Refer to the instruction manual for the SCSI board and correctly install the SCSI board in the PC, and any other SCSI devices connected to the SCSI Controller ...entry. If the system dose not recognize the SCSI board properly, refer to the instruction manual for the SCSI board and make the SCSI board settings again. Settings - Control Panel - Control Panel - Windows 2000 Professional Click Start ...
User Manual
Page 61
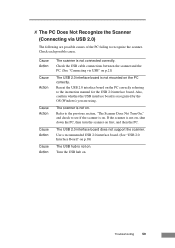
... causes of the PC failing to recognize the scanner. Refer to the previous section, "The Scanner Does Not Turn On," and check to the instruction manual for the USB 2.0 interface board.
... causes of the PC failing to recognize the scanner. Refer to the previous section, "The Scanner Does Not Turn On," and check to the instruction manual for the USB 2.0 interface board.

User Manual
Page 63
... not support certain functions, such as automatic paper size detection or margins settings. For details on how to use a function of the DR-3080CII that the brightness setting is too low. Attempting to install the scanner driver, See "Installing the ISIS/TWAIN Driver" on p.26. ...or application software is not running normally. For details on how to install the application software, refer to the application software instruction manual. If the resulting scanned images are dirty. Cause Action Cause Action Cause Action Cause Action The scanning glass or the rollers inside ...
... not support certain functions, such as automatic paper size detection or margins settings. For details on how to use a function of the DR-3080CII that the brightness setting is too low. Attempting to install the scanner driver, See "Installing the ISIS/TWAIN Driver" on p.26. ...or application software is not running normally. For details on how to install the application software, refer to the application software instruction manual. If the resulting scanned images are dirty. Cause Action Cause Action Cause Action Cause Action The scanning glass or the rollers inside ...

User Manual
Page 65
....3" (70 mm to 364 mm) Thickness: 0.0024" to 0.059" (0.06 mm to 0.15 mm) with automatic feeding 0.0019" to 0.0079" (0.05 mm to 0.2 mm) with manual feeding Weight: 14 to 32 lb bond (52 g/m2 to 128 g/m2) with automatic feeding 11 to 40 lb bond (42 g/m2 to 157 g/m2...) with manual feeding Document Feeding Method Automatic/Manual Scanning Method Contact sensor Light Source LED Scanning Side Simplex/Duplex Scanning Modes Black and white, text enhanced, error diffusion, 256-level grayscale...
....3" (70 mm to 364 mm) Thickness: 0.0024" to 0.059" (0.06 mm to 0.15 mm) with automatic feeding 0.0019" to 0.0079" (0.05 mm to 0.2 mm) with manual feeding Weight: 14 to 32 lb bond (52 g/m2 to 128 g/m2) with automatic feeding 11 to 40 lb bond (42 g/m2 to 157 g/m2...) with manual feeding Document Feeding Method Automatic/Manual Scanning Method Contact sensor Light Source LED Scanning Side Simplex/Duplex Scanning Modes Black and white, text enhanced, error diffusion, 256-level grayscale...


