
User Manual
Page 1
Cover Document Scanner User Manual ♦ Please read this manual before operating this scanner. ♦ After you finish reading this manual, store it in a safe place for future reference. 1 DR-3010C
Cover Document Scanner User Manual ♦ Please read this manual before operating this scanner. ♦ After you finish reading this manual, store it in a safe place for future reference. 1 DR-3010C
User Manual
Page 3
... a procedure. Contents Introduction 3 Symbols Used in the Bypass Mode 24 Placing Cards 24 Placing Folded Documents 25 4. Names and Functions of the DR-3010C Document Scanner 8 3. Be sure to explain procedures, restrictions, handling precautions, and instructions that should be observed for purchasing the Canon imageFORMULA DR-3010C. Please read these cautions. Reading these warnings. Turning the Power ON 18...
... a procedure. Contents Introduction 3 Symbols Used in the Bypass Mode 24 Placing Cards 24 Placing Folded Documents 25 4. Names and Functions of the DR-3010C Document Scanner 8 3. Be sure to explain procedures, restrictions, handling precautions, and instructions that should be observed for purchasing the Canon imageFORMULA DR-3010C. Please read these cautions. Reading these warnings. Turning the Power ON 18...

User Manual
Page 4
...DR-3010C Scanning Documents That Include Both Color and Black-and-White Pages 30 Scanning Different Sized Documents Together 31 Skipping Blank Pages 31 Scanning (Single-Sided) 11" x 17"/A3 Documents 31 Deskewing Documents 32 Moire Reduction 32 Correcting the Text Orientation of Documents 32 Reducing Bleed Through for Thin Documents and Documents...Printing Registered Jobs 65 Chapter 6 Maintenance 66 1. Regular Maintenance 66 Cleaning the Scanner 66 Cleaning the Inside of Documents as Search Keywords 33 Specifying Security Settings for PDF Files 33 5. Starting the Job Registration Tool...
...DR-3010C Scanning Documents That Include Both Color and Black-and-White Pages 30 Scanning Different Sized Documents Together 31 Skipping Blank Pages 31 Scanning (Single-Sided) 11" x 17"/A3 Documents 31 Deskewing Documents 32 Moire Reduction 32 Correcting the Text Orientation of Documents 32 Reducing Bleed Through for Thin Documents and Documents...Printing Registered Jobs 65 Chapter 6 Maintenance 66 1. Regular Maintenance 66 Cleaning the Scanner 66 Cleaning the Inside of Documents as Search Keywords 33 Specifying Security Settings for PDF Files 33 5. Starting the Job Registration Tool...

User Manual
Page 5
.... • Avoid locations that the location where the scanner is installed meets the following environmental requirements. • Provide adequate space around the scanner for documents output after being scanned. • Avoid installing the ...Scanner 6 Handling 7 Disposal 8 2. Names and Functions of Parts 10 Installation Location The performance of the scanner for operation, maintenance, and ventilation. 4" (100 mm) 4" (100 mm) 4" (100 mm) • Provide adequate space in front of this scanner, be sure to vibration. 5 DR-3010C Features of the DR-3010C Document Scanner...
.... • Avoid locations that the location where the scanner is installed meets the following environmental requirements. • Provide adequate space around the scanner for documents output after being scanned. • Avoid installing the ...Scanner 6 Handling 7 Disposal 8 2. Names and Functions of Parts 10 Installation Location The performance of the scanner for operation, maintenance, and ventilation. 4" (100 mm) 4" (100 mm) 4" (100 mm) • Provide adequate space in front of this scanner, be sure to vibration. 5 DR-3010C Features of the DR-3010C Document Scanner...

User Manual
Page 6
... but rapidly heated, water droplets (condensation) may be damaged. 6 DR-3010C When disconnecting the power cord, grasp the plug and remove it is often stepped on your local authorized Canon dealer or service representative for further information. Moving the Scanner • When moving the scanner. The scanner weighs approximately 6.4 lb (2.9 kg). • Make sure to avoid...
... but rapidly heated, water droplets (condensation) may be damaged. 6 DR-3010C When disconnecting the power cord, grasp the plug and remove it is often stepped on your local authorized Canon dealer or service representative for further information. Moving the Scanner • When moving the scanner. The scanner weighs approximately 6.4 lb (2.9 kg). • Make sure to avoid...

User Manual
Page 7
..., you will not be used for an extended period of paper. 7 DR-3010C If anything becomes caught in a fire or electric shock. It is unstable or tilted, or in an area subject to excessive vibrations, as this scanner. • Do not take the AC adapter apart or modify it .... personal injury. These items may result in a humid or dusty location. Then, contact your local authorized Canon dealer or service representative for further information. • Do not drop the scanner, or subject it in an emergency. • Do not allow water or flammable substances (alcohol, paint thinner, benzene...
..., you will not be used for an extended period of paper. 7 DR-3010C If anything becomes caught in a fire or electric shock. It is unstable or tilted, or in an area subject to excessive vibrations, as this scanner. • Do not take the AC adapter apart or modify it .... personal injury. These items may result in a humid or dusty location. Then, contact your local authorized Canon dealer or service representative for further information. • Do not drop the scanner, or subject it in an emergency. • Do not allow water or flammable substances (alcohol, paint thinner, benzene...
User Manual
Page 8
...; Card Scan You can scan a maximum of 30 documents per minute in the scanner enables documents to be scanned with the retailer who sold you the scanner. 2. Features of the DR-3010C Document Scanner The main features of the DR-3010C document scanner are described below. „ Compact Size The dimensions of the scanner are the sizes matching ISO7810 standards. „ Paper Size...
...; Card Scan You can scan a maximum of 30 documents per minute in the scanner enables documents to be scanned with the retailer who sold you the scanner. 2. Features of the DR-3010C Document Scanner The main features of the DR-3010C document scanner are described below. „ Compact Size The dimensions of the scanner are the sizes matching ISO7810 standards. „ Paper Size...

User Manual
Page 9
... on the software you to adjust the contrast and brightness of the document is two-sided or one-sided. „ Prescan Function The scanner is equipped with a Prescan function that are using. 9 DR-3010C „ Auto Color Detection The scanner detects whether the scanned document is in color or black-andwhite, and saves the image in...
... on the software you to adjust the contrast and brightness of the document is two-sided or one-sided. „ Prescan Function The scanner is equipped with a Prescan function that are using. 9 DR-3010C „ Auto Color Detection The scanner detects whether the scanned document is in color or black-andwhite, and saves the image in...

User Manual
Page 10
... Tray Pull this tray out if the document hangs over the edge of the scanner before placing documents. Document Eject Tray Open this tray when you set the switch to 'AUTO', the scanner is linked to read this connector. 10 DR-3010C Stop Key Stops scanning. Power Connector Connect... the supplied AC adapter to turn the scanner ON and OFF. Document Guides Adjust these guides to open . : Displayed if a...
... Tray Pull this tray out if the document hangs over the edge of the scanner before placing documents. Document Eject Tray Open this tray when you set the switch to 'AUTO', the scanner is linked to read this connector. 10 DR-3010C Stop Key Stops scanning. Power Connector Connect... the supplied AC adapter to turn the scanner ON and OFF. Document Guides Adjust these guides to open . : Displayed if a...

User Manual
Page 12
... To use the DR-3010C scanner, your computer must satisfy the following system requirements. • Operating systems: y Microsoft Windows 2000 Professional SP4 or later y Microsoft Windows XP Professional SP3 or later y ... 1024 × 768 (XGA) or better recommended. • An ISIS-compatible application or a TWAIN-compatible application that is compatible with the above operating systems. 12 DR-3010C Installing the Software 13 Setup Disc 13 Software Installation 14 Connecting the Scanner to the Computer 16 3. Scanner System Requirements 12 2. Turning the Power ON 18...
... To use the DR-3010C scanner, your computer must satisfy the following system requirements. • Operating systems: y Microsoft Windows 2000 Professional SP4 or later y Microsoft Windows XP Professional SP3 or later y ... 1024 × 768 (XGA) or better recommended. • An ISIS-compatible application or a TWAIN-compatible application that is compatible with the above operating systems. 12 DR-3010C Installing the Software 13 Setup Disc 13 Software Installation 14 Connecting the Scanner to the Computer 16 3. Scanner System Requirements 12 2. Turning the Power ON 18...

User Manual
Page 13
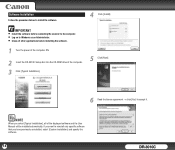
...Canon document scanners. For details, contact your local authorized Canon dealer. • Use the USB interface provided as standard equipment on the computer. Install the software using either Typical Installation or Custom Installation. Menu Screen Typical Installation Read Manuals Custom Installation 13 DR-3010C...driver made available by Microsoft. Setup Disc The following software is included on the DR-3010C Setup disc. • DR-3010C Driver/Job Registration Tool The scanner driver for using the DR-3010C and the tool to USB 1.1). • The USB cable you purchased the ...
...Canon document scanners. For details, contact your local authorized Canon dealer. • Use the USB interface provided as standard equipment on the computer. Install the software using either Typical Installation or Custom Installation. Menu Screen Typical Installation Read Manuals Custom Installation 13 DR-3010C...driver made available by Microsoft. Setup Disc The following software is included on the DR-3010C Setup disc. • DR-3010C Driver/Job Registration Tool The scanner driver for using the DR-3010C and the tool to USB 1.1). • The USB cable you purchased the ...
User Manual
Page 14
... installing the software. 1 Turn the power of the computer ON. 2 Insert the DR-3010C Setup disc into the CD-ROM drive of the displayed software and the User Manual will be installed automatically. IMPORTANT • Install the software before connecting the scanner to the computer. • Log on to install the software. 4 Click...
... installing the software. 1 Turn the power of the computer ON. 2 Insert the DR-3010C Setup disc into the CD-ROM drive of the displayed software and the User Manual will be installed automatically. IMPORTANT • Install the software before connecting the scanner to the computer. • Log on to install the software. 4 Click...
User Manual
Page 16
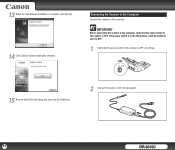
Connecting the Scanner to the Computer Connect the scanner to finish installing the software. 13 When the User Manual installation is OFF. If the power switch is in the ON position, push the switch to set it to OFF. 1 Verify that the power switch of the scanner is OFF ( setting). 15 Remove the DR-3010C Setup disc from the CD-ROM drive. 2 Connect the power cord to the computer, verify that the power switch of the scanner is complete, click [Finish]. 14 Click [Exit] to the computer. IMPORTANT Before connecting the scanner to the AC adapter. 16 DR-3010C
Connecting the Scanner to the Computer Connect the scanner to finish installing the software. 13 When the User Manual installation is OFF. If the power switch is in the ON position, push the switch to set it to OFF. 1 Verify that the power switch of the scanner is OFF ( setting). 15 Remove the DR-3010C Setup disc from the CD-ROM drive. 2 Connect the power cord to the computer, verify that the power switch of the scanner is complete, click [Finish]. 14 Click [Exit] to the computer. IMPORTANT Before connecting the scanner to the AC adapter. 16 DR-3010C

User Manual
Page 17
3 Connect the plug of the AC adapter to the power connector on the back of the scanner. 120 V model 4 Use the supplied USB cable to connect the scanner to the computer. 220-240 V model 17 DR-3010C
3 Connect the plug of the AC adapter to the power connector on the back of the scanner. 120 V model 4 Use the supplied USB cable to connect the scanner to the computer. 220-240 V model 17 DR-3010C

User Manual
Page 18
...first time it ON again. • If you turn the scanner ON ( setting). 18 DR-3010C Turning the Power ON When you will not be automatically turned ON/OFF in accordance with the power of Windows recognizes the scanner and automatically installs the required device driver. IMPORTANT • ... computer are connected properly. 2 Press the power switch on the back of the scanner to turn the computer and the scanner ON for safety. 3 Windows automatically recognizes the DR-3010C as new hardware. 3. NOTE If you should disconnect the power cord from the AC outlet for the first ...
...first time it ON again. • If you turn the scanner ON ( setting). 18 DR-3010C Turning the Power ON When you will not be automatically turned ON/OFF in accordance with the power of Windows recognizes the scanner and automatically installs the required device driver. IMPORTANT • ... computer are connected properly. 2 Press the power switch on the back of the scanner to turn the computer and the scanner ON for safety. 3 Windows automatically recognizes the DR-3010C as new hardware. 3. NOTE If you should disconnect the power cord from the AC outlet for the first ...

User Manual
Page 19
... Placing Cards 24 Placing Folded Documents 25 4. Preparing the Scanner 21 Preparing the Trays 21 Preparing the Document Stopper 21 3. Placing Documents 22 Feeding in the Page Separation Mode 22 Feeding in size from business cards and checks to the Long Document mode. (See "Setting the Long Document Mode," on p.36.) 19 DR-3010C Handling Paper Jams/Double...
... Placing Cards 24 Placing Folded Documents 25 4. Preparing the Scanner 21 Preparing the Trays 21 Preparing the Document Stopper 21 3. Placing Documents 22 Feeding in the Page Separation Mode 22 Feeding in size from business cards and checks to the Long Document mode. (See "Setting the Long Document Mode," on p.36.) 19 DR-3010C Handling Paper Jams/Double...

User Manual
Page 20
... Wrinkled or creased documents Curled documents Carbon paper Coated paper Torn documents Documents with paper clips or staples Extremely thin, translucent paper Documents with the scanner. Always clean the internal parts of the scanner after scanning such documents. • When scanning a two-sided document that is dry ... the type of embossment. 20 DR-3010C In this case, adjust the scanning intensity in the application software and set the Preventing Bleed Through/Removing the Document Background function in the driver before scanning the document. • It is dry can...
... Wrinkled or creased documents Curled documents Carbon paper Coated paper Torn documents Documents with paper clips or staples Extremely thin, translucent paper Documents with the scanner. Always clean the internal parts of the scanner after scanning such documents. • When scanning a two-sided document that is dry ... the type of embossment. 20 DR-3010C In this case, adjust the scanning intensity in the application software and set the Preventing Bleed Through/Removing the Document Background function in the driver before scanning the document. • It is dry can...
User Manual
Page 21
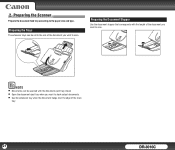
Preparing the Document Stopper Use the document stopper that corresponds with the document eject tray closed. • Open the document eject tray when you want to stack output documents. • Use the extension tray when the document hangs over the edge of the main tray. 21 DR-3010C NOTE • Documents can be scanned with the length of the document you want to scan. Preparing the Trays The extension trays can be set to the size of the document you want to the paper size and type. 2. Preparing the Scanner Prepare the document feed tray according to scan.
Preparing the Document Stopper Use the document stopper that corresponds with the document eject tray closed. • Open the document eject tray when you want to stack output documents. • Use the extension tray when the document hangs over the edge of the main tray. 21 DR-3010C NOTE • Documents can be scanned with the length of the document you want to scan. Preparing the Trays The extension trays can be set to the size of the document you want to the paper size and type. 2. Preparing the Scanner Prepare the document feed tray according to scan.

User Manual
Page 22
... mode and Bypass mode. Feeding documents one sheet at a time or feeding documents consisting of multiple pages that it is called the Bypass mode. 3. Feeding in the feed tray is upside down , with the top fed through the scanner first. 2 Adjust the document guides to fit the width of... 20 lb bond (80 g/ m2) paper.) Doing so may cause a paper jam. 22 DR-3010C
... mode and Bypass mode. Feeding documents one sheet at a time or feeding documents consisting of multiple pages that it is called the Bypass mode. 3. Feeding in the feed tray is upside down , with the top fed through the scanner first. 2 Adjust the document guides to fit the width of... 20 lb bond (80 g/ m2) paper.) Doing so may cause a paper jam. 22 DR-3010C
User Manual
Page 23
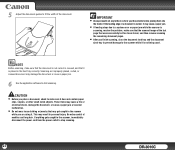
...; Always smooth out any folds or curls in the scanner, immediately disconnect the power cord from the power outlet to stop scanning. 23 DR-3010C CAUTION • Before you finish scanning, close the document feed tray and the document eject tray to prevent damage to the scanner while it does not contain paper clips, staples, or...
...; Always smooth out any folds or curls in the scanner, immediately disconnect the power cord from the power outlet to stop scanning. 23 DR-3010C CAUTION • Before you finish scanning, close the document feed tray and the document eject tray to prevent damage to the scanner while it does not contain paper clips, staples, or...


