
DC210 Manual
Page 5
... what you can do with a disc depends on a single recording side. DVD-R Best for the disc. When you first insert a brand new DVD-RW disc, the camcorder will record on Layer 1 and then continue to 80% more data (2.6 GB) on the type of 8 cm mini DVD discs: DVD-R, DVD-R DL and DVD-RW. Note: DVD-R and DVD-R DL discs can be edited (deleted, rearranged...
... what you can do with a disc depends on a single recording side. DVD-R Best for the disc. When you first insert a brand new DVD-RW disc, the camcorder will record on Layer 1 and then continue to 80% more data (2.6 GB) on the type of 8 cm mini DVD discs: DVD-R, DVD-R DL and DVD-RW. Note: DVD-R and DVD-R DL discs can be edited (deleted, rearranged...

DC210 Manual
Page 6
.... and with single-layered discs using Canon DVD-R DL54 discs and Verbatim DVD-R DL discs. 6 Great Advantages of the disc. For further details, contact directly the manufacturer's customer support center. Easy Playback on a DVD player After you finalize the disc you recorded, all you want to play with this camcorder DVD discs that attempting to play back your disc in permanently losing the...
.... and with single-layered discs using Canon DVD-R DL54 discs and Verbatim DVD-R DL discs. 6 Great Advantages of the disc. For further details, contact directly the manufacturer's customer support center. Easy Playback on a DVD player After you finalize the disc you recorded, all you want to play with this camcorder DVD discs that attempting to play back your disc in permanently losing the...

DC210 Manual
Page 7
... Available features depend on the disc to its initial value so you can use it with a DVD player 3 ( 61) Adding recordings to a disc already finalized ( 63) - - 4 Converting still images into Photomovie scenes ( 60) 1 Disc initialization clears all external DVD devices. 4 You will need to unfinalize the disc first. To finalize a DVD-R DL disc, the camcorder has to process both...
... Available features depend on the disc to its initial value so you can use it with a DVD player 3 ( 61) Adding recordings to a disc already finalized ( 63) - - 4 Converting still images into Photomovie scenes ( 60) 1 Disc initialization clears all external DVD devices. 4 You will need to unfinalize the disc first. To finalize a DVD-R DL disc, the camcorder has to process both...

DC210 Manual
Page 8
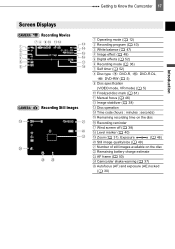
... Setting the Date and Time 27 Basic Functions Recording Shooting Video 28 Selecting the Aspect Ratio of contents Introduction How to select a DVD disc 5 About this Manual About the Joystick and the Joystick Guide 11 About the Power Switch 12 About the Operating Modes 12 Getting... Started Charging the Battery Pack 20 Inserting and Removing a Disc 22 Preparing the Camcorder 23 Adjusting the LCD Screen 24 Using the Menus Selecting a FUNC. 8 Table of your Recordings (16:9 Widescreen or 4:3) .... 29 Taking Photos 30 Zooming ...31 Quick Start Function 31 Playback Playing Back the Video...
... Setting the Date and Time 27 Basic Functions Recording Shooting Video 28 Selecting the Aspect Ratio of contents Introduction How to select a DVD disc 5 About this Manual About the Joystick and the Joystick Guide 11 About the Power Switch 12 About the Operating Modes 12 Getting... Started Charging the Battery Pack 20 Inserting and Removing a Disc 22 Preparing the Camcorder 23 Adjusting the LCD Screen 24 Using the Menus Selecting a FUNC. 8 Table of your Recordings (16:9 Widescreen or 4:3) .... 29 Taking Photos 30 Zooming ...31 Quick Start Function 31 Playback Playing Back the Video...

DC210 Manual
Page 9
...Options Selecting the Size and Quality of Messages 70 Do's and Don'ts Handling Precautions 72 Maintenance/Others 74 Using the Camcorder Abroad 75 Troubleshooting 66 List of Still Images 49 Automatic Focus Priority 50 Other Functions On-Screen Displays 50 Self Timer...60 Playing Back the Disc on an External Device Finalizing the Disc 61 Playing Back your Disc on a TV Screen 65 Recording to a TV or VCR Connection Diagrams 64 Playback on a DVD Player or a Computer's DVD Drive .........62 Unfinalizing the Disc - Additional Recordings on a Finalized Disc 63 External Connections ...
...Options Selecting the Size and Quality of Messages 70 Do's and Don'ts Handling Precautions 72 Maintenance/Others 74 Using the Camcorder Abroad 75 Troubleshooting 66 List of Still Images 49 Automatic Focus Priority 50 Other Functions On-Screen Displays 50 Self Timer...60 Playing Back the Disc on an External Device Finalizing the Disc 61 Playing Back your Disc on a TV Screen 65 Recording to a TV or VCR Connection Diagrams 64 Playback on a DVD Player or a Computer's DVD Drive .........62 Unfinalizing the Disc - Additional Recordings on a Finalized Disc 63 External Connections ...
DC210 Manual
Page 11
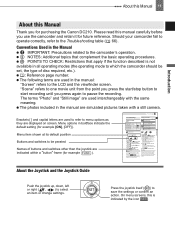
...zone setting appears. About the Joystick and the Joystick Guide Push the joystick up, down, left or right ( , ) to which the camcorder should be perated Names of disc required, etc.). : Reference page number. On menu screens, this is not available in some menu screens refer to the name of buttons ... time, you do not need to reset the clock every time you use the camcorder and retain it for future reference. NOTES If you changed the language by the icon . To adjust for purchasing the Canon DC210. to the LCD and the viewfinder screen. The following terms are used in the...
...zone setting appears. About the Joystick and the Joystick Guide Push the joystick up, down, left or right ( , ) to which the camcorder should be perated Names of disc required, etc.). : Reference page number. On menu screens, this is not available in some menu screens refer to the name of buttons ... time, you do not need to reset the clock every time you use the camcorder and retain it for future reference. NOTES If you changed the language by the icon . To adjust for purchasing the Canon DC210. to the LCD and the viewfinder screen. The following terms are used in the...

DC210 Manual
Page 12
... Operating Mode Indicator / Switch Icon Display Operation CAMERA (Red) PLAY (Green) (Movies) Recording movies on the disc 28 Playing movies from the disc 32 CAMERA (Red) PLAY (Green) (Still images) Recording still images on the camcorder: Hold the lock button pressed down and move the power switch down the power switch momentarily toward...
... Operating Mode Indicator / Switch Icon Display Operation CAMERA (Red) PLAY (Green) (Movies) Recording movies on the disc 28 Playing movies from the disc 32 CAMERA (Red) PLAY (Green) (Still images) Recording still images on the camcorder: Hold the lock button pressed down and move the power switch down the power switch momentarily toward...

DC210 Manual
Page 15
button ( 25, 36) QUICK START button and standby lamp ( 31) AV terminal ( 64) Terminal cover BATT. (battery release) switch ( 20) RESET button ( 66) Serial number Battery attachment unit ( 20) Lens cover switch ( 28, 30) ( open, closed) Disc compartment cover ( 22) Grip belt ( 23) DC IN terminal ( 20) Stereo microphone Names of buttons and switches other than the joystick are indicated within a "button" frame (for example FUNC. ). Introduction Front view Components Guide Left side view Right Side View Getting to Know the Camcorder 15 DISP. button ( 51) FUNC.
button ( 25, 36) QUICK START button and standby lamp ( 31) AV terminal ( 64) Terminal cover BATT. (battery release) switch ( 20) RESET button ( 66) Serial number Battery attachment unit ( 20) Lens cover switch ( 28, 30) ( open, closed) Disc compartment cover ( 22) Grip belt ( 23) DC IN terminal ( 20) Stereo microphone Names of buttons and switches other than the joystick are indicated within a "button" frame (for example FUNC. ). Introduction Front view Components Guide Left side view Right Side View Getting to Know the Camcorder 15 DISP. button ( 51) FUNC.

DC210 Manual
Page 16
16 Getting to Know the Camcorder Back view Top view Bottom view PLAY mode indicator (green) ( 12) Joystick ( 11) CAMERA mode indicator (red) ( 12) LCD screen ( 24) (fast reverse) button ( 33) / Zoom out W (wide-angle) button ( 31) (fast forward) button ( 33) / Zoom in T (telephoto) button ( 31) / (play/pause) ... indicator ( 28, 30) / CHG (charge) indicator ( 20) Start/stop button ( 28) Power switch ( 12) OPEN (disc cover) switch ( 22) Grip belt ( 23) Mode switch ( 43) Zoom lever ( 31) PHOTO button ( 30) Speaker ( 33) Tripod socket ( 29) Strap mount Names of buttons and switches other than...
16 Getting to Know the Camcorder Back view Top view Bottom view PLAY mode indicator (green) ( 12) Joystick ( 11) CAMERA mode indicator (red) ( 12) LCD screen ( 24) (fast reverse) button ( 33) / Zoom out W (wide-angle) button ( 31) (fast forward) button ( 33) / Zoom in T (telephoto) button ( 31) / (play/pause) ... indicator ( 28, 30) / CHG (charge) indicator ( 20) Start/stop button ( 28) Power switch ( 12) OPEN (disc cover) switch ( 22) Grip belt ( 23) Mode switch ( 43) Zoom lever ( 31) PHOTO button ( 30) Speaker ( 33) Tripod socket ( 29) Strap mount Names of buttons and switches other than...
DC210 Manual
Page 17
... Still Images Getting to Know the Camcorder 17 Operating mode ( 12) Recording program ( 43) White balance ( 47) Image effect ( 48) Digital effects ( 52) Recording mode ( 36) Self timer ( 52) Disc type DVD-R, DVD-RW ( 5) DVD-R DL, Disc specification (VIDEO mode, VR mode) ( 5) Finalized disc mark ( 61) Manual focus ( 46) Image stabilizer ( 38) Disc operation Time code (hours : minutes...
... Still Images Getting to Know the Camcorder 17 Operating mode ( 12) Recording program ( 43) White balance ( 47) Image effect ( 48) Digital effects ( 52) Recording mode ( 36) Self timer ( 52) Disc type DVD-R, DVD-RW ( 5) DVD-R DL, Disc specification (VIDEO mode, VR mode) ( 5) Finalized disc mark ( 61) Manual focus ( 46) Image stabilizer ( 38) Disc operation Time code (hours : minutes...

DC210 Manual
Page 18
... one. • When you start recording. Recording reminder The camcorder counts from 1 to the number of images available while the camcorder is writing on the disc. Number of still images available on the disc flashing in red: No disc in green: 6 or more images in green. • ...in yellow: 1 to avoid scenes that are used, the actual battery charge may not be indicated accurately. 18 Getting to Know the Camcorder Disc operation Record, Record pause, Playback, Playback pause, Fast playback, Fast reverse playback, Slow playback, Slow reverse playback Remaining recording time ...
... one. • When you start recording. Recording reminder The camcorder counts from 1 to the number of images available while the camcorder is writing on the disc. Number of still images available on the disc flashing in red: No disc in green: 6 or more images in green. • ...in yellow: 1 to avoid scenes that are used, the actual battery charge may not be indicated accurately. 18 Getting to Know the Camcorder Disc operation Record, Record pause, Playback, Playback pause, Fast playback, Fast reverse playback, Slow playback, Slow reverse playback Remaining recording time ...

DC210 Manual
Page 19
Getting to Know the Camcorder 19 Playing Movies (During Playback) Disc operation Playback time (hours : minutes : seconds) Scene number Data code ( 51) Introduction Viewing Still Images Image number ( 41) Current image / Total number of images Histogram ( 51) Still image quality/size ( 49) Date and time of recording Recording program ( 43) Manual focus ( 46) White balance ( 47) Manual exposure ( 46) Image effect ( 48) Image size ( 49) File size Aperture value Shutter speed ( 44)
Getting to Know the Camcorder 19 Playing Movies (During Playback) Disc operation Playback time (hours : minutes : seconds) Scene number Data code ( 51) Introduction Viewing Still Images Image number ( 41) Current image / Total number of images Histogram ( 51) Still image quality/size ( 49) Date and time of recording Recording program ( 43) Manual focus ( 46) White balance ( 47) Manual exposure ( 46) Image effect ( 48) Image size ( 49) File size Aperture value Shutter speed ( 44)
DC210 Manual
Page 20
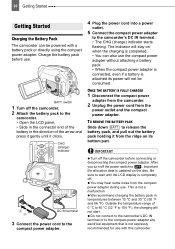
...it from the ridge on its power will not start. switch 1 Turn off the camcorder before use with a battery pack or directly using the compact power adapter. The indicator will stay on the disc. TO REMOVE THE BATTERY PACK Slide down BATT. CHG (charge) indicator DC IN terminal... power adapter to , important file allocation data is updated on when the charging is not expressly recommended for use . IMPORTANT Turn off the camcorder. 2 Attach the battery pack to the compact power adapter any electrical equipment that is completed. • You can be consumed. After you...
...it from the ridge on its power will not start. switch 1 Turn off the camcorder before use with a battery pack or directly using the compact power adapter. The indicator will stay on the disc. TO REMOVE THE BATTERY PACK Slide down BATT. CHG (charge) indicator DC IN terminal... power adapter to , important file allocation data is updated on when the charging is not expressly recommended for use . IMPORTANT Turn off the camcorder. 2 Attach the battery pack to the compact power adapter any electrical equipment that is completed. • You can be consumed. After you...

DC210 Manual
Page 22
... get in the way of the disc cover. 3 Insert the disc and press its center firmly until it clicks in .) mini DVD discs marked with the recording side facing down (single sided discs - Refer also to select a DVD disc ( 5). Retract the grip belt under the camcorder so it will appear when a new DVD-RW is first inserted if the...
... get in the way of the disc cover. 3 Insert the disc and press its center firmly until it clicks in .) mini DVD discs marked with the recording side facing down (single sided discs - Refer also to select a DVD disc ( 5). Retract the grip belt under the camcorder so it will appear when a new DVD-RW is first inserted if the...

DC210 Manual
Page 23
... When you start recording. Avoid moving the camcorder while the operation is being read. The display will move while the disc is in the way of the disc and gently pull it will not get in progress. • You can reach the zoom lever with your index finger, and the start recording movies once...
... When you start recording. Avoid moving the camcorder while the operation is being read. The display will move while the disc is in the way of the disc and gently pull it will not get in progress. • You can reach the zoom lever with your index finger, and the start recording movies once...

DC210 Manual
Page 25
... an Option from the menus that will appear grayed out. 3 Select ( ) the desired setting from the left side column and press ( ). During the playback of a disc recorded in VIDEO mode, pressing FUNC. Menu items not available will appear on top of the screen and under it the list of settings. 4 Select... close the menu. to change from the available options at any time. Using the Menus 25 Using the Menus Using the Menus Many of the camcorder's functions can be highlighted in light blue. For details about the available menu options and settings, refer to the Menu Options Lists ( 36).
... an Option from the menus that will appear grayed out. 3 Select ( ) the desired setting from the left side column and press ( ). During the playback of a disc recorded in VIDEO mode, pressing FUNC. Menu items not available will appear on top of the screen and under it the list of settings. 4 Select... close the menu. to change from the available options at any time. Using the Menus 25 Using the Menus Using the Menus Many of the camcorder's functions can be highlighted in light blue. For details about the available menu options and settings, refer to the Menu Options Lists ( 36).

DC210 Manual
Page 28
...use a DVD-RW disc to use the viewfinder instead. About the LCD and viewfinder screen: The screens are produced using extremely high- This has no effect on or flashing. IMPORTANT Avoid the following actions while the DISC access indicator is off. 2 Turn off the camcorder. 3 ... to pause the recording. • The DISC access indicator will flash while recording and will automatically shut off the camcorder. - Do not subject the camcorder to check if the camcorder operates correctly. press Start/Stop again to set the camcorder in permanent data loss. - About the ...
...use a DVD-RW disc to use the viewfinder instead. About the LCD and viewfinder screen: The screens are produced using extremely high- This has no effect on or flashing. IMPORTANT Avoid the following actions while the DISC access indicator is off. 2 Turn off the camcorder. 3 ... to pause the recording. • The DISC access indicator will flash while recording and will automatically shut off the camcorder. - Do not subject the camcorder to check if the camcorder operates correctly. press Start/Stop again to set the camcorder in permanent data loss. - About the ...

DC210 Manual
Page 29
...( ) toward [NEXT] to display the joystick guide in visually induced motion sickness. Excessive camcorder movement while shooting and extensive use tripods with black sidebars. If you experience such a reaction...the playback and take a rest break as it may melt (due to concentration of fast zooms and panning can result in the normal (4:3) aspect ratio. 6 Press FUNC. Select (... the screen with fastening screws longer than 5.5 mm (0.2 inch). Recording 29 Basic Functions When using a DVD-RW disc, you can also delete the scene immediately after recording it ( 55). 1 Press FUNC. . 2 ...
...( ) toward [NEXT] to display the joystick guide in visually induced motion sickness. Excessive camcorder movement while shooting and extensive use tripods with black sidebars. If you experience such a reaction...the playback and take a rest break as it may melt (due to concentration of fast zooms and panning can result in the normal (4:3) aspect ratio. 6 Press FUNC. Select (... the screen with fastening screws longer than 5.5 mm (0.2 inch). Recording 29 Basic Functions When using a DVD-RW disc, you can also delete the scene immediately after recording it ( 55). 1 Press FUNC. . 2 ...

DC210 Manual
Page 30
...Press PHOTO halfway. Once the focus is on . 2 Move the lens cover switch down to to do not remove the disc. - Do not subject the camcorder to set the camcorder in permanent data loss. - Do not disconnect the power source or turn on or flashing. The red CAMERA indicator will ...setting accordingly ( 41). 30 Recording manually. To play back on screen, and when the DISC access indicator is automatically adjusted, will turn green and one or more AF frames will turn off the camcorder. - Adjust the focus manually ( 46). 1 Move the power switch to ON to vibrations...
...Press PHOTO halfway. Once the focus is on . 2 Move the lens cover switch down to to do not remove the disc. - Do not subject the camcorder to set the camcorder in permanent data loss. - Do not disconnect the power source or turn on or flashing. The red CAMERA indicator will ...setting accordingly ( 41). 30 Recording manually. To play back on screen, and when the DISC access indicator is automatically adjusted, will turn green and one or more AF frames will turn off the camcorder. - Adjust the focus manually ( 46). 1 Move the power switch to ON to vibrations...

DC210 Manual
Page 32
...to full wide angle W. NOTES During the playback of a DVD-R DL (duallayered) disc, you perform any of the [POWER SAVE] setting ( 41). Manual exposure adjustment returns to ON again. The green PLAY indicator will turn on ), the camcorder will start from standby mode, the following actions while in...time until the end of the / switch. You can save energy when using a battery pack. Zoom position returns to the scene index screen. 32 Playback NOTES When you wake up the camcorder from the scene selected and continue until shut-off with the selection frame on the...
...to full wide angle W. NOTES During the playback of a DVD-R DL (duallayered) disc, you perform any of the [POWER SAVE] setting ( 41). Manual exposure adjustment returns to ON again. The green PLAY indicator will turn on ), the camcorder will start from standby mode, the following actions while in...time until the end of the / switch. You can save energy when using a battery pack. Zoom position returns to the scene index screen. 32 Playback NOTES When you wake up the camcorder from the scene selected and continue until shut-off with the selection frame on the...


