

imageCLASS D1180/D1170/D1150/D1120 Basic Operation Guide
Page 40
... Using the Machine Log In Mode If the Department ID Management or User ID Management is set . - Make sure to enter the User ID and password, then press [OK] or [Log In/Out]. - When the main power switch is turned ON, the message is displayed. For information on the Department ID... User ID Management, see "Security," in the eManual. ˔ For Department ID Management ENTER DEPT.ID Use - [numeric keys] to enter the Department ID and password, then press [OK] or [Log In/Out]. ˔ For User ID Management ENTER USER ID :a Use - [numeric keys] to press [Log In/Out] after using...
... Using the Machine Log In Mode If the Department ID Management or User ID Management is set . - Make sure to enter the User ID and password, then press [OK] or [Log In/Out]. - When the main power switch is turned ON, the message is displayed. For information on the Department ID... User ID Management, see "Security," in the eManual. ˔ For Department ID Management ENTER DEPT.ID Use - [numeric keys] to enter the Department ID and password, then press [OK] or [Log In/Out]. ˔ For User ID Management ENTER USER ID :a Use - [numeric keys] to press [Log In/Out] after using...
imageCLASS D1180/D1170/D1150/D1120 Basic Operation Guide
Page 114
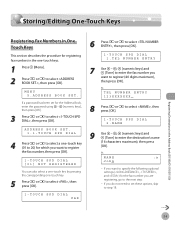
Storing/Editing One-Touch Keys Storing/Editing One-Touch Keys Registering Destinations in the Address Book (D1180/D1170/D1150) Registering Fax Numbers in OneTouch Keys This section describes the procedure for registering fax numbers in the one-touch keys. 1 Press [Menu]. 2 ...destination's name (16 characters maximum), then press [OK]. Ex. If you want to specify the following optional settings (, , and ) for the Address Book, enter the password using - [numeric keys], then press [OK]. 3 Press or to register the fax number, then press [OK]. 1-TOUCH SPD DIAL [01] NOT REGISTERED You can...
Storing/Editing One-Touch Keys Storing/Editing One-Touch Keys Registering Destinations in the Address Book (D1180/D1170/D1150) Registering Fax Numbers in OneTouch Keys This section describes the procedure for registering fax numbers in the one-touch keys. 1 Press [Menu]. 2 ...destination's name (16 characters maximum), then press [OK]. Ex. If you want to specify the following optional settings (, , and ) for the Address Book, enter the password using - [numeric keys], then press [OK]. 3 Press or to register the fax number, then press [OK]. 1-TOUCH SPD DIAL [01] NOT REGISTERED You can...

imageCLASS D1180/D1170/D1150/D1120 Basic Operation Guide
Page 116
...select , then press [OK]. Registering File Server Addresses in One-Touch Keys This section describes the procedure for the Address Book, enter the password using - [numeric keys], then press [OK]. 3 Press or to select , then press [OK]. MENU 5.ADDRESS BOOK SET. Ex. MENU 5....ADDRESS BOOK SET. If a password has been set for registering file server addresses in the Address Book (D1180/D1170/D1150) 2 Press or to enter the destination's name (16 characters maximum), then press [OK]. Registering Destinations in...
...select , then press [OK]. Registering File Server Addresses in One-Touch Keys This section describes the procedure for the Address Book, enter the password using - [numeric keys], then press [OK]. 3 Press or to select , then press [OK]. MENU 5.ADDRESS BOOK SET. Ex. MENU 5....ADDRESS BOOK SET. If a password has been set for registering file server addresses in the Address Book (D1180/D1170/D1150) 2 Press or to enter the destination's name (16 characters maximum), then press [OK]. Registering Destinations in...

imageCLASS D1180/D1170/D1150/D1120 Basic Operation Guide
Page 117
... a one-touch key by pressing the corresponding one -touch key, repeat the procedure from step 4. 5-6 LOGIN NAME :a canon 14 Press or to select , then press [OK]. 1-TOUCH SPD DIAL 5.PASSWORD 15 Use - , [numeric keys] and [Tone] to enter the name of the file server on the network (120... characters maximum), then press [OK]. FILE PATH :a server1/home/share Registering Destinations in the Address Book (D1180/D1170/D1150) 6 Press or to select , then...
... a one-touch key by pressing the corresponding one -touch key, repeat the procedure from step 4. 5-6 LOGIN NAME :a canon 14 Press or to select , then press [OK]. 1-TOUCH SPD DIAL 5.PASSWORD 15 Use - , [numeric keys] and [Tone] to enter the name of the file server on the network (120... characters maximum), then press [OK]. FILE PATH :a server1/home/share Registering Destinations in the Address Book (D1180/D1170/D1150) 6 Press or to select , then...

imageCLASS D1180/D1170/D1150/D1120 Basic Operation Guide
Page 118
...keys beforehand. 1 Press [Menu]. 2 Press or to set for the Address Book, enter the password using - [numeric keys], then press [OK]. 3 Press or to the standby mode. Ex. ... key. You can also select a one-touch key by pressing the corresponding one -touch key. NAME :a Canon Group To register another group, repeat the procedure from step 4. 9 Press [Stop/Reset] to return to ...Keys 5 Press or to enter the group name (16 characters maximum), then press [OK]. If a password has been set as a single destination. GROUP DIAL 1.SELECT ADD/TEL NO 6 Select the destinations you...
...keys beforehand. 1 Press [Menu]. 2 Press or to set for the Address Book, enter the password using - [numeric keys], then press [OK]. 3 Press or to the standby mode. Ex. ... key. You can also select a one-touch key by pressing the corresponding one -touch key. NAME :a Canon Group To register another group, repeat the procedure from step 4. 9 Press [Stop/Reset] to return to ...Keys 5 Press or to enter the group name (16 characters maximum), then press [OK]. If a password has been set as a single destination. GROUP DIAL 1.SELECT ADD/TEL NO 6 Select the destinations you...
imageCLASS D1180/D1170/D1150/D1120 Basic Operation Guide
Page 119
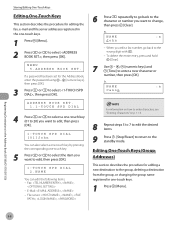
NAME :a Canon For information on how to enter characters, see "Entering Characters," on p. 1-16. 8 Repeat steps 5 to 7 to edit the desired items. 9 Press [Stop/Reset] to return to select , then press [OK]. If a password has been set for the Address Book, enter the password using - [numeric keys], then...Press [Menu]. 2 Press or to enter a new character or number, then press [OK]. Registering Destinations in the Address Book (D1180/D1170/D1150) Storing/Editing One-Touch Keys Editing One-Touch Keys This section describes the procedure for editing the fax, e-mail and file server ...
NAME :a Canon For information on how to enter characters, see "Entering Characters," on p. 1-16. 8 Repeat steps 5 to 7 to edit the desired items. 9 Press [Stop/Reset] to return to select , then press [OK]. If a password has been set for the Address Book, enter the password using - [numeric keys], then...Press [Menu]. 2 Press or to enter a new character or number, then press [OK]. Registering Destinations in the Address Book (D1180/D1170/D1150) Storing/Editing One-Touch Keys Editing One-Touch Keys This section describes the procedure for editing the fax, e-mail and file server ...

imageCLASS D1180/D1170/D1150/D1120 Basic Operation Guide
Page 120
...add to delete from Address Book, see "Registering Group Addresses in the Address Book (D1180/D1170/D1150) 5-9 GROUP DIAL 1.SELECT ADD/TEL NO ② Press or to display the ...Clear]. GROUP DIAL 2.NAME ② Press repeatedly to go back to select , then press [OK]. NAME :a Canon Group To delete the entire name, press and hold [Clear]. ③ Use - , [numeric keys] and ...Tone] to select , then press [OK]. MENU 5.ADDRESS BOOK SET. Ex. If a password has been set for the Address Book, enter the password using - [numeric keys], then press [OK]. 3 Press or to enter a new ...
...add to delete from Address Book, see "Registering Group Addresses in the Address Book (D1180/D1170/D1150) 5-9 GROUP DIAL 1.SELECT ADD/TEL NO ② Press or to display the ...Clear]. GROUP DIAL 2.NAME ② Press repeatedly to go back to select , then press [OK]. NAME :a Canon Group To delete the entire name, press and hold [Clear]. ③ Use - , [numeric keys] and ...Tone] to select , then press [OK]. MENU 5.ADDRESS BOOK SET. Ex. If a password has been set for the Address Book, enter the password using - [numeric keys], then press [OK]. 3 Press or to enter a new ...

imageCLASS D1180/D1170/D1150/D1120 Basic Operation Guide
Page 121
...] to the standby mode. MENU 5.ADDRESS BOOK SET. Registering Destinations in the Address Book (D1180/D1170/D1150) 5-10 Erasing One-Touch Keys This section describes the procedure for the Address Book, enter the password using - [numeric keys], then press [OK]. 3 Press or to select , then press [...OK]. If a password has been set for erasing addresses registered under one -touch key. Storing/Editing One-Touch...
...] to the standby mode. MENU 5.ADDRESS BOOK SET. Registering Destinations in the Address Book (D1180/D1170/D1150) 5-10 Erasing One-Touch Keys This section describes the procedure for the Address Book, enter the password using - [numeric keys], then press [OK]. 3 Press or to select , then press [...OK]. If a password has been set for erasing addresses registered under one -touch key. Storing/Editing One-Touch...

imageCLASS D1180/D1170/D1150/D1120 Basic Operation Guide
Page 122
...all destinations are deleted, then press [OK]. Erasing One-Touch Keys (Group Addresses) This section describes the procedure for the Address Book, enter the password using - [numeric keys], then press [OK]. 3 Press or to select , then press [OK]. ADDRESS BOOK SET. 3.GROUP DIAL 4 ...press [OK]. GROUP DIAL 1.SELECT ADD/TEL NO 6 Press [Clear] repeatedly until all destinations, the registered name is cleared automatically. If a password has been set for erasing group addresses registered under one-touch keys. 1 Press [Menu]. 2 Press or to the standby mode. Registering Destinations...
...all destinations are deleted, then press [OK]. Erasing One-Touch Keys (Group Addresses) This section describes the procedure for the Address Book, enter the password using - [numeric keys], then press [OK]. 3 Press or to select , then press [OK]. ADDRESS BOOK SET. 3.GROUP DIAL 4 ...press [OK]. GROUP DIAL 1.SELECT ADD/TEL NO 6 Press [Clear] repeatedly until all destinations, the registered name is cleared automatically. If a password has been set for erasing group addresses registered under one-touch keys. 1 Press [Menu]. 2 Press or to the standby mode. Registering Destinations...
imageCLASS D1180/D1170/D1150/D1120 Basic Operation Guide
Page 123
...OK]. If you do not need to set for the Address Book, enter the password using - [numeric keys], then press [OK]. 3 Press or to select , then press [OK]. MENU 5.ADDRESS BOOK SET. If a password has been set these options, skip to step 18. to select , then ...OK]. For information on p. 1-16. 5-12 Storing/Editing Coded Dial Codes Storing/Editing Coded Dial Codes Registering Destinations in the Address Book (D1180/D1170/D1150) Registering Fax Numbers in Coded Dial Codes This section describes the procedure for registering fax numbers in the coded dial codes. 1 Press [Menu...
...OK]. If you do not need to set for the Address Book, enter the password using - [numeric keys], then press [OK]. 3 Press or to select , then press [OK]. MENU 5.ADDRESS BOOK SET. If a password has been set these options, skip to step 18. to select , then ...OK]. For information on p. 1-16. 5-12 Storing/Editing Coded Dial Codes Storing/Editing Coded Dial Codes Registering Destinations in the Address Book (D1180/D1170/D1150) Registering Fax Numbers in Coded Dial Codes This section describes the procedure for registering fax numbers in the coded dial codes. 1 Press [Menu...

imageCLASS D1180/D1170/D1150/D1120 Basic Operation Guide
Page 125
... 6 Press or to enter the destination's name (16 characters maximum), then press [OK]. Ex. Ex. Registering Destinations in the Address Book (D1180/D1170/D1150) Storing/Editing Coded Dial Codes 2 Press or to enter characters, see "Entering Characters," on how to select , then press [OK]. MENU... also select a coded dial code by pressing [Coded Dial] followed by the desired three‑digit code. 5 Press or press [OK]. If a password has been set for registering file server addresses in the coded dial codes. 1 Press [Menu]. 2 Press or to select , then press [OK]. ...
... 6 Press or to enter the destination's name (16 characters maximum), then press [OK]. Ex. Ex. Registering Destinations in the Address Book (D1180/D1170/D1150) Storing/Editing Coded Dial Codes 2 Press or to enter characters, see "Entering Characters," on how to select , then press [OK]. MENU... also select a coded dial code by pressing [Coded Dial] followed by the desired three‑digit code. 5 Press or press [OK]. If a password has been set for registering file server addresses in the coded dial codes. 1 Press [Menu]. 2 Press or to select , then press [OK]. ...
imageCLASS D1180/D1170/D1150/D1120 Basic Operation Guide
Page 127
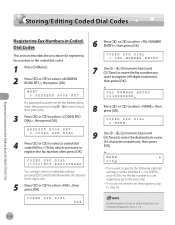
... The destinations must be registered in the Address Book (D1180/D1170/D1150) Storing/Editing Coded Dial Codes 14 Press or to select...press [OK]. You can review the destinations which have been already entered with - [numeric keys]. If a password has been set as a single destination. ADDRESS BOOK SET. 3.GROUP DIAL 4 Press [Coded Dial], enter...Registering Destinations in coded dial codes beforehand. 1 Press [Menu]. 2 Press or to select , then press [OK]. PASSWORD :a 123XXXX To register another coded dial code, repeat the procedure from step 4. 16 Press [Stop/Reset] to return ...
... The destinations must be registered in the Address Book (D1180/D1170/D1150) Storing/Editing Coded Dial Codes 14 Press or to select...press [OK]. You can review the destinations which have been already entered with - [numeric keys]. If a password has been set as a single destination. ADDRESS BOOK SET. 3.GROUP DIAL 4 Press [Coded Dial], enter...Registering Destinations in coded dial codes beforehand. 1 Press [Menu]. 2 Press or to select , then press [OK]. PASSWORD :a 123XXXX To register another coded dial code, repeat the procedure from step 4. 16 Press [Stop/Reset] to return ...

imageCLASS D1180/D1170/D1150/D1120 Basic Operation Guide
Page 128
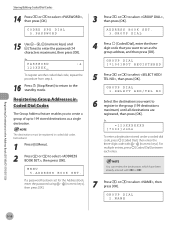
... (000 to 179) you want to the standby mode. E-Mail: , - NAME :a John - NAME :a Canon Group To register another group, repeat the procedure from step 4. MENU 5.ADDRESS BOOK SET. If a password has been set for editing the fax, e-mail and file server addresses in the Address Book (D1180.../D1170/D1150) 5-17 Ex. Ex. 8 Use - , [numeric keys] and [Tone] to enter a new character or ...
... (000 to 179) you want to the standby mode. E-Mail: , - NAME :a John - NAME :a Canon Group To register another group, repeat the procedure from step 4. MENU 5.ADDRESS BOOK SET. If a password has been set for editing the fax, e-mail and file server addresses in the Address Book (D1180.../D1170/D1150) 5-17 Ex. Ex. 8 Use - , [numeric keys] and [Tone] to enter a new character or ...

imageCLASS D1180/D1170/D1150/D1120 Basic Operation Guide
Page 129
If a password has been set for adding a new destination to the group, deleting a destination from the group, or changing ...DIAL 5-18 ■ If you want to delete a destination from the group, then press [Clear]. Registering Destinations in the Address Book (D1180/D1170/D1150) Storing/Editing Coded Dial Codes For information on how to enter characters, see "Registering Group Addresses in the coded dial codes. 1 Press... then press [OK]. Editing Coded Dial Codes (Group Addresses) This section describes the procedure for the Address Book, enter the password using - [numeric keys].
If a password has been set for adding a new destination to the group, deleting a destination from the group, or changing ...DIAL 5-18 ■ If you want to delete a destination from the group, then press [Clear]. Registering Destinations in the Address Book (D1180/D1170/D1150) Storing/Editing Coded Dial Codes For information on how to enter characters, see "Registering Group Addresses in the coded dial codes. 1 Press... then press [OK]. Editing Coded Dial Codes (Group Addresses) This section describes the procedure for the Address Book, enter the password using - [numeric keys].

imageCLASS D1180/D1170/D1150/D1120 Basic Operation Guide
Page 130
Registering Destinations in the Address Book (D1180/D1170/D1150) ■ If you want to change the group name: ① ...pressing [Coded Dial] followed by the desired three‑digit code. 5 Press or to the standby mode. NAME :a Canon Group To delete the entire name, press and hold [Clear] to a wrong character, then press [Clear]. MENU ...5.ADDRESS BOOK SET. Ex. Erasing Coded Dial Codes This section describes the procedure for the Address Book, enter the password using - [numeric keys], then press [OK]. Ex. ADDRESS BOOK SET. 2.CODED SPD DIAL 4 Press or to select...
Registering Destinations in the Address Book (D1180/D1170/D1150) ■ If you want to change the group name: ① ...pressing [Coded Dial] followed by the desired three‑digit code. 5 Press or to the standby mode. NAME :a Canon Group To delete the entire name, press and hold [Clear] to a wrong character, then press [Clear]. MENU ...5.ADDRESS BOOK SET. Ex. Erasing Coded Dial Codes This section describes the procedure for the Address Book, enter the password using - [numeric keys], then press [OK]. Ex. ADDRESS BOOK SET. 2.CODED SPD DIAL 4 Press or to select...

imageCLASS D1180/D1170/D1150/D1120 Basic Operation Guide
Page 131
... been set for the Address Book, enter the password using - [numeric keys], then press [OK]. 3 Press or to select , then press [OK]. GROUP DIAL [*100]GROUP DIAL 5 Press or to select , then press [OK]. ... all destinations, the registered name is cleared automatically. 7 Press [Stop/Reset] to return to select , then press [OK]. Registering Destinations in the Address Book (D1180/D1170/D1150) 5-20 Storing/Editing Coded Dial Codes Erasing Coded Dial Codes (Group Addresses) Follow the procedure below to delete all destinations from a group. 1 Press [Menu...
... been set for the Address Book, enter the password using - [numeric keys], then press [OK]. 3 Press or to select , then press [OK]. GROUP DIAL [*100]GROUP DIAL 5 Press or to select , then press [OK]. ... all destinations, the registered name is cleared automatically. 7 Press [Stop/Reset] to return to select , then press [OK]. Registering Destinations in the Address Book (D1180/D1170/D1150) 5-20 Storing/Editing Coded Dial Codes Erasing Coded Dial Codes (Group Addresses) Follow the procedure below to delete all destinations from a group. 1 Press [Menu...

imageCLASS D1180/D1170/D1150/D1120 Basic Operation Guide
Page 174
...lines in your document transmission is . 1 Press [Menu]. 2 Press or to select , then press [OK]. FAX SETTINGS 1.TX START SPEED Fax (D1180/D1170/D1150) 6-43 COMMUNICATIONS 3.FAX SETTINGS 5 Press or to select , then press [OK]. TX START SPEED 33600bps If your area are in poor condition. SYSTEM...standby mode. 4 Press or to select , then press [OK]. MENU 10.SYSTEM SETTINGS If the System Manager ID and System Password have been set, enter the System Manager ID and System Password using - [numeric keys], then press [Log In/Out]. 3 Press or to select , then press [OK]. Select a slower...
...lines in your document transmission is . 1 Press [Menu]. 2 Press or to select , then press [OK]. FAX SETTINGS 1.TX START SPEED Fax (D1180/D1170/D1150) 6-43 COMMUNICATIONS 3.FAX SETTINGS 5 Press or to select , then press [OK]. TX START SPEED 33600bps If your area are in poor condition. SYSTEM...standby mode. 4 Press or to select , then press [OK]. MENU 10.SYSTEM SETTINGS If the System Manager ID and System Password have been set, enter the System Manager ID and System Password using - [numeric keys], then press [Log In/Out]. 3 Press or to select , then press [OK]. Select a slower...

imageCLASS D1180/D1170/D1150/D1120 Basic Operation Guide
Page 189
... 3.FAX SETTINGS 5 Press or to select , then press [OK]. MENU 10.SYSTEM SETTINGS If the System Manager ID and System Password have been set, enter the System Manager ID and System Password using - [numeric keys], then press [Log In/Out]. 3 Press or to select , then press [OK]. Select a slower speed. SYSTEM SETTINGS.../Reset] to return to the standby mode. 4 Press or to select the desired receive speed, then press [OK]. FAX SETTINGS 2.RX START SPEED Fax (D1180/D1170/D1150) 6-58
... 3.FAX SETTINGS 5 Press or to select , then press [OK]. MENU 10.SYSTEM SETTINGS If the System Manager ID and System Password have been set, enter the System Manager ID and System Password using - [numeric keys], then press [Log In/Out]. 3 Press or to select , then press [OK]. Select a slower speed. SYSTEM SETTINGS.../Reset] to return to the standby mode. 4 Press or to select the desired receive speed, then press [OK]. FAX SETTINGS 2.RX START SPEED Fax (D1180/D1170/D1150) 6-58

imageCLASS D1180/D1170/D1150/D1120 Basic Operation Guide
Page 190
... and store all documents in memory until you are ready to print them. Ex. to select , then MEMORY LOCK ON When you want to set a password, it . Fax (D1180/D1170/D1150) 1 Press [Menu]. 2 Press or to select , then press [OK]. The default setting is called memory lock reception...
... and store all documents in memory until you are ready to print them. Ex. to select , then MEMORY LOCK ON When you want to set a password, it . Fax (D1180/D1170/D1150) 1 Press [Menu]. 2 Press or to select , then press [OK]. The default setting is called memory lock reception...

imageCLASS D1180/D1170/D1150/D1120 Basic Operation Guide
Page 192
Fax (D1180/D1170/D1150) 6-61 MEMORY LOCK OFF The received documents are printed. 6 Press [Stop/Reset] to return to the standby mode. 4 Press or to select , then press [OK]. MENU 10.SYSTEM SETTINGS If the System Manager ID and System Password have been set , enter the password using - [numeric...[Log In/Out]. 3 Press or to select , then press [OK]. COMMUNICATIONS 4.MEMORY LOCK If the memory lock password has been set , enter the System Manager ID and System Password using - [numeric keys], then press [OK]. Printing All Documents Stored in the Memory Lock Reception Mode Printing All...
Fax (D1180/D1170/D1150) 6-61 MEMORY LOCK OFF The received documents are printed. 6 Press [Stop/Reset] to return to the standby mode. 4 Press or to select , then press [OK]. MENU 10.SYSTEM SETTINGS If the System Manager ID and System Password have been set , enter the password using - [numeric...[Log In/Out]. 3 Press or to select , then press [OK]. COMMUNICATIONS 4.MEMORY LOCK If the memory lock password has been set , enter the System Manager ID and System Password using - [numeric keys], then press [OK]. Printing All Documents Stored in the Memory Lock Reception Mode Printing All...


