
ScanGear Toolbox CS v2.2.0 User's Manual
Page 2
Table of Contents About ScanGear Toolbox CS 4 Installing ScanGear Toolbox CS 5 System Requirements 5 Installing/Uninstalling 5 Starting and Closing ScanGear Toolbox CS 8 Starting ...8 Closing...11 Preparations for Using ScanGear Toolbox CS 12 Default Settings for the ScanGear Toolbox CS Toolbar 12 Linkable Drivers and Programs 13 Faxing 13 Mail ...13 Copying 14 Custom Buttons 1-3 14 Tab Settings 15 Fax Setting Tab 15 Mail Setting Tab 16 Copy Setting Tab 17 Save Setting Tab 18 Custom 1-3 Setting Tab 19 Default Settings on the Prefs Tab 20 2
Table of Contents About ScanGear Toolbox CS 4 Installing ScanGear Toolbox CS 5 System Requirements 5 Installing/Uninstalling 5 Starting and Closing ScanGear Toolbox CS 8 Starting ...8 Closing...11 Preparations for Using ScanGear Toolbox CS 12 Default Settings for the ScanGear Toolbox CS Toolbar 12 Linkable Drivers and Programs 13 Faxing 13 Mail ...13 Copying 14 Custom Buttons 1-3 14 Tab Settings 15 Fax Setting Tab 15 Mail Setting Tab 16 Copy Setting Tab 17 Save Setting Tab 18 Custom 1-3 Setting Tab 19 Default Settings on the Prefs Tab 20 2
ScanGear Toolbox CS v2.2.0 User's Manual
Page 5
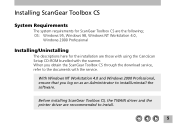
... you obtain the ScanGear Toolbox CS through the download service, refer to install/uninstall the software. Installing ScanGear Toolbox CS System Requirements The system requirements for the installation are those with using the CanoScan Setup CD-ROM bundled with the service. Before installing ScanGear Toolbox CS, the TWAIN driver and the printer driver are the...
... you obtain the ScanGear Toolbox CS through the download service, refer to install/uninstall the software. Installing ScanGear Toolbox CS System Requirements The system requirements for the installation are those with using the CanoScan Setup CD-ROM bundled with the service. Before installing ScanGear Toolbox CS, the TWAIN driver and the printer driver are the...
ScanGear Toolbox CS v2.2.0 User's Manual
Page 6
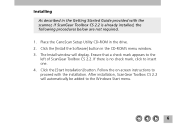
... CanoScan Setup Utility CD-ROM in the CD-ROM's menu window. 3. Click the [Install the Software] button in the drive. 2. Ensure that a check mark appears to insert one. 4. If there is already installed, the following procedures below are not required. 1. Click the [Start Installation]... button. Follow the on-screen instructions to the Windows Start menu. 6 The Install window will automatically be added to proceed with the scanner, ...
... CanoScan Setup Utility CD-ROM in the CD-ROM's menu window. 3. Click the [Install the Software] button in the drive. 2. Ensure that a check mark appears to insert one. 4. If there is already installed, the following procedures below are not required. 1. Click the [Start Installation]... button. Follow the on-screen instructions to the Windows Start menu. 6 The Install window will automatically be added to proceed with the scanner, ...
ScanGear Toolbox CS v2.2.0 User's Manual
Page 9
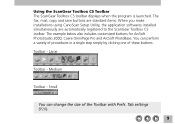
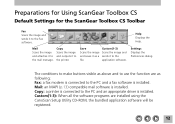
... is launched. You can change the size of these buttons. Medium Toolbar - The fax, mail, copy and save buttons are standard items. When you make installations using CanoScan Setup Utility, the application softwares installed simultaneously are automatically registered to the ScanGear Toolbox CS toolbar. Toolbar -
... is launched. You can change the size of these buttons. Medium Toolbar - The fax, mail, copy and save buttons are standard items. When you make installations using CanoScan Setup Utility, the application softwares installed simultaneously are automatically registered to the ScanGear Toolbox CS toolbar. Toolbar -
ScanGear Toolbox CS v2.2.0 User's Manual
Page 12
.... Save Scans the image and saves it as following; The conditions to make buttons visible as above and to use the function are installed using the CanoScan Setup Utility CD-ROM, the bundled application software will be registered. 12 Custom(1-3): When all the software programs are as a file.... Mail Scans the image and attaches it to the PC and a fax software is installed. Settings Displays the Preferences dialog. Fax: a fax modem is ...
.... Save Scans the image and saves it as following; The conditions to make buttons visible as above and to use the function are installed using the CanoScan Setup Utility CD-ROM, the bundled application software will be registered. 12 Custom(1-3): When all the software programs are as a file.... Mail Scans the image and attaches it to the PC and a fax software is installed. Settings Displays the Preferences dialog. Fax: a fax modem is ...
ScanGear Toolbox CS v2.2.0 User's Manual
Page 14
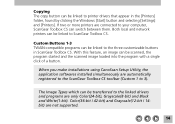
... [Start] button and selecting [Settings] and [Printers]. Custom Buttons 1-3 TWAIN-compatible programs can be linked to ScanGear Toolbox CS. When you make installations using CanoScan Setup Utility, the application softwares installed simultaneously are only Color(24-bit), Grayscale(8-bit) and Black and White(1-bit). Copying The copy button can be linked to printer...
... [Start] button and selecting [Settings] and [Printers]. Custom Buttons 1-3 TWAIN-compatible programs can be linked to ScanGear Toolbox CS. When you make installations using CanoScan Setup Utility, the application softwares installed simultaneously are only Color(24-bit), Grayscale(8-bit) and Black and White(1-bit). Copying The copy button can be linked to printer...
ScanGear Toolbox CS v2.2.0 User's Manual
Page 33
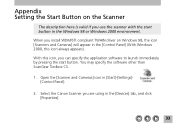
... the start button. Open the [Scanner and Cameras] icon in the [Devices] tab, and click [Properties]. 33 With this icon always appears). Select the Canon Scanner you install WDM/STI compliant TWAIN driver on the Scanner The description here is valid if you can specify the application software to launch immediately by...
... the start button. Open the [Scanner and Cameras] icon in the [Devices] tab, and click [Properties]. 33 With this icon always appears). Select the Canon Scanner you install WDM/STI compliant TWAIN driver on the Scanner The description here is valid if you can specify the application software to launch immediately by...

ScanGear Toolbox CS v2.2.0 User's Manual
Page 34
Close the [Control Panel]. 34 Confirm that [Canon Push Button] is installed, it appears in [Scanner events], then check the unique launching software with the start button from the [Send to this box. 5. Open the [Events] tab. 4. When ScanGear Toolbox CS is set in this application] list box. 0. 3.
Close the [Control Panel]. 34 Confirm that [Canon Push Button] is installed, it appears in [Scanner events], then check the unique launching software with the start button from the [Send to this box. 5. Open the [Events] tab. 4. When ScanGear Toolbox CS is set in this application] list box. 0. 3.

ScanGear Toolbox CS v2.2.0 User's Manual
Page 35
Index Closing 11 Copying 25 Copy Setting Tab 17 Custom 1-3 Setting Tab 19 Custom Function 1-3 27 Fax Setting Tab 15 Installing 5 Launching from the Start Button 8 Linkable Drivers and Programs 13 Mail Setting Tab 16 Manual Launch from the Start Menu ....... 8 MAPI 13 OCR program 19 ...
Index Closing 11 Copying 25 Copy Setting Tab 17 Custom 1-3 Setting Tab 19 Custom Function 1-3 27 Fax Setting Tab 15 Installing 5 Launching from the Start Button 8 Linkable Drivers and Programs 13 Mail Setting Tab 16 Manual Launch from the Start Menu ....... 8 MAPI 13 OCR program 19 ...
User Guide
Page 2
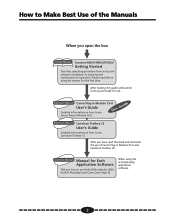
...User's Guide Detailed information on how to use CS-U This Guide Canon Plug-in Module CS-U and CanoScan Toolbox CS... After reading this book and mastered the use of Canon Plug-in Module CS-U. Electronic Manual Canon Plug-in Module User's Guide Detailed information on how to scanning and.... 2 How to Make Best Use of the Manuals When you open the box Printed Manual CanoScan N650U/N656U/N1220U Getting Started Describes operating procedure from set up and software installation to use CanoScan Toolbox CS. Please read this guide and scanner is set up and ready for use...
...User's Guide Detailed information on how to use CS-U This Guide Canon Plug-in Module CS-U and CanoScan Toolbox CS... After reading this book and mastered the use of Canon Plug-in Module CS-U. Electronic Manual Canon Plug-in Module User's Guide Detailed information on how to scanning and.... 2 How to Make Best Use of the Manuals When you open the box Printed Manual CanoScan N650U/N656U/N1220U Getting Started Describes operating procedure from set up and software installation to use CanoScan Toolbox CS. Please read this guide and scanner is set up and ready for use...
User Guide
Page 3
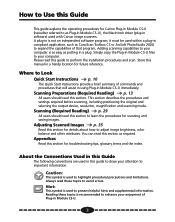
... Instructions provide a brief summary of Plug-in Module CS-U. 3 Where to enhance your attention to as CanoScan Toolbox CS or ArcSoft PhotoStudio 2000, to perform the installation procedures and scan. Store this section for troubleshooting tips, glossary terms and the index. Reading these topics ...draw your enjoyment of commands and procedures that program. A plug-in is used with Canon image scanners. How to Use this Guide This guide explains the operating procedures for Canon Plug-in Module CS-U (hereafter referred to important information. Caution: This symbol is not...
... Instructions provide a brief summary of Plug-in Module CS-U. 3 Where to enhance your attention to as CanoScan Toolbox CS or ArcSoft PhotoStudio 2000, to perform the installation procedures and scan. Store this section for troubleshooting tips, glossary terms and the index. Reading these topics ...draw your enjoyment of commands and procedures that program. A plug-in is used with Canon image scanners. How to Use this Guide This guide explains the operating procedures for Canon Plug-in Module CS-U (hereafter referred to important information. Caution: This symbol is not...
User Guide
Page 4
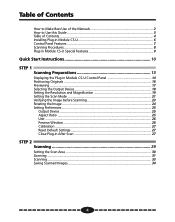
Table of Contents How to Make Best Use of the Manuals 2 How to Use this Guide 3 Table of Contents 4 Installing Plug-in Module CS-U 6 Control Panel Features 7 Scanning Procedures 8 Plug-in Module CS-U Special Features 9 Quick Start Instructions 10 STEP 1 Scanning Preparations 13 Displaying the ...
Table of Contents How to Make Best Use of the Manuals 2 How to Use this Guide 3 Table of Contents 4 Installing Plug-in Module CS-U 6 Control Panel Features 7 Scanning Procedures 8 Plug-in Module CS-U Special Features 9 Quick Start Instructions 10 STEP 1 Scanning Preparations 13 Displaying the ...
User Guide
Page 6
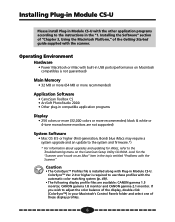
... CANON gamma 1.5 monitor, CANON gamma 1.8 monitor and CANON gamma 2.1 monitor. If you wish to adjust the color balance of the display, double-click [ColorSync™] in your Macintosh's Control Panels folder and select one of the Getting Started guide supplied with the scanner. Installing ...with built-in USB ports (performance on Macintosh compatibles is installed along with Plug-in compatible application programs Display • 256 colors or more (32,000 colors or more recommended) Application Software • CanoScan Toolbox CS • ArcSoft PhotoStudio 2000 • Other plug...
... CANON gamma 1.5 monitor, CANON gamma 1.8 monitor and CANON gamma 2.1 monitor. If you wish to adjust the color balance of the display, double-click [ColorSync™] in your Macintosh's Control Panels folder and select one of the Getting Started guide supplied with the scanner. Installing ...with built-in USB ports (performance on Macintosh compatibles is installed along with Plug-in compatible application programs Display • 256 colors or more (32,000 colors or more recommended) Application Software • CanoScan Toolbox CS • ArcSoft PhotoStudio 2000 • Other plug...

User Guide
Page 8
...; Descreen p. 51 If the current brightness and color pose no problem, there is no need to adjust these procedures to use Plug-in Module CS-U installed? Scanning Procedures Follow these settings. 8 Is Plug-in Module CS-U. Verify the Image before Scanning (Browser Window) § p. 23 Are the Brightness and Color Satisfactory... Scan Mode p. 21 Refer to the scanner's Getting Started guide to attach it . Is the scanner attached? Refer to the scanner's Getting Started guide to install it .
...; Descreen p. 51 If the current brightness and color pose no problem, there is no need to adjust these procedures to use Plug-in Module CS-U installed? Scanning Procedures Follow these settings. 8 Is Plug-in Module CS-U. Verify the Image before Scanning (Browser Window) § p. 23 Are the Brightness and Color Satisfactory... Scan Mode p. 21 Refer to the scanner's Getting Started guide to attach it . Is the scanner attached? Refer to the scanner's Getting Started guide to install it .
User Guide
Page 10
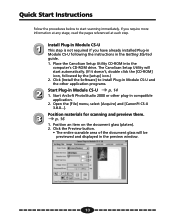
... CS-U p. 14 1. Quick Start Instructions Folow the procedures below to install Plug-in Module CS-U and the other plug-in compatible application. 2. Click the Preview button. • The entire scanable area of the document glass will start scanning immediately. Place the CanoScan Setup Utility CD-ROM into the computer's CD-ROM drive...
... CS-U p. 14 1. Quick Start Instructions Folow the procedures below to install Plug-in Module CS-U and the other plug-in compatible application. 2. Click the Preview button. • The entire scanable area of the document glass will start scanning immediately. Place the CanoScan Setup Utility CD-ROM into the computer's CD-ROM drive...

User Guide
Page 27
... the [Preferences] menu and select [Close Plug-in Module CS-U, this option to show the check mark. 27 This feature is switched off when you install Plug-in After Scan]. Calibration takes approximately 1 minute.
... the [Preferences] menu and select [Close Plug-in Module CS-U, this option to show the check mark. 27 This feature is switched off when you install Plug-in After Scan]. Calibration takes approximately 1 minute.
User Guide
Page 56
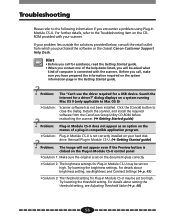
...retail outlet from the CanoScan Setup Utility CD-ROM before reattaching the scanner. (§ Getting Started guide) Problem: ®Solution: Plug-in Module CS-U does not appear as an option on the menus of computer is not correctly installed on a system ...running Mac OS 9 (only applicable to the following information if you encounter a problem using Plug-in Module CS-U. Click the [Cancel] button to the Troubleshooting item on the CDROM provided with the scanner. Hint • Before you call , make sure you purchased the software or the closest Canon...
...retail outlet from the CanoScan Setup Utility CD-ROM before reattaching the scanner. (§ Getting Started guide) Problem: ®Solution: Plug-in Module CS-U does not appear as an option on the menus of computer is not correctly installed on a system ...running Mac OS 9 (only applicable to the following information if you encounter a problem using Plug-in Module CS-U. Click the [Cancel] button to the Troubleshooting item on the CDROM provided with the scanner. Hint • Before you call , make sure you purchased the software or the closest Canon...

User Guide
Page 57
... to Version 9 after you have restarted the application program used to start Plug-in Module CS-U ®Solution 4: Rescan after Plug-in Module CS-U was installed onto Mac OS 8.5 or 8.6. Problem: Scan button cannot be selected ®Solution 1: A scan cannot be performed if the scan area is set too small (less...
... to Version 9 after you have restarted the application program used to start Plug-in Module CS-U ®Solution 4: Rescan after Plug-in Module CS-U was installed onto Mac OS 8.5 or 8.6. Problem: Scan button cannot be selected ®Solution 1: A scan cannot be performed if the scan area is set too small (less...
User Guide
Page 58
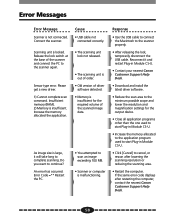
... image exceeding 100 MB. • Scanner or computer is large, it and restart Plug-in Module CS-U. • Contact your nearest Canon Customer Support Help Desk. • Download and install the latest driver software. • Reduce the scan area to the minimum possible scope and lower the resolution and magnification settings for...
... image exceeding 100 MB. • Scanner or computer is large, it and restart Plug-in Module CS-U. • Contact your nearest Canon Customer Support Help Desk. • Download and install the latest driver software. • Reduce the scan area to the minimum possible scope and lower the resolution and magnification settings for...
User Guide
Page 64
... Eyedropper button 39 Black Eyedropper tool 59 Brightness 43, 59 Brightness/Contrast tab 44 Browser 9, 23 Browser button 7, 11, 23 Buttons 14 C Calibration 27, 59 CanoScan Setup Utility CD-ROM 10 Close box 7, 14 Close Plug-in After Scan 27 Color (Documents) 21, 60 Color (Photos) 21, 60 Color balance 45..., 61 Grayscale 21, 61 H Half-tone 9 Highlight mark 39 Highlights 37 Histogram 37, 61 Histogram tab 38 I Image file 61 Image menu 36 Image size 7 Install 6, 10 J JPEG 61 L Load Settings file 53 M Magnification 7, 11, 19, 20, 61 Menu bar 14 Moiré 51, 62 O Optical resolution 54, 62 Output ...
... Eyedropper button 39 Black Eyedropper tool 59 Brightness 43, 59 Brightness/Contrast tab 44 Browser 9, 23 Browser button 7, 11, 23 Buttons 14 C Calibration 27, 59 CanoScan Setup Utility CD-ROM 10 Close box 7, 14 Close Plug-in After Scan 27 Color (Documents) 21, 60 Color (Photos) 21, 60 Color balance 45..., 61 Grayscale 21, 61 H Half-tone 9 Highlight mark 39 Highlights 37 Histogram 37, 61 Histogram tab 38 I Image file 61 Image menu 36 Image size 7 Install 6, 10 J JPEG 61 L Load Settings file 53 M Magnification 7, 11, 19, 20, 61 Menu bar 14 Moiré 51, 62 O Optical resolution 54, 62 Output ...


