Product Guide
Page 3
... for scanning and how to the software and electronic manuals. Chapter 1 Placement and Connections How to situate the scanner and connect it to CanoScan FB320P and FB620P colour scanners and the accompanying software CD-ROM. How to Use the Product Guide This guide provides an in-depth explanation ...divided into four sections. Organization of individual topics related to your computer and printer. Appendices Troubleshooting tips and care and maintenance. *References to Windows in this Guide This guide tackles the scanner and software topics that apply. The guide is intended to...
... for scanning and how to the software and electronic manuals. Chapter 1 Placement and Connections How to situate the scanner and connect it to CanoScan FB320P and FB620P colour scanners and the accompanying software CD-ROM. How to Use the Product Guide This guide provides an in-depth explanation ...divided into four sections. Organization of individual topics related to your computer and printer. Appendices Troubleshooting tips and care and maintenance. *References to Windows in this Guide This guide tackles the scanner and software topics that apply. The guide is intended to...
Product Guide
Page 5
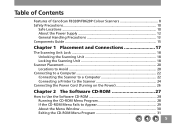
Table of Contents Features of CanoScan FB320P/FB620P Colour Scanners 8 Safety Precautions 10 Safe Locations 10 About the Power Supply 12 General Handling Precautions 13 Components Guide 15 Chapter 1 Placement and ... Use the Software CD-ROM 28 Running the CD-ROM Menu Program 28 If the CD-ROM Menu Fails to Appear 29 About the Menu Window 30 Exiting the CD-ROM Menu Program 31 5
Table of Contents Features of CanoScan FB320P/FB620P Colour Scanners 8 Safety Precautions 10 Safe Locations 10 About the Power Supply 12 General Handling Precautions 13 Components Guide 15 Chapter 1 Placement and ... Use the Software CD-ROM 28 Running the CD-ROM Menu Program 28 If the CD-ROM Menu Fails to Appear 29 About the Menu Window 30 Exiting the CD-ROM Menu Program 31 5
Product Guide
Page 7
... described in preparing this manual are subject to change without the express written permission of Canon Inc. 2. Please note that Canon Inc. tronic or mechanical, for personal or household use. 5. Portions of this guide... are trademarks or registered trademarks of their respective holders. Notwithstanding the considerable care taken in this guide are reproduced herein with Printers 69 The Scanner and the Pringer Cannot Be Operated at the Same Time ......... 69 Using Windows...
... described in preparing this manual are subject to change without the express written permission of Canon Inc. 2. Please note that Canon Inc. tronic or mechanical, for personal or household use. 5. Portions of this guide... are trademarks or registered trademarks of their respective holders. Notwithstanding the considerable care taken in this guide are reproduced herein with Printers 69 The Scanner and the Pringer Cannot Be Operated at the Same Time ......... 69 Using Windows...
Product Guide
Page 25
Refer to the notice titled What to Do if a Printer is Not Operating Correctly (p. 69). • Since data is sent through the scanner to the printer, ensure that the scanner power is on before attempting to print even when not using the scanner. • Devices other than printers cannot be used in the configuration above. • For correct operation, some Epson inkjet models require further adjustments to the scanner's printer port. 25 • Windows Printing System printers cannot be attached to software settings after the preceding steps.
Refer to the notice titled What to Do if a Printer is Not Operating Correctly (p. 69). • Since data is sent through the scanner to the printer, ensure that the scanner power is on before attempting to print even when not using the scanner. • Devices other than printers cannot be used in the configuration above. • For correct operation, some Epson inkjet models require further adjustments to the scanner's printer port. 25 • Windows Printing System printers cannot be attached to software settings after the preceding steps.
Product Guide
Page 28
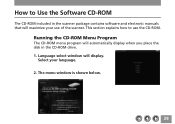
This section explains how to Use the Software CD-ROM The CD-ROM included in the CD-ROM drive. 1. Language select window will maximize your language. 2. The menu window is shown below. 28 Select your use the CD-ROM. How to use of the scanner. Running the CD-ROM Menu Program The CD-ROM menu program will automatically display when you place the disk in the scanner package contains software and electronic manuals that will display.
This section explains how to Use the Software CD-ROM The CD-ROM included in the CD-ROM drive. 1. Language select window will maximize your language. 2. The menu window is shown below. 28 Select your use the CD-ROM. How to use of the scanner. Running the CD-ROM Menu Program The CD-ROM menu program will automatically display when you place the disk in the scanner package contains software and electronic manuals that will display.
Product Guide
Page 29
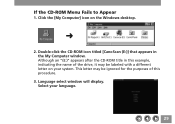
If the CD-ROM Menu Fails to Appear 1. Although an "(E:)" appears after the CD-ROM title in the My Computer window. Double-click the CD-ROM icon titled [CanoScan (E:)] that appears in this example, indicating the name of this procedure. 3. Language select window will display. Select your system. This letter may be ignored for the purposes of the drive, it may be labeled with a different letter on the Windows desktop. 2. Click the [My Computer] icon on your language. 29
If the CD-ROM Menu Fails to Appear 1. Although an "(E:)" appears after the CD-ROM title in the My Computer window. Double-click the CD-ROM icon titled [CanoScan (E:)] that appears in this example, indicating the name of this procedure. 3. Language select window will display. Select your system. This letter may be ignored for the purposes of the drive, it may be labeled with a different letter on the Windows desktop. 2. Click the [My Computer] icon on your language. 29
Product Guide
Page 30
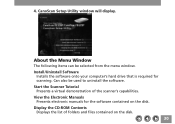
Install/Uninstall Software Installs the software onto your computer's hard drive that is required for the software contained on the disk. 30 Can also be selected from the menu window. Display the CD-ROM Contents Displays the list of the scanner's capabilities. 4. CanoScan Setup Utility window will display. View the Electronic Manuals Presents electronic manuals for scanning. Start the Scanner Tutorial Presents a virtual demonstration of folders and files contained on the disk. About the Menu Window The following items can be used to uninstall the software.
Install/Uninstall Software Installs the software onto your computer's hard drive that is required for the software contained on the disk. 30 Can also be selected from the menu window. Display the CD-ROM Contents Displays the list of the scanner's capabilities. 4. CanoScan Setup Utility window will display. View the Electronic Manuals Presents electronic manuals for scanning. Start the Scanner Tutorial Presents a virtual demonstration of folders and files contained on the disk. About the Menu Window The following items can be used to uninstall the software.
Product Guide
Page 31
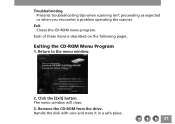
Exit Closes the CD-ROM menu program. Handle the disk with care and store it in a safe place. 31 Each of these items is described on the following pages. Exiting the CD-ROM Menu Program 1. Return to the menu window. 2. The menu window will close. 3. Troubleshooting Presents troubleshooting tips when scanning isn't proceeding as expected or when you encounter a problem operating the scanner. Click the [Exit] button. Remove the CD-ROM from the drive.
Exit Closes the CD-ROM menu program. Handle the disk with care and store it in a safe place. 31 Each of these items is described on the following pages. Exiting the CD-ROM Menu Program 1. Return to the menu window. 2. The menu window will close. 3. Troubleshooting Presents troubleshooting tips when scanning isn't proceeding as expected or when you encounter a problem operating the scanner. Click the [Exit] button. Remove the CD-ROM from the drive.
Product Guide
Page 33
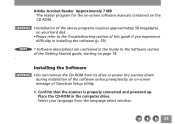
...8226; Installation of the above programs requires approximately 58 megabytes on your language from its drive or power the scanner down during installation of CanoScan Setup Utility. 1. Select your hard disk. • Please refer to the Troubleshooting section of this guide if you experience difficulty in installing...* Software descriptions are contained in the computer drive. Installing the Software • Do not remove the CD-ROM from the language select window. 33 Place the CD-ROM in the Guide to the Software section of the Getting Started guide, starting on -screen message of the...
...8226; Installation of the above programs requires approximately 58 megabytes on your language from its drive or power the scanner down during installation of CanoScan Setup Utility. 1. Select your hard disk. • Please refer to the Troubleshooting section of this guide if you experience difficulty in installing...* Software descriptions are contained in the computer drive. Installing the Software • Do not remove the CD-ROM from the language select window. 33 Place the CD-ROM in the Guide to the Software section of the Getting Started guide, starting on -screen message of the...

Product Guide
Page 34
... programs. However, the CanoCraft CS-P must be installed to proceed with installation. Click the [Start Installation] button on -screen instructions of the window. 4. 2. The following dialog will display. Remove the CD-ROM. 34 Click the [Install/Uninstall Software] button from the CD-ROM menu ...that automatically appears. Follow the instructions in the window to operate the scanner. We recommend installing all the software is complete, follow the on the bottom right of CanoScan Setup Utility to restart your computer. 5. Once installation of all the programs under...
... programs. However, the CanoCraft CS-P must be installed to proceed with installation. Click the [Start Installation] button on -screen instructions of the window. 4. 2. The following dialog will display. Remove the CD-ROM. 34 Click the [Install/Uninstall Software] button from the CD-ROM menu ...that automatically appears. Follow the instructions in the window to operate the scanner. We recommend installing all the software is complete, follow the on the bottom right of CanoScan Setup Utility to restart your computer. 5. Once installation of all the programs under...
Product Guide
Page 35
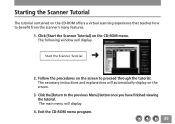
... CD-ROM offers a virtual scanning experience that teaches how to benefit from the scanner's many features. 1. The necessary instructions and explanations will display. 4. The following window will display. Follow the procedures on the screen. 3. Exit the CD-ROM menu program. 35 Click the [Return to proceed through the tutorial. Starting the...
... CD-ROM offers a virtual scanning experience that teaches how to benefit from the scanner's many features. 1. The necessary instructions and explanations will display. 4. The following window will display. Follow the procedures on the screen. 3. Exit the CD-ROM menu program. 35 Click the [Return to proceed through the tutorial. Starting the...
Product Guide
Page 38
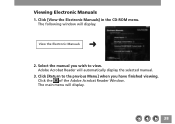
The main menu will display. Click [Return to the previous Menu] when you wish to view. Click [View the Electronic Manuals] in the CD-ROM menu. The following window will display. 38 Click the of the Adobe Acrobat Reader Window. Select the manual you have finished viewing. Adobe Acrobat Reader will automatically display the selected manual. 3. Viewing Electronic Manuals 1. View the Electronic Manuals 2.
The main menu will display. Click [Return to the previous Menu] when you wish to view. Click [View the Electronic Manuals] in the CD-ROM menu. The following window will display. 38 Click the of the Adobe Acrobat Reader Window. Select the manual you have finished viewing. Adobe Acrobat Reader will automatically display the selected manual. 3. Viewing Electronic Manuals 1. View the Electronic Manuals 2.
Product Guide
Page 46
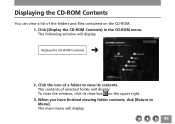
To close box on the CD-ROM. 1. Click the icon of a folder to Menu]. The main menu will display. Click [Display the CD-ROM Contents] in the CD-ROM menu. The following window will display. 46 When you have finished viewing folder contents, click [Return to view its close the window, click its contents. Display the CD-ROM Contents 2. The contents of the folders and files contained on the upper right. 3. Displaying the CD-ROM Contents You can view a list of selected folder will display.
To close box on the CD-ROM. 1. Click the icon of a folder to Menu]. The main menu will display. Click [Display the CD-ROM Contents] in the CD-ROM menu. The following window will display. 46 When you have finished viewing folder contents, click [Return to view its close the window, click its contents. Display the CD-ROM Contents 2. The contents of the folders and files contained on the upper right. 3. Displaying the CD-ROM Contents You can view a list of selected folder will display.
Product Guide
Page 48
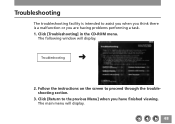
Follow the instructions on the screen to proceed through the troubleshooting section. 3. The main menu will display. Click [Troubleshooting] in the CD-ROM menu. Click [Return to the previous Menu] when you are having problems performing a task. 1. The following window will display. 48 Troubleshooting The troubleshooting facility is intended to assist you when you think there is a malfunction or you have finished viewing. Troubleshooting 2.
Follow the instructions on the screen to proceed through the troubleshooting section. 3. The main menu will display. Click [Troubleshooting] in the CD-ROM menu. Click [Return to the previous Menu] when you are having problems performing a task. 1. The following window will display. 48 Troubleshooting The troubleshooting facility is intended to assist you when you think there is a malfunction or you have finished viewing. Troubleshooting 2.
Product Guide
Page 52
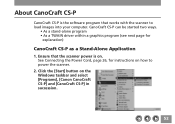
... ways. • As a stand-alone program • As a TWAIN driver within a graphics program (see next page for instructions on . Click the [Start] button on the Windows taskbar and select [Programs], [Canon CanoCraft CS-P] and [CanoCraft CS-P] in succession. 52
... ways. • As a stand-alone program • As a TWAIN driver within a graphics program (see next page for instructions on . Click the [Start] button on the Windows taskbar and select [Programs], [Canon CanoCraft CS-P] and [CanoCraft CS-P] in succession. 52
Product Guide
Page 53
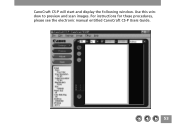
Use this window to preview and scan images. For instructions for these procedures, please see the electronic manual entitled CanoCraft CS-P Users Guide. 53 CanoCraft CS-P will start and display the following window.
Use this window to preview and scan images. For instructions for these procedures, please see the electronic manual entitled CanoCraft CS-P Users Guide. 53 CanoCraft CS-P will start and display the following window.

Product Guide
Page 54
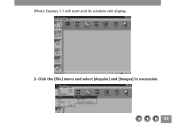
... CS-P can be used as a TWAIN driver within application programs that the scanner power is the acronym for a set of the CanoCraft CS-P will display. 1. A window of scanning standards. TWAIN is on how to power the scanner. 2. For example, you can start iPhoto Express 1.1 and use its buttons to load images... a TWAIN driver for instructions on . CanoCraft CS-P as a TWAIN Driver CanoCraft CS-P can be started from within a graphics program. Click the [Start] button on the Windows taskbar and select [Programs], [Ulead iPhoto Express 1.1] and [iPhoto Express] in succession. 54
... CS-P can be used as a TWAIN driver within application programs that the scanner power is the acronym for a set of the CanoCraft CS-P will display. 1. A window of scanning standards. TWAIN is on how to power the scanner. 2. For example, you can start iPhoto Express 1.1 and use its buttons to load images... a TWAIN driver for instructions on . CanoCraft CS-P as a TWAIN Driver CanoCraft CS-P can be started from within a graphics program. Click the [Start] button on the Windows taskbar and select [Programs], [Ulead iPhoto Express 1.1] and [iPhoto Express] in succession. 54
Product Guide
Page 55
iPhoto Express 1.1 will start and its window will display. 3. Click the [File] menu and select [Acquire] and [Images] in succession. 55
iPhoto Express 1.1 will start and its window will display. 3. Click the [File] menu and select [Acquire] and [Images] in succession. 55
Product Guide
Page 56
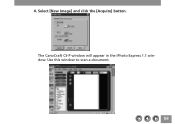
Use this window to scan a document. 56 The CanoCraft CS-P window will appear in the iPhoto Express 1.1 window. Select [New Image] and click the [Acquire] button. 4.
Use this window to scan a document. 56 The CanoCraft CS-P window will appear in the iPhoto Express 1.1 window. Select [New Image] and click the [Acquire] button. 4.
Product Guide
Page 57
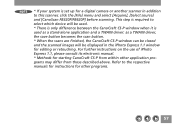
... be closed and the scanned images will be used. * There is only difference between the CanoCraft CS-P window when it is set up for a digital camera or another scanner in the iPhoto Express 1.1 window for editing or retouching. For further instructions on the use of iPhoto Express 1.1, please consult its electronic manual... for instructions for starting CanoCraft CS-P from within other programs. 57 Refer to this scanner, click the [File] menu and select [Acquire], [Select source] and [CanoScan FB320P/FB620P] before scanning.
... be closed and the scanned images will be used. * There is only difference between the CanoCraft CS-P window when it is set up for a digital camera or another scanner in the iPhoto Express 1.1 window for editing or retouching. For further instructions on the use of iPhoto Express 1.1, please consult its electronic manual... for instructions for starting CanoCraft CS-P from within other programs. 57 Refer to this scanner, click the [File] menu and select [Acquire], [Select source] and [CanoScan FB320P/FB620P] before scanning.

