

Product Guide
Page 2
... Guide Explains how to use . 2 Want to know more about the scanner and the software CD-ROM. The manuals that accompany each of the Manuals Open the Package Printed Manual CanoScan FB320P/FB620P Getting Started Briefly explains the procedures from setup and software installation through... scanning. Once you have read this guide thoroughly. FB320P/FB620P Guide This Guide Detailed explanation about how to handle the scanner and the software CanoScan Product CD-ROM, read ... How to Make Best Use of the bundled software programs. Electronic Manuals Manual for Each...
... Guide Explains how to use . 2 Want to know more about the scanner and the software CD-ROM. The manuals that accompany each of the Manuals Open the Package Printed Manual CanoScan FB320P/FB620P Getting Started Briefly explains the procedures from setup and software installation through... scanning. Once you have read this guide thoroughly. FB320P/FB620P Guide This Guide Detailed explanation about how to handle the scanner and the software CanoScan Product CD-ROM, read ... How to Make Best Use of the bundled software programs. Electronic Manuals Manual for Each...

Product Guide
Page 3
... four sections. The guide is intended to be accommodated in the Getting Started guide. Chapter 1 Placement and Connections How to situate the scanner and connect it to the software and electronic manuals. Appendices Troubleshooting tips and care and maintenance. *References to Windows in -depth explanation ... to position documents for scanning and how to run the software. Organization of individual topics related to CanoScan FB320P and FB620P colour scanners and the accompanying software CD-ROM. If you follow its suggestions first before consulting this guide refer to Windows®...
... four sections. The guide is intended to be accommodated in the Getting Started guide. Chapter 1 Placement and Connections How to situate the scanner and connect it to the software and electronic manuals. Appendices Troubleshooting tips and care and maintenance. *References to Windows in -depth explanation ... to position documents for scanning and how to run the software. Organization of individual topics related to CanoScan FB320P and FB620P colour scanners and the accompanying software CD-ROM. If you follow its suggestions first before consulting this guide refer to Windows®...

Product Guide
Page 5
... CanoScan FB320P/FB620P Colour Scanners 8 Safety Precautions 10 Safe Locations 10 About the Power Supply 12 General Handling Precautions 13 Components Guide 15 Chapter 1 Placement and Connections 17 The Scanning Unit Lock 18 Unlocking the Scanning Unit 18 Locking the Scanning Unit 18 Scanner Placement... 20 Locations to Avoid 20 Connecting to a Computer 22 Connecting the Scanner to a Computer 22 Connecting a Printer to the Scanner 24 Connecting the Power Cord (Turning on the Power 26 Chapter 2...
... CanoScan FB320P/FB620P Colour Scanners 8 Safety Precautions 10 Safe Locations 10 About the Power Supply 12 General Handling Precautions 13 Components Guide 15 Chapter 1 Placement and Connections 17 The Scanning Unit Lock 18 Unlocking the Scanning Unit 18 Locking the Scanning Unit 18 Scanner Placement... 20 Locations to Avoid 20 Connecting to a Computer 22 Connecting the Scanner to a Computer 22 Connecting a Printer to the Scanner 24 Connecting the Power Cord (Turning on the Power 26 Chapter 2...

Product Guide
Page 6
Installing the Software 32 Software Titles 32 Installing the Software 33 Starting the Scanner Tutorial 35 Viewing Electronic Manuals 36 What is an Electronic Manual 36 List of Electronic Manuals 36 Software for Viewing Electronic Manuals 37 Viewing ...Electronic Manuals 38 How to Operate Electronic Manuals 39 Displaying the CD-ROM Contents 46 Troubleshooting ...48 Chapter 3 How to Use the Scanner 49 Positioning Documents 50 About CanoCraft CS-P 52 CanoCraft CS-P as a Stand-Alone Application 52 CanoCraft CS-P as a TWAIN Driver 54 Appendices 58 Troubleshooting ...
Installing the Software 32 Software Titles 32 Installing the Software 33 Starting the Scanner Tutorial 35 Viewing Electronic Manuals 36 What is an Electronic Manual 36 List of Electronic Manuals 36 Software for Viewing Electronic Manuals 37 Viewing ...Electronic Manuals 38 How to Operate Electronic Manuals 39 Displaying the CD-ROM Contents 46 Troubleshooting ...48 Chapter 3 How to Use the Scanner 49 Positioning Documents 50 About CanoCraft CS-P 52 CanoCraft CS-P as a Stand-Alone Application 52 CanoCraft CS-P as a TWAIN Driver 54 Appendices 58 Troubleshooting ...
Product Guide
Page 7
...or other countries. • All other brand names and product names used in this guide are reproduced herein with Printers 69 The Scanner and the Pringer Cannot Be Operated at the Same Time ......... 69 Using Windows Printing System (WPS) Printers 69 What to change... of Adobe Systems Incorporated. • IBM, IBM PC/AT Series are trademarks or registered trademarks of their respective holders. Please note that Canon Inc. Precautions with the permission of Abode Systems Incorporated. 7 tronic or mechanical, for any means, elec- Notwithstanding the considerable care taken...
...or other countries. • All other brand names and product names used in this guide are reproduced herein with Printers 69 The Scanner and the Pringer Cannot Be Operated at the Same Time ......... 69 Using Windows Printing System (WPS) Printers 69 What to change... of Adobe Systems Incorporated. • IBM, IBM PC/AT Series are trademarks or registered trademarks of their respective holders. Please note that Canon Inc. Precautions with the permission of Abode Systems Incorporated. 7 tronic or mechanical, for any means, elec- Notwithstanding the considerable care taken...

Product Guide
Page 8
.... Simple Connection to a Parallel Port Easily connected to use. Features of CanoScan FB320P/FB620P Colour Scanners You have purchased one of this scanner is always ready to your convenience. The 300-dot-perinch (dpi) optical resolution CanoScan FB320P and 600-dpi optical resolution CanoScan FB620P incorporate the following special features. Standby Power and Energy-Saving...
.... Simple Connection to a Parallel Port Easily connected to use. Features of CanoScan FB320P/FB620P Colour Scanners You have purchased one of this scanner is always ready to your convenience. The 300-dot-perinch (dpi) optical resolution CanoScan FB320P and 600-dpi optical resolution CanoScan FB620P incorporate the following special features. Standby Power and Energy-Saving...

Product Guide
Page 9
Fine Colour Tones and High Resolution Scanning method employs proprietary Canon LIDE scanning technology in an ultrahigh-sensitivity CIS (contact image sensor). Reproduction of the copyright holder except for personal or household use under limited circumstances... currency, bills, negotiable securities and other documents prohibited by law. Reading 10 bits (1,024 colors) per red, green and blue (RGB) channel, the scanner offers 8-bit output that intellectual property protected by copyright may not be reproduced without the express permission of such items may be subject to criminal...
Fine Colour Tones and High Resolution Scanning method employs proprietary Canon LIDE scanning technology in an ultrahigh-sensitivity CIS (contact image sensor). Reproduction of the copyright holder except for personal or household use under limited circumstances... currency, bills, negotiable securities and other documents prohibited by law. Reading 10 bits (1,024 colors) per red, green and blue (RGB) channel, the scanner offers 8-bit output that intellectual property protected by copyright may not be reproduced without the express permission of such items may be subject to criminal...

Product Guide
Page 10
...(41-95°F) Humidity range: 10%-90% relative humidity (without condensation) • Do not place the equipment in temperature or humidity. Allow scanner to adjust slowly to equipment damage or degraded performance. Refrain from moving the equipment between temperature extremes. 10 Do not substitute other cables. •...subject to rapid changes in places subject to direct sunlight are unavoidable. • The parallel cable provided with the scanner is moved between such environments to avoid the formation of the computer using it if it is 1.2 meters (3.9 feet) long. Place the...
...(41-95°F) Humidity range: 10%-90% relative humidity (without condensation) • Do not place the equipment in temperature or humidity. Allow scanner to adjust slowly to equipment damage or degraded performance. Refrain from moving the equipment between temperature extremes. 10 Do not substitute other cables. •...subject to rapid changes in places subject to direct sunlight are unavoidable. • The parallel cable provided with the scanner is moved between such environments to avoid the formation of the computer using it if it is 1.2 meters (3.9 feet) long. Place the...
Product Guide
Page 11
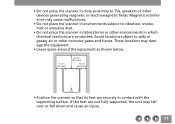
... may damage the equipment. • Leave space around the equipment as shown below. 10 cm (4 inches) 20 cm (8 inches) 10 cm (4 inches) • Position the scanner so that its feet are not fully supported, the unit may cause malfunctions. • Do not place the... scanner in environments subject to vibration, smoke, mist or excessive dust. • Do not place the scanner in laboratories or other corrosive gases and fumes. Avoid locations subject to TVs, speakers or other devices generating...
... may damage the equipment. • Leave space around the equipment as shown below. 10 cm (4 inches) 20 cm (8 inches) 10 cm (4 inches) • Position the scanner so that its feet are not fully supported, the unit may cause malfunctions. • Do not place the... scanner in environments subject to vibration, smoke, mist or excessive dust. • Do not place the scanner in laboratories or other corrosive gases and fumes. Avoid locations subject to TVs, speakers or other devices generating...

Product Guide
Page 12
... outlet will drop the voltage and may result in of the AC adapter. If sharing is no greater than the one supplied with the scanner. It may degrade scanner performance. • Do not handle the AC adapter with wet hands to the same electrical outlet. About the Power Supply • Do not... modified power cord. • Avoid frequent unplugging and plugging in a poor electrical connection. 12 Longer cords will drop the voltage and create static, reducing the scanner's performance. If possible, plug the...
... outlet will drop the voltage and may result in of the AC adapter. If sharing is no greater than the one supplied with the scanner. It may degrade scanner performance. • Do not handle the AC adapter with wet hands to the same electrical outlet. About the Power Supply • Do not... modified power cord. • Avoid frequent unplugging and plugging in a poor electrical connection. 12 Longer cords will drop the voltage and create static, reducing the scanner's performance. If possible, plug the...

Product Guide
Page 13
..., alter or repair any part of the equipment that the AC adapter can be readily removed. • Do not plug the AC adapter into the scanner.
..., alter or repair any part of the equipment that the AC adapter can be readily removed. • Do not plug the AC adapter into the scanner.
Product Guide
Page 15
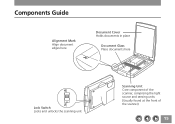
Components Guide Alignment Mark Align document edges here Document Cover Holds documents in place Document Glass Place documents here Lock Switch Locks and unlocks the scanning unit Scanning Unit Core component of the scanner, comprising the light source and sensing units (Usually found at the front of the scanner) 15
Components Guide Alignment Mark Align document edges here Document Cover Holds documents in place Document Glass Place documents here Lock Switch Locks and unlocks the scanning unit Scanning Unit Core component of the scanner, comprising the light source and sensing units (Usually found at the front of the scanner) 15
Product Guide
Page 16
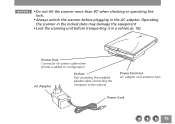
Operating the scanner in the locked state may damage the equipment • Lock the scanning unit before plugging in a vehicle (p. 18). Printer Port Connector for printer cable when printer is added to configuration AC Adapter PC Port Port accepting the supplied parallel cable connecting the computer to the scanner Power Terminal AC adapter cord attaches here Power Cord 16 • Do not tilt the scanner more than 90˚ when checking or operating the lock. • Always unlock the scanner before transporting it in the AC adapter.
Operating the scanner in the locked state may damage the equipment • Lock the scanning unit before plugging in a vehicle (p. 18). Printer Port Connector for printer cable when printer is added to configuration AC Adapter PC Port Port accepting the supplied parallel cable connecting the computer to the scanner Power Terminal AC adapter cord attaches here Power Cord 16 • Do not tilt the scanner more than 90˚ when checking or operating the lock. • Always unlock the scanner before transporting it in the AC adapter.

Product Guide
Page 17
Chapter 1 Placement and Connections The Scanning Unit Lock 18 Scanner Placement 20 Connecting to a Computer 22 Connecting the Power Cord (Turning on the Power 26 17
Chapter 1 Placement and Connections The Scanning Unit Lock 18 Scanner Placement 20 Connecting to a Computer 22 Connecting the Power Cord (Turning on the Power 26 17
Product Guide
Page 18
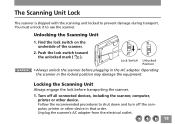
...the lock switch on the underside of the scanner. 2. Unplug the scanner's AC adapter from the electrical outlet. 18 Locking the Scanning Unit Always engage the lock before plugging in the locked position may damage the equipment. Operating the scanner in the AC adapter. Follow the recommended procedures... to shut down and turn off all connected devices, including the scanner, computer, printer or other device in that order. You must unlock ...
...the lock switch on the underside of the scanner. 2. Unplug the scanner's AC adapter from the electrical outlet. 18 Locking the Scanning Unit Always engage the lock before plugging in the locked position may damage the equipment. Operating the scanner in the AC adapter. Follow the recommended procedures... to shut down and turn off all connected devices, including the scanner, computer, printer or other device in that order. You must unlock ...
Product Guide
Page 19
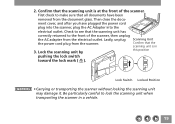
Scanning Unit Confirm that all documents have plugged the power cord plug into the scanner, plug the AC Adapter into the electrical outlet. Lock Switch Locked Position • Carrying or transporting the scanner without locking the scanning unit may damage it. 2. Then close the docu- Lock the scanning unit... the lock switch toward the lock mark ( ). Be particularly careful to the front of the scanner. First check to make sure that the scanning unit is at the front of the scanner, then unplug the AC adapter from the document glass. Check to see that the scanning unit...
Scanning Unit Confirm that all documents have plugged the power cord plug into the scanner, plug the AC Adapter into the electrical outlet. Lock Switch Locked Position • Carrying or transporting the scanner without locking the scanning unit may damage it. 2. Then close the docu- Lock the scanning unit... the lock switch toward the lock mark ( ). Be particularly careful to the front of the scanner. First check to make sure that the scanning unit is at the front of the scanner, then unplug the AC adapter from the document glass. Check to see that the scanning unit...

Product Guide
Page 20
Uneven or stepped surfaces High-temperature environments 20 However, you should avoid the following situations to prevent damage to suit your working environment. Scanner Placement Locations to Avoid The scanner can be placed in a variety of configurations to the equipment and avoid impairing scanning results.
Uneven or stepped surfaces High-temperature environments 20 However, you should avoid the following situations to prevent damage to suit your working environment. Scanner Placement Locations to Avoid The scanner can be placed in a variety of configurations to the equipment and avoid impairing scanning results.
Product Guide
Page 22
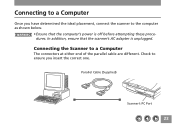
Parallel Cable (Supplied) Scanner's PC Port 22 Connecting to a Computer Once you insert the correct one. Check to ensure you have determined the ideal placement, connect the scanner to a Computer The connectors at either end of the parallel cable are different. In addition, ensure that the computer's power is unplugged. Connecting the Scanner to the computer as shown below. • Ensure that the scanner's AC adapter is off before attempting these procedures.
Parallel Cable (Supplied) Scanner's PC Port 22 Connecting to a Computer Once you insert the correct one. Check to ensure you have determined the ideal placement, connect the scanner to a Computer The connectors at either end of the parallel cable are different. In addition, ensure that the computer's power is unplugged. Connecting the Scanner to the computer as shown below. • Ensure that the scanner's AC adapter is off before attempting these procedures.
Product Guide
Page 23
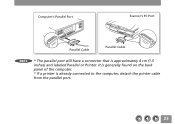
It is generally found on the back panel of the computer. * If a printer is approximately 4 cm (1.5 inches) and labeled Parallel or Printer. Computer's Parallel Port Scanner's PC Port Parallel Cable Parallel Cable * The parallel port will have a connector that is already connected to the computer, detach the printer cable from the parallel port. 23
It is generally found on the back panel of the computer. * If a printer is approximately 4 cm (1.5 inches) and labeled Parallel or Printer. Computer's Parallel Port Scanner's PC Port Parallel Cable Parallel Cable * The parallel port will have a connector that is already connected to the computer, detach the printer cable from the parallel port. 23
Product Guide
Page 24
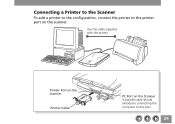
Use the cable supplied with the printer. Printer Port on the Scanner Printer Cable PC Port on the scanner. Connecting a Printer to the Scanner To add a printer to the configuration, connect the printer to the printer port on the Scanner A parallel cable should already be connecting the computer to this port. 24
Use the cable supplied with the printer. Printer Port on the Scanner Printer Cable PC Port on the scanner. Connecting a Printer to the Scanner To add a printer to the configuration, connect the printer to the printer port on the Scanner A parallel cable should already be connecting the computer to this port. 24


