CSD660U_spec.pdf
Page 2
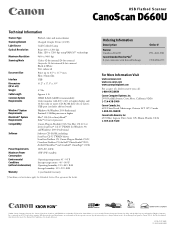
...for Mac OS (8.5 or later); Ordering Information Description Scanner CanoScan D660U Canon Extended Service Plan† 2-year extension with 800 x 600 or higher display and 16-bit color or more; Canon, CanoScan, ScanGear, and VAROS are trademarks of Apple Computer, Inc.,...for energy efficiency. USB Flatbed Scanner CanoScan D660U Technical Information Scanner Type Scanning Element Light Source Optical Resolution Maximum Resolution Scanning Mode Document Size Interface Dimensions (W x Lx H) Weight Cable Length Common System Requirements Windows® System Requirements Macintosh® ...
...for Mac OS (8.5 or later); Ordering Information Description Scanner CanoScan D660U Canon Extended Service Plan† 2-year extension with 800 x 600 or higher display and 16-bit color or more; Canon, CanoScan, ScanGear, and VAROS are trademarks of Apple Computer, Inc.,...for energy efficiency. USB Flatbed Scanner CanoScan D660U Technical Information Scanner Type Scanning Element Light Source Optical Resolution Maximum Resolution Scanning Mode Document Size Interface Dimensions (W x Lx H) Weight Cable Length Common System Requirements Windows® System Requirements Macintosh® ...
CanoScan Toolbox v1.5 User's Guide
Page 3
... Using the Color Pallet ...20 Selecting a Brush Size ...20 13 Working with Start Buttons 6 4 Starting CanoScan Toolbox - with Double-clicking the icon 7 5 Selecting the Scanner ...7 6 Scanning ...8 7 Saving Scanned Images 8 8 Opening Files ...9 Opening a Stored File ...9 Opening a New Image Window ...9 9 Faxing a Scanned Image 10 Scanning and Faxing a Document 10 Selecting the Fax Driver ...10...
... Using the Color Pallet ...20 Selecting a Brush Size ...20 13 Working with Start Buttons 6 4 Starting CanoScan Toolbox - with Double-clicking the icon 7 5 Selecting the Scanner ...7 6 Scanning ...8 7 Saving Scanned Images 8 8 Opening Files ...9 Opening a Stored File ...9 Opening a New Image Window ...9 9 Faxing a Scanned Image 10 Scanning and Faxing a Document 10 Selecting the Fax Driver ...10...
CanoScan Toolbox v1.5 User's Guide
Page 7
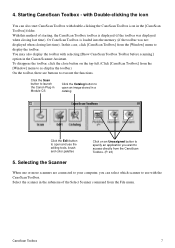
... not displayed when closing last time). Starting CanoScan Toolbox - Select the scanner in the Canon Scanner Assistant. with Double-clicking the icon You can select which scanner to use the editing tools, brush and color palettes Click on the top-left.(Click [CanoScan Toolbox] from the [Window] menu to open and use with selecting...
... not displayed when closing last time). Starting CanoScan Toolbox - Select the scanner in the Canon Scanner Assistant. with Double-clicking the icon You can select which scanner to use the editing tools, brush and color palettes Click on the top-left.(Click [CanoScan Toolbox] from the [Window] menu to open and use with selecting...

CanoScan Toolbox v1.5 User's Guide
Page 8
... Place the photo, document or film on the scanner as indicated in Toolbox editor] option from the Canon Scanner Assistant, or click on your scan settings. 4. The Canon Plug-in the CanoScan Toolbox. To save changes to save an image for the first time: 1. The scanning process is ...installed you are ready to a different location or in a new CanoScan Toolbox Image window. 6. The plug-in closes and the scanned image...
... Place the photo, document or film on the scanner as indicated in Toolbox editor] option from the Canon Scanner Assistant, or click on your scan settings. 4. The Canon Plug-in the CanoScan Toolbox. To save changes to save an image for the first time: 1. The scanning process is ...installed you are ready to a different location or in a new CanoScan Toolbox Image window. 6. The plug-in closes and the scanned image...
CanoScan Toolbox v1.5 User's Guide
Page 9
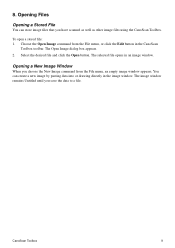
...have scanned as well as other image files using the CanoScan Toolbox. Choose the Open Image command from the File menu, an empty image window appears. The Open Image dialog box appears. 2. The selected file opens in the image window. Opening a New Image Window When you save the data to a file. 8. To... open a stored file: 1. The image window remains Untitled until you choose the New Image command from the File menu, or click the Edit button in the CanoScan Toolbox toolbar. Select the desired file and click the Open button. Opening Files Opening a ...
...have scanned as well as other image files using the CanoScan Toolbox. Choose the Open Image command from the File menu, an empty image window appears. The Open Image dialog box appears. 2. The selected file opens in the image window. Opening a New Image Window When you save the data to a file. 8. To... open a stored file: 1. The image window remains Untitled until you choose the New Image command from the File menu, or click the Edit button in the CanoScan Toolbox toolbar. Select the desired file and click the Open button. Opening Files Opening a ...
CanoScan Toolbox v1.5 User's Guide
Page 12
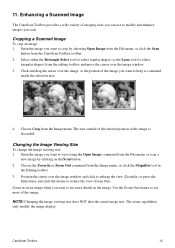
... a Scanned Image To crop an image: 1. Position the cursor over the image window and click to enlarge the view (Zoom In) or press the Option key and click the mouse to select irregular shapes) from the CanoScan Toolbox toolbar. 2. Use the Zoom Out feature to see more of the image ...viewing size: 1. NOTE: Changing the image viewing size does NOT alter the actual image size. Open the image you scan. CanoScan Toolbox 12 Click and drag the cursor over the image window. 3. Zoom in the Editing toolbox. 3. Choose the Zoom In or Zoom Out command from the Image menu. Enhancing a Scanned...
... a Scanned Image To crop an image: 1. Position the cursor over the image window and click to enlarge the view (Zoom In) or press the Option key and click the mouse to select irregular shapes) from the CanoScan Toolbox toolbar. 2. Use the Zoom Out feature to see more of the image ...viewing size: 1. NOTE: Changing the image viewing size does NOT alter the actual image size. Open the image you scan. CanoScan Toolbox 12 Click and drag the cursor over the image window. 3. Zoom in the Editing toolbox. 3. Choose the Zoom In or Zoom Out command from the Image menu. Enhancing a Scanned...
CanoScan Toolbox v1.5 User's Guide
Page 19
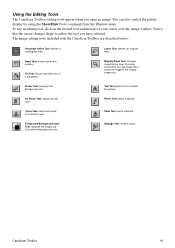
Notice that the cursor changes shape to the original image size. Hand Tool: moves a picture in window. Foreground/Background Color Tool: replaces the foreground color with the CanoScan Toolbox are described below: Rectangle Select Tool: defines a rectangular area. To use an editing tool, click on ...the desired tool and then move your cursor over the image window. The image editing tools included with the ...
Notice that the cursor changes shape to the original image size. Hand Tool: moves a picture in window. Foreground/Background Color Tool: replaces the foreground color with the CanoScan Toolbox are described below: Rectangle Select Tool: defines a rectangular area. To use an editing tool, click on ...the desired tool and then move your cursor over the image window. The image editing tools included with the ...
CanoScan Toolbox v1.5 User's Guide
Page 20
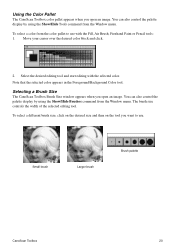
...can also control the palette display by using the Show/Hide Brushes command from the Window menu. Selecting a Brush Size The CanoScan Toolbox Brush Size window appears when you want to use . Using the Color Pallet The CanoScan Toolbox color pallet appears when you open an image. To select a color from the... Window menu. Note that the selected color appears in the Foreground/Background Color tool. You can also control the palette display by using...
...can also control the palette display by using the Show/Hide Brushes command from the Window menu. Selecting a Brush Size The CanoScan Toolbox Brush Size window appears when you want to use . Using the Color Pallet The CanoScan Toolbox color pallet appears when you open an image. To select a color from the... Window menu. Note that the selected color appears in the Foreground/Background Color tool. You can also control the palette display by using...
CanoScan Toolbox v1.5 User's Guide
Page 21
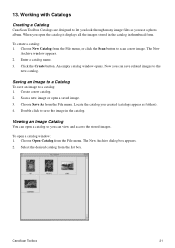
...the catalog it displays all the images stored in the catalog in the catalog. Select the desired catalog from the File menu. CanoScan Toolbox 21 The New Archive window appears. 2. The New Archive dialog box appears. 2. Enter a catalog name. 3. Saving an Image to a Catalog To ...and access the stored images. Now you open a catalog so you created (catalogs appear as you use a photo album. Working with Catalogs Creating a Catalog CanoScan Toolbox Catalogs are designed to scan a new image. To create a catalog: 1. Click the Create button. To open a saved image. 3. Create a new...
...the catalog it displays all the images stored in the catalog in the catalog. Select the desired catalog from the File menu. CanoScan Toolbox 21 The New Archive window appears. 2. The New Archive dialog box appears. 2. Enter a catalog name. 3. Saving an Image to a Catalog To ...and access the stored images. Now you open a catalog so you created (catalogs appear as you use a photo album. Working with Catalogs Creating a Catalog CanoScan Toolbox Catalogs are designed to scan a new image. To create a catalog: 1. Click the Create button. To open a saved image. 3. Create a new...
CanoScan Toolbox v1.5 User's Guide
Page 22
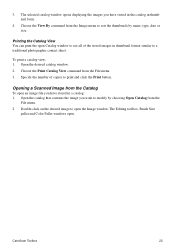
... sort the thumbnails by choosing Open Catalog from the File menu. 3. Double-click on the desired image to a traditional photographic contact sheet. CanoScan Toolbox 22 Specify the number of the stored images in thumbnail format similar to open . Open the catalog that contains the image you have ...want to print and click the Print button. The Editing toolbox, Brush Size pallet and Color Pallet windows open the Image window. Choose the View By command from the Catalog To open Catalog window to see all of copies to modify by name, type, date or size. 3. Open the ...
... sort the thumbnails by choosing Open Catalog from the File menu. 3. Double-click on the desired image to a traditional photographic contact sheet. CanoScan Toolbox 22 Specify the number of the stored images in thumbnail format similar to open . Open the catalog that contains the image you have ...want to print and click the Print button. The Editing toolbox, Brush Size pallet and Color Pallet windows open the Image window. Choose the View By command from the Catalog To open Catalog window to see all of copies to modify by name, type, date or size. 3. Open the ...
ScanGear CS-U 5.8 User's Guide
Page 2
Canon, and CanoScan are registered trademarks of Canon Inc. All other countries. Microsoft and Windows are registered trademarks or trademarks of Canon, Inc. This manual is copyrighted with Windows 98. Under the copyright laws, this manual. 2 ColorGear and ImageTrust are registered trademarks of the Microsoft Corporation in part, without written consent of their respective ...
Canon, and CanoScan are registered trademarks of Canon Inc. All other countries. Microsoft and Windows are registered trademarks or trademarks of Canon, Inc. This manual is copyrighted with Windows 98. Under the copyright laws, this manual. 2 ColorGear and ImageTrust are registered trademarks of the Microsoft Corporation in part, without written consent of their respective ...
ScanGear CS-U 5.8 User's Guide
Page 3
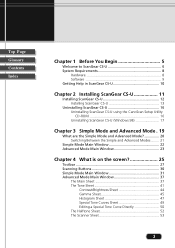
...CS-U 11 Installing ScanGear CS-U 12 Installing ScanGear CS-U 13 Uninstalling ScanGear CS-U 16 Uninstalling ScanGear CS-U using the CanoScan Setup Utility CD-ROM 16 Uninstalling ScanGear CS-U (Windows 98 17 Chapter 3 Simple Mode and Advanced Mode . 19 What are the Simple Mode and Advanced Mode 20 Switching...Between the Simple and Advanced Modes ........ 21 Simple Mode Main Window 22 Advanced Mode Main Window 23 Chapter 4 What is on the screen 25 Toolbar 27 Scanning Buttons 30 Simple Mode Main Window 31 Advanced Mode Main Window 37 The Main Sheet 37 The Tone Sheet 41 Contrast/...
...CS-U 11 Installing ScanGear CS-U 12 Installing ScanGear CS-U 13 Uninstalling ScanGear CS-U 16 Uninstalling ScanGear CS-U using the CanoScan Setup Utility CD-ROM 16 Uninstalling ScanGear CS-U (Windows 98 17 Chapter 3 Simple Mode and Advanced Mode . 19 What are the Simple Mode and Advanced Mode 20 Switching...Between the Simple and Advanced Modes ........ 21 Simple Mode Main Window 22 Advanced Mode Main Window 23 Chapter 4 What is on the screen 25 Toolbar 27 Scanning Buttons 30 Simple Mode Main Window 31 Advanced Mode Main Window 37 The Main Sheet 37 The Tone Sheet 41 Contrast/...
ScanGear CS-U 5.8 User's Guide
Page 4
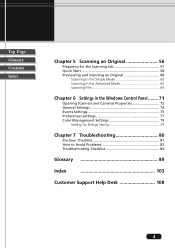
... Previewing and Scanning an Original 60 Scanning in the Simple Mode 60 Scanning in the Advanced Mode 65 Scanning Film 69 Chapter 6 Settings in the Windows Control Panel ......... 71 Opening Scanners and Cameras Properties 72 General Settings 74 Events Settings 75 Preferences Settings 77 Color Management Settings 79 Setting for Energy...
... Previewing and Scanning an Original 60 Scanning in the Simple Mode 60 Scanning in the Advanced Mode 65 Scanning Film 69 Chapter 6 Settings in the Windows Control Panel ......... 71 Opening Scanners and Cameras Properties 72 General Settings 74 Events Settings 75 Preferences Settings 77 Color Management Settings 79 Setting for Energy...
ScanGear CS-U 5.8 User's Guide
Page 6
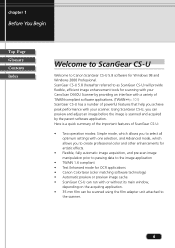
... CS-U) will provide flexible, efficient image enhancement tools for scanning with your CanoScan D660U Scanner by the parent software application. Using ScanGear CS-U, you to create professional color and other enhancements for Windows 98 and Windows 2000 Professional. ScanGear CS-U 5.8 (hereafter referred to Canon ScanGear CS-U 5.8 software for artistic effects. • Flexible, fully automatic image...
... CS-U) will provide flexible, efficient image enhancement tools for scanning with your CanoScan D660U Scanner by the parent software application. Using ScanGear CS-U, you to create professional color and other enhancements for Windows 98 and Windows 2000 Professional. ScanGear CS-U 5.8 (hereafter referred to Canon ScanGear CS-U 5.8 software for artistic effects. • Flexible, fully automatic image...
ScanGear CS-U 5.8 User's Guide
Page 7
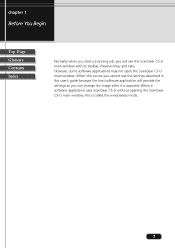
... its toolbar, Preview Area, and tabs. However, some software applications may not open the ScanGear CS-U main window. When this occurs you can change the image after it is called the windowless mode. 7 chapter 1 Before You Begin Top Page Glossary Contents Index Normally ...
... its toolbar, Preview Area, and tabs. However, some software applications may not open the ScanGear CS-U main window. When this occurs you can change the image after it is called the windowless mode. 7 chapter 1 Before You Begin Top Page Glossary Contents Index Normally ...
ScanGear CS-U 5.8 User's Guide
Page 8
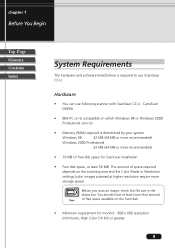
...Begin Top Page Glossary Contents Index System Requirements The hardware and software listed below is determined by your system: Windows 98 32 MB (64 MB or more recommended) Windows 2000 Professional 32 MB (64 MB or more storage space). You should have at least twice that amount ...• You can run • Memory (RAM) required is required to use following scanner with ScanGear CS-U: CanoScan D660U. • IBM PC or its compatible on which Windows 98 or Windows 2000 Professional can use ScanGear CS-U. The amount of space required depends on the hard disk. • Minimum...
...Begin Top Page Glossary Contents Index System Requirements The hardware and software listed below is determined by your system: Windows 98 32 MB (64 MB or more recommended) Windows 2000 Professional 32 MB (64 MB or more storage space). You should have at least twice that amount ...• You can run • Memory (RAM) required is required to use following scanner with ScanGear CS-U: CanoScan D660U. • IBM PC or its compatible on which Windows 98 or Windows 2000 Professional can use ScanGear CS-U. The amount of space required depends on the hard disk. • Minimum...

ScanGear CS-U 5.8 User's Guide
Page 9
chapter 1 Before You Begin Top Page Glossary Contents Index Software • Microsoft® Windows® 98 or Microsoft® Windows® 2000 Professional • TWAIN-compliant parent software application 9
chapter 1 Before You Begin Top Page Glossary Contents Index Software • Microsoft® Windows® 98 or Microsoft® Windows® 2000 Professional • TWAIN-compliant parent software application 9
ScanGear CS-U 5.8 User's Guide
Page 12
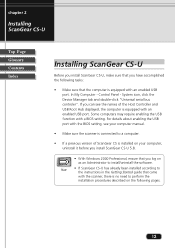
... port with the BIOS setting, see the names of ScanGear CS is installed on your computer, uninstall it before you install ScanGear CS-U 5.8. • With Windows 2000 Professional, ensure that you log on the following tasks: • Make sure that the computer is no need to perform the installation procedures described...
... port with the BIOS setting, see the names of ScanGear CS is installed on your computer, uninstall it before you install ScanGear CS-U 5.8. • With Windows 2000 Professional, ensure that you log on the following tasks: • Make sure that the computer is no need to perform the installation procedures described...
ScanGear CS-U 5.8 User's Guide
Page 15
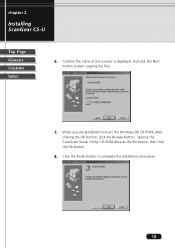
chapter 2 Installing ScanGear CS-U Top Page Glossary Contents Index 6. Click the Finish button to insert the Windows 98 CD-ROM, after clicking the OK button, click the Browse button . When you are prompted to complete the installation procedure. 15 Specify the CanoScan Setup Utility CD-ROM drive as the file source, then click the OK button. 8. Confirm the name of the scanner is displayed, and click the Next button to start copying the files. 7.
chapter 2 Installing ScanGear CS-U Top Page Glossary Contents Index 6. Click the Finish button to insert the Windows 98 CD-ROM, after clicking the OK button, click the Browse button . When you are prompted to complete the installation procedure. 15 Specify the CanoScan Setup Utility CD-ROM drive as the file source, then click the OK button. 8. Confirm the name of the scanner is displayed, and click the Next button to start copying the files. 7.
ScanGear CS-U 5.8 User's Guide
Page 16
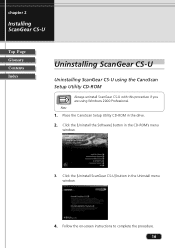
Note 1. Follow the on-screen instructions to complete the procedure. 16 chapter 2 Installing ScanGear CS-U Top Page Glossary Contents Index Uninstalling ScanGear CS-U Uninstalling ScanGear CS-U using the CanoScan Setup Utility CD-ROM Always uninstall ScanGear CS-U with this procedure if you are using Windows 2000 Professional. Click the [Uninstall the Software] button in the drive. 2. Place the CanoScan Setup Utility CD-ROM in the CD-ROM's menu window. 3. Click the [Uninstall ScanGear CS-U] button in the Uninstall menu window. 4.
Note 1. Follow the on-screen instructions to complete the procedure. 16 chapter 2 Installing ScanGear CS-U Top Page Glossary Contents Index Uninstalling ScanGear CS-U Uninstalling ScanGear CS-U using the CanoScan Setup Utility CD-ROM Always uninstall ScanGear CS-U with this procedure if you are using Windows 2000 Professional. Click the [Uninstall the Software] button in the drive. 2. Place the CanoScan Setup Utility CD-ROM in the CD-ROM's menu window. 3. Click the [Uninstall ScanGear CS-U] button in the Uninstall menu window. 4.


