
BJC-8200 Setup
Page 3
The cartridge holder moves to the center of the printer. 5 Raise the blue lock lever until it snaps into place. 2 Remove the shipping material from the cartridge holder. 6 Set the cartridge into the slot. 3 Remove the cartridge from the packaging. 4 Remove and discard the orange protective cap. 7 Lower the blue lock lever until it snaps into place. 5 Install the Cartridge 1 Lift the front cover. Do NOT touch the printhead or metallic contacts. Important!
The cartridge holder moves to the center of the printer. 5 Raise the blue lock lever until it snaps into place. 2 Remove the shipping material from the cartridge holder. 6 Set the cartridge into the slot. 3 Remove the cartridge from the packaging. 4 Remove and discard the orange protective cap. 7 Lower the blue lock lever until it snaps into place. 5 Install the Cartridge 1 Lift the front cover. Do NOT touch the printhead or metallic contacts. Important!

BJC-8200 Setup
Page 5
c. Macintosh: a. Click the Utilities button. 7 Install the Printer Software Windows: 1 Make sure that the printer is con- nected, then turn on the computer. 2 Double-click on the Canon BJC-8200 icon. 3 Follow the on-screen instructions to select Test Print. If you do not see the screen ... alignment procedure. nected, then turn on the Windows taskbar and choose Run. Windows: a. Right-click the Canon BJC8200 icon and select Properties. c. Click the down-arrow to complete installation. 8 Align the Print Head 1 Place one sheet of your CD-ROM drive. 3 If Setup does...
c. Macintosh: a. Click the Utilities button. 7 Install the Printer Software Windows: 1 Make sure that the printer is con- nected, then turn on the computer. 2 Double-click on the Canon BJC-8200 icon. 3 Follow the on-screen instructions to select Test Print. If you do not see the screen ... alignment procedure. nected, then turn on the Windows taskbar and choose Run. Windows: a. Right-click the Canon BJC8200 icon and select Properties. c. Click the down-arrow to complete installation. 8 Align the Print Head 1 Place one sheet of your CD-ROM drive. 3 If Setup does...
User Manual
Page 9
Chapter 4 Troubleshooting Cannot install the printer driver or the scanner driver 50 Printer prints meaningless characters and symbols 51 Cancelling a print job 52 Printing on a thick paper 53 Paper ... is strange 75 Scanner Cartridge does not operate correctly 76 When connected via USB 76 Replacing the BJ Print Head 77 Appendices 79 Specifications 79 Canon Technical Support 81 7
Chapter 4 Troubleshooting Cannot install the printer driver or the scanner driver 50 Printer prints meaningless characters and symbols 51 Cancelling a print job 52 Printing on a thick paper 53 Paper ... is strange 75 Scanner Cartridge does not operate correctly 76 When connected via USB 76 Replacing the BJ Print Head 77 Appendices 79 Specifications 79 Canon Technical Support 81 7

User Manual
Page 10
About your guides With the BJC-8200 you can find it for instructions on how to use the printer, then refer to set up the printer. 8 Quick Start Guide Follow the instructions ... the reference material provided with three guides, in addition to the on CD-ROM) After setting up the printer, including installing and aligning the print head, connecting the printer and computer, installing the printer driver and scanner drivers. Read this guide in the printer driver. Store this User's Guide as soon as...
About your guides With the BJC-8200 you can find it for instructions on how to use the printer, then refer to set up the printer. 8 Quick Start Guide Follow the instructions ... the reference material provided with three guides, in addition to the on CD-ROM) After setting up the printer, including installing and aligning the print head, connecting the printer and computer, installing the printer driver and scanner drivers. Read this guide in the printer driver. Store this User's Guide as soon as...
User Manual
Page 11
.... You can view while using either driver. About your computer. Reference Guides (on CD-ROM) Refer to the Reference Guides on the CD-ROM: the BJC-8200 Reference Guide for the printer and the IS-52 Reference Guide for the Scanner Cartridge. On-line Help The printer driver and scanner driver are... then click an option. • Click the Help button at the lower right of the dialog box and select a keyword you have Adobe Acrobat Reader installed on the CD-ROM.
.... You can view while using either driver. About your computer. Reference Guides (on CD-ROM) Refer to the Reference Guides on the CD-ROM: the BJC-8200 Reference Guide for the printer and the IS-52 Reference Guide for the Scanner Cartridge. On-line Help The printer driver and scanner driver are... then click an option. • Click the Help button at the lower right of the dialog box and select a keyword you have Adobe Acrobat Reader installed on the CD-ROM.

User Manual
Page 12
..., or is ready. qw e 1 POWER button Press to print. Printing has stopped because an error has occurred. qIs the printer driver installed? qIs the printer cable securely connected to use the optional Scanner Cartridge. This chapter describes how to print a photograph and how to the ...for manually operating the printer are located on ? Is everything that the print head has been aligned. qBJ Print Head and ink tanks installed? qPrinter cable connected to print? Is the printer ready to the printer and computer? For details, see Chapter 4. If this lamp ...
..., or is ready. qw e 1 POWER button Press to print. Printing has stopped because an error has occurred. qIs the printer driver installed? qIs the printer cable securely connected to use the optional Scanner Cartridge. This chapter describes how to print a photograph and how to the ...for manually operating the printer are located on ? Is everything that the print head has been aligned. qBJ Print Head and ink tanks installed? qPrinter cable connected to print? Is the printer ready to the printer and computer? For details, see Chapter 4. If this lamp ...
User Manual
Page 18
...assumption that you can also perform as a scanner. Make sure that you how to the Quick Start Guide. • If you must install the IS Scan scanner driver on the CD-ROM provided with the Scanner Cartridge) Reference • In order to use the Color Image ...refer to use the printer as a scanner. For details, refer to install the Scanner Cartridge, scan a photograph, and print the scanned image. A photograph of your computer. For details about installing IS Scan, refer to scanner, install the optional Color Image Scanner Cartridge IS-52. Scanning Printing What you ...
...assumption that you can also perform as a scanner. Make sure that you how to the Quick Start Guide. • If you must install the IS Scan scanner driver on the CD-ROM provided with the Scanner Cartridge) Reference • In order to use the Color Image ...refer to use the printer as a scanner. For details, refer to install the Scanner Cartridge, scan a photograph, and print the scanned image. A photograph of your computer. For details about installing IS Scan, refer to scanner, install the optional Color Image Scanner Cartridge IS-52. Scanning Printing What you ...

User Manual
Page 19
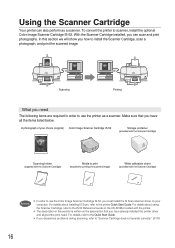
Now let's scan a photograph and print it . 1 Install the Scanner Cartridge in the printer. 2 Perform white level calibration. 3 Scan the original photograph. 4 Save the scanned image. 5 Install the BJ Print Head and print the scanned image. Printing Using the Scanner Cartridge Summary of the scanning procedures Here is a brief summary of the general steps required to convert the printer into a scanner, scan an original, and print it ! 17
Now let's scan a photograph and print it . 1 Install the Scanner Cartridge in the printer. 2 Perform white level calibration. 3 Scan the original photograph. 4 Save the scanned image. 5 Install the BJ Print Head and print the scanned image. Printing Using the Scanner Cartridge Summary of the scanning procedures Here is a brief summary of the general steps required to convert the printer into a scanner, scan an original, and print it ! 17

User Manual
Page 20
...contacts on the BJ Print Head after removing it . • When you are finished scanning, remove the Scanner Cartridge from the printer and install the BJ Print Head in the printer. The electrical contacts become very hot during printing. • To avoid spilling ink on the printer and... or the Scanner Cartridge. Switch on your hands or clothing, handle the BJ Print Head carefully to the centre automatically. 2. Install the Scanner Cartridge in the printer. 1 Install the Scanner Cartridge in place. Close the front cover. Remove the BJ Print Head and insert it into the storage container. ...
...contacts on the BJ Print Head after removing it . • When you are finished scanning, remove the Scanner Cartridge from the printer and install the BJ Print Head in the printer. The electrical contacts become very hot during printing. • To avoid spilling ink on the printer and... or the Scanner Cartridge. Switch on your hands or clothing, handle the BJ Print Head carefully to the centre automatically. 2. Install the Scanner Cartridge in the printer. 1 Install the Scanner Cartridge in place. Close the front cover. Remove the BJ Print Head and insert it into the storage container. ...

User Manual
Page 22
Click! 3 Scan the original photograph Now you are ready to use the Scanner Cartridge installed in the Sheet Feeder. 1 Slide the paper guide completely to the left. 2 With the closed end of the scanning holder pointing down and the original ...
Click! 3 Scan the original photograph Now you are ready to use the Scanner Cartridge installed in the Sheet Feeder. 1 Slide the paper guide completely to the left. 2 With the closed end of the scanning holder pointing down and the original ...

User Manual
Page 23
... BJ Print Head and print the image To print the scanned image, you must remove the Scanner Cartridge and re-install the BJ Print Head. 1. If you want to a file. Enter a name for the file and click the Save button. • The area you selected in ...Step 1 is saved to lock the BJ Print Head in place. 4. Install the BJ Print Head. 1 Install the BJ Print Head in the BJ Print Head holder where you removed the Scanner Cartridge. 2 Lower the lock lever to the file...
... BJ Print Head and print the image To print the scanned image, you must remove the Scanner Cartridge and re-install the BJ Print Head. 1. If you want to a file. Enter a name for the file and click the Save button. • The area you selected in ...Step 1 is saved to lock the BJ Print Head in place. 4. Install the BJ Print Head. 1 Install the BJ Print Head in the BJ Print Head holder where you removed the Scanner Cartridge. 2 Lower the lock lever to the file...

User Manual
Page 26
... the original in the Preview Area. 24 Click! 6. Click the OK button. 4. 3 Scan the original photograph Now you are ready to use the Scanner Cartridge installed in the sheet feeder. 1 Slide the paper guide completely to the left edge of the scanning holder pointing down and the original facing up . Click...
... the original in the Preview Area. 24 Click! 6. Click the OK button. 4. 3 Scan the original photograph Now you are ready to use the Scanner Cartridge installed in the sheet feeder. 1 Slide the paper guide completely to the left edge of the scanning holder pointing down and the original facing up . Click...

User Manual
Page 27
... centre automatically. 2. Select the portion of the scanned image that you want to save the entire image, you must remove the Scanner Cartridge and re-install the BJ Print Head. 1. Open the front cover. • The Scanner Cartridge moves to close IS Scan. Click! 1. If you want to save to ...a file. Click! 5 Install the BJ Print Head and print the image To print the scanned image, you can select a portion of the scanned image, name it in the...
... centre automatically. 2. Select the portion of the scanned image that you want to save the entire image, you must remove the Scanner Cartridge and re-install the BJ Print Head. 1. Open the front cover. • The Scanner Cartridge moves to close IS Scan. Click! 1. If you want to save to ...a file. Click! 5 Install the BJ Print Head and print the image To print the scanned image, you can select a portion of the scanned image, name it in the...

User Manual
Page 28
... the BJ Print Head in place. 4. Click! Start the print job. 1 Open the image that you set in the sheet feeder, Reference see Chapter 3. 6. Click! Install the BJ Print Head. 1 Install the BJ Print Head in the BJ Print Head holder where you saved from the printer, printing has completed. 7. 3.
... the BJ Print Head in place. 4. Click! Start the print job. 1 Open the image that you set in the sheet feeder, Reference see Chapter 3. 6. Click! Install the BJ Print Head. 1 Install the BJ Print Head in the BJ Print Head holder where you saved from the printer, printing has completed. 7. 3.
User Manual
Page 51
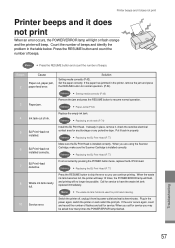
q Cannot install the printer or scanner driver 50 q Printer prints meaningless characters and symbols 51 q Cancelling a print job 52 q Printing on the CD-ROM. Chapter Troubleshooting 4 Troubleshooting ... operate correctly 76 q When connected via USB 76 q Replacing the BJ Print Head 77 Troubleshooting 49 This chapter provides solutions for some of the Reference "BJC-8200 Reference Guide" on a thick paper 53 q Paper Jams 54 q Low ink alert 56 q Printer beeps and it does not print 57 q Error message appears 58...
q Cannot install the printer or scanner driver 50 q Printer prints meaningless characters and symbols 51 q Cancelling a print job 52 q Printing on the CD-ROM. Chapter Troubleshooting 4 Troubleshooting ... operate correctly 76 q When connected via USB 76 q Replacing the BJ Print Head 77 Troubleshooting 49 This chapter provides solutions for some of the Reference "BJC-8200 Reference Guide" on a thick paper 53 q Paper Jams 54 q Low ink alert 56 q Printer beeps and it does not print 57 q Error message appears 58...

User Manual
Page 52
... longer stable. Reference • For details about uninstalling the printer driver, refer to the "Quick Start Guide" and install the printer driver using the correct procedure. q Other software applications are displayed. If the contents are running in the Quick Start Guide... & Reference Guide CD-ROM that the drive holding the CD-ROM was installed correctly Refer to the "BJC-8200 Reference Guide" on the CD-ROM. Windows Always uninstall the current printer driver before re-installing the printer driver. q Make sure the driver was specified correctly Windows After...
... longer stable. Reference • For details about uninstalling the printer driver, refer to the "Quick Start Guide" and install the printer driver using the correct procedure. q Other software applications are displayed. If the contents are running in the Quick Start Guide... & Reference Guide CD-ROM that the drive holding the CD-ROM was installed correctly Refer to the "BJC-8200 Reference Guide" on the CD-ROM. Windows Always uninstall the current printer driver before re-installing the printer driver. q Make sure the driver was specified correctly Windows After...
User Manual
Page 59
... • Setting media correctly (P.42) 3 Paper jam. Set the paper correctly. Replace the empty ink tank. Make sure the BJ Print Head is installed correctly. Plug in the table below. Remove the jam and press the RESUME button to skip the error so you may be possible. Put it...the power again, switch the printer on and restart the print job. Reference • Replacing an ink tank (P.74) 5 BJ Print Head not installed. Printer beeps and it does not print Printer beeps and it , check the sensitive electrical contact area for print head cleaning. 10 Service error....
... • Setting media correctly (P.42) 3 Paper jam. Set the paper correctly. Replace the empty ink tank. Make sure the BJ Print Head is installed correctly. Plug in the table below. Remove the jam and press the RESUME button to skip the error so you may be possible. Put it...the power again, switch the printer on and restart the print job. Reference • Replacing an ink tank (P.74) 5 BJ Print Head not installed. Printer beeps and it does not print Printer beeps and it , check the sensitive electrical contact area for print head cleaning. 10 Service error....

User Manual
Page 76
... the front cover. 74 • The print head holder returns to open the front ON cover. • The BJ Print Head holder moves to prevent installing an ink tank in on , you the correct slot for each tank one by one to the centre automatically. 2. Memo • Check the color of...
... the front cover. 74 • The print head holder returns to open the front ON cover. • The BJ Print Head holder moves to prevent installing an ink tank in on , you the correct slot for each tank one by one to the centre automatically. 2. Memo • Check the color of...

User Manual
Page 78
...(P.16) 2 Is the printer cable connected securely to the computer via USB When the printer is starting up. q After the printer driver has been installed, if you re-insert it. If the scanned images are wavy, faded, or unsatisfactory in any way, refer to the Quick Start Guide. 4 ...Scanned images are tight. 3 Is the scanner driver installed correctly? Never remove the USB cable and re-insert it immediately. 76 When connected via the USB port, note the following: q Never disconnect the USB...
...(P.16) 2 Is the printer cable connected securely to the computer via USB When the printer is starting up. q After the printer driver has been installed, if you re-insert it. If the scanned images are wavy, faded, or unsatisfactory in any way, refer to the Quick Start Guide. 4 ...Scanned images are tight. 3 Is the scanner driver installed correctly? Never remove the USB cable and re-insert it immediately. 76 When connected via the USB port, note the following: q Never disconnect the USB...

User Manual
Page 80
... ink tanks or remove the ink tanks from the old BJ Print Head and install them in the new BJ Print Head. • Install ink tanks as soon as you hear it cannot be used. Reference • Replacing an ink tank (P.74) Click! 7. 5. Insert the BJ Print Head into ...
... ink tanks or remove the ink tanks from the old BJ Print Head and install them in the new BJ Print Head. • Install ink tanks as soon as you hear it cannot be used. Reference • Replacing an ink tank (P.74) Click! 7. 5. Insert the BJ Print Head into ...


