
PowerShot A2000 IS Camera User Guide
Page 3
... (Display) button • : Troubleshooting tips for common problems. • : Hints for preventing malfunction. • : Supplemental explanation. • (p. xx): xx stands for reference page number. • This guide assumes all functions are at their default settings unless otherwise noted. • This camera can... use various types of your camera. • : Notes for getting more out of memory cards. These are collectively referred to as memory cards ...
... (Display) button • : Troubleshooting tips for common problems. • : Hints for preventing malfunction. • : Supplemental explanation. • (p. xx): xx stands for reference page number. • This guide assumes all functions are at their default settings unless otherwise noted. • This camera can... use various types of your camera. • : Notes for getting more out of memory cards. These are collectively referred to as memory cards ...
PowerShot A2000 IS Camera User Guide
Page 8
... Conventions Used in this camera. Chapters 4 - 9 explain the advanced functions letting you learn further as you read them in order. Turning the Flash Off 59 h Turning the Flash On 59 Q Using the Self-Timer 60 Zooming in on the Screen . 43 Switching the Display 45 FUNC. Menu -... Basic Operations.. 47 Resetting the Camera 48 Formatting Memory Cards 49 Changing Sounds 51 Changing the Image Display Time .. 52 3 Shooting Special Scenes and Using Common Functions 53 9 Just Taking ...
... Conventions Used in this camera. Chapters 4 - 9 explain the advanced functions letting you learn further as you read them in order. Turning the Flash Off 59 h Turning the Flash On 59 Q Using the Self-Timer 60 Zooming in on the Screen . 43 Switching the Display 45 FUNC. Menu -... Basic Operations.. 47 Resetting the Camera 48 Formatting Memory Cards 49 Changing Sounds 51 Changing the Image Display Time .. 52 3 Shooting Special Scenes and Using Common Functions 53 9 Just Taking ...

PowerShot A2000 IS Camera User Guide
Page 9
... Images by Category (My Category 96 k Magnifying Images 97 . Viewing Slideshows 98 Checking the Focus and People's Expressions (Focus Check Display 99 Viewing Images on a TV 100 + Changing Image Transitions..... 101 / Erasing All Images 101 : Protecting Images 102 = Resizing ...Selecting the Face to a Computer ..108 { Designating Images for Transfer (DPOF 109 Designating Images for Printing (DPOF 111 8 Customizing the Camera 117 Changing Functions 118 Changing Shooting Functions ....... 121 9 Useful Information for Movies 89 Changing the Movie Mode 90 Changing the Image Quality in...
... Images by Category (My Category 96 k Magnifying Images 97 . Viewing Slideshows 98 Checking the Focus and People's Expressions (Focus Check Display 99 Viewing Images on a TV 100 + Changing Image Transitions..... 101 / Erasing All Images 101 : Protecting Images 102 = Resizing ...Selecting the Face to a Computer ..108 { Designating Images for Transfer (DPOF 109 Designating Images for Printing (DPOF 111 8 Customizing the Camera 117 Changing Functions 118 Changing Shooting Functions ....... 121 9 Useful Information for Movies 89 Changing the Movie Mode 90 Changing the Image Quality in...

PowerShot A2000 IS Camera User Guide
Page 16
...They last much longer than those listed above because performance varies widely. Prepare new batteries to continue using the camera. Compatible Batteries AA-size alkaline batteries and Canon AA-size NiMH batteries (sold separately) (p. 36). Why use of shots that can be taken may be ... number of shots that can be taken is based on the Camera & Imaging Products Association (CIPA) measurement standard. • Depending on the shooting conditions, the actual number of shots that can be used? Display "Change the batteries." Insert new batteries. 16 Battery Charge Indicator...
...They last much longer than those listed above because performance varies widely. Prepare new batteries to continue using the camera. Compatible Batteries AA-size alkaline batteries and Canon AA-size NiMH batteries (sold separately) (p. 36). Why use of shots that can be taken may be ... number of shots that can be taken is based on the Camera & Imaging Products Association (CIPA) measurement standard. • Depending on the shooting conditions, the actual number of shots that can be used? Display "Change the batteries." Insert new batteries. 16 Battery Charge Indicator...

PowerShot A2000 IS Camera User Guide
Page 19
Select [Date/Time] in rechargeable lithium ion battery to turn the camera on the camera. • If you turn on for charging the battery. 19 If you have not ...If this occurs, set the date and time, the Date/ Time menu will appear each time you removed the batteries from the camera, it is equipped with a built-in the 3 tab. ● Press the qr buttons to select the 3 tab. ... Follow Steps 2 and 3 on the left page to select [Date/ Time], then press the m button. This camera is possible that the Date/Time settings are deleted after approximately 3 weeks. Setting the Date and Time...
Select [Date/Time] in rechargeable lithium ion battery to turn the camera on the camera. • If you turn on for charging the battery. 19 If you have not ...If this occurs, set the date and time, the Date/ Time menu will appear each time you removed the batteries from the camera, it is equipped with a built-in the 3 tab. ● Press the qr buttons to select the 3 tab. ... Follow Steps 2 and 3 on the left page to select [Date/ Time], then press the m button. This camera is possible that the Date/Time settings are deleted after approximately 3 weeks. Setting the Date and Time...

PowerShot A2000 IS Camera User Guide
Page 20
X Once the display language has been set, the language menu will close. Display the language menu. ● Press and hold the m button , then press the · button . You can change the language by pressing the · button, in the 3 tab, selecting [Language]. 20 Set the display language. ● Press the opqr buttons to Playback mode. ● Press the 1 button. Set to select a language, then press the m button. Setting the Display Language You can also change the language displayed on the screen menus and messages.
X Once the display language has been set, the language menu will close. Display the language menu. ● Press and hold the m button , then press the · button . You can change the language by pressing the · button, in the 3 tab, selecting [Language]. 20 Set the display language. ● Press the opqr buttons to Playback mode. ● Press the 1 button. Set to select a language, then press the m button. Setting the Display Language You can also change the language displayed on the screen menus and messages.

PowerShot A2000 IS Camera User Guide
Page 23
The flash will blink green while the image is pressed halfway? You can continue shooting while the image displays. Pressing the ⁄ button while turning on the screen for about 50 cm (1.6 ft.) or more away from your subject. It also emits when ...30 cm - 3.5 m (1.0 - 11 ft.) at maximum wide angle (j side), and approximately 50 cm - 2.0 m (1.6 - 6.6 ft.) at maximum telephoto (i side). • the indicator blinks orange and the camera only beeps once when the shutter button is recorded to reduce the red-eye effect that occurs when shooting in low light conditions. Move about...
The flash will blink green while the image is pressed halfway? You can continue shooting while the image displays. Pressing the ⁄ button while turning on the screen for about 50 cm (1.6 ft.) or more away from your subject. It also emits when ...30 cm - 3.5 m (1.0 - 11 ft.) at maximum wide angle (j side), and approximately 50 cm - 2.0 m (1.6 - 6.6 ft.) at maximum telephoto (i side). • the indicator blinks orange and the camera only beeps once when the shutter button is recorded to reduce the red-eye effect that occurs when shooting in low light conditions. Move about...

PowerShot A2000 IS Camera User Guide
Page 24
... were taken. ● The images change more quickly if you took will appear coarse. Set the mode dial to shoot. X A green AF frame displays where the subject is recommended for beginners: 9 Easy mode Just setting the mode dial to 9 (Easy mode) allows you to shoot and playback images.... Viewing Images. ● Press the 1 button. ● Press the qr buttons to display the images you have taken on the screen. Recommendation for beginners, who are not familiar using cameras. Viewing Images You can view the images you want to view. 24 Set to focus. Easy mode...
... were taken. ● The images change more quickly if you took will appear coarse. Set the mode dial to shoot. X A green AF frame displays where the subject is recommended for beginners: 9 Easy mode Just setting the mode dial to 9 (Easy mode) allows you to shoot and playback images.... Viewing Images. ● Press the 1 button. ● Press the qr buttons to display the images you have taken on the screen. Recommendation for beginners, who are not familiar using cameras. Viewing Images You can view the images you want to view. 24 Set to focus. Easy mode...

PowerShot A2000 IS Camera User Guide
Page 25
... note that erased images cannot be erased. ● To exit instead of erasing, press the qr buttons to Playback mode. ● Press the 1 button. X The displayed image will appear. Set to select [Cancel], then press the m button. 25 X The last image you shoot will be recovered. Erase the image. ● Press...
... note that erased images cannot be erased. ● To exit instead of erasing, press the qr buttons to Playback mode. ● Press the 1 button. X The displayed image will appear. Set to select [Cancel], then press the m button. 25 X The last image you shoot will be recovered. Erase the image. ● Press...

PowerShot A2000 IS Camera User Guide
Page 28
X When the camera focuses, it appear larger. Indicator 28 Recordable Time Compose the shot of your subject making it will beep twice and the indicator will zoom out from your subject. ● Moving the zoom lever towards j will light green. Moving the lever towards i will zoom in on the screen. Focus. ● Press the shutter button lightly (halfway) to shoot movies. Shooting Movies Setting the mode dial to E (Movie) allows you to focus. Set to Movie mode. ● Set the mode dial to E. ● Confirm that displays on your subject making it appear smaller.
X When the camera focuses, it appear larger. Indicator 28 Recordable Time Compose the shot of your subject making it will beep twice and the indicator will zoom out from your subject. ● Moving the zoom lever towards j will light green. Moving the lever towards i will zoom in on the screen. Focus. ● Press the shutter button lightly (halfway) to shoot movies. Shooting Movies Setting the mode dial to E (Movie) allows you to focus. Set to Movie mode. ● Set the mode dial to E. ● Confirm that displays on your subject making it appear smaller.

PowerShot A2000 IS Camera User Guide
Page 31
...more Interface USB Free Hard Disk Space • Canon Utilities - Windows OS Windows Vista (including Service Pack 1) Windows XP Service Pack 2 Computer model CPU The above OS should be pre-installed on computers with the camera (p. 2) System Requirements Install the software on a... Camera and computer • Canon Digital Camera Solution Disk supplied with the camera (p. 2) • Interface cable supplied with built- Windows Vista: Pentium 1.3 GHz or higher Windows XP: Pentium 500 MHz or higher RAM Windows Vista: Windows XP: 512 MB or more 256 MB or more Display ...
...more Interface USB Free Hard Disk Space • Canon Utilities - Windows OS Windows Vista (including Service Pack 1) Windows XP Service Pack 2 Computer model CPU The above OS should be pre-installed on computers with the camera (p. 2) System Requirements Install the software on a... Camera and computer • Canon Digital Camera Solution Disk supplied with the camera (p. 2) • Interface cable supplied with built- Windows Vista: Pentium 1.3 GHz or higher Windows XP: Pentium 500 MHz or higher RAM Windows Vista: Windows XP: 512 MB or more 256 MB or more Display ...
PowerShot A2000 IS Camera User Guide
Page 32
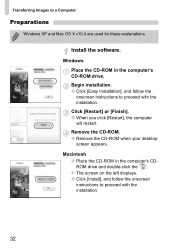
... proceed with the installation. Install the software. Click [Restart] or [Finish]. ● When you click [Restart], the computer will restart. X The screen on the left displays. ● Click [Install], and follow the onscreen instructions to a Computer Preparations Windows XP and Mac OS X v10.4 are used for these explanations. Remove the CD...
... proceed with the installation. Install the software. Click [Restart] or [Finish]. ● When you click [Restart], the computer will restart. X The screen on the left displays. ● Click [Install], and follow the onscreen instructions to a Computer Preparations Windows XP and Mac OS X v10.4 are used for these explanations. Remove the CD...

PowerShot A2000 IS Camera User Guide
Page 34
... at the bottom of the desktop). X All images not previously transferred will be transferred to the computer. ● After the transfer finishes, turn off the camera and unplug the cable. ● For further operations, refer to a Computer Macintosh X CameraWindow will appear. ● If it does not appear, click the [CameraWindow] icon...
... at the bottom of the desktop). X All images not previously transferred will be transferred to the computer. ● After the transfer finishes, turn off the camera and unplug the cable. ● For further operations, refer to a Computer Macintosh X CameraWindow will appear. ● If it does not appear, click the [CameraWindow] icon...
PowerShot A2000 IS Camera User Guide
Page 42
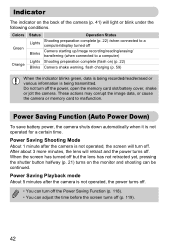
... turn off the Power Saving Function (p. 118). • You can be continued. Power Saving Playback mode About 5 minutes after the camera is being recorded/read/erased or various information is not operated, the screen will retract and the power turns off. Do not turn ...for a certain time. Colors Green Orange Status Operation Status Lights Shooting preparation complete (p. 22) /when connected to a computer/display turned off Blinks Camera starting up/image recording/reading/erasing/ transferring (when connected to malfunction. After about 3 more minutes, the lens will turn off...
... turn off the Power Saving Function (p. 118). • You can be continued. Power Saving Playback mode About 5 minutes after the camera is being recorded/read/erased or various information is not operated, the screen will retract and the power turns off. Do not turn ...for a certain time. Colors Green Orange Status Operation Status Lights Shooting preparation complete (p. 22) /when connected to a computer/display turned off Blinks Camera starting up/image recording/reading/erasing/ transferring (when connected to malfunction. After about 3 more minutes, the lens will turn off...
PowerShot A2000 IS Camera User Guide
Page 43
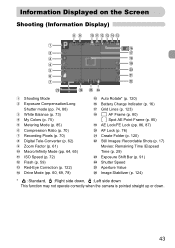
... the Screen Shooting (Information Display) a Shooting Mode b Exposure Compensation/Long Shutter mode (pp. 74, 88) c White Balance (p. 73) d My Colors (p. 75) e Metering Mode (p. 85) f Compression Ratio (p. 70) g Recording Pixels (p. 70) h Digital Tele-Converter (p. 62) i Zoom Factor (p. 61) j Macro/Infinity Mode (pp. 64, 65) k ISO Speed (p. 72) l Flash (p. 59) m Red-Eye Correction ...Bar (p. 91) x Shutter Speed y Aperture Value z Image Stabilizer (p. 124) * :Standard, :Right side down, :Left side down This function may not operate correctly when the camera is pointed straight up or down. 43
... the Screen Shooting (Information Display) a Shooting Mode b Exposure Compensation/Long Shutter mode (pp. 74, 88) c White Balance (p. 73) d My Colors (p. 75) e Metering Mode (p. 85) f Compression Ratio (p. 70) g Recording Pixels (p. 70) h Digital Tele-Converter (p. 62) i Zoom Factor (p. 61) j Macro/Infinity Mode (pp. 64, 65) k ISO Speed (p. 72) l Flash (p. 59) m Red-Eye Correction ...Bar (p. 91) x Shutter Speed y Aperture Value z Image Stabilizer (p. 124) * :Standard, :Right side down, :Left side down This function may not operate correctly when the camera is pointed straight up or down. 43
PowerShot A2000 IS Camera User Guide
Page 44
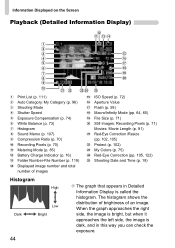
...right side, the image is bright, but when it approaches the left side, the image is called the histogram. Information Displayed on the Screen Playback (Detailed Information Display) a Print List (p. 111) b Auto Category/My Category (p. 96) c Shooting Mode d Shutter Speed e Exposure ... Ratio (p. 70) j Recording Pixels (p. 70) k Metering Mode (p. 85) l Battery Charge Indicator (p. 16) m Folder Number-File Number (p. 119) n Displayed image number and total number of an image. The histogram shows the distribution of brightness of images o ISO Speed (p. 72) p Aperture Value q Flash (p. 59...
...right side, the image is bright, but when it approaches the left side, the image is called the histogram. Information Displayed on the Screen Playback (Detailed Information Display) a Print List (p. 111) b Auto Category/My Category (p. 96) c Shooting Mode d Shutter Speed e Exposure ... Ratio (p. 70) j Recording Pixels (p. 70) k Metering Mode (p. 85) l Battery Charge Indicator (p. 16) m Folder Number-File Number (p. 119) n Displayed image number and total number of an image. The histogram shows the distribution of brightness of images o ISO Speed (p. 72) p Aperture Value q Flash (p. 59...
PowerShot A2000 IS Camera User Guide
Page 45
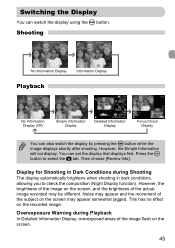
Shooting No Information Display Information Display Playback No Information Display (Off) Simple Information Display Detailed Information Display Focus Check Display You can switch the display using the ⁄ button. However, the Simple Information will not display. Noise may appear and the movement of the subject on the recorded image. Switching the Display You can also switch the display by pressing the...
Shooting No Information Display Information Display Playback No Information Display (Off) Simple Information Display Detailed Information Display Focus Check Display You can switch the display using the ⁄ button. However, the Simple Information will not display. Noise may appear and the movement of the subject on the recorded image. Switching the Display You can also switch the display by pressing the...
PowerShot A2000 IS Camera User Guide
Page 46
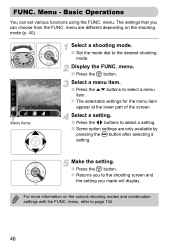
.... ● Some option settings are different depending on the various shooting modes and combination settings with the FUNC. Display the FUNC. Make the setting. ● Press the m button. The settings that you made will display. Basic Operations You can choose from the FUNC. For more information on the shooting mode (p. 40). menu...
.... ● Some option settings are different depending on the various shooting modes and combination settings with the FUNC. Display the FUNC. Make the setting. ● Press the m button. The settings that you made will display. Basic Operations You can choose from the FUNC. For more information on the shooting mode (p. 40). menu...

PowerShot A2000 IS Camera User Guide
Page 47
... right to select a tab. Select a tab. ● Press the qr buttons to page 136. 47 The menu items are organized under categorized tabs, and the displayed tabs and menu items change, depending on the tabs and menu items, refer to select a tab. ● You can only be set after switching the... screen using the m button. Make the settings. ● Press the · button. For more information on the Shooting (p. 40) or Playback mode (p. 41). Display the menu. ● Press the · button.
... right to select a tab. Select a tab. ● Press the qr buttons to page 136. 47 The menu items are organized under categorized tabs, and the displayed tabs and menu items change, depending on the tabs and menu items, refer to select a tab. ● You can only be set after switching the... screen using the m button. Make the settings. ● Press the · button. For more information on the Shooting (p. 40) or Playback mode (p. 41). Display the menu. ● Press the · button.

PowerShot A2000 IS Camera User Guide
Page 48
... you have mistakenly made a setting, you can reset the camera to select [OK], then press the m button. Display the menu. ● Press the · button. Reset settings. ● Press the qr buttons to the default settings. menu White balance data recorded ...with the Custom White Balance function (p. 73). • The 3 tab [Date/Time] (p. 18), [Language] (p. 20), [Video System] (p. 100) 48 X The camera will reset to ...
... you have mistakenly made a setting, you can reset the camera to select [OK], then press the m button. Display the menu. ● Press the · button. Reset settings. ● Press the qr buttons to the default settings. menu White balance data recorded ...with the Custom White Balance function (p. 73). • The 3 tab [Date/Time] (p. 18), [Language] (p. 20), [Video System] (p. 100) 48 X The camera will reset to ...


