User Manual
Page 2
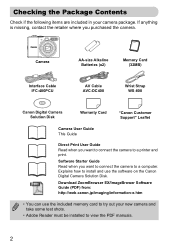
...Contents Check if the following items are included in your new camera and take some test shots. • Adobe Reader must be installed to install and use the software on the Canon Digital Camera Solution Disk. Camera AA-size Alkaline Batteries (x2) Memory Card (32MB) Interface... Cable IFC-400PCU AV Cable AVC-DC400 Wrist Strap WS-800 Canon Digital Camera Solution Disk Warranty Card "Canon Customer Support" Leaflet Camera User Guide This Guide ...
...Contents Check if the following items are included in your new camera and take some test shots. • Adobe Reader must be installed to install and use the software on the Canon Digital Camera Solution Disk. Camera AA-size Alkaline Batteries (x2) Memory Card (32MB) Interface... Cable IFC-400PCU AV Cable AVC-DC400 Wrist Strap WS-800 Canon Digital Camera Solution Disk Warranty Card "Canon Customer Support" Leaflet Camera User Guide This Guide ...
User Manual
Page 31
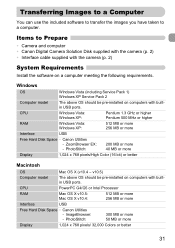
...-installed on a computer meeting the following requirements. Transferring Images to a Computer You can use the included software to transfer the images you have taken to Prepare • Camera and computer • Canon Digital Camera Solution Disk supplied with the camera (p. 2) • Interface cable supplied with builtin USB ports. PhotoStitch: 50 MB or more Interface USB Free...
...-installed on a computer meeting the following requirements. Transferring Images to a Computer You can use the included software to transfer the images you have taken to Prepare • Camera and computer • Canon Digital Camera Solution Disk supplied with the camera (p. 2) • Interface cable supplied with builtin USB ports. PhotoStitch: 50 MB or more Interface USB Free...
User Manual
Page 32
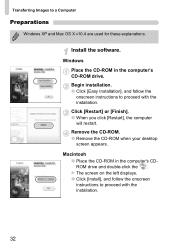
...] or [Finish]. ● When you click [Restart], the computer will restart. Macintosh ● Place the CD-ROM in the computer's CD-ROM drive. Install the software.
...] or [Finish]. ● When you click [Restart], the computer will restart. Macintosh ● Place the CD-ROM in the computer's CD-ROM drive. Install the software.

User Manual
Page 34
...computer. ● After the transfer finishes, turn off the camera and unplug the cable. ● For further operations, refer to a Computer Macintosh X CameraWindow will appear. ● If it does not appear, click the [CameraWindow] icon on the camera's screen, and the c button will light blue. You ...cannot shoot while the Direct Transfer menu displays. Transferring Images to the Software Starter Guide. 34 X The Direct Transfer menu appears on the Dock (the bar ...
...computer. ● After the transfer finishes, turn off the camera and unplug the cable. ● For further operations, refer to a Computer Macintosh X CameraWindow will appear. ● If it does not appear, click the [CameraWindow] icon on the camera's screen, and the c button will light blue. You ...cannot shoot while the Direct Transfer menu displays. Transferring Images to the Software Starter Guide. 34 X The Direct Transfer menu appears on the Dock (the bar ...
User Manual
Page 35
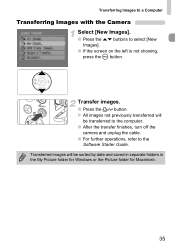
X All images not previously transferred will be transferred to the computer. ● After the transfer finishes, turn off the camera and unplug the cable. ● For further operations, refer to select [New Images]. ● If the screen on the left is not showing, press the &#... in separate folders in the My Picture folder for Windows or the Picture folder for Macintosh. 35 Transferring Images to a Computer Transferring Images with the Camera Select [New Images]. ● Press the op buttons to the Software Starter Guide.
X All images not previously transferred will be transferred to the computer. ● After the transfer finishes, turn off the camera and unplug the cable. ● For further operations, refer to select [New Images]. ● If the screen on the left is not showing, press the &#... in separate folders in the My Picture folder for Windows or the Picture folder for Macintosh. 35 Transferring Images to a Computer Transferring Images with the Camera Select [New Images]. ● Press the op buttons to the Software Starter Guide.
User Manual
Page 63
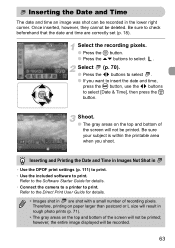
... the date and time are shot with a small number of recording pixels. Be sure to the Direct Print User Guide for details. • Connect the camera to a printer to select [Date & Time], then press the m button. Inserting the Date and Time The date and time an image was shot can be...; however, the entire image displayed will not be deleted. Select (p. 70). ● Press the qr buttons to select . ● If you shoot. Refer to the Software Starter Guide for details. • Images shot in • Use the DPOF print settings (p. 111) to print. • Use the included...
... the date and time are shot with a small number of recording pixels. Be sure to the Direct Print User Guide for details. • Connect the camera to a printer to select [Date & Time], then press the m button. Inserting the Date and Time The date and time an image was shot can be...; however, the entire image displayed will not be deleted. Select (p. 70). ● Press the qr buttons to select . ● If you shoot. Refer to the Software Starter Guide for details. • Images shot in • Use the DPOF print settings (p. 111) to print. • Use the included...
User Manual
Page 107
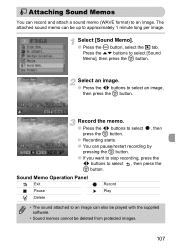
.... , then ● You can record and attach a sound memo (WAVE format) to an image. The attached sound memo can also be played with the supplied software. • Sound memos cannot be up to approximately 1 minute long per image. ^ Attaching Sound Memos You can pause/restart recording by pressing the m button. ●...
.... , then ● You can record and attach a sound memo (WAVE format) to an image. The attached sound memo can also be played with the supplied software. • Sound memos cannot be up to approximately 1 minute long per image. ^ Attaching Sound Memos You can pause/restart recording by pressing the m button. ●...
User Manual
Page 119
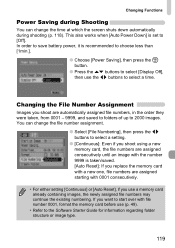
...], then press the m button. ● Press the op buttons to select [Display Off], then use the qr buttons to select a time. In order to the Software Starter Guide for information regarding folder structure or image type. 119 Changing Functions Power Saving during shooting (p. 118). You can change the time at which...
...], then press the m button. ● Press the op buttons to select [Display Off], then use the qr buttons to select a time. In order to the Software Starter Guide for information regarding folder structure or image type. 119 Changing Functions Power Saving during shooting (p. 118). You can change the time at which...
User Manual
Page 131
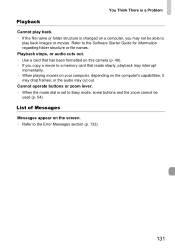
... the mode dial is set to Easy mode, some buttons and the zoom cannot be able to a memory card that has been formatted on this camera (p. 49). • If you copy a movie to play back. • If the file name or folder structure is changed on the computer's capabilities, it may... drop frames, or the audio may not be used (p. 54). List of Messages Messages appear on the screen. • Refer to the Software Starter Guide for information regarding folder structure or file names.
... the mode dial is set to Easy mode, some buttons and the zoom cannot be able to a memory card that has been formatted on this camera (p. 49). • If you copy a movie to play back. • If the file name or folder structure is changed on the computer's capabilities, it may... drop frames, or the audio may not be used (p. 54). List of Messages Messages appear on the screen. • Refer to the Software Starter Guide for information regarding folder structure or file names.
User Manual
Page 144
... Sepia Tones 75 Shooting Date and Time Î Date/ Time Shooting Using a TV 77 Shutter Button 21 Slide Show 98 Snow (Scene Mode 57 Software Digital Camera Solution Disk . 2 Software Starter Guide.......... 2 Transferring Images to a Computer 31 Sound 51 Sound Memos 107 Strap 2, 13 Sunset (Scene Mode 57 Supplementary Flash 126 T Terminal........... 26, 33...
... Sepia Tones 75 Shooting Date and Time Î Date/ Time Shooting Using a TV 77 Shutter Button 21 Slide Show 98 Snow (Scene Mode 57 Software Digital Camera Solution Disk . 2 Software Starter Guide.......... 2 Transferring Images to a Computer 31 Sound 51 Sound Memos 107 Strap 2, 13 Sunset (Scene Mode 57 Supplementary Flash 126 T Terminal........... 26, 33...


