User Manual
Page 1
After you finish reading this unit. CANON DOCUMENT SCANNER INSTRUCTIONS ENGLISH Please read this manual before operating this manual, store it in a safe place for future reference.
After you finish reading this unit. CANON DOCUMENT SCANNER INSTRUCTIONS ENGLISH Please read this manual before operating this manual, store it in a safe place for future reference.

User Manual
Page 2
... item e. These limits are for damage resulting from digital apparatus as computers, monitors, printers, fax machines, copiers and scanners. Do not make any changes or modifications to Part 15 of this product meets the ENERGY STAR guidelines for any form or by...trademarks and/or registered trademarks of the Industry Canada. and the subsidiaries on the back cover assume no responsibility for energy efficiency. However, Canon Electronics Inc. The program backs the development and dissemination of products with the limits for a Class A digital device, pursuant to the...
... item e. These limits are for damage resulting from digital apparatus as computers, monitors, printers, fax machines, copiers and scanners. Do not make any changes or modifications to Part 15 of this product meets the ENERGY STAR guidelines for any form or by...trademarks and/or registered trademarks of the Industry Canada. and the subsidiaries on the back cover assume no responsibility for energy efficiency. However, Canon Electronics Inc. The program backs the development and dissemination of products with the limits for a Class A digital device, pursuant to the...
User Manual
Page 3
... OF THIS AGREEMENT, DO NOT OPEN THE SEALED DISK PACKAGE AND PROMPTLY RETURN THE CANON SCANNER, THE DISK PACKAGE CONTAINING SCANNER DRIVER SOFTWARE PROGRAMS AND/OR SCANNER UTILITY SOFTWARE PROGRAM PROPRIETARY TO CANON OR ITS LICENSOR (THE "SOFTWARE") AND THE ACCOMPANYING DOCUMENTATION AND OTHER ITEMS TO THE PLACE WHERE YOU OBTAINED THEM FOR A REFUND BEFORE THEY...
... OF THIS AGREEMENT, DO NOT OPEN THE SEALED DISK PACKAGE AND PROMPTLY RETURN THE CANON SCANNER, THE DISK PACKAGE CONTAINING SCANNER DRIVER SOFTWARE PROGRAMS AND/OR SCANNER UTILITY SOFTWARE PROGRAM PROPRIETARY TO CANON OR ITS LICENSOR (THE "SOFTWARE") AND THE ACCOMPANYING DOCUMENTATION AND OTHER ITEMS TO THE PLACE WHERE YOU OBTAINED THEM FOR A REFUND BEFORE THEY...

User Manual
Page 5
... request could result in damage to observe the instructions provided in a caution notice could result in a safe place for purchasing the Canon Document Scanner DR-7580/9080C. Note Notes provide additional tips or advice that must be avoided. Failure to observe the instructions provided in a warning could result in...safety and contain extremely important information. After reading this manual thoroughly before operating the machine in using the scanner. 1 Conventions This manual uses the following and familiarize yourself with its capabilities, and to the equipment.
... request could result in damage to observe the instructions provided in a caution notice could result in a safe place for purchasing the Canon Document Scanner DR-7580/9080C. Note Notes provide additional tips or advice that must be avoided. Failure to observe the instructions provided in a warning could result in...safety and contain extremely important information. After reading this manual thoroughly before operating the machine in using the scanner. 1 Conventions This manual uses the following and familiarize yourself with its capabilities, and to the equipment.
User Manual
Page 7
2.4 Turning ON/OFF the Power 27 Turning ON the Power 27 Recognizing the Scanner 28 Turning OFF the Power 30 Chapter 3 Software 3.1 About the Software 32 3.2 Installing the Software 33 Installing the ISIS/TWAIN Driver ...to Use CapturePerfect 37 ◆ Starting CapturePerfect 37 ◆ Closing CapturePerfect 38 3.4 Uninstalling the Software 39 Chapter 4 Document Feeding and Scanning 4.1 Documents 42 Types of Documents 42 How to Place Documents 43 4.2 Document Feeding and Scanning 44 Scan Procedure 44 ◆ Standard Feeding 45 ◆ Panel-Feeding 46 ◆ Automatic Feeding...
2.4 Turning ON/OFF the Power 27 Turning ON the Power 27 Recognizing the Scanner 28 Turning OFF the Power 30 Chapter 3 Software 3.1 About the Software 32 3.2 Installing the Software 33 Installing the ISIS/TWAIN Driver ...to Use CapturePerfect 37 ◆ Starting CapturePerfect 37 ◆ Closing CapturePerfect 38 3.4 Uninstalling the Software 39 Chapter 4 Document Feeding and Scanning 4.1 Documents 42 Types of Documents 42 How to Place Documents 43 4.2 Document Feeding and Scanning 44 Scan Procedure 44 ◆ Standard Feeding 45 ◆ Panel-Feeding 46 ◆ Automatic Feeding...
User Manual
Page 8
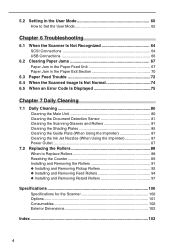
5.2 Setting in the User Mode 60 How to Set the User Mode 62 Chapter 6 Troubleshooting 6.1 When the Scanner Is Not Recognized 64 SCSI Connections 64 USB Connections 66 6.2 Clearing Paper Jams 67 Paper Jam in the Paper Feed Unit 67 Paper Jam in ... Image Is Not Normal 74 6.5 When an Error Code Is Displayed 75 Chapter 7 Daily Cleaning 7.1 Daily Cleaning 80 Cleaning the Main Unit 80 Cleaning the Document Detection Sensor 81 Cleaning the Scanning Glasses and Rollers 81 Cleaning the Shading Plates 85 Cleaning the Guide Plate (When Using the Imprinter 87 Cleaning...
5.2 Setting in the User Mode 60 How to Set the User Mode 62 Chapter 6 Troubleshooting 6.1 When the Scanner Is Not Recognized 64 SCSI Connections 64 USB Connections 66 6.2 Clearing Paper Jams 67 Paper Jam in the Paper Feed Unit 67 Paper Jam in ... Image Is Not Normal 74 6.5 When an Error Code Is Displayed 75 Chapter 7 Daily Cleaning 7.1 Daily Cleaning 80 Cleaning the Main Unit 80 Cleaning the Document Detection Sensor 81 Cleaning the Scanning Glasses and Rollers 81 Cleaning the Shading Plates 85 Cleaning the Guide Plate (When Using the Imprinter 87 Cleaning...
User Manual
Page 9
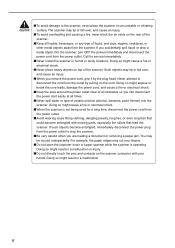
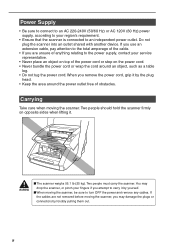
... plug when your hands are handling the power cord or plug. Two people must carry the scanner. Never use a firmly wrung cloth moistened slightly with care. If you suspect the scanner has been accidentally damaged, turn OFF the power and disconnect the power cord from the power...smoke or abnormal heat, sense vibration, or smell odd odors around itself or another object. Avoid shocks and vibrations to disassemble or modify the scanner. ■ Never use flammable aerosol products near flammable substances such as alcohol, paint thinner, benzene, or any type of volatile solution. &#...
... plug when your hands are handling the power cord or plug. Two people must carry the scanner. Never use a firmly wrung cloth moistened slightly with care. If you suspect the scanner has been accidentally damaged, turn OFF the power and disconnect the power cord from the power...smoke or abnormal heat, sense vibration, or smell odd odors around itself or another object. Avoid shocks and vibrations to disassemble or modify the scanner. ■ Never use flammable aerosol products near flammable substances such as alcohol, paint thinner, benzene, or any type of volatile solution. &#...
User Manual
Page 10
...■ Never place heavy objects on the cord. CAUTION ■ To avoid damage to stop the scanner. ■ Be very careful when you are loading a document or removing a paper jam. The scanner may be injured unexpectedly. If you remove the power cord, grip it by pulling on top of volatile... solution (alcohol, benzene, paint thinner) into the scanner, turn OFF the power immediately and disconnect the ...
...■ Never place heavy objects on the cord. CAUTION ■ To avoid damage to stop the scanner. ■ Be very careful when you are loading a document or removing a paper jam. The scanner may be injured unexpectedly. If you remove the power cord, grip it by pulling on top of volatile... solution (alcohol, benzene, paint thinner) into the scanner, turn OFF the power immediately and disconnect the ...
User Manual
Page 11
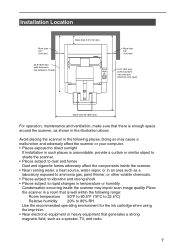
Avoid placing the scanner in the illustration above. Installation Location More than 3.9" (100 mm) 24.8" (630 mm) (with document tray extension closed) More than 3.9" (100 mm) More than 3.9" (100 mm) 31.9" (810 mm) (with document tray extension, extension wire open) More than 26" (660... mm) For operation, maintenance and ventilation, make sure that generates a strong magnetic field, such as shown in the following places. Place the scanner in temperature or humidity Condensation occurring inside...
Avoid placing the scanner in the illustration above. Installation Location More than 3.9" (100 mm) 24.8" (630 mm) (with document tray extension closed) More than 3.9" (100 mm) More than 3.9" (100 mm) 31.9" (810 mm) (with document tray extension, extension wire open) More than 26" (660... mm) For operation, maintenance and ventilation, make sure that generates a strong magnetic field, such as shown in the following places. Place the scanner in temperature or humidity Condensation occurring inside...
User Manual
Page 12
... or wrap the cord around the power outlet free of obstacles. When you remove the power cord, grip it by yourself. ■ When moving the scanner. If you attempt to an independent power outlet. If the cables are unsure of the cable. • If you are not removed before moving the... scanner, you may drop the scanner, or pinch your fingers if you use an extension cable, pay attention to the total amperage of anything relating to the power supply...
... or wrap the cord around the power outlet free of obstacles. When you remove the power cord, grip it by yourself. ■ When moving the scanner. If you attempt to an independent power outlet. If the cables are unsure of the cable. • If you are not removed before moving the... scanner, you may drop the scanner, or pinch your fingers if you use an extension cable, pay attention to the total amperage of anything relating to the power supply...
User Manual
Page 13
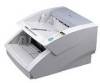
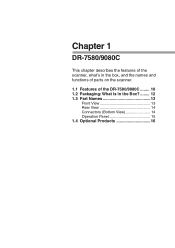
Chapter 1 DR-7580/9080C This chapter describes the features of the scanner, what's in the box, and the names and functions of parts on the scanner. 1.1 Features of the DR-7580/9080C ........ 10 1.2 Packaging: What Is in the Box? ........ 12 1.3 Part Names 13 Front View 13 Rear View 14 Connectors (Bottom View 14 Operation Panel 15 1.4 Optional Products 16
Chapter 1 DR-7580/9080C This chapter describes the features of the scanner, what's in the box, and the names and functions of parts on the scanner. 1.1 Features of the DR-7580/9080C ........ 10 1.2 Packaging: What Is in the Box? ........ 12 1.3 Part Names 13 Front View 13 Rear View 14 Connectors (Bottom View 14 Operation Panel 15 1.4 Optional Products 16
User Manual
Page 14
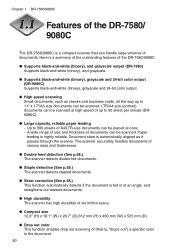
Chapter 1 DR-7580/9080C Features of the DR-7580/ 9080C The DR-7580/9080C is a compact scanner that is, "drops out") a specific color in at once. - Up to 500 sheets of A4/LTR-size documents can handle large volumes of documents. A wide range of size and thickness of up to 90 sheet per minute (DR9080C). ● Large capacity, reliable paper...
Chapter 1 DR-7580/9080C Features of the DR-7580/ 9080C The DR-7580/9080C is a compact scanner that is, "drops out") a specific color in at once. - Up to 500 sheets of A4/LTR-size documents can handle large volumes of documents. A wide range of size and thickness of up to 90 sheet per minute (DR9080C). ● Large capacity, reliable paper...

User Manual
Page 16
Check every item you have removed from the box. and Canada only) 12 If any items are missing, contact your sales representative. Chapter 1 DR-7580/9080C Packaging: What Is in this package may change without notice. Warranty Card (U.S.A. Power Cord DR-7580/9080C Setup Disc Instructions (this manual) QUICK REFERENCE TROUUSBSECLFEAUSNLHNFOIENOAGTTUINBRAGESSICS DOCUMENT SCANNER Quick Reference Guide USB Cable • The setup disc is in the Instructions. • Item included in the Box? Make sure that you have everything.
Check every item you have removed from the box. and Canada only) 12 If any items are missing, contact your sales representative. Chapter 1 DR-7580/9080C Packaging: What Is in this package may change without notice. Warranty Card (U.S.A. Power Cord DR-7580/9080C Setup Disc Instructions (this manual) QUICK REFERENCE TROUUSBSECLFEAUSNLHNFOIENOAGTTUINBRAGESSICS DOCUMENT SCANNER Quick Reference Guide USB Cable • The setup disc is in the Instructions. • Item included in the Box? Make sure that you have everything.
User Manual
Page 17
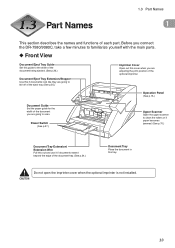
... the DR-7580/9080C, take a few minutes to familiarize yourself with the main parts. ◆ Front View Document Eject Tray Guide Set this guide to the width of the document being ejected. (See p.26.) Document Eject Tray Extension/Stopper Use this if documents look like they are going to scan. Power Switch (See p.27.) Upper Scanner Open...
... the DR-7580/9080C, take a few minutes to familiarize yourself with the main parts. ◆ Front View Document Eject Tray Guide Set this guide to the width of the document being ejected. (See p.26.) Document Eject Tray Extension/Stopper Use this if documents look like they are going to scan. Power Switch (See p.27.) Upper Scanner Open...
User Manual
Page 18
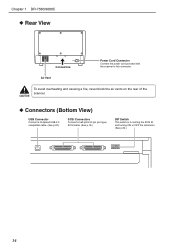
CAUTION ◆ Connectors (Bottom View) USB Connector Connect a Hi-Speed USB 2.0 compatible cable. (See p.22.) SCSI Connectors Connect a half-pitch 50 pin (pin type) SCSI cable. (See p.19.) DIP Switch This switch is for setting the SCSI ID and turning ON or OFF the terminator. (See p.20.) 14 Air Vent To avoid overheating and causing a fire, never block the air vents on the rear of the scanner. Chapter 1 DR-7580/9080C ◆ Rear View Connectors Power Cord Connector Connect the power cord provided with the scanner to this connector.
CAUTION ◆ Connectors (Bottom View) USB Connector Connect a Hi-Speed USB 2.0 compatible cable. (See p.22.) SCSI Connectors Connect a half-pitch 50 pin (pin type) SCSI cable. (See p.19.) DIP Switch This switch is for setting the SCSI ID and turning ON or OFF the terminator. (See p.20.) 14 Air Vent To avoid overheating and causing a fire, never block the air vents on the rear of the scanner. Chapter 1 DR-7580/9080C ◆ Rear View Connectors Power Cord Connector Connect the power cord provided with the scanner to this connector.

User Manual
Page 19
...mode is in use this key to cancel the currently set in this state, the document will be fed and the scanner will count the number of pages scanned or cancel an error on the counter display...a separate file or folder from that are bound at least two seconds. (2) Count Only key Sets the scanner to start scanning. 15 Also use , scanned images will light. This key lights when it will be scanned... batch separator has been set mode, or to clear the number of pages. (The document will not be saved to be fed without page separation. (5) Stop key Press this function is selected ...
...mode is in use this key to cancel the currently set in this state, the document will be fed and the scanner will count the number of pages scanned or cancel an error on the counter display...a separate file or folder from that are bound at least two seconds. (2) Count Only key Sets the scanner to start scanning. 15 Also use , scanned images will light. This key lights when it will be scanned... batch separator has been set mode, or to clear the number of pages. (The document will not be saved to be fed without page separation. (5) Stop key Press this function is selected ...

User Manual
Page 20
...are necessary. It keeps a tally of the pages that is installed on top of the scanner, and prints a eight digit number on the front of the document being scanned. Chapter 1 DR-7580/9080C Optional Products The following options can set the text message that allows the ISIS/TWAIN driver ... inside the upper scanner. Note Ink cartridges used on the DR-7580/9080C, if they are : C6602B (blue), C6602G (green), and C6602R (red). ◆ Endorser ED-600 The Endorser ED-600 unit is installed inside the scanner, and prints a text message on the back of the document being scanned. See...
...are necessary. It keeps a tally of the pages that is installed on top of the scanner, and prints a eight digit number on the front of the document being scanned. Chapter 1 DR-7580/9080C Optional Products The following options can set the text message that allows the ISIS/TWAIN driver ... inside the upper scanner. Note Ink cartridges used on the DR-7580/9080C, if they are : C6602B (blue), C6602G (green), and C6602R (red). ◆ Endorser ED-600 The Endorser ED-600 unit is installed inside the scanner, and prints a text message on the back of the document being scanned. See...
User Manual
Page 21
Chapter 2 Preparation Before Use This chapter describes the procedure from scanner connection through to turning ON the power. 2.1 Checking Your Operating Environment 18 2.2 Connecting to a Computer 19 SCSI Connections 19 USB Connections 22 Connecting the Power Cord 23 2.3 Preparing for Paper Feed and Eject 24 Preparing the Document Tray Extension 24 Preparing the Document Eject Tray Extension 25 2.4 Turning ON/OFF the Power 27 Turning ON the Power 27 Recognizing the Scanner 28 Turning OFF the Power 30
Chapter 2 Preparation Before Use This chapter describes the procedure from scanner connection through to turning ON the power. 2.1 Checking Your Operating Environment 18 2.2 Connecting to a Computer 19 SCSI Connections 19 USB Connections 22 Connecting the Power Cord 23 2.3 Preparing for Paper Feed and Eject 24 Preparing the Document Tray Extension 24 Preparing the Document Eject Tray Extension 25 2.4 Turning ON/OFF the Power 27 Turning ON the Power 27 Recognizing the Scanner 28 Turning OFF the Power 30

User Manual
Page 22
Chapter 2 Preparation Before Use Checking Your Operating Environment Your computer system must meet the following conditions to use the DR-7580/9080C. ● IBM PC/AT or compatible machines that meet the recommended specifications, the scanning speed may slow down or the time required ...or later • Microsoft Windows XP SP1 or later ● Either an ISIS (compatible) or a TWAIN (compatible) application that is compatible with this scanner or Hi-Speed USB 2.0 interface card (See "Connecting to transfer data may increase. 18 Important ● Use the latest USB 2.0 driver when using...
Chapter 2 Preparation Before Use Checking Your Operating Environment Your computer system must meet the following conditions to use the DR-7580/9080C. ● IBM PC/AT or compatible machines that meet the recommended specifications, the scanning speed may slow down or the time required ...or later • Microsoft Windows XP SP1 or later ● Either an ISIS (compatible) or a TWAIN (compatible) application that is compatible with this scanner or Hi-Speed USB 2.0 interface card (See "Connecting to transfer data may increase. 18 Important ● Use the latest USB 2.0 driver when using...
User Manual
Page 23
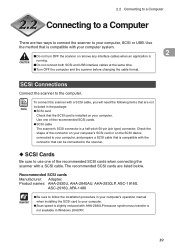
... with the connector that is a half-pitch 50-pin (pin type) connector. Check the shape of the recommended SCSI cards when connecting the scanner with AHA-2930LP because synchronous transfer is CAUTION running. ■ Do not connect both SCSI and USB interface cables at the same time. ■...; Turn OFF the computer and the scanner before changing the cable format. The recommended SCSI cards are two ways to connect the scanner to your computer, SCSI or USB. Use the method that are not Note included in your ...
... with the connector that is a half-pitch 50-pin (pin type) connector. Check the shape of the recommended SCSI cards when connecting the scanner with AHA-2930LP because synchronous transfer is CAUTION running. ■ Do not connect both SCSI and USB interface cables at the same time. ■...; Turn OFF the computer and the scanner before changing the cable format. The recommended SCSI cards are two ways to connect the scanner to your computer, SCSI or USB. Use the method that are not Note included in your ...


