Instruction Manual
Page 20
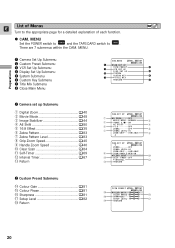
...Submenu 6 Custom Key Submenu 7 Title Mix Submenu 8 Close Main Menu CAM. SET UP 4 5 SYSTEM CUSTOM KEY 6 7 TITLE MIX RETURN 8 1 Camera set up Submenu q Digital Zoom 40 w Movie Mode 48 e Image Stabilizer 44 r AE Shift 80 t 16:9 Effect 35 y Zebra Pattern 83 u Zebra Pattern Level 83 i... Submenu !4 Colour Gain 81 !5 Colour Phase 81 !6 Sharpness 81 !7 Setup Level 82 !8 Return CSTM PRESET SEL. MENU Set the POWER switch to CAMERA and the TAPE/CARD switch to the appropriate page for a detailed explanation of each function. 2 CAM. MENU. ZOOM OFF MOVIE MODE••NORMAL...
...Submenu 6 Custom Key Submenu 7 Title Mix Submenu 8 Close Main Menu CAM. SET UP 4 5 SYSTEM CUSTOM KEY 6 7 TITLE MIX RETURN 8 1 Camera set up Submenu q Digital Zoom 40 w Movie Mode 48 e Image Stabilizer 44 r AE Shift 80 t 16:9 Effect 35 y Zebra Pattern 83 u Zebra Pattern Level 83 i... Submenu !4 Colour Gain 81 !5 Colour Phase 81 !6 Sharpness 81 !7 Setup Level 82 !8 Return CSTM PRESET SEL. MENU Set the POWER switch to CAMERA and the TAPE/CARD switch to the appropriate page for a detailed explanation of each function. 2 CAM. MENU. ZOOM OFF MOVIE MODE••NORMAL...
Instruction Manual
Page 34
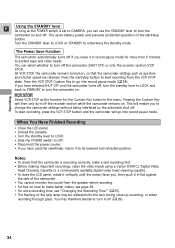
... correctly, make a test recording first. • Before making important recordings, clean the video heads using a Canon DVM-CL Digital Video Head Cleaning Cassette or a commercially available digital video head cleaning cassette. • To close -up recording, or when recording through glass. VCR STOP Select...stop button to start recording from the speaker when recording. • For tips on , so that the camcorder is set to CAMERA, you can select whether to turn off the camcorder (SHUT OFF) or only the recorder section (VCR STOP). When You Have Finished Recording • Close...
... correctly, make a test recording first. • Before making important recordings, clean the video heads using a Canon DVM-CL Digital Video Head Cleaning Cassette or a commercially available digital video head cleaning cassette. • To close -up recording, or when recording through glass. VCR STOP Select...stop button to start recording from the speaker when recording. • For tips on , so that the camcorder is set to CAMERA, you can select whether to turn off the camcorder (SHUT OFF) or only the recorder section (VCR STOP). When You Have Finished Recording • Close...

Instruction Manual
Page 40
...zoom in W T Zoom out ZOOM W T Recording T W This camcorder is set to 5 times. + TAPE CAMERA ( 18) CAM. The zoom control continues to 40 × or 100 × and close as 1 cm (3/8 in digital zoom range. • When the digital zoom is at least 1m (3 ft 3 3/8 in and out between... or 1× and 100x magnification - the camcorder automatically switches between you can focus on the camcorder can be operated from either the side grip, the camcorder handle or the wireless controller. • Digital zoom cannot be used in CARD CAMERA mode. 20× Optical Zoom Press the ...
...zoom in W T Zoom out ZOOM W T Recording T W This camcorder is set to 5 times. + TAPE CAMERA ( 18) CAM. The zoom control continues to 40 × or 100 × and close as 1 cm (3/8 in digital zoom range. • When the digital zoom is at least 1m (3 ft 3 3/8 in and out between... or 1× and 100x magnification - the camcorder automatically switches between you can focus on the camcorder can be operated from either the side grip, the camcorder handle or the wireless controller. • Digital zoom cannot be used in CARD CAMERA mode. 20× Optical Zoom Press the ...

Instruction Manual
Page 48
...image enhancement and print out. Open the menu and select CAM. Slide the program selector to that normally occurs when you would like appearance." + TAPE CAMERA ( 18) CAM.SET UP MOVIE MODE•• NORMAL 1. During playback, pause the video at a video, scene by 1.5×. Selecting the ...from MOVIE MODE in the display. Since the frame rate is set it to FRAME and close the menu. • FRAME appears in the CAMERA menu. • Frame mode cannot be used with the Easy Recording program. • Frame video may not appear completely smooth during normal playback....
...image enhancement and print out. Open the menu and select CAM. Slide the program selector to that normally occurs when you would like appearance." + TAPE CAMERA ( 18) CAM.SET UP MOVIE MODE•• NORMAL 1. During playback, pause the video at a video, scene by 1.5×. Selecting the ...from MOVIE MODE in the display. Since the frame rate is set it to FRAME and close the menu. • FRAME appears in the CAMERA menu. • Frame mode cannot be used with the Easy Recording program. • Frame video may not appear completely smooth during normal playback....
Instruction Manual
Page 50
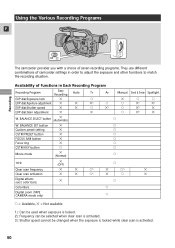
... of Functions in order to adjust the exposure and other functions to match the recording situation. Availability of camcorder settings in Each Recording Program Recording Program Easy Recording Auto Tv Av EXP dial:Exposure lock i h EXP... dial:Aperture adjustment i i i1) h EXP dial:Shutter speed i i h i1) EXP dial:Gain adjustment i i W. color bars) i Color Bars h Digital zoom (TAPE CAMERA mode only) h Manual Sand & Snow Spotlight i h h h i1) i1) h i1) i h i1) i h h h h h h h h h h2) i h i h h =...
... of Functions in order to adjust the exposure and other functions to match the recording situation. Availability of camcorder settings in Each Recording Program Recording Program Easy Recording Auto Tv Av EXP dial:Exposure lock i h EXP... dial:Aperture adjustment i i i1) h EXP dial:Shutter speed i i h i1) EXP dial:Gain adjustment i i W. color bars) i Color Bars h Digital zoom (TAPE CAMERA mode only) h Manual Sand & Snow Spotlight i h h h i1) i1) h i1) i h i1) i h h h h h h h h h h2) i h i h h =...

Instruction Manual
Page 60
... setting even if you stop recording Wipe The camcorder retains the last recorded scene as a still image before entering the record pause mode. Using Digital Effects Show your recordings ( 63). Fader Effects Colour Bar TAPE CAMERA Movie Still Image h i h h h h h= Available, i= Not available CARD CAMERA Still Image i i i Recording Notes: • When you start recording, the...
... setting even if you stop recording Wipe The camcorder retains the last recorded scene as a still image before entering the record pause mode. Using Digital Effects Show your recordings ( 63). Fader Effects Colour Bar TAPE CAMERA Movie Still Image h i h h h h h= Available, i= Not available CARD CAMERA Still Image i i i Recording Notes: • When you start recording, the...

Instruction Manual
Page 61
... start /stop button. 61 Press the D.EFFECTS/BARS SELECT button. • The digital effects menu appears. 2. Select the FADE-T and press the D.EFFECTS/BARS SELECT button. • The menu closes and FADE-T flashes in TAPE CAMERA mode, make sure the program selector is activated (display lights continuously) or deactivated (display... When operating faders in the display. 4. Select FADER and press the SELECT dial in. • FADE-T, WIPE and OVERLAP settings appear. 3. Overlap E The camcorder retains the last recorded scene as a still image before entering the record pause mode.
... start /stop button. 61 Press the D.EFFECTS/BARS SELECT button. • The digital effects menu appears. 2. Select the FADE-T and press the D.EFFECTS/BARS SELECT button. • The menu closes and FADE-T flashes in TAPE CAMERA mode, make sure the program selector is activated (display lights continuously) or deactivated (display... When operating faders in the display. 4. Select FADER and press the SELECT dial in. • FADE-T, WIPE and OVERLAP settings appear. 3. Overlap E The camcorder retains the last recorded scene as a still image before entering the record pause mode.

Instruction Manual
Page 62
...) or deactivated (display flashes). Press the start /stop button. • Recording starts, and the still image gradually changes to Q. + TAPE CAMERA ( 18) FADER FADER OVERLAP 1. Select FADER and press the SELECT dial in. • FADE-T, WIPE and OVERLAP settings appear. 3. Operating Wipe... and Overlap E When operating faders in TAPE CAMERA mode, make sure the program selector is memorized as a still image and the camcorder goes into record pause mode. 6. Press the D.EFFECTS/BARS SELECT button. • The...
...) or deactivated (display flashes). Press the start /stop button. • Recording starts, and the still image gradually changes to Q. + TAPE CAMERA ( 18) FADER FADER OVERLAP 1. Select FADER and press the SELECT dial in. • FADE-T, WIPE and OVERLAP settings appear. 3. Operating Wipe... and Overlap E When operating faders in TAPE CAMERA mode, make sure the program selector is memorized as a still image and the camcorder goes into record pause mode. 6. Press the D.EFFECTS/BARS SELECT button. • The...

Instruction Manual
Page 64
Operating the Effects E + TAPE CAMERA ( 18) EFFECT EFFECT BLK&WHT 1. Press the D.EFFECTS/BARS SELECT button. • The digital effects menu appears. 2. Select EFFECT and press the SELECT dial in the display. 4. Recording 64 Press the D.EFFECTS/BARS ON/OFF button. • The name ...
Operating the Effects E + TAPE CAMERA ( 18) EFFECT EFFECT BLK&WHT 1. Press the D.EFFECTS/BARS SELECT button. • The digital effects menu appears. 2. Select EFFECT and press the SELECT dial in the display. 4. Recording 64 Press the D.EFFECTS/BARS ON/OFF button. • The name ...

Instruction Manual
Page 65
Select COLOR BARS and press the SELECT dial in. • The menu closes and COLOR BARS flashes in the display. • Each time you press the D.EFFECTS/BARS ON/OFF button, the colour bars are activated or deactivated. EFFECTS/BARS SELECT button. • The digital effects menu appears. 2. Press the D. Using the Colour Bars You can display and record industry standard SMPTE colour bars. Press the D. Recording 65 EFFECTS/BARS ON/OFF button. • The colour bars appear in the display. 3. E Activating the Colour Bars + TAPE CAMERA ( 18) COLOR BARS 1.
Select COLOR BARS and press the SELECT dial in. • The menu closes and COLOR BARS flashes in the display. • Each time you press the D.EFFECTS/BARS ON/OFF button, the colour bars are activated or deactivated. EFFECTS/BARS SELECT button. • The digital effects menu appears. 2. Press the D. Using the Colour Bars You can display and record industry standard SMPTE colour bars. Press the D. Recording 65 EFFECTS/BARS ON/OFF button. • The colour bars appear in the display. 3. E Activating the Colour Bars + TAPE CAMERA ( 18) COLOR BARS 1.
Instruction Manual
Page 101
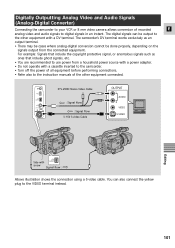
...Cable : Signal flow : Signal flow S-150 S-video Cable OUTPUT L AUDIO R VIDEO S-VIDEO Editing Side with a cassette inserted to the camcorder. • Turn off the power of all equipment before performing connections. • Refer also to the other equipment connected. For example: ...equipment with a DV terminal. The digital signals can also connect the yellow plug to digital signals in an instant. Digitally Outputting Analog Video and Audio Signals (Analog-Digital Converter) Connecting the camcorder to your VCR or 8 mm video camera allows conversion of recorded E analog ...
...Cable : Signal flow : Signal flow S-150 S-video Cable OUTPUT L AUDIO R VIDEO S-VIDEO Editing Side with a cassette inserted to the camcorder. • Turn off the power of all equipment before performing connections. • Refer also to the other equipment connected. For example: ...equipment with a DV terminal. The digital signals can also connect the yellow plug to digital signals in an instant. Digitally Outputting Analog Video and Audio Signals (Analog-Digital Converter) Connecting the camcorder to your VCR or 8 mm video camera allows conversion of recorded E analog ...
Instruction Manual
Page 149
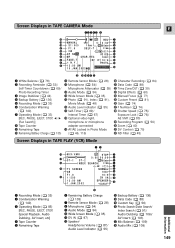
... or microphone adapter connected !9 AF/AE Locked in Photo Mode ( 46, 116) @0 Character Recording ( 84) @1 Data Code ( 88) @2 Time Zone/DST ( 30) @3 Digital Effects ( 60) @4 Manual Focus ( 77) @5 Custom Preset ( 81) @6 Gain ( 74) @7 F Number ( 74) @8 Shutter Speed ( 75)/ Exposure Lock ( 76...)/ AE Shift ( 80) @9 Recording Program ( 50) #0 Zoom ( 40) #1 DV Control ( 70) #2 ND Filter ( 45) Screen Displays in TAPE CAMERA Mode qwert y #0 W T SP REC u @9 MANUAL 0:12:34 i @8 S1/500 10sec 60min o @7 F1.8 SELF-T !0 @6 0dB j h A1 !1 @5 CP NDOMNF VOICE !2 ...
... or microphone adapter connected !9 AF/AE Locked in Photo Mode ( 46, 116) @0 Character Recording ( 84) @1 Data Code ( 88) @2 Time Zone/DST ( 30) @3 Digital Effects ( 60) @4 Manual Focus ( 77) @5 Custom Preset ( 81) @6 Gain ( 74) @7 F Number ( 74) @8 Shutter Speed ( 75)/ Exposure Lock ( 76...)/ AE Shift ( 80) @9 Recording Program ( 50) #0 Zoom ( 40) #1 DV Control ( 70) #2 ND Filter ( 45) Screen Displays in TAPE CAMERA Mode qwert y #0 W T SP REC u @9 MANUAL 0:12:34 i @8 S1/500 10sec 60min o @7 F1.8 SELF-T !0 @6 0dB j h A1 !1 @5 CP NDOMNF VOICE !2 ...
Instruction Manual
Page 153
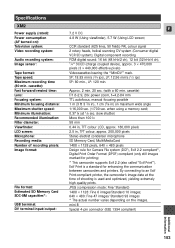
...) on the images. Digital component recording PCM digital sound: 16 bit (48 kHz/2 ch); 12 bit (32 kHz/4 ch); 1/4" 3CCD (charge coupled device), approx. 3 × 470,000 pixels (3 ×...pixels Design rule for Camera File system (DCF), Exif 2.2 compliant*, Digital Print Order Format (DPOF) compliant (only still images marked for enhancing the communication between camcorders and printers. Approx....: Number of shooting is a standard for printing) * This camcorder supports Exif 2.2 (also called "Exif Print"). Specifications XM2 Power supply (rated): Power consumption (AF turned on): Television ...
...) on the images. Digital component recording PCM digital sound: 16 bit (48 kHz/2 ch); 12 bit (32 kHz/4 ch); 1/4" 3CCD (charge coupled device), approx. 3 × 470,000 pixels (3 ×...pixels Design rule for Camera File system (DCF), Exif 2.2 compliant*, Digital Print Order Format (DPOF) compliant (only still images marked for enhancing the communication between camcorders and printers. Approx....: Number of shooting is a standard for printing) * This camcorder supports Exif 2.2 (also called "Exif Print"). Specifications XM2 Power supply (rated): Power consumption (AF turned on): Television ...


