
CanoScan LiDE50 Quick Start Guide
Page 1
...print&scan@canon.com.my http://www.canon.com.my CANON MARKETING (THAILAND) CO. LTD. 1 Thomas Holt Drive, North Ryde, Sydney N.S.W. 2113, Australia Info-Line: (02) 9805 2864 CANON NEW ZEALAND LTD. Install the Software Windows 3 p. de R.L. Box 2262 1180 EG Amstelveen, The Netherlands CANON...I-IE-068A ©CANON INC. 2002 PRINTED IN CHINA Quick Start Guide Be sure to install the software programs before connecting the scanner to the computer! Setup and Scanning Check the Package Contents 2 p. 00-QSG_E_Cov.fm Page 1 Monday, April 7, 2003 2:07 PM CANON INC. 30-2, Shimomaruko ...
...print&scan@canon.com.my http://www.canon.com.my CANON MARKETING (THAILAND) CO. LTD. 1 Thomas Holt Drive, North Ryde, Sydney N.S.W. 2113, Australia Info-Line: (02) 9805 2864 CANON NEW ZEALAND LTD. Install the Software Windows 3 p. de R.L. Box 2262 1180 EG Amstelveen, The Netherlands CANON...I-IE-068A ©CANON INC. 2002 PRINTED IN CHINA Quick Start Guide Be sure to install the software programs before connecting the scanner to the computer! Setup and Scanning Check the Package Contents 2 p. 00-QSG_E_Cov.fm Page 1 Monday, April 7, 2003 2:07 PM CANON INC. 30-2, Shimomaruko ...
CanoScan LiDE50 Quick Start Guide
Page 2
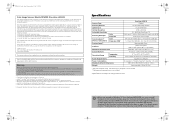
.... Specifications Scanner Type Scanning Element Light Source Optical Resolution Selectable Resolution Scanning Bit Depth Scanning Speed*1 (Photo or Document) Preview Speed*2 Color Grayscale Color Grayscale, B&W Interface Maximum Document Size Scanner Buttons Operating Range Temperature Humidity Power Requirements Power Consumption Maximum Exterior Dimensions Weight CanoScan LiDE 50 Flatbed CIS (Contact Image Sensor) 3-color (RGB) LED 1200 x 2400 dpi 25 - 9600 dpi (ScanGear CS) 16 bit input / 16 bit or 8 bit output for each color (RGB) 16 bit input / 8 bit output 6.4 msec./line...
.... Specifications Scanner Type Scanning Element Light Source Optical Resolution Selectable Resolution Scanning Bit Depth Scanning Speed*1 (Photo or Document) Preview Speed*2 Color Grayscale Color Grayscale, B&W Interface Maximum Document Size Scanner Buttons Operating Range Temperature Humidity Power Requirements Power Consumption Maximum Exterior Dimensions Weight CanoScan LiDE 50 Flatbed CIS (Contact Image Sensor) 3-color (RGB) LED 1200 x 2400 dpi 25 - 9600 dpi (ScanGear CS) 16 bit input / 16 bit or 8 bit output for each color (RGB) 16 bit input / 8 bit output 6.4 msec./line...

CanoScan LiDE50 Quick Start Guide
Page 3
... GUIDE FIRST! You can install this manual onto the hard disk together with the bundled software, and how to the procedures in the Quick Start Guide. PageManager (Windows only) Select the "View the Electronic Manuals" menu on the CanoScan Setup Utility CD-ROM. Double-click the icon to using the scanner. User's Guides for Application Programs (PDF format manuals) • ArcSoft PhotoStudio • ArcSoft PhotoBase PDF • OmniPage SE • Presto! 00-QSG_E_MAIN.fm Page...
... GUIDE FIRST! You can install this manual onto the hard disk together with the bundled software, and how to the procedures in the Quick Start Guide. PageManager (Windows only) Select the "View the Electronic Manuals" menu on the CanoScan Setup Utility CD-ROM. Double-click the icon to using the scanner. User's Guides for Application Programs (PDF format manuals) • ArcSoft PhotoStudio • ArcSoft PhotoBase PDF • OmniPage SE • Presto! 00-QSG_E_MAIN.fm Page...

CanoScan LiDE50 Quick Start Guide
Page 4
... Scanner and Accessories Scanner USB Interface Cable Documents and Software Programs • Quick Start Guide (this guide) • Additional Documents • CanoScan Setup Utility CD-ROM Stand Page 11 • The two figures in the brackets below indicate the respective sizes of the Windows/ Macintosh versions of the software. • Approximately 479 MB (for Windows) / 189 MB (for Macintosh) of hard disk space on your computer is required to install all the programs. Additional free...
... Scanner and Accessories Scanner USB Interface Cable Documents and Software Programs • Quick Start Guide (this guide) • Additional Documents • CanoScan Setup Utility CD-ROM Stand Page 11 • The two figures in the brackets below indicate the respective sizes of the Windows/ Macintosh versions of the software. • Approximately 479 MB (for Windows) / 189 MB (for Macintosh) of hard disk space on your computer is required to install all the programs. Additional free...

CanoScan LiDE50 Quick Start Guide
Page 5
... install or uninstall software programs. 1 Turn the computer on. Continue on -screen messages to continue the installation. • In few cases, your operating system may require a restart. The CanoScan Setup Utility main menu will start. Follow the on-screen message prompts and click [Yes] or [Next] to restart and resume installation. 6 When the installation is complete, click [Yes]. 00-QSG_E_MAIN.fm Page 3 Monday, April 7, 2003 2:08 PM Install the Software (Windows...
... install or uninstall software programs. 1 Turn the computer on. Continue on -screen messages to continue the installation. • In few cases, your operating system may require a restart. The CanoScan Setup Utility main menu will start. Follow the on-screen message prompts and click [Yes] or [Next] to restart and resume installation. 6 When the installation is complete, click [Yes]. 00-QSG_E_MAIN.fm Page 3 Monday, April 7, 2003 2:08 PM Install the Software (Windows...

CanoScan LiDE50 Quick Start Guide
Page 6
The CanoScan Setup Utility main menu will start. If no window displays, double-click the CD-ROM icon, then the Setup icon. 3 Click [Install the Software]. You will install six software programs and the Scanning Guide (HTML format manual). 5 The installation procedure will display. Follow the on-screen message prompts and click [Yes], [Next] or [Install] to look for the software on . Click [Yes] if you like to continue the installation. 6 When the installation is...
The CanoScan Setup Utility main menu will start. If no window displays, double-click the CD-ROM icon, then the Setup icon. 3 Click [Install the Software]. You will install six software programs and the Scanning Guide (HTML format manual). 5 The installation procedure will display. Follow the on-screen message prompts and click [Yes], [Next] or [Install] to look for the software on . Click [Yes] if you like to continue the installation. 6 When the installation is...

CanoScan LiDE50 Quick Start Guide
Page 7
... or transporting the scanner without locking the scanning unit may occur. 1 Peel the caution seal from the front of the scanner. 2 Gently turn the scanner over. 3 Push the lock switch toward the unlock mark ( ). 4 Return the scanner to a horizontal position. 00-QSG_E_MAIN.fm Page 5 Monday, April 7, 2003 2:08 PM Unlock the Scanning Unit • Unlock the scanning unit before connecting the scanner to lock the scanning unit when transporting the...
... or transporting the scanner without locking the scanning unit may occur. 1 Peel the caution seal from the front of the scanner. 2 Gently turn the scanner over. 3 Push the lock switch toward the unlock mark ( ). 4 Return the scanner to a horizontal position. 00-QSG_E_MAIN.fm Page 5 Monday, April 7, 2003 2:08 PM Unlock the Scanning Unit • Unlock the scanning unit before connecting the scanner to lock the scanning unit when transporting the...
CanoScan LiDE50 Quick Start Guide
Page 8
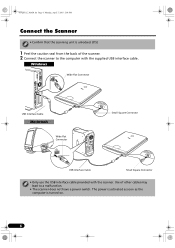
... with the scanner. Use of the scanner. 2 Connect the scanner to a malfunction. • The scanner does not have a power switch. Windows Wide Flat Connector USB Interface Cable Macintosh Wide Flat Connector Small Square Connector USB Interface Cable Small Square Connector • Only use the USB interface cable provided with the supplied USB interface cable. 00-QSG_E_MAIN.fm Page 6 Monday, April 7, 2003 2:08 PM Connect the Scanner • Confirm that the scanning unit is turned on. 6
... with the scanner. Use of the scanner. 2 Connect the scanner to a malfunction. • The scanner does not have a power switch. Windows Wide Flat Connector USB Interface Cable Macintosh Wide Flat Connector Small Square Connector USB Interface Cable Small Square Connector • Only use the USB interface cable provided with the supplied USB interface cable. 00-QSG_E_MAIN.fm Page 6 Monday, April 7, 2003 2:08 PM Connect the Scanner • Confirm that the scanning unit is turned on. 6

CanoScan LiDE50 Quick Start Guide
Page 9
Top Bottom Alignment Mark Windows 2 Select [Start], [Programs] or [All Programs], [ArcSoft PhotoStudio] and [PhotoStudio 5]. PhotoStudio will start . 7 PhotoStudio will start . Macintosh 2 Double-click the [Applications (Mac OS 9)] and [PhotoStudio] folder and the [PhotoStudio] icon. 00-QSG_E_MAIN.fm Page 7 Monday, April 7, 2003 2:08 PM Try Scanning The following steps explain how to scan with ArcSoft PhotoStudio. 1 Place a photo or a picture on the glass by aligning its top edge with the alignment mark, and close the document cover.
Top Bottom Alignment Mark Windows 2 Select [Start], [Programs] or [All Programs], [ArcSoft PhotoStudio] and [PhotoStudio 5]. PhotoStudio will start . 7 PhotoStudio will start . Macintosh 2 Double-click the [Applications (Mac OS 9)] and [PhotoStudio] folder and the [PhotoStudio] icon. 00-QSG_E_MAIN.fm Page 7 Monday, April 7, 2003 2:08 PM Try Scanning The following steps explain how to scan with ArcSoft PhotoStudio. 1 Place a photo or a picture on the glass by aligning its top edge with the alignment mark, and close the document cover.

CanoScan LiDE50 Quick Start Guide
Page 10
... the image. You can select "Photo", "Magazine", "Newspaper" or "Document". • Photo: Color, 300 dpi • Magazine: Color, 150 dpi • Newspaper: Black and White, 300 dpi • Document: Grayscale, 300 dpi 5 Click [Preview]. After calibration, the preview scan will start . Macintosh 3 Click the Acquire icon or click the [File] menu and select [Import...]. 00-QSG_E_MAIN.fm Page 8 Monday, April 7, 2003 2:08 PM Try Scanning Windows...
... the image. You can select "Photo", "Magazine", "Newspaper" or "Document". • Photo: Color, 300 dpi • Magazine: Color, 150 dpi • Newspaper: Black and White, 300 dpi • Document: Grayscale, 300 dpi 5 Click [Preview]. After calibration, the preview scan will start . Macintosh 3 Click the Acquire icon or click the [File] menu and select [Import...]. 00-QSG_E_MAIN.fm Page 8 Monday, April 7, 2003 2:08 PM Try Scanning Windows...

CanoScan LiDE50 Quick Start Guide
Page 11
... software, read the Scanning Guide or the User's Guide (PDF format manual) for each software program on the CanoScan Setup Utility CD-ROM. 9 Select the folder where you wish to store the image file, enter a file name, select a file type (JPG format is recommended) and click [Save]. 9 Click or (close box) in the PhotoStudio window to close it . The scanned image will start. Try Scanning 7 Click or (close box) in the PhotoStudio window. 8 Save the scanned image. 00-QSG_E_MAIN.fm Page...
... software, read the Scanning Guide or the User's Guide (PDF format manual) for each software program on the CanoScan Setup Utility CD-ROM. 9 Select the folder where you wish to store the image file, enter a file name, select a file type (JPG format is recommended) and click [Save]. 9 Click or (close box) in the PhotoStudio window to close it . The scanned image will start. Try Scanning 7 Click or (close box) in the PhotoStudio window. 8 Save the scanned image. 00-QSG_E_MAIN.fm Page...

CanoScan LiDE50 Quick Start Guide
Page 12
... default settings for scanning by clicking the [Cancel] button. COPY Button To print (copy) the scanned image with a single touch of the button. Select an option from the CanoScan Setup Utility CD-ROM. PageManager (Windows) / Acrobat Reader (Macintosh) should be installed and enabled. This step is required only for Windows). • While scanning, you can use the four convenient buttons on the scanner before pressing a button. • To use this function. FILE Button To save the scanned image as a PDF file...
... default settings for scanning by clicking the [Cancel] button. COPY Button To print (copy) the scanned image with a single touch of the button. Select an option from the CanoScan Setup Utility CD-ROM. PageManager (Windows) / Acrobat Reader (Macintosh) should be installed and enabled. This step is required only for Windows). • While scanning, you can use the four convenient buttons on the scanner before pressing a button. • To use this function. FILE Button To save the scanned image as a PDF file...

CanoScan LiDE50 Quick Start Guide
Page 13
Press the hook. 11 00-QSG_E_MAIN.fm Page 11 Monday, April 7, 2003 2:08 PM Using the Scanner in the Upright Position Installing the Stand Positioning an Item Removing the Stand Removing the stand.
Press the hook. 11 00-QSG_E_MAIN.fm Page 11 Monday, April 7, 2003 2:08 PM Using the Scanner in the Upright Position Installing the Stand Positioning an Item Removing the Stand Removing the stand.

CanoScan LiDE50 Quick Start Guide
Page 14
...: Scanner Model: CanoScan LiDE 50 Serial Number (on the back of the equipment): • About the Computer Used Manufacturer: CPU: Memory Capacity (RAM): Hard Disk Capacity: Model: Clock Speed: MB MB Space Available: OS: Windows XP Me 2000 98 Macintosh Monitor Type: OS 9.0 OS 9.1 OS 9.2 OS X v10.1 Monitor Size: Printer: Manufacturer: Type of Printer: Installed Virus Protection Program: Installed Compression Program: On-Board Expansion Cards: Printer Resolutions: Attached Peripherals: Connected Network System...
...: Scanner Model: CanoScan LiDE 50 Serial Number (on the back of the equipment): • About the Computer Used Manufacturer: CPU: Memory Capacity (RAM): Hard Disk Capacity: Model: Clock Speed: MB MB Space Available: OS: Windows XP Me 2000 98 Macintosh Monitor Type: OS 9.0 OS 9.1 OS 9.2 OS X v10.1 Monitor Size: Printer: Manufacturer: Type of Printer: Installed Virus Protection Program: Installed Compression Program: On-Board Expansion Cards: Printer Resolutions: Attached Peripherals: Connected Network System...


