
User Manual
Page 4
... information about the scanner operational settings, maintenance, and troubleshooting. Hint • The User Manual and the CapturePerfect 3.0 document files are provided in electronic form and registered in the Easy Start Guide to set up the scanner. User Manual CapturePerfect 3.0 Operation Guide • Electronic versions of two sections: Hardware and Software. Reference Guide This manual consists of its capabilities and make the most of the basic scanner operating instructions extracted from the Setup CD. (See p. 2-5.) iii...
... information about the scanner operational settings, maintenance, and troubleshooting. Hint • The User Manual and the CapturePerfect 3.0 document files are provided in electronic form and registered in the Easy Start Guide to set up the scanner. User Manual CapturePerfect 3.0 Operation Guide • Electronic versions of two sections: Hardware and Software. Reference Guide This manual consists of its capabilities and make the most of the basic scanner operating instructions extracted from the Setup CD. (See p. 2-5.) iii...

User Manual
Page 7
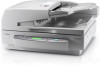
...Chapter 2 Setup 1. Installation Requirements 2-3 3. Count Only Mode 3-21 7. Changing the Stamp Cartridge 5-2 2. Hardware Table of Parts 1-11 Feeder 1-11 Flatbed 1-11 Rear 1-12 Operation Panel 1-12 4. Important Safety Instructions 1-2 Installation Location 1-2 Removing the Transportation Screw 1-2 Installing the Securing Braces 1-3 Power 1-3 Checking the Rear Cables 1-4 Opening and Closing the Feeder 1-4 Moving the Scanner 1-4 Handling 1-5 Disposal 1-7 2. Clearing Paper Jams 3-22 Clearing a Paper Jam 3-22 Paper Jam Causes 3-24 Chapter 4 User Modes 1. Documents...
...Chapter 2 Setup 1. Installation Requirements 2-3 3. Count Only Mode 3-21 7. Changing the Stamp Cartridge 5-2 2. Hardware Table of Parts 1-11 Feeder 1-11 Flatbed 1-11 Rear 1-12 Operation Panel 1-12 4. Important Safety Instructions 1-2 Installation Location 1-2 Removing the Transportation Screw 1-2 Installing the Securing Braces 1-3 Power 1-3 Checking the Rear Cables 1-4 Opening and Closing the Feeder 1-4 Moving the Scanner 1-4 Handling 1-5 Disposal 1-7 2. Clearing Paper Jams 3-22 Clearing a Paper Jam 3-22 Paper Jam Causes 3-24 Chapter 4 User Modes 1. Documents...
User Manual
Page 16
... documents, and other documents that cannot be scanned using only control panel key operations. (See "About the Job Function" on p. 3-11.) ● User Mode The User Mode functions can clarify scanned text by processing background or foreground colors. ● Count-Only Mode When operating the scanner as a stand-alone device, this mode counts the number of loaded document sheets. (See "Count Only Mode" on p. 3-21.) ● Long Document Mode Document sheets up to ON in the user mode settings, two-sided documents are scanned one side at...
... documents, and other documents that cannot be scanned using only control panel key operations. (See "About the Job Function" on p. 3-11.) ● User Mode The User Mode functions can clarify scanned text by processing background or foreground colors. ● Count-Only Mode When operating the scanner as a stand-alone device, this mode counts the number of loaded document sheets. (See "Count Only Mode" on p. 3-21.) ● Long Document Mode Document sheets up to ON in the user mode settings, two-sided documents are scanned one side at...

User Manual
Page 20
... Con t r as s Dup . [ ON ] OF F S t a n d - P as t b Set Keys Use these switches to specify the SCSI ID or terminator ON or OFF. (See p. 2-7.) d SCSI Connectors Connect a SCSI cable (50-pin half pitch, pin type) here. (See p. 2-7.) e Power Cord Connector Connect the provided power cord here. Rear Chapter 1 Before You Start Using the Scanner Operation Panel a Air Vents b USB Connector Connect a Hi-Speed USB 2.0 compatible USB cable here. (See p. 2-6.) c DIP Switches Configure these keys to change the setting of the...
... Con t r as s Dup . [ ON ] OF F S t a n d - P as t b Set Keys Use these switches to specify the SCSI ID or terminator ON or OFF. (See p. 2-7.) d SCSI Connectors Connect a SCSI cable (50-pin half pitch, pin type) here. (See p. 2-7.) e Power Cord Connector Connect the provided power cord here. Rear Chapter 1 Before You Start Using the Scanner Operation Panel a Air Vents b USB Connector Connect a Hi-Speed USB 2.0 compatible USB cable here. (See p. 2-6.) c DIP Switches Configure these keys to change the setting of the...

User Manual
Page 40
... scanner malfunction. • Do not open the feeder cover during scanning. The procedure you should use the standard feeding mode, instruct the scanner to stop the scanner. • Check the stack and remove all clips, staples, pins, or any other type of document pages with moving parts, especially the rollers that feed the paper. Panel Feeding (See p. 3-9) Panel feeding comes in handy when using the flatbed, set the scanning side to [Flatbed] or [Auto] in the scanner settings screen. • If the scanning side is set to start...
... scanner malfunction. • Do not open the feeder cover during scanning. The procedure you should use the standard feeding mode, instruct the scanner to stop the scanner. • Check the stack and remove all clips, staples, pins, or any other type of document pages with moving parts, especially the rollers that feed the paper. Panel Feeding (See p. 3-9) Panel feeding comes in handy when using the flatbed, set the scanning side to [Flatbed] or [Auto] in the scanner settings screen. • If the scanning side is set to start...

User Manual
Page 42
... scanner. 4. The Start key lamp lights green. 3. Hint If the scanning side is set to [Auto] and the feeding option is set to remove the ejected document pages. 3-10 IMPORTANT See "Placing Documents onto the Scanner" on the scanner settings screen. 2. ■ Automatic Feeding Automatic feeding can cause a paper jam. 6. After you place a document on the flatbed and press the Start key, the document on the flatbed will be used when feeding a document from the feeder. The scanner detects the documents, and scanning starts. Raise the document feeder tray to [Automatic Feeding...
... scanner. 4. The Start key lamp lights green. 3. Hint If the scanning side is set to [Auto] and the feeding option is set to remove the ejected document pages. 3-10 IMPORTANT See "Placing Documents onto the Scanner" on the scanner settings screen. 2. ■ Automatic Feeding Automatic feeding can cause a paper jam. 6. After you place a document on the flatbed and press the Start key, the document on the flatbed will be used when feeding a document from the feeder. The scanner detects the documents, and scanning starts. Raise the document feeder tray to [Automatic Feeding...

User Manual
Page 46
...Scan Batch to Printer Scan Batch to File Prints scanned images Saves scanned images as files in on CapturePerfect 3.0, refer to this application] except for Canon document scanners. 5. Select [Job Start Button] under [Send to the CapturePerfect 3.0 Operation Guide. 6. Select the desired scan mode from the CapturePerfect Scan menu. Restart Windows. ■ Scanning with CapturePerfect The following modes. CapturePerfect 3.0 includes the following three scanning methods are available from the Scan menu to a new e-mail message 3-14 Clear all the check boxes under [Scanner...
...Scan Batch to Printer Scan Batch to File Prints scanned images Saves scanned images as files in on CapturePerfect 3.0, refer to this application] except for Canon document scanners. 5. Select [Job Start Button] under [Send to the CapturePerfect 3.0 Operation Guide. 6. Select the desired scan mode from the CapturePerfect Scan menu. Restart Windows. ■ Scanning with CapturePerfect The following modes. CapturePerfect 3.0 includes the following three scanning methods are available from the Scan menu to a new e-mail message 3-14 Clear all the check boxes under [Scanner...

User Manual
Page 49
... saving the image data. IMPORTANT You must load a document and press the Start key to [Automatic Feeding], scanning is performed as described below, depending on p. 8-4.) Hint • To scan using the flatbed, set the scanning side to [Flatbed] or [Auto]. • If the scanning side is lit. Specify the file name and the file type for the scanner driver opens. If there are automatically detected and scanned when placed in the feeder tray will be scanned. Set the scan settings. (See "ISIS/TWAIN Driver Settings...
... saving the image data. IMPORTANT You must load a document and press the Start key to [Automatic Feeding], scanning is performed as described below, depending on p. 8-4.) Hint • To scan using the flatbed, set the scanning side to [Flatbed] or [Auto]. • If the scanning side is lit. Specify the file name and the file type for the scanner driver opens. If there are automatically detected and scanned when placed in the feeder tray will be scanned. Set the scan settings. (See "ISIS/TWAIN Driver Settings...

User Manual
Page 76
... during use of the scanner are addressed: • The Scanner Does Not Turn ON (See p. 6-5) • The "Wait" Message Does Not Disappear (See p. 6-5) • The Scanner Is Not Recognized (Connecting via USB) (See p. 6-6) • The Scanner Is Not Recognized (Connecting via SCSI) (See p. 6-6) • Scanning Is Not Performed (See p. 6-7) • Slow Scanning Speed (See p. 6-7) • Documents Do Not Feed Properly (See p. 6-8) • Saved Image Files Do Not Open (See p. 6-8) • Scanning...
... during use of the scanner are addressed: • The Scanner Does Not Turn ON (See p. 6-5) • The "Wait" Message Does Not Disappear (See p. 6-5) • The Scanner Is Not Recognized (Connecting via USB) (See p. 6-6) • The Scanner Is Not Recognized (Connecting via SCSI) (See p. 6-6) • Scanning Is Not Performed (See p. 6-7) • Slow Scanning Speed (See p. 6-7) • Documents Do Not Feed Properly (See p. 6-8) • Saved Image Files Do Not Open (See p. 6-8) • Scanning...

User Manual
Page 78
... folder, as anti-virus software, are not installed correctly Uninstall and then reinstall the ISIS/TWAIN driver and Job Registration Tool. If this does not solve the problem, consider the following possible causes: Cause Solution The ISIS/TWAIN driver and Job Registration Tool are draining memory resources. Cause Another application is disabled when the amount of a document are scanned one that is not enough free space on the hard disk...
... folder, as anti-virus software, are not installed correctly Uninstall and then reinstall the ISIS/TWAIN driver and Job Registration Tool. If this does not solve the problem, consider the following possible causes: Cause Solution The ISIS/TWAIN driver and Job Registration Tool are draining memory resources. Cause Another application is disabled when the amount of a document are scanned one that is not enough free space on the hard disk...

User Manual
Page 79
... attempting to an appropriate value. The scanning side setting for the ISIS/ TWAIN driver is not improved after cleaning the rollers, contact your documents carefully before loading. • Replacement rollers can cause paper jams. Check your local Canon dealer or service representative. Open the image file with size, paper thickness or quality that supports multi-page TIFF files, or save it again. ■ Scanning Results Are Not as Expected If the scanned images do not appear as consumables. If...
... attempting to an appropriate value. The scanning side setting for the ISIS/ TWAIN driver is not improved after cleaning the rollers, contact your documents carefully before loading. • Replacement rollers can cause paper jams. Check your local Canon dealer or service representative. Open the image file with size, paper thickness or quality that supports multi-page TIFF files, or save it again. ■ Scanning Results Are Not as Expected If the scanned images do not appear as consumables. If...

User Manual
Page 81
... Not Operate Properly Job data is in the user mode settings. (See "About the User Modes" on your computer properly connected to the scanner? Register the job using Job Registration Tool. For details, see Chapter 9 "Job Registration Tool Settings" of the Software section. The Windows Events function is set to English in the user mode settings. Problem Cause Solution Scanning is not performed and the "Send failed" message appears after selecting the job and pressing the Start key. 1) The ISIS/TWAIN driver...
... Not Operate Properly Job data is in the user mode settings. (See "About the User Modes" on your computer properly connected to the scanner? Register the job using Job Registration Tool. For details, see Chapter 9 "Job Registration Tool Settings" of the Software section. The Windows Events function is set to English in the user mode settings. Problem Cause Solution Scanning is not performed and the "Send failed" message appears after selecting the job and pressing the Start key. 1) The ISIS/TWAIN driver...

User Manual
Page 99
... operation for [Scanning Side]. (See "[Scanning Options] (TWAIN Driver Only)" on p. 8-8.) • Selecting [Skip Blank Page] enables the [Setting] button, and clicking the button opens the [Blank Skip Setting] dialog box. Chapter 8 ISIS/TWAIN Driver Settings [Deskew] Check Box The Deskew function detects slanted document pages and straightens the scanned images. When non-blank pages are skipped, reduce the content density. • The Skip Blank Pages function may not work properly in this dialog box. [Standard] Output each document page is scanned, whether the scanned image...
... operation for [Scanning Side]. (See "[Scanning Options] (TWAIN Driver Only)" on p. 8-8.) • Selecting [Skip Blank Page] enables the [Setting] button, and clicking the button opens the [Blank Skip Setting] dialog box. Chapter 8 ISIS/TWAIN Driver Settings [Deskew] Check Box The Deskew function detects slanted document pages and straightens the scanned images. When non-blank pages are skipped, reduce the content density. • The Skip Blank Pages function may not work properly in this dialog box. [Standard] Output each document page is scanned, whether the scanned image...

User Manual
Page 100
Scan Area Dialog Box (ISIS Driver) Scan Area Dialog Box (TWAIN Driver) The area window and [Preview] button appear with application programs that display the [Scan] button in the Basic Setup dialog box of the document page to display help for the ISIS driver and TWAIN driver. The Scan Area dialog box is not displayed if the application program provides its own function to specify the scan area. [More] Button Click this button to display the Advanced Settings dialog box. (See...
Scan Area Dialog Box (ISIS Driver) Scan Area Dialog Box (TWAIN Driver) The area window and [Preview] button appear with application programs that display the [Scan] button in the Basic Setup dialog box of the document page to display help for the ISIS driver and TWAIN driver. The Scan Area dialog box is not displayed if the application program provides its own function to specify the scan area. [More] Button Click this button to display the Advanced Settings dialog box. (See...

User Manual
Page 103
... then saved. Advanced Settings Dialog Box (ISIS Driver) This dialog box is called from a scanner setting or scanning dialog box belonging to make advanced settings for this mode when scanning a document with the top and bottom of Advanced Settings dialog box. Chapter 8 ISIS/TWAIN Driver Settings [Calendar type] Specify this dialog box. Front Back Buttons [OK] button Click this button to accept changes and close the dialog box. [Cancel] button Click this button to reject changes and close the dialog box. [Help] button...
... then saved. Advanced Settings Dialog Box (ISIS Driver) This dialog box is called from a scanner setting or scanning dialog box belonging to make advanced settings for this mode when scanning a document with the top and bottom of Advanced Settings dialog box. Chapter 8 ISIS/TWAIN Driver Settings [Calendar type] Specify this dialog box. Front Back Buttons [OK] button Click this button to accept changes and close the dialog box. [Cancel] button Click this button to reject changes and close the dialog box. [Help] button...

User Manual
Page 107
.... [Panel Feeding] If scanning is started from the application program. 8-16 To finish scanning, press the Stop key on the scanner or stop scanning from an application program, the document loaded in the feeder or on the scanner. This dialog box allows you click the [Others] button in the Advanced Settings dialog box. Other Settings Dialog Box This dialog box appears when you to "Gamma Table Files" in the ISIS/TWAIN driver Help for TWAIN-compatible application programs (Job Registration Tool...
.... [Panel Feeding] If scanning is started from the application program. 8-16 To finish scanning, press the Stop key on the scanner or stop scanning from an application program, the document loaded in the feeder or on the scanner. This dialog box allows you click the [Others] button in the Advanced Settings dialog box. Other Settings Dialog Box This dialog box appears when you to "Gamma Table Files" in the ISIS/TWAIN driver Help for TWAIN-compatible application programs (Job Registration Tool...

User Manual
Page 108
... [Feeding Option] is set to an ISIS-compatible application program). - IMPORTANT When Multi-Stream is enabled in the feeder. [Panel] Batches are separated whenever the New File key on the scanner is pressed. [Patchcode] Batches are separated each time the Start key on p. 3-19. To finish scanning, press the stop button on the [Scanning Side] setting in the Basic Setup dialog box (or the scanning side setting in the settings dialog box belonging to [Flatbed], [Automatic Feeding...
... [Feeding Option] is set to an ISIS-compatible application program). - IMPORTANT When Multi-Stream is enabled in the feeder. [Panel] Batches are separated whenever the New File key on the scanner is pressed. [Patchcode] Batches are separated each time the Start key on p. 3-19. To finish scanning, press the stop button on the [Scanning Side] setting in the Basic Setup dialog box (or the scanning side setting in the settings dialog box belonging to [Flatbed], [Automatic Feeding...

User Manual
Page 115
... for the scanned image files. [Add] button To send to multiple recipients, click the [Add] button. Chapter 9 Job Registration Tool Settings Scanner Setting Click the [Setting] button to configure the scanner settings. [Mail address] Enter the e-mail address of the recipient for the files to save. When multi-page documents are scanned, image files are scanned in a separate image file. 9-6 The following dialog box appears for entering additional recipient e-mail addresses. [Save Image] Select this to save scanned images. [Save to My Pictures folder] Check Box Select...
... for the scanned image files. [Add] button To send to multiple recipients, click the [Add] button. Chapter 9 Job Registration Tool Settings Scanner Setting Click the [Setting] button to configure the scanner settings. [Mail address] Enter the e-mail address of the recipient for the files to save. When multi-page documents are scanned, image files are scanned in a separate image file. 9-6 The following dialog box appears for entering additional recipient e-mail addresses. [Save Image] Select this to save scanned images. [Save to My Pictures folder] Check Box Select...

User Manual
Page 116
... setting] Button This button is enabled when the [Save to My Pictures folder] check box is larger than the text compressed. 9-7 If the size of the scanned document as one PDF file. Access to shared network folders may be restricted to save each page of the manuscript is not selected, and allows you to enter the user name and password required to access the shared network folder specified for scanned images. [Print format...
... setting] Button This button is enabled when the [Save to My Pictures folder] check box is larger than the text compressed. 9-7 If the size of the scanned document as one PDF file. Access to shared network folders may be restricted to save each page of the manuscript is not selected, and allows you to enter the user name and password required to access the shared network folder specified for scanned images. [Print format...

User Manual
Page 120
Chapter 9 Job Registration Tool Settings [Restore] Button Read an output backup file (*.reg), and restore the job data. ■ Job Back Up Settings Set this function to back up the registered jobs when the same job is to be executed in a different environment, such as occurs when multiple users log on to Windows or when multiple scanners are used. [Back Up] Button Write a backup file (*.reg) of an existing backup file, the...
Chapter 9 Job Registration Tool Settings [Restore] Button Read an output backup file (*.reg), and restore the job data. ■ Job Back Up Settings Set this function to back up the registered jobs when the same job is to be executed in a different environment, such as occurs when multiple users log on to Windows or when multiple scanners are used. [Back Up] Button Write a backup file (*.reg) of an existing backup file, the...


