
Set-up Sheet for imageCLASS 2300N
Page 1
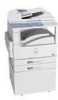
Set-Up Sheet for the Machine Thank you have the following: G Machine with cabinet stand G Toner cartridge (in this sheet before referring to any other documentation. Unpack the machine and its components. Check that you for one-touch speed dialing keys (2) To get your machine ready for use, please follow the instructions in carton) G Stamp cartridge and tweezers G Paper size notice cards (2) G Paper size plates (2) G Paper size labels (2) G Power cord G Telephone cable G Destination labels for purchasing the Canon imageCLASS 2300.
Set-Up Sheet for the Machine Thank you have the following: G Machine with cabinet stand G Toner cartridge (in this sheet before referring to any other documentation. Unpack the machine and its components. Check that you for one-touch speed dialing keys (2) To get your machine ready for use, please follow the instructions in carton) G Stamp cartridge and tweezers G Paper size notice cards (2) G Paper size plates (2) G Paper size labels (2) G Power cord G Telephone cable G Destination labels for purchasing the Canon imageCLASS 2300.
Set-up Sheet for imageCLASS 2300N
Page 5
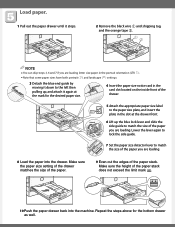
... detector lever to match the size of the paper stack does not exceed the limit mark . 10 Push the paper drawer back into the drawer. Make sure the height of the paper you are loading letter size paper in the portrait orientation (LTR ). G Note that some paper sizes have both portrait ( ) and landscape ( ) ...the mark for the bottom drawer as well. Lower the lever again to the paper size plate, and insert the plate in the card slot located on the inside front of the paper stack. Load paper. 1 Pull out the paper drawer until it stops. 2 Remove the black wire 1 and shipping tag, and...
... detector lever to match the size of the paper stack does not exceed the limit mark . 10 Push the paper drawer back into the drawer. Make sure the height of the paper you are loading letter size paper in the portrait orientation (LTR ). G Note that some paper sizes have both portrait ( ) and landscape ( ) ...the mark for the bottom drawer as well. Lower the lever again to the paper size plate, and insert the plate in the card slot located on the inside front of the paper stack. Load paper. 1 Pull out the paper drawer until it stops. 2 Remove the black wire 1 and shipping tag, and...

Copying Guide for imageCLASS 2300
Page 5
...in This Manual vi Legal Notices viii Trademarks viii Copyright viii Disclaimers viii Chapter 1 Introduction to Copying Overview of the imageCLASS 2300 1-2 Flow of Copy Operations 1-4 Placing Originals 1-9 Orientation 1-10 Platen Glass 1-11 Feeder 1-13 Canceling a Copy... Chapter 2 Basic Copying Features Copy Quantity 2-2 Specifying the Required Number of Copies 2-2 Changing the Copy Quantity 2-2 Paper Selection 2-4 Automatic Paper Selection 2-4 Manual Paper Selection 2-6 Copy Exposure and Image Quality Adjustments 2-9 Copy Exposure (Manual 2-10 Image Quality (Manual 2-11 Copy ...
...in This Manual vi Legal Notices viii Trademarks viii Copyright viii Disclaimers viii Chapter 1 Introduction to Copying Overview of the imageCLASS 2300 1-2 Flow of Copy Operations 1-4 Placing Originals 1-9 Orientation 1-10 Platen Glass 1-11 Feeder 1-13 Canceling a Copy... Chapter 2 Basic Copying Features Copy Quantity 2-2 Specifying the Required Number of Copies 2-2 Changing the Copy Quantity 2-2 Paper Selection 2-4 Automatic Paper Selection 2-4 Manual Paper Selection 2-6 Copy Exposure and Image Quality Adjustments 2-9 Copy Exposure (Manual 2-10 Image Quality (Manual 2-11 Copy ...

Copying Guide for imageCLASS 2300
Page 11
... Features screen). You can set the following basic copy features from this screen: Select the paper size automatically, or specify the paper size manually for a copy job. (See "Paper Selection," on p. 2-4.) Adjust the copy exposure and image quality automatically or manually. (See... 2-20.) Scan another original while the machine is ready to make higher priority copies. (See "Interrupt Mode," on p. 3-2.) 1-2 Overview of the imageCLASS 2300 I Special Features Screen The screen below appears when the machine is printing a previous job. (See "Reserved Copying," on p. 1-18.) Interrupt ...
... Features screen). You can set the following basic copy features from this screen: Select the paper size automatically, or specify the paper size manually for a copy job. (See "Paper Selection," on p. 2-4.) Adjust the copy exposure and image quality automatically or manually. (See... 2-20.) Scan another original while the machine is ready to make higher priority copies. (See "Interrupt Mode," on p. 3-2.) 1-2 Overview of the imageCLASS 2300 I Special Features Screen The screen below appears when the machine is printing a previous job. (See "Reserved Copying," on p. 1-18.) Interrupt ...

Copying Guide for imageCLASS 2300
Page 15
... the desired copy mode on the Copy Basic Features screen. 1 Special Features NOTE On the Copy Basic Features screen, you can select the copy ratio, paper size, and copy exposure and image quality settings. 4 Set the desired copy modes on the Special Features screen. ❑ Press [Special Features]. ❑ Press the...
... the desired copy mode on the Copy Basic Features screen. 1 Special Features NOTE On the Copy Basic Features screen, you can select the copy ratio, paper size, and copy exposure and image quality settings. 4 Set the desired copy modes on the Special Features screen. ❑ Press [Special Features]. ❑ Press the...

Copying Guide for imageCLASS 2300
Page 16
... the instruction below. Flow of Copy Operations 1-7 If the following screen is complete. 7 If you cannot change copy mode settings, such as the copy quantity, paper size, and copy ratio. Stop The display for each original. F3 ❑ Press [F3] (YES).
... the instruction below. Flow of Copy Operations 1-7 If the following screen is complete. 7 If you cannot change copy mode settings, such as the copy quantity, paper size, and copy ratio. Stop The display for each original. F3 ❑ Press [F3] (YES).

Copying Guide for imageCLASS 2300
Page 18
Placing Originals 1-9 I Feeder Place a stack of paper that you are using, and the settings that you have specified. The machine automatically scans them into memory. I Platen Glass Place originals on the platen glass when scanning bound originals (such as books and magazines), originals on the size and type 1 of originals in the feeder, depending on heavy or lightweight paper, and transparencies. Introduction to Copying Placing Originals Place originals on the platen glass or in the feeder © press [Start].
Placing Originals 1-9 I Feeder Place a stack of paper that you are using, and the settings that you have specified. The machine automatically scans them into memory. I Platen Glass Place originals on the platen glass when scanning bound originals (such as books and magazines), originals on the size and type 1 of originals in the feeder, depending on heavy or lightweight paper, and transparencies. Introduction to Copying Placing Originals Place originals on the platen glass or in the feeder © press [Start].

Copying Guide for imageCLASS 2300
Page 20
... placed face down . Platen Glass You should use the platen glass when scanning bound originals (such as books and magazines), originals on heavy or lightweight paper, and transparencies. 1 Lift up the feeder. 1 Introduction to scan into memory must be detected correctly. 2 Place your original with an open/close sensor on the...
... placed face down . Platen Glass You should use the platen glass when scanning bound originals (such as books and magazines), originals on heavy or lightweight paper, and transparencies. 1 Lift up the feeder. 1 Introduction to scan into memory must be detected correctly. 2 Place your original with an open/close sensor on the...

Copying Guide for imageCLASS 2300
Page 21
... placing originals on the platen glass, the size of thick books. Follow the instructions on the display and specify the original size or select the paper size. Be sure to make copies of the original is complete. 1-12 Placing Originals STMT originals and postcards cannot be detected. Doing so may... result in personal injury. Introduction to Copying If you are enlarging an STMT or LTR original to 11" x 17" or LGL paper, place the original horizontally on the platen glass, and align it with the STMT or LTR marks. 3 Gently lower the feeder. 1 CAUTION Close the...
... placing originals on the platen glass, the size of thick books. Follow the instructions on the display and specify the original size or select the paper size. Be sure to make copies of the original is complete. 1-12 Placing Originals STMT originals and postcards cannot be detected. Doing so may... result in personal injury. Introduction to Copying If you are enlarging an STMT or LTR original to 11" x 17" or LGL paper, place the original horizontally on the platen glass, and align it with the STMT or LTR marks. 3 Gently lower the feeder. 1 CAUTION Close the...

Copying Guide for imageCLASS 2300
Page 22
... rollers are dirty from scanning an original written in pencil, perform the feeder cleaning procedure. (See Chapter 6, "Routine Maintenance," in turn could cause a paper jam. Carbon backed paper or other highly transparent originals Avoid scanning the same original using the feeder more than approximately 30 times. Transparencies and other originals that might...
... rollers are dirty from scanning an original written in pencil, perform the feeder cleaning procedure. (See Chapter 6, "Routine Maintenance," in turn could cause a paper jam. Carbon backed paper or other highly transparent originals Avoid scanning the same original using the feeder more than approximately 30 times. Transparencies and other originals that might...

Copying Guide for imageCLASS 2300
Page 23
Place your originals as far into the feeder as they will go. 1 Introduction to Copying Collate Display Contrast Special Features COPY FAX A beep sounds when the originals are enlarging LTR originals to fit the size of your originals face up in the original supply tray. Collate Display Contrast Special Features COPY FAX 1-14 Placing Originals If you are set correctly. 2 Adjust the slide guides to 11" x 17" or LGL paper, place your originals horizontally. 1 Neatly place your originals.
Place your originals as far into the feeder as they will go. 1 Introduction to Copying Collate Display Contrast Special Features COPY FAX A beep sounds when the originals are enlarging LTR originals to fit the size of your originals face up in the original supply tray. Collate Display Contrast Special Features COPY FAX 1-14 Placing Originals If you are set correctly. 2 Adjust the slide guides to 11" x 17" or LGL paper, place your originals horizontally. 1 Neatly place your originals.

Copying Guide for imageCLASS 2300
Page 24
... Originals mode. (See "Different Size Originals," on p. 3-22.) Placing Originals 1-15 When scanning is complete, remove the originals from the original output tray to avoid paper jams. 1 Original Output Tray Collate Display Contrast Special Features COPY FAX NOTE The scanned originals are output face down to Copying IMPORTANT Do not add...
... Originals mode. (See "Different Size Originals," on p. 3-22.) Placing Originals 1-15 When scanning is complete, remove the originals from the original output tray to avoid paper jams. 1 Original Output Tray Collate Display Contrast Special Features COPY FAX NOTE The scanned originals are output face down to Copying IMPORTANT Do not add...

Copying Guide for imageCLASS 2300
Page 27
... the current job is warming up, at power ON, or after the current job completes. The machine begins printing the reserved copy job after clearing a paper jam. This helps you to select the reserved copy job © press F4 (CANCEL). 1-18 Reserved Copying COPY 1 Press [COPY]. NOTE To cancel a reserved copy...
... the current job is warming up, at power ON, or after the current job completes. The machine begins printing the reserved copy job after clearing a paper jam. This helps you to select the reserved copy job © press F4 (CANCEL). 1-18 Reserved Copying COPY 1 Press [COPY]. NOTE To cancel a reserved copy...

Copying Guide for imageCLASS 2300
Page 32
Basic Copying Features This chapter describes the basic copying features. 2 CHAPTER Copy Quantity 2-2 Specifying the Required Number of Copies 2-2 Changing the Copy Quantity 2-2 Paper Selection 2-4 Automatic Paper Selection 2-4 Manual Paper Selection 2-6 Copy Exposure and Image Quality Adjustments 2-9 Copy Exposure (Manual 2-10 Image Quality (Manual 2-11 Copy Exposure and Image Quality (Automatic 2-12 Changing the Copy (Zoom) Ratio 2-14 Preset Zoom 2-15 Zoom by Percentage 2-16 Auto Zoom 2-17 Collating Copies 2-20 Page Order (Collate 2-21 2-1
Basic Copying Features This chapter describes the basic copying features. 2 CHAPTER Copy Quantity 2-2 Specifying the Required Number of Copies 2-2 Changing the Copy Quantity 2-2 Paper Selection 2-4 Automatic Paper Selection 2-4 Manual Paper Selection 2-6 Copy Exposure and Image Quality Adjustments 2-9 Copy Exposure (Manual 2-10 Image Quality (Manual 2-11 Copy Exposure and Image Quality (Automatic 2-12 Changing the Copy (Zoom) Ratio 2-14 Preset Zoom 2-15 Zoom by Percentage 2-16 Auto Zoom 2-17 Collating Copies 2-20 Page Order (Collate 2-21 2-1

Copying Guide for imageCLASS 2300
Page 35
...on the following types of the margin areas, see Chapter 2, "Basic Operations," in the Reference Guide.) You can set to manually specify a paper size for a copy job. 2 NOTE If you cannot use the Auto Zoom mode, or Image Combination mode. For instructions on the size of... on the copy. Nonstandard size originals - Originals smaller than STMT If the machine is 'AUTO PAPER'. The paper size is set whether to activate or deactivate the Automatic Paper Selection for each paper drawer and the stack bypass. (See Chapter 3, "Selecting and Storing Settings," in the Reference Guide...
...on the following types of the margin areas, see Chapter 2, "Basic Operations," in the Reference Guide.) You can set to manually specify a paper size for a copy job. 2 NOTE If you cannot use the Auto Zoom mode, or Image Combination mode. For instructions on the size of... on the copy. Nonstandard size originals - Originals smaller than STMT If the machine is 'AUTO PAPER'. The paper size is set whether to activate or deactivate the Automatic Paper Selection for each paper drawer and the stack bypass. (See Chapter 3, "Selecting and Storing Settings," in the Reference Guide...

Copying Guide for imageCLASS 2300
Page 36
... different from the Additional Functions menu), is not displayed. (See Chapter 3, "Selecting and Storing Settings," in Common Settings (from the original paper size. If DRAWER ELIGIBLTY is set , and the display returns to '01 OFF' in the Reference Guide.) 3 Make sure that is... set to the Copy Basic Features screen. 4 Press [Start]. Load the appropriate paper. F2 2 Place your original © press [F2] (PAPER SELECT). Paper Selection 2-5 COPY lights, and the Copy Basic Features screen appears. Basic Copying Features COPY 1 Press [COPY]. The ...
... different from the Additional Functions menu), is not displayed. (See Chapter 3, "Selecting and Storing Settings," in Common Settings (from the original paper size. If DRAWER ELIGIBLTY is set , and the display returns to '01 OFF' in the Reference Guide.) 3 Make sure that is... set to the Copy Basic Features screen. 4 Press [Start]. Load the appropriate paper. F2 2 Place your original © press [F2] (PAPER SELECT). Paper Selection 2-5 COPY lights, and the Copy Basic Features screen appears. Basic Copying Features COPY 1 Press [COPY]. The ...

Copying Guide for imageCLASS 2300
Page 37
... Chapter 3, "Selecting and 2 Storing Settings," in the Reference Guide.) NOTE The paper sizes/types loaded in the paper drawers can make copies after manually selecting the paper size and type of paper loaded in the paper drawers or stack bypass. NOTE The default setting is set to '01 OFF' ... menu. (See Chapter 3, "Selecting and Storing Settings," in the Reference Guide.) Basic Copying Features COPY F2 1 Press [COPY]. Manual Paper Selection You can be set from the Additional Functions menu), is not displayed. (See Chapter 3, "Selecting and Storing Settings," in the Reference Guide...
... Chapter 3, "Selecting and 2 Storing Settings," in the Reference Guide.) NOTE The paper sizes/types loaded in the paper drawers can make copies after manually selecting the paper size and type of paper loaded in the paper drawers or stack bypass. NOTE The default setting is set to '01 OFF' ... menu. (See Chapter 3, "Selecting and Storing Settings," in the Reference Guide.) Basic Copying Features COPY F2 1 Press [COPY]. Manual Paper Selection You can be set from the Additional Functions menu), is not displayed. (See Chapter 3, "Selecting and Storing Settings," in the Reference Guide...

Copying Guide for imageCLASS 2300
Page 38
...the stack bypass: ❑ Load the desired paper size and type in the paper drawers. The Paper Size setting menu appears. Paper Selection 2-7 To select the stack bypass for the current job or for a reserved job, press F2 (STACK BYPASS). The Paper Type setting menu appears. G If you ...previous menu option becomes highlighted. 2 NOTE The paper sizes shown on the LCD display vary depending on which paper sizes are loaded in the stack bypass. The display above appears only if the paper size is set to select the desired paper size. Basic Copying Features F3 3 Press [F3...
...the stack bypass: ❑ Load the desired paper size and type in the paper drawers. The Paper Size setting menu appears. Paper Selection 2-7 To select the stack bypass for the current job or for a reserved job, press F2 (STACK BYPASS). The Paper Type setting menu appears. G If you ...previous menu option becomes highlighted. 2 NOTE The paper sizes shown on the LCD display vary depending on which paper sizes are loaded in the stack bypass. The display above appears only if the paper size is set to select the desired paper size. Basic Copying Features F3 3 Press [F3...

Copying Guide for imageCLASS 2300
Page 39
Start 4 Press [Start]. Basic Copying Features The Copy Basic Features screen returns. F4 OK F3 2 F4 OK The Paper Size setting menu returns. ❑ Press [F3] (M) or [F4] (L) to select the paper type © press [OK]. Copying starts. F3 ❑ Press [F3] (M) or [F4] (L) to select the paper size © press [OK]. NOTE To cancel all settings and restore the machine's standard settings, press (Reset). 2-8 Paper Selection
Start 4 Press [Start]. Basic Copying Features The Copy Basic Features screen returns. F4 OK F3 2 F4 OK The Paper Size setting menu returns. ❑ Press [F3] (M) or [F4] (L) to select the paper type © press [OK]. Copying starts. F3 ❑ Press [F3] (M) or [F4] (L) to select the paper size © press [OK]. NOTE To cancel all settings and restore the machine's standard settings, press (Reset). 2-8 Paper Selection

Copying Guide for imageCLASS 2300
Page 40
... Image Quality Adjustments The exposure and image quality can be adjusted when the original is best suited for making copies from photos printed on photographic paper, or photo originals containing halftones (i.e., printed photos).
... Image Quality Adjustments The exposure and image quality can be adjusted when the original is best suited for making copies from photos printed on photographic paper, or photo originals containing halftones (i.e., printed photos).

