
DC210 Manual
Page 3
...an unstable cart, stand, tripod, bracket or table. Do not use the camera close to TV transmitters, portable communication devices or other ). They may cause the product and cart combination to the Canon DVD Camcorder DC210 A and all its accessories. 1 Read Instructions - Do not place on... Power Adapter is a safety feature. Quick stops, excessive force, and uneven surfaces may cause picture interference, or permanently damage the camera. 8 Water and Moisture - If the plug still fails to fit, contact your electrician to grounding electrodes, and requirements for future reference. ...
...an unstable cart, stand, tripod, bracket or table. Do not use the camera close to TV transmitters, portable communication devices or other ). They may cause the product and cart combination to the Canon DVD Camcorder DC210 A and all its accessories. 1 Read Instructions - Do not place on... Power Adapter is a safety feature. Quick stops, excessive force, and uneven surfaces may cause picture interference, or permanently damage the camera. 8 Water and Moisture - If the plug still fails to fit, contact your electrician to grounding electrodes, and requirements for future reference. ...

DC210 Manual
Page 8
...About the Joystick and the Joystick Guide 11 About the Power Switch 12 About the Operating Modes 12 Getting to Know the Camcorder Supplied Accessories 14 Components Guide 15 Screen Displays 17 Preparations Getting Started Charging the Battery Pack 20 Inserting and Removing a Disc ...22 Preparing the Camcorder 23 Adjusting the LCD Screen 24 Using the Menus Selecting a FUNC. Menu 36 Setup Menus 37 Camera Setup (Digital Zoom, Image Stabilizer, etc 37 Disc Operations (Photomovie, Finalize, etc 39 ...
...About the Joystick and the Joystick Guide 11 About the Power Switch 12 About the Operating Modes 12 Getting to Know the Camcorder Supplied Accessories 14 Components Guide 15 Screen Displays 17 Preparations Getting Started Charging the Battery Pack 20 Inserting and Removing a Disc ...22 Preparing the Camcorder 23 Adjusting the LCD Screen 24 Using the Menus Selecting a FUNC. Menu 36 Setup Menus 37 Camera Setup (Digital Zoom, Image Stabilizer, etc 37 Disc Operations (Photomovie, Finalize, etc 39 ...
DC210 Manual
Page 11
...and "Still image" are simulated pictures taken with the same meaning. To adjust for purchasing the Canon DC210. Select the time zone referring to save the settings or confirm an action. Press the joystick...operating procedures. Menu options in the manual: "Screen" refers to close the menu. The default setting is Paris. 5 Select ( ) your camcorder fail to operate correctly, refer to open the setup menus. 3 Select ( ) [DISPLAY SETUP] and press ( ). 4 Select ( ... terms are used interchangeably with a still camera. Should your time zone and press ( ).
...and "Still image" are simulated pictures taken with the same meaning. To adjust for purchasing the Canon DC210. Select the time zone referring to save the settings or confirm an action. Press the joystick...operating procedures. Menu options in the manual: "Screen" refers to close the menu. The default setting is Paris. 5 Select ( ) your camcorder fail to operate correctly, refer to open the setup menus. 3 Select ( ) [DISPLAY SETUP] and press ( ). 4 Select ( ... terms are used interchangeably with a still camera. Should your time zone and press ( ).

DC210 Manual
Page 12
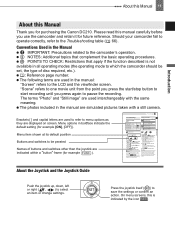
... In the manual, indicates that the function is not available. About the Power Switch In addition to turning the camcorder on the camcorder: Hold the lock button pressed down and move the power switch down the power switch momentarily toward [NEXT] to... display the next 'page' of the guide. green indicator). NEXT When the joystick guide contains multiple 'pages', [NEXT] and the page number icon ( ) will toggle the operating mode between recording (CAMERA...
... In the manual, indicates that the function is not available. About the Power Switch In addition to turning the camcorder on the camcorder: Hold the lock button pressed down and move the power switch down the power switch momentarily toward [NEXT] to... display the next 'page' of the guide. green indicator). NEXT When the joystick guide contains multiple 'pages', [NEXT] and the page number icon ( ) will toggle the operating mode between recording (CAMERA...

DC210 Manual
Page 16
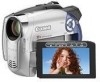
16 Getting to Know the Camcorder Back view Top view Bottom view PLAY mode indicator (green) ( 12) Joystick ( 11) CAMERA mode indicator (red) ( 12) LCD screen ( 24) (fast reverse) button ( 33) / Zoom out W (wide-angle) button ( 31) (fast forward) button ( 33) / Zoom in T (telephoto) button ( ...
16 Getting to Know the Camcorder Back view Top view Bottom view PLAY mode indicator (green) ( 12) Joystick ( 11) CAMERA mode indicator (red) ( 12) LCD screen ( 24) (fast reverse) button ( 33) / Zoom out W (wide-angle) button ( 31) (fast forward) button ( 33) / Zoom in T (telephoto) button ( ...

DC210 Manual
Page 28
... pausing while the scene is off. 2 Turn off the camcorder. 3 Close the lens cover and the LCD panel. 4 Remove the disc. This has no effect on the disc ( 36). The red CAMERA indicator will stay on or flashing. When recording in CAMERA mode. To restore the power, slide the power switch toward... MODE and release it, or move the power switch to and back to vibrations or strong impacts. - Do not subject the camcorder to ON again. Less than 99.99% of the ...
... pausing while the scene is off. 2 Turn off the camcorder. 3 Close the lens cover and the LCD panel. 4 Remove the disc. This has no effect on the disc ( 36). The red CAMERA indicator will stay on or flashing. When recording in CAMERA mode. To restore the power, slide the power switch toward... MODE and release it, or move the power switch to and back to vibrations or strong impacts. - Do not subject the camcorder to ON again. Less than 99.99% of the ...

DC210 Manual
Page 29
... aspect ratio of your Recordings (16:9 Widescreen or 4:3) You can result in the normal (4:3) aspect ratio. 6 Press FUNC. Excessive camcorder movement while shooting and extensive use tripods with black sidebars. Select ( ) the icon to delete the scene while reviewing it to ...[ OFF] to open the setup menus. 3 Select ( ) [CAMERA SETUP] and press ( ). 4 Select ( ) [WIDESCREEN] and press ( ). 5 Select ( ) a setting option and press ( ). Set it ( 55). 1 Press FUNC. . 2 ...
... aspect ratio of your Recordings (16:9 Widescreen or 4:3) You can result in the normal (4:3) aspect ratio. 6 Press FUNC. Excessive camcorder movement while shooting and extensive use tripods with black sidebars. Select ( ) the icon to delete the scene while reviewing it to ...[ OFF] to open the setup menus. 3 Select ( ) [CAMERA SETUP] and press ( ). 4 Select ( ) [WIDESCREEN] and press ( ). 5 Select ( ) a setting option and press ( ). Set it ( 55). 1 Press FUNC. . 2 ...

DC210 Manual
Page 30
...cover switch down to to open the disc cover and do so may result in CAMERA mode. Taking Photos ( 12) IMPORTANT Avoid the following actions while the disc access display ( ) appears on ...or flashing. The red CAMERA indicator will appear. 5 Press PHOTO fully. Adjust the focus manually ( 46). 1 Move the power switch ... turn green and one or more AF frames will turn off the camcorder. - Failing to vibrations or strong impacts. - Do not open the lens cover. 3 Move the / switch ...
...cover switch down to to open the disc cover and do so may result in CAMERA mode. Taking Photos ( 12) IMPORTANT Avoid the following actions while the disc access display ( ) appears on ...or flashing. The red CAMERA indicator will appear. 5 Press PHOTO fully. Adjust the focus manually ( 46). 1 Move the power switch ... turn green and one or more AF frames will turn off the camcorder. - Failing to vibrations or strong impacts. - Do not open the lens cover. 3 Move the / switch ...
DC210 Manual
Page 37
...1/30 (1/15 when recording still images). Mode switch: AUTO or P (only in the [ PROGRAM AE] recording program) [ ON], [ OFF] The camcorder automatically uses slow shutter speeds to the playlist. Advanced Functions DELETE ( 55) Disc type: • VR mode Delete a scene. SLIDESHOW ( 34) [...], [ONE SCENE], [CANCEL] Add a scene to obtain brighter recordings in the playlist. MOVE ( 55) Setup Menus Camera Setup (Digital Zoom, Image Stabilizer, etc.) CAMERA SETUP A.SL SHUTTER Disc type: • VR mode Move a scene in places with insufficient lighting. Menu Options Lists ...
...1/30 (1/15 when recording still images). Mode switch: AUTO or P (only in the [ PROGRAM AE] recording program) [ ON], [ OFF] The camcorder automatically uses slow shutter speeds to the playlist. Advanced Functions DELETE ( 55) Disc type: • VR mode Delete a scene. SLIDESHOW ( 34) [...], [ONE SCENE], [CANCEL] Add a scene to obtain brighter recordings in the playlist. MOVE ( 55) Setup Menus Camera Setup (Digital Zoom, Image Stabilizer, etc.) CAMERA SETUP A.SL SHUTTER Disc type: • VR mode Move a scene in places with insufficient lighting. Menu Options Lists ...
DC210 Manual
Page 40
...209;OL], [FRANÇAIS], [ITALIANO], [POLSKI], [ ROMANA ], [TÜRKÇE], [ ], [ ], [ ], [ ], [ ], [ ], [ ], [ ], [] TV SCREEN [ ON], [ OFF] When set to [ ON], the camcorder's on-screen displays will not affect the recordings on the screen of the screen. Use the markers as if the subject was looking at the... the markers will appear also on the disc or memory card. DATA CODE ( 51) [ DATE], [ TIME], [ DATE & TIME], [ CAMERA DATA] MARKERS Use the joystick ( ) to adjust the brightness to make sure your subject is rotated 180 degrees to face the subject, most screen...
...209;OL], [FRANÇAIS], [ITALIANO], [POLSKI], [ ROMANA ], [TÜRKÇE], [ ], [ ], [ ], [ ], [ ], [ ], [ ], [ ], [] TV SCREEN [ ON], [ OFF] When set to [ ON], the camcorder's on-screen displays will not affect the recordings on the screen of the screen. Use the markers as if the subject was looking at the... the markers will appear also on the disc or memory card. DATA CODE ( 51) [ DATE], [ TIME], [ DATE & TIME], [ CAMERA DATA] MARKERS Use the joystick ( ) to adjust the brightness to make sure your subject is rotated 180 degrees to face the subject, most screen...
DC210 Manual
Page 50
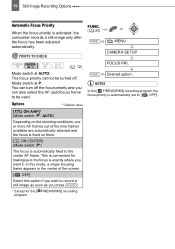
In this option if you wish to [ OFF]. MENU CAMERA SETUP FOCUS PRI. 50 Still Image Recording Options Automatic Focus Priority When the focus priority is exactly where you press PHOTO . * Except for the [ FIREWORKS] ... at P: You can also select the AF (autofocus) frame to the center AF frame. This is convenient for making sure the focus is activated, the camcorder records a still image only after the focus has been adjusted automatically. Options Default value [ ON:AiAF] (Mode switch: P*, AUTO) Depending on the shooting...
In this option if you wish to [ OFF]. MENU CAMERA SETUP FOCUS PRI. 50 Still Image Recording Options Automatic Focus Priority When the focus priority is exactly where you press PHOTO . * Except for the [ FIREWORKS] ... at P: You can also select the AF (autofocus) frame to the center AF frame. This is convenient for making sure the focus is activated, the camcorder records a still image only after the focus has been adjusted automatically. Options Default value [ ON:AiAF] (Mode switch: P*, AUTO) Depending on the shooting...

DC210 Manual
Page 51
...8226; Data code2 only • All displays off in the following section. 3 Histogram display: For still images you can display the complete camera data registered at the time of recording. For details on how to read the histogram display, refer to be displayed when playing back movies. ...the histogram represents highlights and the left side represents shadows. Other Functions 51 Other Functions Other Functions On-Screen Displays The camcorder keeps a data code containing the date and time and other camera data (shutter speed, exposure, etc.) registered at the time of recording.
...8226; Data code2 only • All displays off in the following section. 3 Histogram display: For still images you can display the complete camera data registered at the time of recording. For details on how to read the histogram display, refer to be displayed when playing back movies. ...the histogram represents highlights and the left side represents shadows. Other Functions 51 Other Functions Other Functions On-Screen Displays The camcorder keeps a data code containing the date and time and other camera data (shutter speed, exposure, etc.) registered at the time of recording.

DC210 Manual
Page 52
while one of the faders to begin or end a scene with a fade from or to a black screen. FUNC. ( 25) : Press Start/Stop . The camcorder starts recording after a 10-second countdown. The countdown appears on the screen. : Press PHOTO , first halfway to activate the autofocus and then fully to cancel ... will record the still image after a 10-second countdown. SEPIA] Options Default value [ D.EFFECT OFF] Select this setting when you turn off the camcorder. MENU CAMERA SETUP SELF TIMER FUNC.
while one of the faders to begin or end a scene with a fade from or to a black screen. FUNC. ( 25) : Press Start/Stop . The camcorder starts recording after a 10-second countdown. The countdown appears on the screen. : Press PHOTO , first halfway to activate the autofocus and then fully to cancel ... will record the still image after a 10-second countdown. SEPIA] Options Default value [ D.EFFECT OFF] Select this setting when you turn off the camcorder. MENU CAMERA SETUP SELF TIMER FUNC.

