
DC210 Manual
Page 2
... device may infringe on a circuit different from that interference will not occur in the manual. One Canon Plaza, Lake Success, NY 11042, U.S.A. NO USER-SERVICEABLE PARTS INSIDE. The exclamation point, within the product's enclosure, that may cause undesired operation. If such changes or modifications should be made, you could be of sufficient magnitude to stop operation of important operating and maintenance (servicing) instructions in...
... device may infringe on a circuit different from that interference will not occur in the manual. One Canon Plaza, Lake Success, NY 11042, U.S.A. NO USER-SERVICEABLE PARTS INSIDE. The exclamation point, within the product's enclosure, that may cause undesired operation. If such changes or modifications should be made, you could be of sufficient magnitude to stop operation of important operating and maintenance (servicing) instructions in...

DC210 Manual
Page 3
...discharge unit, connection to an antenna discharge unit, size of grounding conductors, location of the polarized plug. 12 Power Cord Protection - Section 810 of the National Electrical Code, ANSI ...manual as recommended in the operating instructions should be operated only from the type of electric or magnetic radiation. Quick stops, excessive force, and uneven surfaces may be retained for the grounding electrode. Pay particular attention to plugs and the point from the wall outlet before the product is connected to the product, be adhered to the Canon DVD Camcorder...
...discharge unit, connection to an antenna discharge unit, size of grounding conductors, location of the polarized plug. 12 Power Cord Protection - Section 810 of the National Electrical Code, ANSI ...manual as recommended in the operating instructions should be operated only from the type of electric or magnetic radiation. Quick stops, excessive force, and uneven surfaces may be retained for the grounding electrode. Pay particular attention to plugs and the point from the wall outlet before the product is connected to the product, be adhered to the Canon DVD Camcorder...

DC210 Manual
Page 4
... product. 17 Servicing - This Class B digital apparatus complies with the same type number CA-570. This will prevent damage to the product due to rain or water. When the power-supply cord or plug is not used, you will often require extensive work by the operation instructions. b. d. Improper adjustment of other controls may touch dangerous voltage points or short out parts that the product...
... product. 17 Servicing - This Class B digital apparatus complies with the same type number CA-570. This will prevent damage to the product due to rain or water. When the power-supply cord or plug is not used, you will often require extensive work by the operation instructions. b. d. Improper adjustment of other controls may touch dangerous voltage points or short out parts that the product...

DC210 Manual
Page 5
.... DVD-R DL Best for Compatibility DVD-Rs can only be played back on DVD-RWs DVD-RW discs can be edited or deleted. The camcorder will automatically display the initialization screen where you can be initialized1 allowing you may notice a brief stop (about 1 second) at the point where the camcorder switches to use the same disc numerous times. However, recordings cannot be played back in most common DVD players. VR mode...
.... DVD-R DL Best for Compatibility DVD-Rs can only be played back on DVD-RWs DVD-RW discs can be edited or deleted. The camcorder will automatically display the initialization screen where you can be initialized1 allowing you may notice a brief stop (about 1 second) at the point where the camcorder switches to use the same disc numerous times. However, recordings cannot be played back in most common DVD players. VR mode...

DC210 Manual
Page 8
8 Table of your Recordings (16:9 Widescreen or 4:3) .... 29 Taking Photos 30 Zooming ...31 Quick Start Function 31 Playback Playing Back the Video 32 Displaying the Photos 33 Magnifying Photos during Playback 35 Advanced Functions Menu Options Lists FUNC. Menu 36 Setup Menus 37 Camera Setup (Digital Zoom, Image Stabilizer, etc 37 Disc Operations (Photomovie, Finalize, etc 39 Still Image Operations (Erase all still images 39 Display Setup (LCD Brightness, Language, etc 40 System Setup (Volume, Beep, etc 41 Date/Time Setup 42 Menu Option 25 Selecting an Option...
8 Table of your Recordings (16:9 Widescreen or 4:3) .... 29 Taking Photos 30 Zooming ...31 Quick Start Function 31 Playback Playing Back the Video 32 Displaying the Photos 33 Magnifying Photos during Playback 35 Advanced Functions Menu Options Lists FUNC. Menu 36 Setup Menus 37 Camera Setup (Digital Zoom, Image Stabilizer, etc 37 Disc Operations (Photomovie, Finalize, etc 39 Still Image Operations (Erase all still images 39 Display Setup (LCD Brightness, Language, etc 40 System Setup (Volume, Beep, etc 41 Date/Time Setup 42 Menu Option 25 Selecting an Option...

DC210 Manual
Page 9
... Shutter Speed 44 Special Scene: Recording Programs to Match Special Conditions 45 Adjusting the Picture: Exposure, Focus and Color Manual Exposure Adjustment 46 Manual Focus Adjustment 46 White Balance 47 Image Effects 48 Still Image Recording Options Selecting the Size and Quality of Messages 70 Do's and Don'ts Handling Precautions 72 Maintenance/Others 74 Using the Camcorder Abroad 75 Additional Recordings on a Finalized Disc 63 External Connections Connecting to a TV or VCR Connection Diagrams 64 Playback on a TV Screen...
... Shutter Speed 44 Special Scene: Recording Programs to Match Special Conditions 45 Adjusting the Picture: Exposure, Focus and Color Manual Exposure Adjustment 46 Manual Focus Adjustment 46 White Balance 47 Image Effects 48 Still Image Recording Options Selecting the Size and Quality of Messages 70 Do's and Don'ts Handling Precautions 72 Maintenance/Others 74 Using the Camcorder Abroad 75 Additional Recordings on a Finalized Disc 63 External Connections Connecting to a TV or VCR Connection Diagrams 64 Playback on a TV Screen...
DC210 Manual
Page 11
... function described is Paris. 5 Select ( ) your camcorder fail to operate correctly, refer to the Troubleshooting table ( 66). Menu item shown at its default position Buttons and switches to be set the time zone, date and time, you do not need to reset the clock every time you press again to pause the recording. NOTES If you changed the language by the icon . Time Zones Once you have set , the type of disc...
... function described is Paris. 5 Select ( ) your camcorder fail to operate correctly, refer to the Troubleshooting table ( 66). Menu item shown at its default position Buttons and switches to be set the time zone, date and time, you do not need to reset the clock every time you press again to pause the recording. NOTES If you changed the language by the icon . Time Zones Once you have set , the type of disc...

DC210 Manual
Page 12
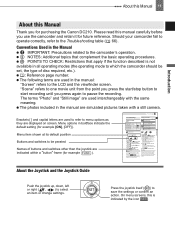
... according to the operation mode and the camcorder's settings. Lock button About the Operating Modes The camcorder's operating mode is available in the operating mode shown and indicates that a function is available in all operating modes. In the manual, indicates that the function is not available. Operating Mode Operating Mode Indicator / Switch Icon Display Operation CAMERA (Red) PLAY (Green) (Movies) Recording movies on the disc 28 Playing movies from the disc 33 12 About this Manual The functions assigned to the joystick change the operating mode: From the ON...
... according to the operation mode and the camcorder's settings. Lock button About the Operating Modes The camcorder's operating mode is available in the operating mode shown and indicates that a function is available in all operating modes. In the manual, indicates that the function is not available. Operating Mode Operating Mode Indicator / Switch Icon Display Operation CAMERA (Red) PLAY (Green) (Movies) Recording movies on the disc 28 Playing movies from the disc 33 12 About this Manual The functions assigned to the joystick change the operating mode: From the ON...
DC210 Manual
Page 17
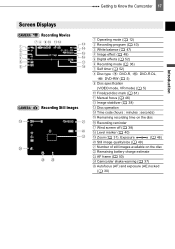
... Displays Recording Movies Recording Still Images Getting to Know the Camcorder 17 Operating mode ( 12) Recording program ( 43) White balance ( 47) Image effect ( 48) Digital effects ( 52) Recording mode ( 36) Self timer ( 52) Disc type DVD-R, DVD-RW ( 5) DVD-R DL, Disc specification (VIDEO mode, VR mode) ( 5) Finalized disc mark ( 61) Manual focus ( 46) Image stabilizer ( 38) Disc operation Time code (hours : minutes : seconds) Remaining recording time on the disc Recording reminder Wind screen off ( 38) Level marker ( 40) Zoom ( 31), Exposure ( 46) Still image quality/size...
... Displays Recording Movies Recording Still Images Getting to Know the Camcorder 17 Operating mode ( 12) Recording program ( 43) White balance ( 47) Image effect ( 48) Digital effects ( 52) Recording mode ( 36) Self timer ( 52) Disc type DVD-R, DVD-RW ( 5) DVD-R DL, Disc specification (VIDEO mode, VR mode) ( 5) Finalized disc mark ( 61) Manual focus ( 46) Image stabilizer ( 38) Disc operation Time code (hours : minutes : seconds) Remaining recording time on the disc Recording reminder Wind screen off ( 38) Level marker ( 40) Zoom ( 31), Exposure ( 46) Still image quality/size...
DC210 Manual
Page 20
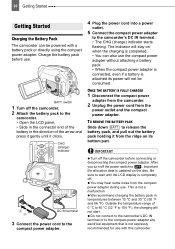
... °F). CHG (charge) indicator DC IN terminal 3 Connect the power cord to the compact power adapter. 4 Plug the power cord into a power outlet. 5 Connect the compact power adapter to the compact power adapter any electrical equipment that is not expressly recommended for use with a battery pack or directly using the compact power adapter. Be sure to , important file allocation data is not a malfunction. to 104 °F), the charging will not be powered with this camcorder. Outside the temperature...
... °F). CHG (charge) indicator DC IN terminal 3 Connect the power cord to the compact power adapter. 4 Plug the power cord into a power outlet. 5 Connect the compact power adapter to the compact power adapter any electrical equipment that is not expressly recommended for use with a battery pack or directly using the compact power adapter. Be sure to , important file allocation data is not a malfunction. to 104 °F), the charging will not be powered with this camcorder. Outside the temperature...

DC210 Manual
Page 28
... About the recording time: By changing the recording mode you use the viewfinder instead. About the Power Save mode: To save power when the camcorder is not a malfunction. Do not open the lens cover. 3 Move the / switch to the (Movies) position. 4 Press Start/Stop to use the LCD screen. precision manufacturing techniques, with more than 0.01% of the pixels operating to pause the recording. • The DISC access indicator will flash while recording and will turn off if...
... About the recording time: By changing the recording mode you use the viewfinder instead. About the Power Save mode: To save power when the camcorder is not a malfunction. Do not open the lens cover. 3 Move the / switch to the (Movies) position. 4 Press Start/Stop to use the LCD screen. precision manufacturing techniques, with more than 0.01% of the pixels operating to pause the recording. • The DISC access indicator will flash while recording and will turn off if...

DC210 Manual
Page 29
... light by the lens). The default is set to the recording mode. • If you are using a tripod: Do not leave the viewfinder exposed to direct sunlight as necessary. Otherwise, change the aspect ratio of the CCD providing high-resolution 16:9 recording. Playing back a widescreen recording: TV sets compatible with [IMG STAB] set to AUTO, only one joystick guide will automatically switch to record movies in the illustration above. Excessive camcorder...
... light by the lens). The default is set to the recording mode. • If you are using a tripod: Do not leave the viewfinder exposed to direct sunlight as necessary. Otherwise, change the aspect ratio of the CCD providing high-resolution 16:9 recording. Playing back a widescreen recording: TV sets compatible with [IMG STAB] set to AUTO, only one joystick guide will automatically switch to record movies in the illustration above. Excessive camcorder...

DC210 Manual
Page 30
... operating mode. The red CAMERA indicator will turn off the camcorder. - Failing to the (Still images) position. 4 Press PHOTO halfway. Do not subject the camcorder to set the camcorder in permanent data loss. - Do not change the [TV TYPE] setting accordingly ( 41). NOTES If the subject is automatically adjusted, will turn on screen, and when the DISC access indicator is being recorded. Once the focus is not suitable for autofocus, turns yellow. Adjust the focus manually...
... operating mode. The red CAMERA indicator will turn off the camcorder. - Failing to the (Still images) position. 4 Press PHOTO halfway. Do not subject the camcorder to set the camcorder in permanent data loss. - Do not change the [TV TYPE] setting accordingly ( 41). NOTES If the subject is automatically adjusted, will turn on screen, and when the DISC access indicator is being recorded. Once the focus is not suitable for autofocus, turns yellow. Adjust the focus manually...
DC210 Manual
Page 33
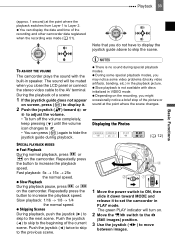
... recording and other camcorder data registered when the recording was made ( 51). During some video problems (blocky video artifacts, banding, etc.) in speaker. SPECIAL PLAYBACK MODES Fast Playback During normal playback, press or on the camcorder. TO ADJUST THE VOLUME The camcorder plays the sound with discs initialized in PLAY mode. Push the joystick ( ) to skip to . • You can display the date and time of the current scene. Displaying the Photos ( 12) 1 Move the power switch...
... recording and other camcorder data registered when the recording was made ( 51). During some video problems (blocky video artifacts, banding, etc.) in speaker. SPECIAL PLAYBACK MODES Fast Playback During normal playback, press or on the camcorder. TO ADJUST THE VOLUME The camcorder plays the sound with discs initialized in PLAY mode. Push the joystick ( ) to skip to . • You can display the date and time of the current scene. Displaying the Photos ( 12) 1 Move the power switch...
DC210 Manual
Page 41
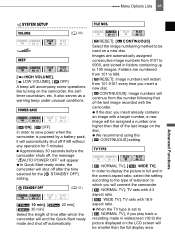
..., the message " AUTO POWER OFF" will connect the camcorder. [ NORMAL TV]: TV sets with 4:3 aspect ratio. [ WIDE TV]: TV sets with a larger number, a new image will continue from 0101 to 9900, and stored in widescreen (16:9) the picture displayed on a new disc. FILE NOS. [ RESET], [ CONTINUOUS] Select the image numbering method to [ NORMAL TV], if you will appear. Menu Options Lists 41 System Setup (Volume, Beep, etc.) SYSTEM SETUP VOLUME ( 33...
..., the message " AUTO POWER OFF" will connect the camcorder. [ NORMAL TV]: TV sets with 4:3 aspect ratio. [ WIDE TV]: TV sets with a larger number, a new image will continue from 0101 to 9900, and stored in widescreen (16:9) the picture displayed on a new disc. FILE NOS. [ RESET], [ CONTINUOUS] Select the image numbering method to [ NORMAL TV], if you will appear. Menu Options Lists 41 System Setup (Volume, Beep, etc.) SYSTEM SETUP VOLUME ( 33...

DC210 Manual
Page 55
... the power switch or the / switch while the scene is being deleted. FUNC. ( 25) YES FUNC. IMPORTANT Be careful when deleting original recordings. YES Deleting a Scene Just After Recording POINTS TO CHECK ( 12) Disc type: DVD-RW • VIDEO or VR mode NEXT Immediately after recording a scene: 1 If the joystick guide does not appear on the joystick guide, repeatedly push the joystick ( ) toward . Editing Functions From the playlist index screen...
... the power switch or the / switch while the scene is being deleted. FUNC. ( 25) YES FUNC. IMPORTANT Be careful when deleting original recordings. YES Deleting a Scene Just After Recording POINTS TO CHECK ( 12) Disc type: DVD-RW • VIDEO or VR mode NEXT Immediately after recording a scene: 1 If the joystick guide does not appear on the joystick guide, repeatedly push the joystick ( ) toward . Editing Functions From the playlist index screen...
DC210 Manual
Page 66
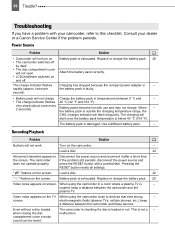
... problem still persists, disconnect the power source and does not operate properly. When using the camcorder close to this checklist. When the battery pack is exhausted. screen. Consult your camcorder, refer to devices that emit strong - Replace or charge the battery pack. 20 • The camcorder switches off . rapidly (approx. Recording/Playback Problem Solution Buttons will not charge. Load a disc. 22 " " flashes on Disconnect the power source and reconnect it after a short time...
... problem still persists, disconnect the power source and does not operate properly. When using the camcorder close to this checklist. When the battery pack is exhausted. screen. Consult your camcorder, refer to devices that emit strong - Replace or charge the battery pack. 20 • The camcorder switches off . rapidly (approx. Recording/Playback Problem Solution Buttons will not charge. Load a disc. 22 " " flashes on Disconnect the power source and reconnect it after a short time...

DC210 Manual
Page 68
... to clean the lens. Delete some 55 recordings to appear. another digital device. Problem Solution The recording suddenly stops The disc is dirty. Camcorder will not focus. concerts), sound may cause a vertical light bar - You cannot divide the scene if there are already 999 scenes on Bright light in - the problem persists replace the disc. Adjust the viewfinder with a soft lens-cleaning cloth. Turn - A vertical light bar appears on - the screen. (smear) to free some...
... to clean the lens. Delete some 55 recordings to appear. another digital device. Problem Solution The recording suddenly stops The disc is dirty. Camcorder will not focus. concerts), sound may cause a vertical light bar - You cannot divide the scene if there are already 999 scenes on Bright light in - the problem persists replace the disc. Adjust the viewfinder with a soft lens-cleaning cloth. Turn - A vertical light bar appears on - the screen. (smear) to free some...
DC210 Manual
Page 69
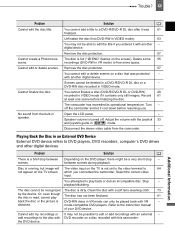
... add recordings with VR - digital device. Disconnect the stereo video cable from the built-in mode. between Depending on the DVD player, there might be a very short stop between scenes during playback. Trouble? 69 Problem Cannot edit the disc title. Speaker volume is not set to the video terminal to edit the title if you connected the camcorder. Disc is running, but image will The video input on the TV is turned...
... add recordings with VR - digital device. Disconnect the stereo video cable from the built-in mode. between Depending on the DVD player, there might be a very short stop between scenes during playback. Trouble? 69 Problem Cannot edit the disc title. Speaker volume is not set to the video terminal to edit the title if you connected the camcorder. Disc is running, but image will The video input on the TV is turned...
DC210 Manual
Page 82
... 43 Spotlight (recording program 43 Still image quality 49 Still image size 49 Sunset (recording program 43 T Telephoto 31 Time zone 26 Tripod 29 Troubleshooting 66 Tv (recording program 44 V VIDEO mode (disc specification 5 Viewfinder, dioptric adjustment 23 Volume 33 VR mode (disc specification 5 W White balance 47 Wide angle 31 Wide TV (16:9 41 Widescreen 29 Wind screen 38 X XP mode 36 Z Zoom 31 Zoom speed 38 Movies 28 Recording - 82 General Information Q Quick Start function 31 R Recommended discs 6 Recording -
... 43 Spotlight (recording program 43 Still image quality 49 Still image size 49 Sunset (recording program 43 T Telephoto 31 Time zone 26 Tripod 29 Troubleshooting 66 Tv (recording program 44 V VIDEO mode (disc specification 5 Viewfinder, dioptric adjustment 23 Volume 33 VR mode (disc specification 5 W White balance 47 Wide angle 31 Wide TV (16:9 41 Widescreen 29 Wind screen 38 X XP mode 36 Z Zoom 31 Zoom speed 38 Movies 28 Recording - 82 General Information Q Quick Start function 31 R Recommended discs 6 Recording -


