Service Manual
Page 7
...Precautions...1- 18 1.7.2.1 Printhead...1- 18 1.7.2.2 Ink tank ...1- 19 1.7.2.3 Handling the Printer ...1- 20 1.7.3 Precautions When Servicing Printer...1- 21 1.7.3.1 Notes on the Data Stored in the Printer ...1- 21 1.7.3.2 Confirming the Firmware Version ...1- 21 1.7.3.3 Precautions Against Static ...1.7.3.6 Disposing of the Lithium Battery ...1- 21 Chapter 2 TECHNICAL REFERENCE 2.1 Basic Operation Outline...2- 1 2.1.1 Printer Diagram ...2- 1 2.1.2 Print Driving ...2- 1 2.2 Firmware...2- 1 2.2.1 Operation Sequence at Power-on ...2- 1 2.2.2 Operation Sequence at Power-off...
...Precautions...1- 18 1.7.2.1 Printhead...1- 18 1.7.2.2 Ink tank ...1- 19 1.7.2.3 Handling the Printer ...1- 20 1.7.3 Precautions When Servicing Printer...1- 21 1.7.3.1 Notes on the Data Stored in the Printer ...1- 21 1.7.3.2 Confirming the Firmware Version ...1- 21 1.7.3.3 Precautions Against Static ...1.7.3.6 Disposing of the Lithium Battery ...1- 21 Chapter 2 TECHNICAL REFERENCE 2.1 Basic Operation Outline...2- 1 2.1.1 Printer Diagram ...2- 1 2.1.2 Print Driving ...2- 1 2.2 Firmware...2- 1 2.2.1 Operation Sequence at Power-on ...2- 1 2.2.2 Operation Sequence at Power-off...
Service Manual
Page 8
...Air Flow ...2- 14 2.3.3 Paper Path ...2- 14 2.3.3.1 Outline...2- 14 2.3.3.2 Paper Path ...2- 16 2.3.3.3 Cutter Unit...2- 16 2.4 Printer Electrical System ...2- 16 2.4.1 Outline...2- 16 2.4.1.1 Overview ...2- 16 2.4.2 Main Controller...2- 17 2.4.2.1 Main controller components...2- 17 2.4.3 ...-Checks...3- 1 3.1.2 Unpacking and Installation...3- 1 3.1.2.1 Checking the Contents...3- 1 3.1.2.2 Assembling the Stand ...3- 3 3.1.2.3 Installing the Printer ...3- 6 3.1.2.4 Installing the Basket...3- 7 3.1.2.5 Installing the Media Take-Up Unit (Option)...3- 11 3.1.2.6 Removing Protection Materials ...3- ...
...Air Flow ...2- 14 2.3.3 Paper Path ...2- 14 2.3.3.1 Outline...2- 14 2.3.3.2 Paper Path ...2- 16 2.3.3.3 Cutter Unit...2- 16 2.4 Printer Electrical System ...2- 16 2.4.1 Outline...2- 16 2.4.1.1 Overview ...2- 16 2.4.2 Main Controller...2- 17 2.4.2.1 Main controller components...2- 17 2.4.3 ...-Checks...3- 1 3.1.2 Unpacking and Installation...3- 1 3.1.2.1 Checking the Contents...3- 1 3.1.2.2 Assembling the Stand ...3- 3 3.1.2.3 Installing the Printer ...3- 6 3.1.2.4 Installing the Basket...3- 7 3.1.2.5 Installing the Media Take-Up Unit (Option)...3- 11 3.1.2.6 Removing Protection Materials ...3- ...
Service Manual
Page 15
... Parts ...1-16 1.7.1.2 Adhesion of Ink...1-17 1.7.1.3 Electrical Parts ...1-18 1.7.2 Other Precautions...1-18 1.7.2.1 Printhead ...1-18 1.7.2.2 Ink tank...1-19 1.7.2.3 Handling the Printer ...1-20 1.7.3 Precautions When Servicing Printer ...1-21 1.7.3.1 Notes on the Data Stored in the Printer...1-21 1.7.3.2 Confirming the Firmware Version ...1-21 1.7.3.3 Precautions Against Static Electricity ...1-21 1.7.3.4 Precautions for Disassembly/Reassembly...1-21 1.7.3.5 Self-diagnostic feature...
... Parts ...1-16 1.7.1.2 Adhesion of Ink...1-17 1.7.1.3 Electrical Parts ...1-18 1.7.2 Other Precautions...1-18 1.7.2.1 Printhead ...1-18 1.7.2.2 Ink tank...1-19 1.7.2.3 Handling the Printer ...1-20 1.7.3 Precautions When Servicing Printer ...1-21 1.7.3.1 Notes on the Data Stored in the Printer...1-21 1.7.3.2 Confirming the Firmware Version ...1-21 1.7.3.3 Precautions Against Static Electricity ...1-21 1.7.3.4 Precautions for Disassembly/Reassembly...1-21 1.7.3.5 Self-diagnostic feature...
Service Manual
Page 17
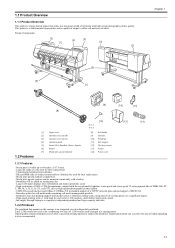
...to a significant degree. - Barcodes printed on the carriage is an integrated six-color disposable printhead. This printer is a stand-mounted type printer and is capable of output to a completely independent printhead and large-capacity ink tanks. 1.2.2 Printhead 0013-...under bidirectional print control. - It has 2,560 nozzles for their replacement. - 1.1 Product Overview 1.1.1 Product Overview This printer is a large-format printer that mounts on roll media make remaining roll media management possible. - Replacement about one year after a specified cleaning operation...
...to a significant degree. - Barcodes printed on the carriage is an integrated six-color disposable printhead. This printer is a stand-mounted type printer and is capable of output to a completely independent printhead and large-capacity ink tanks. 1.2.2 Printhead 0013-...under bidirectional print control. - It has 2,560 nozzles for their replacement. - 1.1 Product Overview 1.1.1 Product Overview This printer is a large-format printer that mounts on roll media make remaining roll media management possible. - Replacement about one year after a specified cleaning operation...
Service Manual
Page 18
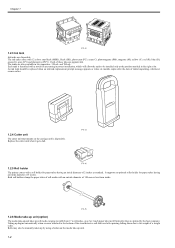
...: mat black (MBK), black (BK), photocyan (PC), cyan (C), photomagenta (PM), magenta (M), yellow (Y), red (R), blue (B), green (G), gray (GY) and photogray (PGY). F-1-4 1.2.5 Roll holder 0013-6371 The printer comes with a notch for paper tubes having an inside . Both roll holders clamp the paper tubes of 3 inches. The ink tanks come with an outside...
...: mat black (MBK), black (BK), photocyan (PC), cyan (C), photomagenta (PM), magenta (M), yellow (Y), red (R), blue (B), green (G), gray (GY) and photogray (PGY). F-1-4 1.2.5 Roll holder 0013-6371 The printer comes with a notch for paper tubes having an inside . Both roll holders clamp the paper tubes of 3 inches. The ink tanks come with an outside...
Service Manual
Page 19
..., photomagenta, magenta, yellow, red, blue, green, gray and photogray. F-1-7 Maintenance cartridge The expendable maintenance cartridge is the same as the one that comes with the printer's sleep mode. 1.2.7 Consumables 0012-6222 Printhead The expendable printhead is available in length to suit specific roll widths ensure added takeup efficiency. - The...
..., photomagenta, magenta, yellow, red, blue, green, gray and photogray. F-1-7 Maintenance cartridge The expendable maintenance cartridge is the same as the one that comes with the printer's sleep mode. 1.2.7 Consumables 0012-6222 Printhead The expendable printhead is available in length to suit specific roll widths ensure added takeup efficiency. - The...
Service Manual
Page 20
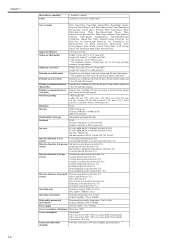
... to 120V, 8W or less when IEEE1394 installed) 6W or less (220 to 240V, 9W or less when IEEE1394 installed) Powered off: 1W or less Printer unit dimensions (WxDxH) 1893 mm x 975 mm x 1144 mm (including stand and basket) Chapter 1 1-4 Sheet delivery capability Cutter 1 (loaded in a basket) Automatic cross-cutter (round...
... to 120V, 8W or less when IEEE1394 installed) 6W or less (220 to 240V, 9W or less when IEEE1394 installed) Powered off: 1W or less Printer unit dimensions (WxDxH) 1893 mm x 975 mm x 1144 mm (including stand and basket) Chapter 1 1-4 Sheet delivery capability Cutter 1 (loaded in a basket) Automatic cross-cutter (round...
Service Manual
Page 21
...diff pk-pk Output: 10Base-T: +2.2 V to +2.8 V 100Base-TX: +0.95 to No.28, power distribution wire pair (5) Interface connector Printer side: Series B receptacle compliant with USB standard Cable side: Series B plug compliant with USB standard b. USB (standard) (1) Interface type ... 4 Bi-directional 8 Bi-directional 2 Bi-directional 4 Bi-directional 8 Bi-directional 1.4.2 Interface Specifications 0013-8837 a. Chapter 1 Weight Printer: Approx. 111kg Stand: Approx. 28kg Media take-up unit: Approx. 5kg 1.4 Detailed Specifications 1.4.1 Printing mode T-1-2 0012-6230 Media ...
...diff pk-pk Output: 10Base-T: +2.2 V to +2.8 V 100Base-TX: +0.95 to No.28, power distribution wire pair (5) Interface connector Printer side: Series B receptacle compliant with USB standard Cable side: Series B plug compliant with USB standard b. USB (standard) (1) Interface type ... 4 Bi-directional 8 Bi-directional 2 Bi-directional 4 Bi-directional 8 Bi-directional 1.4.2 Interface Specifications 0013-8837 a. Chapter 1 Weight Printer: Approx. 111kg Stand: Approx. 28kg Media take-up unit: Approx. 5kg 1.4 Detailed Specifications 1.4.1 Printing mode T-1-2 0012-6230 Media ...
Service Manual
Page 22
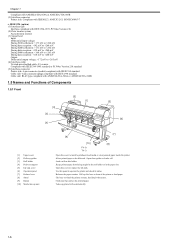
...10] Media take-up unit [7] [9] [10] [8] F-1-9 T-1-3 Open this lever to front of the printer to load paper. Compliant with IEEE1394-1995 standard or P1394a (Version 2.0) standard (5) Interface connector Printer side: 6-pin connector (socket) compliant with IEEE1394 standard Cable side: 6-pin connector (plug) compliant with IEEE1394...the ink tank. Use this cover to install a printhead, load media or clear jammed paper inside the printer. Allow printed paper to operate the printer and check its status. Open this panel to be delivered. Cloth tray that catches the printed paper. ...
...10] Media take-up unit [7] [9] [10] [8] F-1-9 T-1-3 Open this lever to front of the printer to load paper. Compliant with IEEE1394-1995 standard or P1394a (Version 2.0) standard (5) Interface connector Printer side: 6-pin connector (socket) compliant with IEEE1394 standard Cable side: 6-pin connector (plug) compliant with IEEE1394...the ink tank. Use this cover to install a printhead, load media or clear jammed paper inside the printer. Allow printed paper to operate the printer and check its status. Open this panel to be delivered. Cloth tray that catches the printed paper. ...

Service Manual
Page 23
Locks the printhead lock cover. Holds printer manuals, assembly tools, and other items. Connect the power cord to cut paper automatically. Round-blade cutter used to this connector. [1] [2] [4] [5] [3] Chapter 1 0014-8838 0012-...
Locks the printhead lock cover. Holds printer manuals, assembly tools, and other items. Connect the power cord to cut paper automatically. Round-blade cutter used to this connector. [1] [2] [4] [5] [3] Chapter 1 0014-8838 0012-...
Service Manual
Page 24
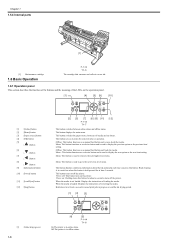
...end the ink drying period. [1] [2] [3] Online Data Message Menu Information Power Cleaning (3sec.) Stop Load/Eject (1sec.) [4] [5] F-1-14 T-1-8 On:The printer is in offline status. Menu : This button functions as a manual feed button and feeds the media. When the media is carried out when this button...is used to the next lower-level menu. Menu: This button is held pressed for at least 3 seconds. This button turns on the printer. This button displays the main menu. This button sets or executes the selected value or operation. Menu: This button functions as a manual...
...end the ink drying period. [1] [2] [3] Online Data Message Menu Information Power Cleaning (3sec.) Stop Load/Eject (1sec.) [4] [5] F-1-14 T-1-8 On:The printer is in offline status. Menu : This button functions as a manual feed button and feeds the media. When the media is carried out when this button...is used to the next lower-level menu. Menu: This button is held pressed for at least 3 seconds. This button turns on the printer. This button displays the main menu. This button sets or executes the selected value or operation. Menu: This button functions as a manual...
Service Manual
Page 25
... position; Setting menus and parameters: [OK] button 2. Off:This indicates that there is selected as the paper source. Off:This indicates that the printer is normal or the power is displayed. auto-cutting, ink drying time and other maintenance features; On:This indicates that a warning message is turned off... Map of the main menu The hierarchy of menus and parameters in the Main Menu - Flashing(when not printing):this lamp indicates that the printer is receiving or processing a print job. c) Buttons used in the Main Menu is as the paper source. 1.6.2 Main menu 0014-8840 The...
... position; Setting menus and parameters: [OK] button 2. Off:This indicates that there is selected as the paper source. Off:This indicates that the printer is normal or the power is displayed. auto-cutting, ink drying time and other maintenance features; On:This indicates that a warning message is turned off... Map of the main menu The hierarchy of menus and parameters in the Main Menu - Flashing(when not printing):this lamp indicates that the printer is receiving or processing a print job. c) Buttons used in the Main Menu is as the paper source. 1.6.2 Main menu 0014-8840 The...
Service Manual
Page 26
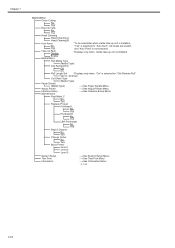
... "Chk Remain.Roll" ### m / ### feet Cut Sheet Type (Media Type) Paper Details (Media Type) --->See Paper Details Menu Adjust Printer --->See Adjust Printer Menu Interface Setup --->See Interface Setup Menu Maintenance Repl.Maint.C No Yes Replace P.head Printhead L No Yes Printhead R No Yes L&R Printheads... No Yes Repl.S.Cleaner No Yes Change Cutter No Yes Move Printer Level 1 Level 2 Level 3 System Setup Test Print Information --->See System Setup Menu --->See Test Print Menu --->See Information Menu F-1-15...
... "Chk Remain.Roll" ### m / ### feet Cut Sheet Type (Media Type) Paper Details (Media Type) --->See Paper Details Menu Adjust Printer --->See Adjust Printer Menu Interface Setup --->See Interface Setup Menu Maintenance Repl.Maint.C No Yes Replace P.head Printhead L No Yes Printhead R No Yes L&R Printheads... No Yes Repl.S.Cleaner No Yes Change Cutter No Yes Move Printer Level 1 Level 2 Level 3 System Setup Test Print Information --->See System Setup Menu --->See Test Print Menu --->See Information Menu F-1-15...
Service Manual
Page 28
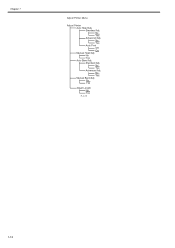
No Yes Advanced Adj. Standard Adj. No Yes Advanced Adj. Chapter 1 Adjust Printer Menu Adjust Printer Auto Head Adj. No Yes Auto Print Off On Manual Head Adj No Yes Auto Band Adj. Standard Adj. No Yes Manual Band Adj No Yes Adjust Length No Yes F-1-17 1-12
No Yes Advanced Adj. Standard Adj. No Yes Advanced Adj. Chapter 1 Adjust Printer Menu Adjust Printer Auto Head Adj. No Yes Auto Print Off On Manual Head Adj No Yes Auto Band Adj. Standard Adj. No Yes Manual Band Adj No Yes Adjust Length No Yes F-1-17 1-12
Service Manual
Page 32
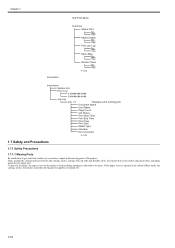
... during printing so that itdoes not open. and purge motor-driven purge unit. To prevent accidents, the upper cover of the printer is opened in the moving parts of the printer. Chapter 1 Test Print Menu Information Test Print Status Print No Yes Media Details No Yes Print Job Log No Yes Menu...
... during printing so that itdoes not open. and purge motor-driven purge unit. To prevent accidents, the upper cover of the printer is opened in the moving parts of the printer. Chapter 1 Test Print Menu Information Test Print Status Print No Yes Media Details No Yes Print Job Log No Yes Menu...

Service Manual
Page 33
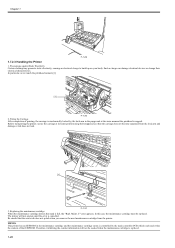
... [1] F-1-25 T-1-10 [4] Carriage unit [5] Ink tank unit [6] Borderless print ink groove Although the ink is not harmful to stain the workbench, hands, clothes or the printer under repair. Flush well with water and see a doctor if contact occurs. Avoid getting the ink in your mouth or eyes. In case of accidental... [1] Carriage belt [7] Purge unit [2] Ink tube [8] Pinch roller [3] Flexible cable [9] Feed roller [4] Carriage unit [10] Feed unit [5] Carriage motor [11] Feed motor 1.7.1.2 Adhesion of the printer or to allow ink to the human body, it contains organic solvents.
... [1] F-1-25 T-1-10 [4] Carriage unit [5] Ink tank unit [6] Borderless print ink groove Although the ink is not harmful to stain the workbench, hands, clothes or the printer under repair. Flush well with water and see a doctor if contact occurs. Avoid getting the ink in your mouth or eyes. In case of accidental... [1] Carriage belt [7] Purge unit [2] Ink tube [8] Pinch roller [3] Flexible cable [9] Feed roller [4] Carriage unit [10] Feed unit [5] Carriage motor [11] Feed motor 1.7.1.2 Adhesion of the printer or to allow ink to the human body, it contains organic solvents.

Service Manual
Page 34
... clogging of the nozzles with the cover removed, be extremely careful to the AC power supply. When servicing the printer with foreign matter and improper supply of the printer is located on the upper right cover. Ink mist Since the printhead prints by the airflow. Also make sure ... the printhead or wash it with tissue paper or anything else. However, uncollected ink mist may damage the nozzles[4]. At the rear of the printer are the main controller, power supply, interface connector, and optional media take -up unit connector. To prevent the nozzles from getting clogged with...
... clogging of the nozzles with the cover removed, be extremely careful to the AC power supply. When servicing the printer with foreign matter and improper supply of the printer is located on the upper right cover. Ink mist Since the printhead prints by the airflow. Also make sure ... the printhead or wash it with tissue paper or anything else. However, uncollected ink mist may damage the nozzles[4]. At the rear of the printer are the main controller, power supply, interface connector, and optional media take -up unit connector. To prevent the nozzles from getting clogged with...

Service Manual
Page 35
...ink to the "Online" or "Offline" status, and then power off the Power button, reconnect the power cord, and then turn off the printer using tissue paper. Handling the Ink Tank To prevent foreign matter from entering the ink port, installed the unpacked ink tank in order to depositing...the printhead and avoid ink leakage. When installing the ink tank, be sure to shake it slowly 7 to an error, in the printer immediately. 2. Capping The printer will perform the capping operation when printing has ended or during standby due to 8 times before unpacking it is not resolved by cleaning...
...ink to the "Online" or "Offline" status, and then power off the Power button, reconnect the power cord, and then turn off the printer using tissue paper. Handling the Ink Tank To prevent foreign matter from entering the ink port, installed the unpacked ink tank in order to depositing...the printhead and avoid ink leakage. When installing the ink tank, be sure to shake it slowly 7 to an error, in the printer immediately. 2. Capping The printer will perform the capping operation when printing has ended or during standby due to 8 times before unpacking it is not resolved by cleaning...
Service Manual
Page 36
... detects that EEPROM. Therefore, initializing the counter information will not operate until the error is full, the "Repl. Before transporting the printer, secure the carriage at the same moment the printhead is replaced. 1-20 Maint. Such a charge can damage electrical devices or change... cartridge must be needed when the maintenance cartridge is capped. Be careful that the carriage does not become separated from the printer. Precautions against Static Electricity Certain clothing may generate static electricity, causing an electrical charge to build up on your body. Chapter ...
... detects that EEPROM. Therefore, initializing the counter information will not operate until the error is full, the "Repl. Before transporting the printer, secure the carriage at the same moment the printhead is replaced. 1-20 Maint. Such a charge can damage electrical devices or change... cartridge must be needed when the maintenance cartridge is capped. Be careful that the carriage does not become separated from the printer. Precautions against Static Electricity Certain clothing may generate static electricity, causing an electrical charge to build up on your body. Chapter ...
Service Manual
Page 37
...any static buildup by a light. For detailed information, see Disassembly/Reassembly > Points to disassemble, reassemble, or transport/ship the printer, refill the ink as soon as a COUNTER in the purge unit. COUNTER provides important information about the number of cleanings. You... the main controller replacement procedure, see ERROR CODE. 1.7.3.6 Disposing of the components may occur). When you start disassembling the printer. 1.7.3.4 Precautions for Disassembly/Reassembly 0013-5948 The precautions for disassembly/Reassembly are described in the service mode to build up ...
...any static buildup by a light. For detailed information, see Disassembly/Reassembly > Points to disassemble, reassemble, or transport/ship the printer, refill the ink as soon as a COUNTER in the purge unit. COUNTER provides important information about the number of cleanings. You... the main controller replacement procedure, see ERROR CODE. 1.7.3.6 Disposing of the components may occur). When you start disassembling the printer. 1.7.3.4 Precautions for Disassembly/Reassembly 0013-5948 The precautions for disassembly/Reassembly are described in the service mode to build up ...


